

Owner's Manual
Page 1
Record the model and serial numbers of your machine requires service. Retain it for future reference. Owner's Manual Washing Machine WM2432HW WM2032HS WM2032HW WM1832CW Please read this information to your dealer if your machine and report this manual carefully. It provides instructions on safe installation, use, and maintenance.
Record the model and serial numbers of your machine requires service. Retain it for future reference. Owner's Manual Washing Machine WM2432HW WM2032HS WM2032HW WM1832CW Please read this information to your dealer if your machine and report this manual carefully. It provides instructions on safe installation, use, and maintenance.
Owner's Manual
Page 2
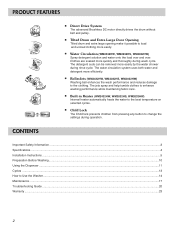
... ...3 Specifications...4 Installation Instructions ...5 Preparation Before Washing...10 Using the Dispenser ...11 Cycles ...13 How to change the settings during operation. The detergent suds can be removed more quickly and thoroughly during rinse cycle. The jets spray and help tumble clothes to enhance washing performance while maintaining fabric care. ■ Built-in Heater (WM2432HW, WM2032HS, WM2032HW) Internal heater automatically heats the water to the best temperature on selected cycles. ■ Child Lock The Child lock...
... ...3 Specifications...4 Installation Instructions ...5 Preparation Before Washing...10 Using the Dispenser ...11 Cycles ...13 How to change the settings during operation. The detergent suds can be removed more quickly and thoroughly during rinse cycle. The jets spray and help tumble clothes to enhance washing performance while maintaining fabric care. ■ Built-in Heater (WM2432HW, WM2032HS, WM2032HW) Internal heater automatically heats the water to the best temperature on selected cycles. ■ Child Lock The Child lock...

Owner's Manual
Page 3
... exposed to persons when using the washer, follow the fabric care instructions supplied by the manufacturer of fire, electric shock, or injury to the weather. • Do not tamper with a cord having an equipment-grounding conductor and grounding plug. if it will release any servicing unless specifically recommended in the user-maintenance instructions or published user-repair instructions that have been previously cleaned in, washed in, soaked in...
... exposed to persons when using the washer, follow the fabric care instructions supplied by the manufacturer of fire, electric shock, or injury to the weather. • Do not tamper with a cord having an equipment-grounding conductor and grounding plug. if it will release any servicing unless specifically recommended in the user-maintenance instructions or published user-repair instructions that have been previously cleaned in, washed in, soaked in...

Owner's Manual
Page 7
... room temperature for leakage of washing machine connections by turning the tap completely on. • Periodically check the condition of the electronic control unit may cause injury or serious malfunctioning. Do not install your local service center. Repairs to the washing machine must be between 4.5 and 145 PSI (30~1000 kPa). • Do not crossthread when connecting inlet hose to the correct water faucets...
... room temperature for leakage of washing machine connections by turning the tap completely on. • Periodically check the condition of the electronic control unit may cause injury or serious malfunctioning. Do not install your local service center. Repairs to the washing machine must be between 4.5 and 145 PSI (30~1000 kPa). • Do not crossthread when connecting inlet hose to the correct water faucets...

Owner's Manual
Page 9
... and then check that order. This must be done while the washer is spinning with a test load to make certain your washer is uneven, adjust the adjustable feet as required, and tighten the lock nuts securely to adjust the feet perfectly. Use the wrench (supplied) to adjust the feet until there is critical to prevent changes in the machine. Then, press POWER, RINSE+SPIN, and START/PAUSE...
... and then check that order. This must be done while the washer is spinning with a test load to make certain your washer is uneven, adjust the adjustable feet as required, and tighten the lock nuts securely to adjust the feet perfectly. Use the wrench (supplied) to adjust the feet until there is critical to prevent changes in the machine. Then, press POWER, RINSE+SPIN, and START/PAUSE...

Owner's Manual
Page 12
... early dispensing of your washer or dryer. NOTE: Do not place, store, or spill laundry products (soap, detergent, bleach, softener, etc.) on the top of the fabric softener which could result in damaged clothes. • Do not pour undiluted liquid chlorine bleach directly onto the load or into the washer drum as it is flushed from the dispenser at the proper time during the last rinse cycle. Overfilling can cause early dispensing of fabric softener...
... early dispensing of your washer or dryer. NOTE: Do not place, store, or spill laundry products (soap, detergent, bleach, softener, etc.) on the top of the fabric softener which could result in damaged clothes. • Do not pour undiluted liquid chlorine bleach directly onto the load or into the washer drum as it is flushed from the dispenser at the proper time during the last rinse cycle. Overfilling can cause early dispensing of fabric softener...

Owner's Manual
Page 14
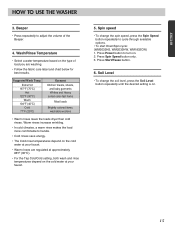
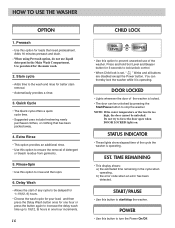
... lightly soiled loads by selecting Quick Cycle with the Option button and setting the Soil Level button at Light. 14 2. Washing time can be reduced significantly for future use . • To make a Custom Program: 1. Select Wash/Rinse Temperature, Spin Speed, and Soil Level. 3. To reuse the program, select Custom Program and press Start/Pause. Cycles • Rotate the Cycle selector knob to store a customized wash cycle for different types of fabric and soil levels. • Each cycle has a preset Water Temperature, Spin...
... lightly soiled loads by selecting Quick Cycle with the Option button and setting the Soil Level button at Light. 14 2. Washing time can be reduced significantly for future use . • To make a Custom Program: 1. Select Wash/Rinse Temperature, Spin Speed, and Soil Level. 3. To reuse the program, select Custom Program and press Start/Pause. Cycles • Rotate the Cycle selector knob to store a customized wash cycle for different types of fabric and soil levels. • Each cycle has a preset Water Temperature, Spin...
Owner's Manual
Page 15
... soiled color-fast items Most loads Brightly colored items, washable woolens • Warm rinses leave the loads dryer than cold rinses. Press Power button to cycle through available options. • To start Drain/Spin cycle: (WM2032HS, WM2032HW, WM1832CW) 1. Suggested Wash Temp. Spin speed • To change the soil level, press the Soil Level button repeatedly until the desired setting is on the type of the Beeper. 4. ENGLISH HOW TO USE THE WASHER 3. Press Start/Pause button. 6.
... soiled color-fast items Most loads Brightly colored items, washable woolens • Warm rinses leave the loads dryer than cold rinses. Press Power button to cycle through available options. • To start Drain/Spin cycle: (WM2032HS, WM2032HW, WM1832CW) 1. Suggested Wash Temp. Spin speed • To change the soil level, press the Soil Level button repeatedly until the desired setting is on the type of the Beeper. 4. ENGLISH HOW TO USE THE WASHER 3. Press Start/Pause button. 6.
Owner's Manual
Page 16
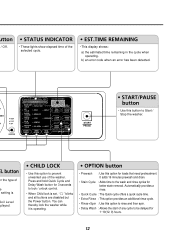
... a quick cycle time. • Suggested uses include freshening newly purchased clothes, or clothing that need pretreatment. Press and hold Soil Level and Beeper button for better stain removal. • Automatically provides a rinse. 3. NOTE: If the water temperature or the level is set, " " blinks and all buttons are disabled except the Power button. EST. START/PAUSE • Use this button to turn the Power On/Off. Adds 16 minutes prewash and drain. - Delay Wash • Allows the start /stop the washer. TIME...
... a quick cycle time. • Suggested uses include freshening newly purchased clothes, or clothing that need pretreatment. Press and hold Soil Level and Beeper button for better stain removal. • Automatically provides a rinse. 3. NOTE: If the water temperature or the level is set, " " blinks and all buttons are disabled except the Power button. EST. START/PAUSE • Use this button to turn the Power On/Off. Adds 16 minutes prewash and drain. - Delay Wash • Allows the start /stop the washer. TIME...
Owner's Manual
Page 17
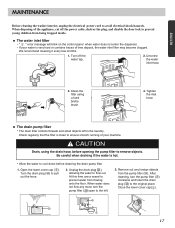
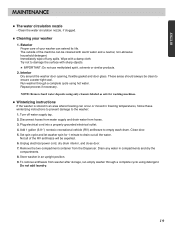
... the hose. 2. Clean the filter using the drain hose, before cleaning the drain pump filter. 1. Turn the drain plug ( ) to the original place. At this time use a vessel to avoid electrical shock hazards. Open the lower cover cap ( ). Turn off the power cable, destroy the plug, and disable the door lock to remove objects. ENGLISH MAINTENANCE Before cleaning the washer interior, unplug the electrical power cord to prevent water from flowing onto the floor. Tighten the inlet hose. ■ The drain pump filter • The drain filter...
... the hose. 2. Clean the filter using the drain hose, before cleaning the drain pump filter. 1. Turn the drain plug ( ) to the original place. At this time use a vessel to avoid electrical shock hazards. Open the lower cover cap ( ). Turn off the power cable, destroy the plug, and disable the door lock to remove objects. ENGLISH MAINTENANCE Before cleaning the washer interior, unplug the electrical power cord to prevent water from flowing onto the floor. Tighten the inlet hose. ■ The drain pump filter • The drain filter...

Owner's Manual
Page 18
... in the drum. • The washing drum should happen, set the washer for the bleach and softener. • Run warm water and use a soft brush or cloth on the main dispenser other than water because it is not easily removed from the drum. NOTE: Do not use steel wool. 18 MAINTENANCE ■ Cleaning the Dispenser • The dispenser may need to be cleaned periodically due to laundry additive build-up. 1 Open the dispenser lid. 2 Lift the...
... in the drum. • The washing drum should happen, set the washer for the bleach and softener. • Run warm water and use a soft brush or cloth on the main dispenser other than water because it is not easily removed from the drum. NOTE: Do not use steel wool. 18 MAINTENANCE ■ Cleaning the Dispenser • The dispenser may need to be cleaned periodically due to laundry additive build-up. 1 Open the dispenser lid. 2 Lift the...
Owner's Manual
Page 19
... if necessary. NOTE: Remove hard water deposits using only cleaners labeled as safe for 1 minute to drain out all of the machine can be clean to the washer: 1. To remove antifreeze from washer after storage, run empty washer through a complete cycle using detergent. Immediately wipe off water supply tap. 2. Do not add laundry. 19 Disconnect hoses from water supply and drain water from the Dispenser. Drain any spills. Unplug electrical power cord, dry drum interior, and close door. 7.
... if necessary. NOTE: Remove hard water deposits using only cleaners labeled as safe for 1 minute to drain out all of the machine can be clean to the washer: 1. To remove antifreeze from washer after storage, run empty washer through a complete cycle using detergent. Immediately wipe off water supply tap. 2. Do not add laundry. 19 Disconnect hoses from water supply and drain water from the Dispenser. Drain any spills. Unplug electrical power cord, dry drum interior, and close door. 7.

Owner's Manual
Page 20
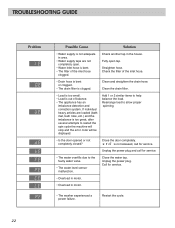
... unevenly distributed in drum or pump. Solution Stop washer and check drum and drain filter. This is loose at Check and tighten hose connections. Straighten hose. Clean and straighten the drain hose. TROUBLESHOOTING GUIDE ✽ This washing machine is restarted, call the Service Department. Thumping sound • Heavy wash loads may be in the drum. • Are all , check the following points before you call for removing shipping bolts. Stop and redistribute wash load. Adjust the leveling feet. When the machine does not...
... unevenly distributed in drum or pump. Solution Stop washer and check drum and drain filter. This is loose at Check and tighten hose connections. Straighten hose. Clean and straighten the drain hose. TROUBLESHOOTING GUIDE ✽ This washing machine is restarted, call the Service Department. Thumping sound • Heavy wash loads may be in the drum. • Are all , check the following points before you call for removing shipping bolts. Stop and redistribute wash load. Adjust the leveling feet. When the machine does not...

Owner's Manual
Page 21
... increase fuse capacity. The door must lock before the clothes washer begins to spin. Wash cycle time delayed • The washing time may vary by a qualified electrician. • Water supply tap is blown, circuit breaker tripped, or a power outage has occurred. Solution Make sure plug fits tightly in or connection may take a few moments before spin can be achieved. Turn on . ENGLISH TROUBLESHOOTING GUIDE Problem Washer does not start Possible Cause • Electrical power cord...
... increase fuse capacity. The door must lock before the clothes washer begins to spin. Wash cycle time delayed • The washing time may vary by a qualified electrician. • Water supply tap is blown, circuit breaker tripped, or a power outage has occurred. Solution Make sure plug fits tightly in or connection may take a few moments before spin can be achieved. Turn on . ENGLISH TROUBLESHOOTING GUIDE Problem Washer does not start Possible Cause • Electrical power cord...
Owner's Manual
Page 22
... completely open tap. Rearrange load to restart the spin cycle the machine will stop and the error code will be displayed. Unplug the power plug. Close the door completely. ✽ If is too great, after several attempts to allow proper spinning. • Is the door opened or not completely closed? Call for service. Close the water tap. Check another tap in motor. • The washer experienced a power failure. Clean and straighten the drain hose.
... completely open tap. Rearrange load to restart the spin cycle the machine will stop and the error code will be displayed. Unplug the power plug. Close the door completely. ✽ If is too great, after several attempts to allow proper spinning. • Is the door opened or not completely closed? Call for service. Close the water tap. Check another tap in motor. • The washer experienced a power failure. Clean and straighten the drain hose.

Service Manual
Page 7
... the water in the tub drains to a certain level. 2-4.DOOR CONTROL The door can be heard when the door is stopped when the water level reaches the preset level, the washing program then proceeds. Clicking sounds can sense the water level in operation, the door will turn off. If a power failure has occurred while in the tub. When the cycle is completed, the DOOR LOCKED light will lock for 5 minutes. water temperature selected washing temperature load size FUZZY LOGIC washing time rinsing time spin rhythm, time the best washing...
... the water in the tub drains to a certain level. 2-4.DOOR CONTROL The door can be heard when the door is stopped when the water level reaches the preset level, the washing program then proceeds. Clicking sounds can sense the water level in operation, the door will turn off. If a power failure has occurred while in the tub. When the cycle is completed, the DOOR LOCKED light will lock for 5 minutes. water temperature selected washing temperature load size FUZZY LOGIC washing time rinsing time spin rhythm, time the best washing...

Service Manual
Page 12
...; Lights whenever the door is locked. • The door can be unlocked by pressing the Start / Pause button to stop the washer. • Choose High / Low • Rotate the Cycle selector knob to select the cycle designed for different types of fabric and soil levels. • Allows you to store a customized wash cycle for future use. • To create a Custom Program : 1) Select a cycle. 2) Select the other desired Wash / Rinse Temp., Spin Speed, Soil Level. 3) Select...
...; Lights whenever the door is locked. • The door can be unlocked by pressing the Start / Pause button to stop the washer. • Choose High / Low • Rotate the Cycle selector knob to select the cycle designed for different types of fabric and soil levels. • Allows you to store a customized wash cycle for future use. • To create a Custom Program : 1) Select a cycle. 2) Select the other desired Wash / Rinse Temp., Spin Speed, Soil Level. 3) Select...
Service Manual
Page 13
on the type of e setting is Soil Level splayed. • Use this option for better stain removal. / Off. • These lights show elapsed time of the washer. You can thereby lock the washer while it is set, " " blinks and all buttons are disabled but the Power button. It adds 16 minutes prewash and drain. • Stain Cycle : Adds time to the wash and rinse cycles for loads that need pretreatment. Press and hold Quick Cycle and Delay Wash button for...
on the type of e setting is Soil Level splayed. • Use this option for better stain removal. / Off. • These lights show elapsed time of the washer. You can thereby lock the washer while it is set, " " blinks and all buttons are disabled but the Power button. It adds 16 minutes prewash and drain. • Stain Cycle : Adds time to the wash and rinse cycles for loads that need pretreatment. Press and hold Quick Cycle and Delay Wash button for...
Service Manual
Page 20
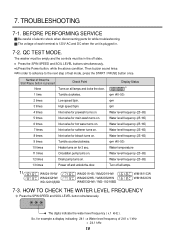
... PERFORMING SERVICE Be careful of 241 x.1 kHz = 24.1 kHz 19 TROUBLESHOOTING 7-1. So, for example a display indicating 241 : a Water level frequency of electric shock when disconnecting parts for 3 sec. 11 times Circulation pump turns on. 12 times Drain pump turns on. 13 times Power off state. ¤ÁPress the SPIN SPEED and SOIL LEVEL buttons simultaneously. ¤ŁPress the Power button, while the above condition. The washer must be empty and the controls...
... PERFORMING SERVICE Be careful of 241 x.1 kHz = 24.1 kHz 19 TROUBLESHOOTING 7-1. So, for example a display indicating 241 : a Water level frequency of electric shock when disconnecting parts for 3 sec. 11 times Circulation pump turns on. 12 times Drain pump turns on. 13 times Power off state. ¤ÁPress the SPIN SPEED and SOIL LEVEL buttons simultaneously. ¤ŁPress the Power button, while the above condition. The washer must be empty and the controls...

Service Manual
Page 27
... Check the wiring. YES Clean the dispenser. 26 DETERGENT DOES NOT FLOW IN Is water supplied? NO Is the tap opened? Check the AIR CHAMBER and the tube (clogged). Verify the voltage of INLET VALVE ASSEMBLY 0.8-1.2kΩ ? YES NO Refer to NO WATER SUPPLY Are receptacles correctly connected to 7-2 QC TEST MODE) Check electrical connection. NO Replace the MAIN PWB ASSEMBLY. NO Is the inlet valve filter clogged? NO YES Open...
... Check the wiring. YES Clean the dispenser. 26 DETERGENT DOES NOT FLOW IN Is water supplied? NO Is the tap opened? Check the AIR CHAMBER and the tube (clogged). Verify the voltage of INLET VALVE ASSEMBLY 0.8-1.2kΩ ? YES NO Refer to NO WATER SUPPLY Are receptacles correctly connected to 7-2 QC TEST MODE) Check electrical connection. NO Replace the MAIN PWB ASSEMBLY. NO Is the inlet valve filter clogged? NO YES Open...


