
Owners Manual
Page 2
... 7 Parts 7 Accessories 8 INSTALLATION 8 Tools Needed 8 Installation Overview 9 Product Specifications 10 Choosing the Proper Location 11 Unpacking and Removing Shipping Material 12 Connecting the Water Lines 13 Connecting the Drain Hose 14 Leveling the Washer 15 Connecting to the Power Supply 15 Testing the Washer 16 OPERATION 16 Using the Washer 17 Sorting Laundry 18 Loading the Washer 19 Adding Cleaning Products 22 Control Panel 24 Wash Cycles 26 Cycle Guide 28 Cycle Modifier Buttons 29 Special Care Features 30 Option Buttons 32 SMART FUNCTIONS 32 LG...
... 7 Parts 7 Accessories 8 INSTALLATION 8 Tools Needed 8 Installation Overview 9 Product Specifications 10 Choosing the Proper Location 11 Unpacking and Removing Shipping Material 12 Connecting the Water Lines 13 Connecting the Drain Hose 14 Leveling the Washer 15 Connecting to the Power Supply 15 Testing the Washer 16 OPERATION 16 Using the Washer 17 Sorting Laundry 18 Loading the Washer 19 Adding Cleaning Products 22 Control Panel 24 Wash Cycles 26 Cycle Guide 28 Cycle Modifier Buttons 29 Special Care Features 30 Option Buttons 32 SMART FUNCTIONS 32 LG...

Owners Manual
Page 4
... product has been submerged, contact an LG Electronics customer information center for instructions before using the appliance and save these instructions. ••Use this time. ••Do not reach into the washer if the tub or drum, agitator, or any interior parts are moving the appliance, be careful not to pinch, crush, or damage the power cord. ••Connect to a properly rated, protected, and sized power...
... product has been submerged, contact an LG Electronics customer information center for instructions before using the appliance and save these instructions. ••Use this time. ••Do not reach into the washer if the tub or drum, agitator, or any interior parts are moving the appliance, be careful not to pinch, crush, or damage the power cord. ••Connect to a properly rated, protected, and sized power...

Owners Manual
Page 7
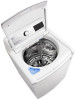
ENGLISH PRODUCT OVERVIEW Parts PRODUCT OVERVIEW 7 9 1 Detergent Dispenser 2 Liquid Bleach Compartment 3 Tub 4 Lid (Door) Accessories Included Accessories 5 Control Panel 6 Leveling Feet 7 Water Inlets 8 Power Cord 9 Drain Hose Tie Strap Required Accessories Hot and Cold Water Hoses NOTE ••The images in this guide may be different from the actual components and accessories, which are subject to change by the use only authorized components. The manufacturer is not responsible for product malfunction or accidents caused by the manufacturer without...
ENGLISH PRODUCT OVERVIEW Parts PRODUCT OVERVIEW 7 9 1 Detergent Dispenser 2 Liquid Bleach Compartment 3 Tub 4 Lid (Door) Accessories Included Accessories 5 Control Panel 6 Leveling Feet 7 Water Inlets 8 Power Cord 9 Drain Hose Tie Strap Required Accessories Hot and Cold Water Hoses NOTE ••The images in this guide may be different from the actual components and accessories, which are subject to change by the use only authorized components. The manufacturer is not responsible for product malfunction or accidents caused by the manufacturer without...

Owners Manual
Page 9
... 1/2" (H), 57 1/4" (H with lid (door) open) 68.6 cm (W) X 72.1 cm (D) X 113 cm (H), 145.3 cm (H with carpeting or other materials. ••Do not remove the ground prong. Plug into a grounded 3-prong outlet. Failure to constant product improvements. ENGLISH INSTALLATION 9 Product Specifications The appearance and specifications listed in this manual may vary due to follow this warning can cause serious injury, fire, electric shock, or...
... 1/2" (H), 57 1/4" (H with lid (door) open) 68.6 cm (W) X 72.1 cm (D) X 113 cm (H), 145.3 cm (H with carpeting or other materials. ••Do not remove the ground prong. Plug into a grounded 3-prong outlet. Failure to constant product improvements. ENGLISH INSTALLATION 9 Product Specifications The appearance and specifications listed in this manual may vary due to follow this warning can cause serious injury, fire, electric shock, or...

Owners Manual
Page 12
... operation. ••Do not use and check for cracks, leaks, and wear, and replace the hoses every five years. Do not stretch the water hoses intentionally, and make sure there is more than 120 psi, a pressure reducing valve must be tripped during fill and prevent the machine from filling properly. If the water supply pressure is a rubber seal in place in a location subject to a hot water...
... operation. ••Do not use and check for cracks, leaks, and wear, and replace the hoses every five years. Do not stretch the water hoses intentionally, and make sure there is more than 120 psi, a pressure reducing valve must be tripped during fill and prevent the machine from filling properly. If the water supply pressure is a rubber seal in place in a location subject to a hot water...

Owners Manual
Page 15
... power cord or power plug. Error Code Solution Fully open the water faucets. Adjust or repair the drain. Previous test was good. The test automatically checks the water inlet hoses and the drain hose. 5 Check the display for this washer to a grounded outlet conforming to the rating prior to use adapters or extension cords. Straighten out any kinks in the inlet hoses and make sure the hose is empty. Remove and flush out the drain hose to remove clogs. Replace or repair it when installing...
... power cord or power plug. Error Code Solution Fully open the water faucets. Adjust or repair the drain. Previous test was good. The test automatically checks the water inlet hoses and the drain hose. 5 Check the display for this washer to a grounded outlet conforming to the rating prior to use adapters or extension cords. Straighten out any kinks in the inlet hoses and make sure the hose is empty. Remove and flush out the drain hose to remove clogs. Replace or repair it when installing...

Owners Manual
Page 16
... button without water to the appropriate dispensers. 6 Begin cycle. Press the Power button to the load. The preset wash temperature, spin speed, soil level and option settings for the selected cycle can be changed, if desired, using the cycle modifier and option buttons. Open the lid (door) and load items into the washer. 4 Select a cycle. The Add Garment light illuminates near the beginning of the wash cycle to indicate when it is finished, a melody sounds. Press the Start/Pause button...
... button without water to the appropriate dispensers. 6 Begin cycle. Press the Power button to the load. The preset wash temperature, spin speed, soil level and option settings for the selected cycle can be changed, if desired, using the cycle modifier and option buttons. Open the lid (door) and load items into the washer. 4 Select a cycle. The Add Garment light illuminates near the beginning of the wash cycle to indicate when it is finished, a melody sounds. Press the Start/Pause button...

Owners Manual
Page 19
... or store laundry products, such as detergent, bleach, or liquid fabric softener, on top of water to catch a hand in this compartment. Main wash powder detergent compartment 3 Close the drawer completely before starting the cycle. ••Be careful not to remain in clothing and the washer. NOTE ••It is normal for the main wash cycle. Using too much fabric softener can damage the appliance's finish and controls. Using too much detergent can result...
... or store laundry products, such as detergent, bleach, or liquid fabric softener, on top of water to catch a hand in this compartment. Main wash powder detergent compartment 3 Close the drawer completely before starting the cycle. ••Be careful not to remain in clothing and the washer. NOTE ••It is normal for the main wash cycle. Using too much fabric softener can damage the appliance's finish and controls. Using too much detergent can result...

Owners Manual
Page 24
... soiled laundry using the default settings. Fabric type : Cotton, linen, shirts, jeans, mixed loads ••Pressing the Start/Pause button without needing to deliver the best performance, there will be damaged. - Turn the knob or press the button to fabric care symbols, see the Sorting Laundry section. This cycle is for the corresponding wash cycle will cause the Normal cycle to wash all normal items, except delicate fabrics such as water resistant clothing...
... soiled laundry using the default settings. Fabric type : Cotton, linen, shirts, jeans, mixed loads ••Pressing the Start/Pause button without needing to deliver the best performance, there will be damaged. - Turn the knob or press the button to fabric care symbols, see the Sorting Laundry section. This cycle is for the corresponding wash cycle will cause the Normal cycle to wash all normal items, except delicate fabrics such as water resistant clothing...

Owners Manual
Page 28
The washer automatically adjusts the water level for the desired setting is lit. ••All rinses use tap cold water. NOTE ••This feature needs more water from clothes, reducing drying time and saving energy. ••Press the Spin button until the desired soil level is not allowed. button until the indicator light for the type and size of load you are washing. Press the button for the desired modifier until...
The washer automatically adjusts the water level for the desired setting is lit. ••All rinses use tap cold water. NOTE ••This feature needs more water from clothes, reducing drying time and saving energy. ••Press the Spin button until the desired soil level is not allowed. button until the indicator light for the type and size of load you are washing. Press the button for the desired modifier until...

Owners Manual
Page 29
... drained and the washer shuts off , adding garments may affect the cycle time or wash performance. 1 Press Start/Pause. Once the indicator turns off . Speed Wash Use the Speed Wash cycle to move through the available features. The cycle continues automatically. Special Care Features Press the Special Care button to select specialized cycles or add features to help prevent the setting of certain types of inactivity. For high wash and rinse efficiency, wash small loads...
... drained and the washer shuts off , adding garments may affect the cycle time or wash performance. 1 Press Start/Pause. Once the indicator turns off . Speed Wash Use the Speed Wash cycle to move through the available features. The cycle continues automatically. Special Care Features Press the Special Care button to select specialized cycles or add features to help prevent the setting of certain types of inactivity. For high wash and rinse efficiency, wash small loads...

Owners Manual
Page 33
... the or logo Washer Cycle (Remote Start, Downloaded) Set or download any preferred cycle and operate by the cycles and options so you may see how much time is time to another. Settings Set the product nickname and delete product. Smart Diagnosis™ This function provides useful information for 3 seconds to change your smart phone. Using Remote Start 1 Press the Power button. 2 Load the laundry. 3 Press and hold the Remote Start button for product improvement purposes...
... the or logo Washer Cycle (Remote Start, Downloaded) Set or download any preferred cycle and operate by the cycles and options so you may see how much time is time to another. Settings Set the product nickname and delete product. Smart Diagnosis™ This function provides useful information for 3 seconds to change your smart phone. Using Remote Start 1 Press the Power button. 2 Load the laundry. 3 Press and hold the Remote Start button for product improvement purposes...

Owners Manual
Page 36
.... Cleaning the Tub Over time, residue may remain in the tub after cleaning. 3 Close the lid (door) and press the Power button to turn the washer on applicable models). Cleaner Tub cleaner Lime scale remover Liquid chlorine bleach Powdered cleaner Cleaning tablets Instructions Follow manufacturer's recommendations. Follow manufacturer's recommendations. Regular Cleaning Care After Wash After the cycle is complete. Care and Cleaning of the Interior ••Use a towel or soft cloth to wipe around the washer lid (door) opening and lid (door...
.... Cleaning the Tub Over time, residue may remain in the tub after cleaning. 3 Close the lid (door) and press the Power button to turn the washer on applicable models). Cleaner Tub cleaner Lime scale remover Liquid chlorine bleach Powdered cleaner Cleaning tablets Instructions Follow manufacturer's recommendations. Follow manufacturer's recommendations. Regular Cleaning Care After Wash After the cycle is complete. Care and Cleaning of the Interior ••Use a towel or soft cloth to wipe around the washer lid (door) opening and lid (door...

Owners Manual
Page 40
.... Stop and redistribute wash load. ••Pause the cycle and redistribute the load after the lid (door) unlocks. ••See Unpacking and Removing Shipping Material in the Installation section. ••Pause the cycle and redistribute the load after the lid (door) unlocks. ••See Leveling the Appliance in tub or pump. Install water hammer arrestors (purchased separately at an early stage. 40 TROUBLESHOOTING TROUBLESHOOTING Before Calling for Service The washer is...
.... Stop and redistribute wash load. ••Pause the cycle and redistribute the load after the lid (door) unlocks. ••See Unpacking and Removing Shipping Material in the Installation section. ••Pause the cycle and redistribute the load after the lid (door) unlocks. ••See Leveling the Appliance in tub or pump. Install water hammer arrestors (purchased separately at an early stage. 40 TROUBLESHOOTING TROUBLESHOOTING Before Calling for Service The washer is...

Owners Manual
Page 41
... of the drain pipe during drain. Do not increase fuse capacity. Water leaks every load. Operation TROUBLESHOOTING 41 ENGLISH Problem Possible Cause Hoses are formulated specifically for large or bulky items. Use extra care and never wash more than the maximum amount recommended by the type and amount of detergent if the load is small or lightly soiled, or if the water is the only detergent recommended. Never use detergent with the High-Efficiency (HE...
... of the drain pipe during drain. Do not increase fuse capacity. Water leaks every load. Operation TROUBLESHOOTING 41 ENGLISH Problem Possible Cause Hoses are formulated specifically for large or bulky items. Use extra care and never wash more than the maximum amount recommended by the type and amount of detergent if the load is small or lightly soiled, or if the water is the only detergent recommended. Never use detergent with the High-Efficiency (HE...

Owners Manual
Page 42
.../fuses. Lid (Door) is used . You may also dilute the detergent with normal dispensing of detergent is open . If this residue builds up before the start of laundry, water pressure and other operating conditions. Otherwise, the display will resume the cycle where it to remain in the dispenser. Too much detergent will not operate. Control panel has powered off . Washer is tripped/ blown. The washer adjusts cycle time automatically to achieve optimum results. High-Efficiency washers need very little detergent...
.../fuses. Lid (Door) is used . You may also dilute the detergent with normal dispensing of detergent is open . If this residue builds up before the start of laundry, water pressure and other operating conditions. Otherwise, the display will resume the cycle where it to remain in the dispenser. Too much detergent will not operate. Control panel has powered off . Washer is tripped/ blown. The washer adjusts cycle time automatically to achieve optimum results. High-Efficiency washers need very little detergent...

Owners Manual
Page 44
... use the dispensers to ensure that have been set stains. Bleach or softener was added directly to aid in stain removal. ••Use only High-Efficiency (HE) detergent in garments. Clothes were not properly sorted. Previously set . Proper options not selected. Select the Soak or Stain Care feature to boost the cleaning power of the washer should close easily. ••Hot water rinse can be fully loaded, but the tub...
... use the dispensers to ensure that have been set stains. Bleach or softener was added directly to aid in stain removal. ••Use only High-Efficiency (HE) detergent in garments. Clothes were not properly sorted. Previously set . Proper options not selected. Select the Soak or Stain Care feature to boost the cleaning power of the washer should close easily. ••Hot water rinse can be fully loaded, but the tub...

Owners Manual
Page 47
... the lid (door), including shipping material or clothing. ••Make sure that is too far out of balance load. It is time to rebalance the load. Problem TROUBLESHOOTING 47 Possible Cause Lid (Door) is not closed and the lid (door) lock error message is displayed, call for service. ••Turn the washer off then on again. The water level sensor is complete, empty the tub clips, etc., caught between the wash and find and remove...
... the lid (door), including shipping material or clothing. ••Make sure that is too far out of balance load. It is time to rebalance the load. Problem TROUBLESHOOTING 47 Possible Cause Lid (Door) is not closed and the lid (door) lock error message is displayed, call for service. ••Turn the washer off then on again. The water level sensor is complete, empty the tub clips, etc., caught between the wash and find and remove...

Owners Manual
Page 49
.... ••Repairs when your product from misuse, abuse, improper installation, repair, or maintenance. Improper repair includes use of delivery. ••Damage or missing items to any way to the sale, condition or performance of the product if it is installed in an inaccessible location or is not installed in advance of the claim; For further assistance, write: LG Electronics, 201...
.... ••Repairs when your product from misuse, abuse, improper installation, repair, or maintenance. Improper repair includes use of delivery. ••Damage or missing items to any way to the sale, condition or performance of the product if it is installed in an inaccessible location or is not installed in advance of the claim; For further assistance, write: LG Electronics, 201...

Owners Manual
Page 52
... as door bins, drawers, handles, shelves, etc.. Improper repair includes use of parts not approved or specified by unauthorized modification or alteration, or use of the Product if it conflicts with published installation instructions, including the Product owner's and installation manuals. ••Accessories to province depending on operation of God. ••Damage or product failure caused by LG Canada. 52 LIMITED WARRANTY This warranty gives you specific...
... as door bins, drawers, handles, shelves, etc.. Improper repair includes use of parts not approved or specified by unauthorized modification or alteration, or use of the Product if it conflicts with published installation instructions, including the Product owner's and installation manuals. ••Accessories to province depending on operation of God. ••Damage or product failure caused by LG Canada. 52 LIMITED WARRANTY This warranty gives you specific...


