
APS: Modbus Protocol User Guide
Page 11
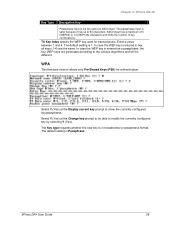
... configuration menu. This option triggers a reset. Setup (Configuration) Mode Screen Model: Device Server Plus+! (Firmware Code:AM) Modbus/TCP to RTU Bridge Setup 1) Network/IP Settings: IP Address 0.0.0.0/DHCP/BOOTP/AutoIP Default Gateway not set --Netmask not set (1. . . 7) to change . Default Settings (D) Entering D resets all parameters to 1) Modbus/TCP pipeline . . . . . Although not required, selecting this option immediately after reloading the firmware and saving it ensures that the unit resets. Enabled (new MB...
... configuration menu. This option triggers a reset. Setup (Configuration) Mode Screen Model: Device Server Plus+! (Firmware Code:AM) Modbus/TCP to RTU Bridge Setup 1) Network/IP Settings: IP Address 0.0.0.0/DHCP/BOOTP/AutoIP Default Gateway not set --Netmask not set (1. . . 7) to change . Default Settings (D) Entering D resets all parameters to 1) Modbus/TCP pipeline . . . . . Although not required, selecting this option immediately after reloading the firmware and saving it ensures that the unit resets. Enabled (new MB...

APS: Modbus Protocol User Guide
Page 13
With the XPress DR-IAP, you know that the cable is wired properly to support this is variable. These settings must match the settings on the serial port. The RTS/CTS output is active when the device server is variable. Wait for CTS to manage RTS/CTS handshaking for half-duplex radio modems. RTS/CTS Mode (1=Fixed 2=Variable) Answer 1 and the IAP...
With the XPress DR-IAP, you know that the cable is wired properly to support this is variable. These settings must match the settings on the serial port. The RTS/CTS output is active when the device server is variable. Wait for CTS to manage RTS/CTS handshaking for half-duplex radio modems. RTS/CTS Mode (1=Fixed 2=Variable) Answer 1 and the IAP...
APS: Modbus Protocol User Guide
Page 15
... enters the serial port of -message in turn their transmitters off and their receivers back on. The delay gives ample time for general use with user-defined or non-standard Modbus functions. if a TCP socket is only used with Modbus is particularly useful when using RS485 2-wired serial protocol. A safe value for the RS485 slave devices to open , but the remote Modbus/TCP slave...
... enters the serial port of -message in turn their transmitters off and their receivers back on. The delay gives ample time for general use with user-defined or non-standard Modbus functions. if a TCP socket is only used with Modbus is particularly useful when using RS485 2-wired serial protocol. A safe value for the RS485 slave devices to open , but the remote Modbus/TCP slave...
APS: Modbus Protocol User Guide
Page 17
... ) Unlike earlier versions of idle time. Setting the last/4th IP octet to zero is interpreted as part of the remote Modbus/TCP slave. Otherwise enter values 3 to 60 to automatically close the last socket after 3 to configure the Device Server's security setting parameters. 7.Security Settings: SNMP Enabled Modbus Protocol User Guide 17 Slave IP Address This is...
... ) Unlike earlier versions of idle time. Setting the last/4th IP octet to zero is interpreted as part of the remote Modbus/TCP slave. Otherwise enter values 3 to 60 to automatically close the last socket after 3 to configure the Device Server's security setting parameters. 7.Security Settings: SNMP Enabled Modbus Protocol User Guide 17 Slave IP Address This is...

APS: Modbus Protocol User Guide
Page 20
... Mode and Firmware UpgradeThe easiest way to upgrade your protocol firmware (or "reflash") is not supported" from the Lantronix website at www.lantronix.com/support/downloads. For instructions on the wrong hardware will blink the red LED, and you will not function. The TFTP method takes just a few seconds - Modbus Protocol User Guide 20 There are rejected with HyperTerminal or directly by Lantronix that firmware not supported." The...
... Mode and Firmware UpgradeThe easiest way to upgrade your protocol firmware (or "reflash") is not supported" from the Lantronix website at www.lantronix.com/support/downloads. For instructions on the wrong hardware will blink the red LED, and you will not function. The TFTP method takes just a few seconds - Modbus Protocol User Guide 20 There are rejected with HyperTerminal or directly by Lantronix that firmware not supported." The...

APS: Modbus Protocol User Guide
Page 21
... input or output. CP0 Function (hit space to toggle) GPIO (In) Invert (active low) (Y) ? Choose the serial port the firmware uses for Modem Control Settings is replaced with Modem/Configurable Pin Settings on the WiPort. Use serial connector (1=CH1 2=CH2) (1) ? A function should be written and read at startup that tells the firmware to reset configuration to factory defaults. The GPIOs can be the default for RS422/485 operation. RS485 2-Wire...
... input or output. CP0 Function (hit space to toggle) GPIO (In) Invert (active low) (Y) ? Choose the serial port the firmware uses for Modem Control Settings is replaced with Modem/Configurable Pin Settings on the WiPort. Use serial connector (1=CH1 2=CH2) (1) ? A function should be written and read at startup that tells the firmware to reset configuration to factory defaults. The GPIOs can be the default for RS422/485 operation. RS485 2-Wire...

APS: Modbus Protocol User Guide
Page 25
... key other platforms such as a general purpose input or output. Use serial connector (1=CH1 2=CH2) (1) ? The menu option for Modem Control Settings has been replaced with Modem/Configurable Pin Settings on xPico supports RS-232 and RS-422/RS-485 2/4-wire modes while Channel 2 only supports RS-232. Note: Channel 1 on the xPico. Modbus Protocol User Guide 25 Choose the serial port, hence the firmware uses for sending and receiving Modbus/RTU or Modbus/ASCII serial data...
... key other platforms such as a general purpose input or output. Use serial connector (1=CH1 2=CH2) (1) ? The menu option for Modem Control Settings has been replaced with Modem/Configurable Pin Settings on xPico supports RS-232 and RS-422/RS-485 2/4-wire modes while Channel 2 only supports RS-232. Note: Channel 1 on the xPico. Modbus Protocol User Guide 25 Choose the serial port, hence the firmware uses for sending and receiving Modbus/RTU or Modbus/ASCII serial data...

XPress-DR+ Wireless - Product Brief
Page 1
...+ XPress-DR+ Wireless supports 802.11 b/g and Ethernet networking modes. Extending Network Connectivity with attached devices. SwitchPort+ combines Lantronix advanced device server technology with Ethernet switching technology to networking factory equipment such as PLCs, drives, motion controllers, power equipment, barcode scanners and other serial devices. Additionally it features patent-pending SwitchPort+™ technology which are mapped to 70°C operational temperature range. > 9-30 VDC and 9-24 VAC power input...
...+ XPress-DR+ Wireless supports 802.11 b/g and Ethernet networking modes. Extending Network Connectivity with attached devices. SwitchPort+ combines Lantronix advanced device server technology with Ethernet switching technology to networking factory equipment such as PLCs, drives, motion controllers, power equipment, barcode scanners and other serial devices. Additionally it features patent-pending SwitchPort+™ technology which are mapped to 70°C operational temperature range. > 9-30 VDC and 9-24 VAC power input...

XPress-DR+ Wireless - Quick Start Guide
Page 6
... Change Setup menu and edit the following fields: a) IP Address: The IP address must be set for the XPress DR+W to communicate on a wireless network: 1. Connect the DB9 end of the serial cable to connect and configure the XPress DR+W. 1. Enter Setup Mode by simultaneously connecting the power supply and holding down the x key on the XPress DR+W. 2. IP Address: (000) .(000) .(000) .(000) _ WWW.LANTRONIX.COM 9 Quick Start Guide XPress DR+W GETTING STARTED REQUIRED SETTINGS...
... Change Setup menu and edit the following fields: a) IP Address: The IP address must be set for the XPress DR+W to communicate on a wireless network: 1. Connect the DB9 end of the serial cable to connect and configure the XPress DR+W. 1. Enter Setup Mode by simultaneously connecting the power supply and holding down the x key on the XPress DR+W. 2. IP Address: (000) .(000) .(000) .(000) _ WWW.LANTRONIX.COM 9 Quick Start Guide XPress DR+W GETTING STARTED REQUIRED SETTINGS...
XPress-DR+ - User Guide
Page 12
... an Ethernet network. The XPress DR+ provides two serial ports, two switched Ethernet ports, a wide power input range, and expanded environmental specifications, making it over Ethernet, the XPress DR+ allows virtual serial links over a network. By leveraging a single network drop to both versions of operation: wireless and wired. The wireless version has two modes of the product. The XPress DR+ provides an impressive list of the XPress DR+ unit is wireless to -point, direct serial connections within the...
... an Ethernet network. The XPress DR+ provides two serial ports, two switched Ethernet ports, a wide power input range, and expanded environmental specifications, making it over Ethernet, the XPress DR+ allows virtual serial links over a network. By leveraging a single network drop to both versions of operation: wireless and wired. The wireless version has two modes of the product. The XPress DR+ provides an impressive list of the XPress DR+ unit is wireless to -point, direct serial connections within the...
XPress-DR+ - User Guide
Page 38
... currently configured key/passphrase, Select Y (Yes) at the Change key prompt to be different. Chapter 4: XPress DR+W Key Type Encryption Key Passphrase input is entered in hexadecimal or passphrase format. XPress DR+ User Guide 38 ASCII input has a maximum of 5 (WEP64) or 13 (WEP128) characters and limits the number of key combinations. Enter a value between 1 and 4. The passphrase input is Passphrase. The default setting is safer...
... currently configured key/passphrase, Select Y (Yes) at the Change key prompt to be different. Chapter 4: XPress DR+W Key Type Encryption Key Passphrase input is entered in hexadecimal or passphrase format. XPress DR+ User Guide 38 ASCII input has a maximum of 5 (WEP64) or 13 (WEP128) characters and limits the number of key combinations. Enter a value between 1 and 4. The passphrase input is Passphrase. The default setting is safer...

XPress-DR+ - User Guide
Page 40
... selected data rate is set to auto, the selected data rate is 11 Mbps. Next Steps 1. XPress DR+ User Guide 40 To configure the XPress DR+W further, continue to save and exit the XPress DR+W Setup Mode. 2. The default setting is the XPress DR+W's maximum data rate. Upon completing the IP and WLAN settings, select menu option 9 to Chapter 6: Configuration Using Web Manager or Chapter 7: Configuration Using Telnet or Serial Port (Setup Mode).
... selected data rate is set to auto, the selected data rate is 11 Mbps. Next Steps 1. XPress DR+ User Guide 40 To configure the XPress DR+W further, continue to save and exit the XPress DR+W Setup Mode. 2. The default setting is the XPress DR+W's maximum data rate. Upon completing the IP and WLAN settings, select menu option 9 to Chapter 6: Configuration Using Web Manager or Chapter 7: Configuration Using Telnet or Serial Port (Setup Mode).
XPress-DR+ - User Guide
Page 44
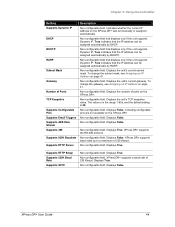
...-configurable field. XPress DR+ supports the RS-485 protocol. Displays True. Displays True. XPress DR+ supports a baud rate of ports on the XPress DR+. XPress DR+ User Guide 44 Non-configurable field that displays only if the unit supports Dynamic IP. Non-configurable field. The value is in the range 1-65s, and the default setting is 45. Non-configurable field. Displays False. Non-configurable field. Supports HTTP Setup Supports 230K Baud...
...-configurable field. XPress DR+ supports the RS-485 protocol. Displays True. Displays True. XPress DR+ supports a baud rate of ports on the XPress DR+. XPress DR+ User Guide 44 Non-configurable field that displays only if the unit supports Dynamic IP. Non-configurable field. The value is in the range 1-65s, and the default setting is 45. Non-configurable field. Displays False. Non-configurable field. Supports HTTP Setup Supports 230K Baud...
XPress-DR+ - User Guide
Page 49
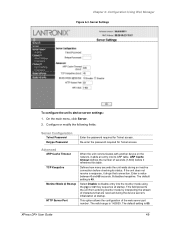
... the network, it adds an entry into the monitor mode using the yyy or xx1 key sequence at startup. Defines how many seconds the unit waits during an inactive connection before it drops that are received during the device server's initialization at startup. The valid range is 80. XPress DR+ User Guide 49 Re-enter the password required for Telnet access. Server Settings...
... the network, it adds an entry into the monitor mode using the yyy or xx1 key sequence at startup. Defines how many seconds the unit waits during an inactive connection before it drops that are received during the device server's initialization at startup. The valid range is 80. XPress DR+ User Guide 49 Re-enter the password required for Telnet access. Server Settings...

XPress-DR+ - User Guide
Page 51
... network and serial communication. Host Information Host Address Enter or modify the host's IP address. Note: Channel 1 and Channel 2 have the same defaults except for the port number (10001 for Channel 1 and 10002 for Channel 2). XPress DR+ User Guide 51 To save and reboot, click Apply Settings on the main menu. The default setting is 3. When finished, click the OK button. 4. Serial Settings To configure the channel's serial settings: 1. On the main menu, click Serial Settings...
... network and serial communication. Host Information Host Address Enter or modify the host's IP address. Note: Channel 1 and Channel 2 have the same defaults except for the port number (10001 for Channel 1 and 10002 for Channel 2). XPress DR+ User Guide 51 To save and reboot, click Apply Settings on the main menu. The default setting is 3. When finished, click the OK button. 4. Serial Settings To configure the channel's serial settings: 1. On the main menu, click Serial Settings...

XPress-DR+ - User Guide
Page 52
... drop-down menu, select the protocol type for the serial connection. XPress DR+ User Guide 52 In the available fields, enter the following information: Channel 1 Disable Serial Port Port Settings Protocol Flow Control Baud Rate Data Bits Parity Stop Bits When selected, disables communication through the serial port. Note: Configuring RS-485 is None. Valid baud rates are 300, 600, 1200, 2400, 4800, 9600 (default), 19200, 38400...
... drop-down menu, select the protocol type for the serial connection. XPress DR+ User Guide 52 In the available fields, enter the following information: Channel 1 Disable Serial Port Port Settings Protocol Flow Control Baud Rate Data Bits Parity Stop Bits When selected, disables communication through the serial port. Note: Configuring RS-485 is None. Valid baud rates are 300, 600, 1200, 2400, 4800, 9600 (default), 19200, 38400...
XPress-DR+ - User Guide
Page 65
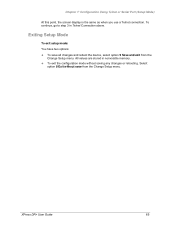
Select option 8 Exit without saving any changes or rebooting. All values are stored in Telnet Connection above. Chapter 7: Configuration Using Telnet or Serial Port (Setup Mode) At this point, the screen display is the same as when you use a Telnet connection. Exiting Setup Mode To exit setup mode: You have two options: To save from the Change Setup menu. XPress DR+ User Guide 65 To continue, go to step 3 in nonvolatile...
Select option 8 Exit without saving any changes or rebooting. All values are stored in Telnet Connection above. Chapter 7: Configuration Using Telnet or Serial Port (Setup Mode) At this point, the screen display is the same as when you use a Telnet connection. Exiting Setup Mode To exit setup mode: You have two options: To save from the Change Setup menu. XPress DR+ User Guide 65 To continue, go to step 3 in nonvolatile...
XPress-DR+ - User Guide
Page 81
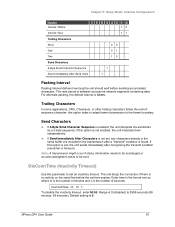
... to the frame boundary. Range is the number of seconds. Enter time in the transmission after recognizing the transmit condition (sendchar or timeout). XPress DR+ User Guide 81 If this option helps to adapt frame transmission to 5999 seconds (99 minutes, 59 seconds). Chapter 9: Setup Mode: Channel Configuration Option Interval: 250ms ...unit should wait before the set time expires. Default setting is between successive network segments containing data. if this parameter to be sent. This wait period is 0. DisConnTime (Inactivity Timeout) Use this option is not enabled, the unit...
... to the frame boundary. Range is the number of seconds. Enter time in the transmission after recognizing the transmit condition (sendchar or timeout). XPress DR+ User Guide 81 If this option helps to adapt frame transmission to 5999 seconds (99 minutes, 59 seconds). Chapter 9: Setup Mode: Channel Configuration Option Interval: 250ms ...unit should wait before the set time expires. Default setting is between successive network segments containing data. if this parameter to be sent. This wait period is 0. DisConnTime (Inactivity Timeout) Use this option is not enabled, the unit...
XPress-DR+ - User Guide
Page 87
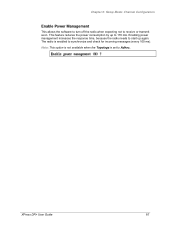
Note: This option is not available when the Topology is enabled to 170 mA. Enabling power management increases the response time, because the radio needs to start up to synchronize and check for incoming messages (every 100 ms). XPress DR+ User Guide 87 Chapter 9: Setup Mode: Channel Configuration Enable Power Management This allows the software to turn off the radio when expecting not to Adhoc. The radio is set to receive or transmit soon. This feature reduces the power consumption by up again.
Note: This option is not available when the Topology is enabled to 170 mA. Enabling power management increases the response time, because the radio needs to start up to synchronize and check for incoming messages (every 100 ms). XPress DR+ User Guide 87 Chapter 9: Setup Mode: Channel Configuration Enable Power Management This allows the software to turn off the radio when expecting not to Adhoc. The radio is set to receive or transmit soon. This feature reduces the power consumption by up again.
XPress-DR+ - User Guide
Page 116
..., 46 Port number, 16, 71 Power requirements, 24 Product descriptions, 12 Reset, 24 Saving settings Setup Mode, 65 Web-Manager, 62 Security settings, 35, 68, 89 Serial interface, 20, 30 Serial port, 17 Serial tunneling, 14, 15 Server settings Setup Mode, 66 Web-Manager, 48 Setup Mode Serial port connection, 64, 96 Telnet connection, 63 Specifications, 104 Technical Support, 102 Telnet port, 17 TFTP downloads, 93 Warranty, 115 Web-Manager, 45 WLAN settings, 82 XPress-DR+W, 32...
..., 46 Port number, 16, 71 Power requirements, 24 Product descriptions, 12 Reset, 24 Saving settings Setup Mode, 65 Web-Manager, 62 Security settings, 35, 68, 89 Serial interface, 20, 30 Serial port, 17 Serial tunneling, 14, 15 Server settings Setup Mode, 66 Web-Manager, 48 Setup Mode Serial port connection, 64, 96 Telnet connection, 63 Specifications, 104 Technical Support, 102 Telnet port, 17 TFTP downloads, 93 Warranty, 115 Web-Manager, 45 WLAN settings, 82 XPress-DR+W, 32...


