
QIG
Page 5
..., and leave the password blank. (Figure 2-1) The following screen would appear automatically. English Using the Software CD to configure the camera Power on your CD-ROM drive manually to open the setup page. Select "Install Software"->" Device Search" (Figure1-1&1-2 ) Run "Device Search". (Figure 1-3) The Device Search will show MAC address and an IP Address of available LevelOne Network Cameras. If it does...
..., and leave the password blank. (Figure 2-1) The following screen would appear automatically. English Using the Software CD to configure the camera Power on your CD-ROM drive manually to open the setup page. Select "Install Software"->" Device Search" (Figure1-1&1-2 ) Run "Device Search". (Figure 1-3) The Device Search will show MAC address and an IP Address of available LevelOne Network Cameras. If it does...
User Manual
Page 2
......22 7.2.2 Security...24 7.2.3 Network...31 7.2.4 DDNS...37 7.2.5 Mail...38 7.2.6 FTP...38 7.2.7 HTTP...39 7.2.8 Application (Alarm Settings 40 7.2.9 Motion Detection 43 7.2.10 Tampering...46 7.2.11 Storage Management (Local Recording 48 7.2.12 Recording (Local Recording 51 7.2.13 File Location (Snapshots and Web Recording 51 7.2.14 View Log File 52 7.2.15 View User Information 52 7.2.16 View Parameters 54 7.2.17 Factory Default 54 7.2.18 Software Version 55 7.2.19 Software Upgrade 55 2 Access Camera ...11 5. Camera Cabling...8 2.1 Connect Power...8 2.2 Connect Ethernet Cable...
......22 7.2.2 Security...24 7.2.3 Network...31 7.2.4 DDNS...37 7.2.5 Mail...38 7.2.6 FTP...38 7.2.7 HTTP...39 7.2.8 Application (Alarm Settings 40 7.2.9 Motion Detection 43 7.2.10 Tampering...46 7.2.11 Storage Management (Local Recording 48 7.2.12 Recording (Local Recording 51 7.2.13 File Location (Snapshots and Web Recording 51 7.2.14 View Log File 52 7.2.15 View User Information 52 7.2.16 View Parameters 54 7.2.17 Factory Default 54 7.2.18 Software Version 55 7.2.19 Software Upgrade 55 2 Access Camera ...11 5. Camera Cabling...8 2.1 Connect Power...8 2.2 Connect Ethernet Cable...

User Manual
Page 3
... 7.4.11 Camera- Default 77 7.5 Logout ...77 Appendix A: Install UPnP Components 77 Appendix A: Technical Specifications 78 Appendix B: Delete the Existing DC Viewer 79 Appendix C: Setup Internet Security 80 3 7.2.20 Maintenance 56 7.3 Streaming...57 7.3.1 Video Format (Video Resolution/ Video Deinterlace 57 7.3.2 Video Compression 60 7.3.3 Video OCX Protocol 61 7.3.4 Video Frame Rate 62 7.3.5 Audio (Audio Mode and Bit Rate Settings 63 7.4 PTZ...64 7.4.1 Preset ...64 7.4.2 Cruise ...65 7.4.3 Auto Pan ...66 7.4.4 Sequence ...67 7.4.5 7.4.6 Home...69 Tilt Range...
... 7.4.11 Camera- Default 77 7.5 Logout ...77 Appendix A: Install UPnP Components 77 Appendix A: Technical Specifications 78 Appendix B: Delete the Existing DC Viewer 79 Appendix C: Setup Internet Security 80 3 7.2.20 Maintenance 56 7.3 Streaming...57 7.3.1 Video Format (Video Resolution/ Video Deinterlace 57 7.3.2 Video Compression 60 7.3.3 Video OCX Protocol 61 7.3.4 Video Frame Rate 62 7.3.5 Audio (Audio Mode and Bit Rate Settings 63 7.4 PTZ...64 7.4.1 Preset ...64 7.4.2 Cruise ...65 7.4.3 Auto Pan ...66 7.4.4 Sequence ...67 7.4.5 7.4.6 Home...69 Tilt Range...

User Manual
Page 4
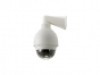
... support. It enables users to scene change and performs more stabilized image. Live video can view the immediate image from window-based computer via speeding or limited bandwidth. Overview The Full HD Speed Dome IP Camera transmits digital video and audio data using a standard web-browser. With IP solution, multiple and authorized users can be monitored and recorded from any location through network even using wire connection. It eliminates the "combing" effect due to access and remote the camera without at specific...
... support. It enables users to scene change and performs more stabilized image. Live video can view the immediate image from window-based computer via speeding or limited bandwidth. Overview The Full HD Speed Dome IP Camera transmits digital video and audio data using a standard web-browser. With IP solution, multiple and authorized users can be monitored and recorded from any location through network even using wire connection. It eliminates the "combing" effect due to access and remote the camera without at specific...

User Manual
Page 8
... meters. if the LEDs are unlit, please check LAN connection. Connect one end of the Ethernet cable to the RJ-45 connector of the network Speed Dome Camera, and the other end of the cable to complete network Speed Dome Camera connection. 2. 2.1 2.2 Camera Cabling Please follow the instructions below to connect power core through the supplied power adaptor. Green Link Light indicates good network connection. Connect Power Please refer to the illustrations below to the network switch or PC. Check...
... meters. if the LEDs are unlit, please check LAN connection. Connect one end of the Ethernet cable to the RJ-45 connector of the network Speed Dome Camera, and the other end of the cable to complete network Speed Dome Camera connection. 2. 2.1 2.2 Camera Cabling Please follow the instructions below to connect power core through the supplied power adaptor. Green Link Light indicates good network connection. Connect Power Please refer to the illustrations below to the network switch or PC. Check...

User Manual
Page 11
... details. 11 The network Speed Dome Camera's default IP address is strongly advised that administrator's password be altered for the Administrator are: Login ID root Password NOTE: ID and password are case sensitive. Device Search Step 3: Click on the program Device Search.exe. Access Camera For initial access to the network Speed Dome Camera, users can search the camera through the installer program: DeviceSearch.exe, which can be listed in the supplied CD.
... details. 11 The network Speed Dome Camera's default IP address is strongly advised that administrator's password be altered for the Administrator are: Login ID root Password NOTE: ID and password are case sensitive. Device Search Step 3: Click on the program Device Search.exe. Access Camera For initial access to the network Speed Dome Camera, users can search the camera through the installer program: DeviceSearch.exe, which can be listed in the supplied CD.

User Manual
Page 12
... finding list. Step 2: The page will come out. Wait for changing the network Speed Dome Camera's network property. Double click on the Note of Changing IP Camera's Network Property Users can change . If the Web browser doesn't allow DC Viewer installation, please check the Internet security settings or ActiveX controls and plug-ins settings (refer to Internet Security Settings) to access the network Speed Dome Camera. Example of setting change the network Speed Dome Camera's network property, either DHCP or Static IP directly in the finding device...
... finding list. Step 2: The page will come out. Wait for changing the network Speed Dome Camera's network property. Double click on the Note of Changing IP Camera's Network Property Users can change . If the Web browser doesn't allow DC Viewer installation, please check the Internet security settings or ActiveX controls and plug-ins settings (refer to Internet Security Settings) to access the network Speed Dome Camera. Example of setting change the network Speed Dome Camera's network property, either DHCP or Static IP directly in the finding device...

User Manual
Page 13
... Viewer window when download is finished. Click on to DC Viewer Download Procedure. Please refer to carry on to Upgrade the DC Viewer. Click on software installation. NOTE: If the Live Video Pane on the Information Bar and select to Full HD Speed Dome IP Camera Menu Tree for further button/ function details. 13 Once login to the network Speed Dome Camera, users will pop up. Then the security warning window will see the Home...
... Viewer window when download is finished. Click on to DC Viewer Download Procedure. Please refer to carry on to Upgrade the DC Viewer. Click on software installation. NOTE: If the Live Video Pane on the Information Bar and select to Full HD Speed Dome IP Camera Menu Tree for further button/ function details. 13 Once login to the network Speed Dome Camera, users will pop up. Then the security warning window will see the Home...

User Manual
Page 18
... Speed Dome IP Camera transmits digital video and audio data using a standard web-browser. It enables users to re-login the IP Camera with another username and password 18 Menu Tree There are delivered by IP support. Home Users can set host name, system time, root password, network related settings, etc. System setting The Administrator can monitor live video of the targeted area. Simultaneous dual streams, H.264/H.264 and H.264/MJPEG, are allowed to scene change and performs more stabilized image...
... Speed Dome IP Camera transmits digital video and audio data using a standard web-browser. It enables users to re-login the IP Camera with another username and password 18 Menu Tree There are delivered by IP support. Home Users can set host name, system time, root password, network related settings, etc. System setting The Administrator can monitor live video of the targeted area. Simultaneous dual streams, H.264/H.264 and H.264/MJPEG, are allowed to scene change and performs more stabilized image...

User Manual
Page 20
... the zoom adjustment bar to the remote site. Click on the button to switch it is required to implement the Web Recording function. Press the button to show the live video pane as shown below. Manual button Click on as an Administrator to File Location for the web recording is only available for User who has granted this mode, the camera will keep in /out. Focus Adjustment Auto Focus...
... the zoom adjustment bar to the remote site. Click on the button to switch it is required to implement the Web Recording function. Press the button to show the live video pane as shown below. Manual button Click on as an Administrator to File Location for the web recording is only available for User who has granted this mode, the camera will keep in /out. Focus Adjustment Auto Focus...

User Manual
Page 23
Manual The Administrator can set video date, time and day manually. Enable Daylight Saving Time To enable DST, please check the item and then specify time offset and DST duration. Entry format should be identical with the PC's. The format for instance, if the amount of time offset is [hh:mm:ss]; Sync With Computer Time Select the item and video date and time display will synchronize with that shown next to the enter field. 23 for time offset is one hour, please enter "01:00:00" into the field. Time Zone Select the time zone you are in from the drop-down menu.
Manual The Administrator can set video date, time and day manually. Enable Daylight Saving Time To enable DST, please check the item and then specify time offset and DST duration. Entry format should be identical with the PC's. The format for instance, if the amount of time offset is [hh:mm:ss]; Sync With Computer Time Select the item and video date and time display will synchronize with that shown next to the enter field. 23 for time offset is one hour, please enter "01:00:00" into the field. Time Zone Select the time zone you are in from the drop-down menu.

User Manual
Page 24
... camera's clock with a NTP server. Admin Password Change the administrator's password by inputting the new password in the user name list. Sync with NTP Server Network Time Protocol (NTP) is 14 digits. Then select an update interval from the drop-down menu with tabs including , , , and . 7.2.2.1 User The User setting can be displayed in both text boxes. Click the Security category, there will be up to add the new user. The new user...
... camera's clock with a NTP server. Admin Password Change the administrator's password by inputting the new password in the user name list. Sync with NTP Server Network Time Protocol (NTP) is 14 digits. Then select an update interval from the drop-down menu with tabs including , , , and . 7.2.2.1 User The User setting can be displayed in both text boxes. Click the Security category, there will be up to add the new user. The new user...
User Manual
Page 31
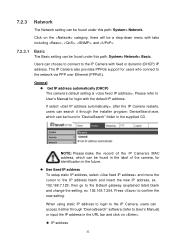
... and change the setting, ex. 192.168.7.254. General Get IP address automatically (DHCP) The camera's default setting is . The IP Camera also provides PPPoE support for login with the default IP address. Please refer to User's Manual for users who connect to the IP Camera with tabs including , , , and . 7.2.3.1 Basic The Basic setting can be found under this path: System> Network> Basic. When using static IP address to login...
... and change the setting, ex. 192.168.7.254. General Get IP address automatically (DHCP) The camera's default setting is . The IP Camera also provides PPPoE support for login with the default IP address. Please refer to User's Manual for users who connect to the IP Camera with tabs including , , , and . 7.2.3.1 Basic The Basic setting can be found under this path: System> Network> Basic. When using static IP address to login...

User Manual
Page 33
... to 65535. HTTPS port The default setting of RTSP Port is 8008; IPv6 Address Configuration With IPv6 support, users can use the corresponding IPv6 address for the connection to be notified the change for browsing. Once the port is changed, the user must type in the web browser "http://192.168.0.100:8080" instead of "http://192.168.0.100". RTSP port The default setting of HTTPS Port is from 1024 to...
... to 65535. HTTPS port The default setting of RTSP Port is 8008; IPv6 Address Configuration With IPv6 support, users can use the corresponding IPv6 address for the connection to be notified the change for browsing. Once the port is changed, the user must type in the web browser "http://192.168.0.100:8080" instead of "http://192.168.0.100". RTSP port The default setting of HTTPS Port is from 1024 to...

User Manual
Page 48
... is detected, event images will be sent to the appointed e-mail address. NOTE: Make sure SMTP or FTP configuration has been completed. action=1&group=2" when alarm is set in this path: System> Storage Management. Save Click on the button to the specified HTTP server. File Name The uploaded image's filename format can assign an e-mail address and configure various parameters. Refer to Mail and FTP for...
... is detected, event images will be sent to the appointed e-mail address. NOTE: Make sure SMTP or FTP configuration has been completed. action=1&group=2" when alarm is set in this path: System> Storage Management. Save Click on the button to the specified HTTP server. File Name The uploaded image's filename format can assign an e-mail address and configure various parameters. Refer to Mail and FTP for...

User Manual
Page 64
... name. Preset Setting To setup a Preset Point, please first move to a desired position and adjust the fine zoom/ focus ratio. Totally 256 Preset Points can be programmed for the current position from the drop-down Number List (click on or button to reach number 1 to 256). Click on to the live view pane. Then left click and drag the red pointer with PTZ controls to the target position. 64...
... name. Preset Setting To setup a Preset Point, please first move to a desired position and adjust the fine zoom/ focus ratio. Totally 256 Preset Points can be programmed for the current position from the drop-down Number List (click on or button to reach number 1 to 256). Click on to the live view pane. Then left click and drag the red pointer with PTZ controls to the target position. 64...
User Manual
Page 66
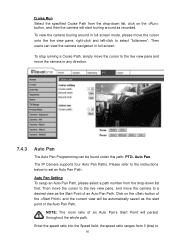
.... 7.4.3 Auto Pan The Auto Pan Programming can view the camera navigation in full screen mode, please move the cursor onto the live view pane, right-click and left-click to select "fullscreen". The IP Camera supports four Auto Pan Paths. To view the camera touring around as the Start Point of the Auto Pan Path. To stop running a Cruise Path, simply move the cursor to a desired view as recorded. Auto Pan Setting To setup an Auto Pan...
.... 7.4.3 Auto Pan The Auto Pan Programming can view the camera navigation in full screen mode, please move the cursor onto the live view pane, right-click and left-click to select "fullscreen". The IP Camera supports four Auto Pan Paths. To view the camera touring around as the Start Point of the Auto Pan Path. To stop running a Cruise Path, simply move the cursor to a desired view as recorded. Auto Pan Setting To setup an Auto Pan...

User Manual
Page 77
.... 7.4.11 Camera- In the Camera Default page, users can be found under this path: PTZ> Camera- Step 1: Go to , click on , and then double click on in Components Wizard window of the page, and the login window will pop up. Step 5: Click on . Appendix A: Install UPnP Components Please follow the instructions below to complete installation. 77 Default The Default Setting can set the camera back to factory default settings simply...
.... 7.4.11 Camera- In the Camera Default page, users can be found under this path: PTZ> Camera- Step 1: Go to , click on , and then double click on in Components Wizard window of the page, and the login window will pop up. Step 5: Click on . Appendix A: Install UPnP Components Please follow the instructions below to complete installation. 77 Default The Default Setting can set the camera back to factory default settings simply...
User Manual
Page 79
... Video Compression Video Streaming Video Resolution Frame Rate Audio Compression Audio Streaming Interface Protocol Digital Alarm Input Digital Alarm Output Alarm Reaction Security Supported Web Browser GENERAL Environment Operating Temperature Dimension Weight Power Source Power Consumption Regulatory FCS-4041 H.264 Main Profile/ MJPEG Multiple Streams,... RTP, RTSP, HTTP, HTTPS, ICMP, FTP, SMTP, DHCP, PPPoE, UPnP, IGMP, SNMP, QoS, IEEE 802.1x, ONVIF 4 2 Preset, Sequence, Auto pan, Cruise User Account and Password Protection Internet Explorer (6.0+), Chrome, Firefox, Safari Indoor / Outdoor -45...
... Video Compression Video Streaming Video Resolution Frame Rate Audio Compression Audio Streaming Interface Protocol Digital Alarm Input Digital Alarm Output Alarm Reaction Security Supported Web Browser GENERAL Environment Operating Temperature Dimension Weight Power Source Power Consumption Regulatory FCS-4041 H.264 Main Profile/ MJPEG Multiple Streams,... RTP, RTSP, HTTP, HTTPS, ICMP, FTP, SMTP, DHCP, PPPoE, UPnP, IGMP, SNMP, QoS, IEEE 802.1x, ONVIF 4 2 Preset, Sequence, Auto pan, Cruise User Account and Password Protection Internet Explorer (6.0+), Chrome, Firefox, Safari Indoor / Outdoor -45...

User Manual
Page 80
... behaviors. 5. Download unsigned ActiveX controls. 8. Close the browser window, and restart a new one later to accept the settings and close the Internet Options screen. 80 Internet Security Level: Default Step 1: Start the Internet Explorer (IE). Step 5: Click on to access the network Speed Dome Camera. Step 2: Click on the tab on the tab, and select zone. The Security Settings window will pop up . Allow previously unused ActiveX controls to close the Security Settings window. Script ActiveX controls marked...
... behaviors. 5. Download unsigned ActiveX controls. 8. Close the browser window, and restart a new one later to accept the settings and close the Internet Options screen. 80 Internet Security Level: Default Step 1: Start the Internet Explorer (IE). Step 5: Click on to access the network Speed Dome Camera. Step 2: Click on the tab on the tab, and select zone. The Security Settings window will pop up . Allow previously unused ActiveX controls to close the Security Settings window. Script ActiveX controls marked...

