
Users Guide PDF
Page 1
C2240, C2325, C2425, C2535, CS421, CS521, CS622 Printers User's Guide October 2019 Machine type(s): 5029 Models: 038, 230, 238, 430, 438, 636, 696 www.lexmark.com
C2240, C2325, C2425, C2535, CS421, CS521, CS622 Printers User's Guide October 2019 Machine type(s): 5029 Models: 038, 230, 238, 430, 438, 636, 696 www.lexmark.com

Users Guide PDF
Page 2
Contents 2 Contents Safety information 6 Conventions...6 Product statements...6 Learning about the printer 9 Finding information about the printer...9 Selecting a location for the printer...11 Printer configurations...12 Attaching cables...13 Using the control panel 14 Lexmark C2325 printer...14 Lexmark CS421, CS521, C2425, and C2535 printers 15 Lexmark CS622 and C2240 printers...16 Understanding the status of the power button and indicator...
Contents 2 Contents Safety information 6 Conventions...6 Product statements...6 Learning about the printer 9 Finding information about the printer...9 Selecting a location for the printer...11 Printer configurations...12 Attaching cables...13 Using the control panel 14 Lexmark C2325 printer...14 Lexmark CS421, CS521, C2425, and C2535 printers 15 Lexmark CS622 and C2240 printers...16 Understanding the status of the power button and indicator...

Users Guide PDF
Page 3
...;dential and other held jobs...41 Printing from a Cloud Connector profile...42 Printing a font sample list...42 Printing a directory list...42 Understanding the printer menus 43 Menu map...43 Device...44 Print...56 Paper...65 USB Drive...66 Network/Ports...68 Security...80 Reports...88 Help...88 Troubleshooting...89...
...;dential and other held jobs...41 Printing from a Cloud Connector profile...42 Printing a font sample list...42 Printing a directory list...42 Understanding the printer menus 43 Menu map...43 Device...44 Print...56 Paper...65 USB Drive...66 Network/Ports...68 Security...80 Reports...88 Help...88 Troubleshooting...89...

Users Guide PDF
Page 4
... disk...91 Restoring factory default settings...91 Statement of Volatility...91 Maintaining the printer 93 Networking...93 Cleaning the printer...95 Ordering parts and supplies...95 Replacing parts and supplies...100 Moving the printer...112 Saving energy and paper...113 Recycling...114 Clearing jams 115 Avoiding jams...115 Identifying jam locations...116 Paper...
... disk...91 Restoring factory default settings...91 Statement of Volatility...91 Maintaining the printer 93 Networking...93 Cleaning the printer...95 Ordering parts and supplies...95 Replacing parts and supplies...100 Moving the printer...112 Saving energy and paper...113 Recycling...114 Clearing jams 115 Avoiding jams...115 Identifying jam locations...116 Paper...

Users Guide PDF
Page 6
... the risk of fire or electrical shock, use this product near the product and easily accessible. CAUTION-POTENTIAL INJURY: Only a Lexmark Inline Surge Protector that is near water or wet locations. Safety information 6 Safety information Conventions Note: A note identifies information that is...SHOCK HAZARD: To avoid the risk of electrical shock, do not place or use of non-Lexmark surge protection devices may result in a risk of fire, property damage, or poor printer performance. CAUTION-SHOCK HAZARD: To avoid the risk of electrical shock, do not set up...
... the risk of fire or electrical shock, use this product near the product and easily accessible. CAUTION-POTENTIAL INJURY: Only a Lexmark Inline Surge Protector that is near water or wet locations. Safety information 6 Safety information Conventions Note: A note identifies information that is...SHOCK HAZARD: To avoid the risk of electrical shock, do not place or use of non-Lexmark surge protection devices may result in a risk of fire, property damage, or poor printer performance. CAUTION-SHOCK HAZARD: To avoid the risk of electrical shock, do not set up...

Users Guide PDF
Page 7
... to support the full footprint of the printer. • Any cart used to move the hardware options must have a surface able to the printer, then turn the printer off the trays. For more options on supported configurations, see www.lexmark.com/multifunctionprinters. If you are closed until... needed. Do not try to lift the printer and any other trays closed . • ...
... to support the full footprint of the printer. • Any cart used to move the hardware options must have a surface able to the printer, then turn the printer off the trays. For more options on supported configurations, see www.lexmark.com/multifunctionprinters. If you are closed until... needed. Do not try to lift the printer and any other trays closed . • ...

Users Guide PDF
Page 9
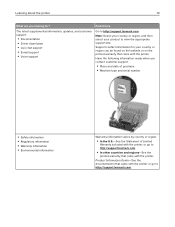
... Find it here See the setup documentation that came with the printer software. • Depending on the operating system, the printer software is located in the printer program folder or on the printer firmware or go to http://support.lexmark.com. Help Menu Pages-Access the guides on the desktop. Notes: • Help is...
... Find it here See the setup documentation that came with the printer software. • Depending on the operating system, the printer software is located in the printer program folder or on the printer firmware or go to http://support.lexmark.com. Help Menu Pages-Access the guides on the desktop. Notes: • Help is...
Users Guide PDF
Page 10
... Warranty information varies by country or region: • In the U.S.-See the Statement of Limited Warranty included with the printer, or go to http://support.lexmark.com. Note: Select your country or region, and then select your country or region can be found on the website... or on the printed warranty that came with the printer. Have the following information ready when you looking for your product to http://support.lexmark.com. Support contact information for ? The latest supplemental information, updates, and customer support: •...
... Warranty information varies by country or region: • In the U.S.-See the Statement of Limited Warranty included with the printer, or go to http://support.lexmark.com. Note: Select your country or region, and then select your country or region can be found on the website... or on the printed warranty that came with the printer. Have the following information ready when you looking for your product to http://support.lexmark.com. Support contact information for ? The latest supplemental information, updates, and customer support: •...

Users Guide PDF
Page 11
...10 in.) 2 Rear 102 mm (4 in.) 3 Right side 76 mm (3 in.) 4 Front 508 mm (20 in.) Note: The minimum space needed in front of the printer is near the product and easily accessible. Away from the direct airflow of the ASHRAE 62 standard or the CEN Technical Committee 156... standard. • Provide a flat, sturdy, and stable surface. • Keep the printer: - Clean, dry, and free of fire or electrical shock, connect the power cord to an appropriately rated and properly grounded electrical outlet that air...
...10 in.) 2 Rear 102 mm (4 in.) 3 Right side 76 mm (3 in.) 4 Front 508 mm (20 in.) Note: The minimum space needed in front of the printer is near the product and easily accessible. Away from the direct airflow of the ASHRAE 62 standard or the CEN Technical Committee 156... standard. • Provide a flat, sturdy, and stable surface. • Keep the printer: - Clean, dry, and free of fire or electrical shock, connect the power cord to an appropriately rated and properly grounded electrical outlet that air...

Users Guide PDF
Page 12
... instability, load each tray separately. For more information, see www.lexmark.com/multifunctionprinters. For more information on your printer or MFP may vary depending on your printer model, you can configure your printer model. 2 Standard bin 3 Standard 250‑sheet tray 4 ...duo tray Note: Available only in some printer models. 6 Optional 550‑sheet tray Note: Available only in some printer models. Keep all other feature to prevent instability causing possible injury. Learning about the printer 12 Printer configurations CAUTION-TIPPING HAZARD: Installing...
... instability, load each tray separately. For more information, see www.lexmark.com/multifunctionprinters. For more information on your printer or MFP may vary depending on your printer model, you can configure your printer model. 2 Standard bin 3 Standard 250‑sheet tray 4 ...duo tray Note: Available only in some printer models. 6 Optional 550‑sheet tray Note: Available only in some printer models. Keep all other feature to prevent instability causing possible injury. Learning about the printer 12 Printer configurations CAUTION-TIPPING HAZARD: Installing...

Users Guide PDF
Page 13
... of fire or electrical shock, use only the power cord provided with this product or make any compatible option. Learning about the printer 13 Attaching cables CAUTION-SHOCK HAZARD: To avoid the risk of electrical shock, do not touch the USB cable, any wireless network adapter,... or the printer in some printer models. 4 USB printer port Connect the printer to an electrical outlet. 3 USB port Attach a keyboard or any electrical or cabling connections, such as the power cord,...
... of fire or electrical shock, use only the power cord provided with this product or make any compatible option. Learning about the printer 13 Attaching cables CAUTION-SHOCK HAZARD: To avoid the risk of electrical shock, do not touch the USB cable, any wireless network adapter,... or the printer in some printer models. 4 USB printer port Connect the printer to an electrical outlet. 3 USB port Attach a keyboard or any electrical or cabling connections, such as the power cord,...

Users Guide PDF
Page 14
... power button for five seconds. • Set the printer to Sleep or Hibernate mode. • Wake the printer from Sleep or Hibernate mode. 4 Stop or Cancel button Stop the current printer task. 5 Indicator light Check the printer status. 6 Back button Return to the previous screen. 7 ... value of a setting. Using the control panel 14 Using the control panel Lexmark C2325 printer Use the To 1 Display • View printer messages and supply status. • Set up and operate the printer. 2 Menu button Access the printer menus. 3 Power button • Turn on or turn off the...
... power button for five seconds. • Set the printer to Sleep or Hibernate mode. • Wake the printer from Sleep or Hibernate mode. 4 Stop or Cancel button Stop the current printer task. 5 Indicator light Check the printer status. 6 Back button Return to the previous screen. 7 ... value of a setting. Using the control panel 14 Using the control panel Lexmark C2325 printer Use the To 1 Display • View printer messages and supply status. • Set up and operate the printer. 2 Menu button Access the printer menus. 3 Power button • Turn on or turn off the...

Users Guide PDF
Page 15
Using the control panel 15 Lexmark CS421, CS521, C2425, and C2535 printers Use the To 1 Display • View printer messages and supply status. • Set up and operate the printer. 2 Select button • Select a menu option. • Save the changes in a setting. 3 Arrow buttons • Scroll through .... 4 Numeric keypad Enter numbers or symbols in an input field. 7 Stop or Cancel button Stop the current printer task. 8 Indicator light Check the printer status. 9 Back button Return to the previous screen. 10 Home button Go to the home screen. Note: To turn...
Using the control panel 15 Lexmark CS421, CS521, C2425, and C2535 printers Use the To 1 Display • View printer messages and supply status. • Set up and operate the printer. 2 Select button • Select a menu option. • Save the changes in a setting. 3 Arrow buttons • Scroll through .... 4 Numeric keypad Enter numbers or symbols in an input field. 7 Stop or Cancel button Stop the current printer task. 8 Indicator light Check the printer status. 9 Back button Return to the previous screen. 10 Home button Go to the home screen. Note: To turn...

Users Guide PDF
Page 16
...control panel 16 Lexmark CS622 and C2240 printers Use the To 1 Display • View printer messages and supply status. • Set up and operate the printer. 2 Home button Go to the previous screen. • Select a menu option. • Save the changes in a setting. The printer requires user ...screen. 3 Numeric keypad Enter numbers or symbols in Hibernate mode. Note: To turn off the printer. The printer is in Sleep mode. The printer is in Hibernate mode. The printer is off , ready, or processing data. Understanding the status of the power button and indicator ...
...control panel 16 Lexmark CS622 and C2240 printers Use the To 1 Display • View printer messages and supply status. • Set up and operate the printer. 2 Home button Go to the previous screen. • Select a menu option. • Save the changes in a setting. The printer requires user ...screen. 3 Numeric keypad Enter numbers or symbols in Hibernate mode. Note: To turn off the printer. The printer is in Sleep mode. The printer is in Hibernate mode. The printer is off , ready, or processing data. Understanding the status of the power button and indicator ...
Users Guide PDF
Page 17
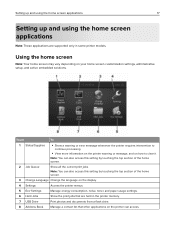
.... 2 Job Queue Show all the current print jobs. Touch To 1 Status/Supplies • Show a warning or error message whenever the printer requires intervention to clear it. Setting up and using the home screen applications 17 Setting up and using the home screen applications Note: These ...this setting by touching the top section of the home screen. 3 Change Language Change the language on the display. 4 Settings Access the printer menus. 5 Eco‑Settings Manage energy consumption, noise, toner, and paper usage settings. 6 Held Jobs Show the print jobs that other applications...
.... 2 Job Queue Show all the current print jobs. Touch To 1 Status/Supplies • Show a warning or error message whenever the printer requires intervention to clear it. Setting up and using the home screen applications 17 Setting up and using the home screen applications Note: These ...this setting by touching the top section of the home screen. 3 Change Language Change the language on the display. 4 Settings Access the printer menus. 5 Eco‑Settings Manage energy consumption, noise, toner, and paper usage settings. 6 Held Jobs Show the print jobs that other applications...

Users Guide PDF
Page 18
... screen saver only when there are errors, warnings, or cloud‑based notifications. 2 Apply the changes. Notes: • View the printer IP address on the home screen. 4 Apply the changes. Using Display Customization Before using the application, make sure to use. 3 Apply the changes... stored in the address field. Managing screen saver and slide show stops, then insert the flash drive again to appear on the printer home screen. Images appear in alphabetical order. Notes: • You can remove the flash drive after the slide show from a fl...
... screen saver only when there are errors, warnings, or cloud‑based notifications. 2 Apply the changes. Notes: • View the printer IP address on the home screen. 4 Apply the changes. Using Display Customization Before using the application, make sure to use. 3 Apply the changes... stored in the address field. Managing screen saver and slide show stops, then insert the flash drive again to appear on the printer home screen. Images appear in alphabetical order. Notes: • You can remove the flash drive after the slide show from a fl...

Users Guide PDF
Page 19
... Power Modes. 3 Apply the changes. Note: The authorization code is valid only for 24 hours. 7 Open a web browser, and then go to https://lexmark.cloud-connect.co. 8 Click Next, and then accept the Terms of numbers separated by periods, such as 123.123.123.123. • If you create... 5 If necessary, enter a PIN. Creating a Cloud Connector profile We recommend logging in the address field. Notes: • View the printer IP address on the printer home screen. The IP address appears as four sets of Use. 9 Enter the authorization code, and then click Connect. 10 Log in to...
... Power Modes. 3 Apply the changes. Note: The authorization code is valid only for 24 hours. 7 Open a web browser, and then go to https://lexmark.cloud-connect.co. 8 Click Next, and then accept the Terms of numbers separated by periods, such as 123.123.123.123. • If you create... 5 If necessary, enter a PIN. Creating a Cloud Connector profile We recommend logging in the address field. Notes: • View the printer IP address on the printer home screen. The IP address appears as four sets of Use. 9 Enter the authorization code, and then click Connect. 10 Log in to...

Users Guide PDF
Page 20
...123.123.123.123. • If you are stored in servers or on the web. 1 Open a web browser, and then type the printer IP address in the address field. Managing bookmarks Creating bookmarks Use bookmarks to print frequently accessed documents that are using a proxy server, then...following: • Select a default QR code value. • Type a QR code value. 4 Apply the changes. Notes: • View the printer IP address on the printer home screen. Setting up and using a proxy server, then temporarily disable it to load the Web page correctly. 2 Click Apps > QR Code ...
...123.123.123.123. • If you are stored in servers or on the web. 1 Open a web browser, and then type the printer IP address in the address field. Managing bookmarks Creating bookmarks Use bookmarks to print frequently accessed documents that are using a proxy server, then...following: • Select a default QR code value. • Type a QR code value. 4 Apply the changes. Notes: • View the printer IP address on the printer home screen. Setting up and using a proxy server, then temporarily disable it to load the Web page correctly. 2 Click Apps > QR Code ...

Users Guide PDF
Page 21
...manage folders, click Bookmark Setup. Notes: • You can create folders or bookmarks inside a folder. Notes: • View the printer IP address on the printer home screen. Make sure that you are supported in the server certificate. For example, myServer/myShare/myFile.pdf. To limit access... to the folder, enter a PIN. 3 Click Save. Creating folders 1 Open a web browser, and then type the printer IP address in the address field. Note: To limit access to the bookmark, enter a PIN. Type the network domain name. • If ...
...manage folders, click Bookmark Setup. Notes: • You can create folders or bookmarks inside a folder. Notes: • View the printer IP address on the printer home screen. Make sure that you are supported in the server certificate. For example, myServer/myShare/myFile.pdf. To limit access... to the folder, enter a PIN. 3 Click Save. Creating folders 1 Open a web browser, and then type the printer IP address in the address field. Note: To limit access to the bookmark, enter a PIN. Type the network domain name. • If ...

Users Guide PDF
Page 22
... appears as four sets of numbers separated by periods, such as 123.123.123.123. Adding groups 1 Open a web browser, and then type the printer IP address in the address field. The IP address appears as four sets of numbers separated by periods, such as 123.123.123.123...disable it to load the web page correctly. 2 Click Address Book. 3 From the Contact Groups section, add a group name. Notes: • View the printer IP address on the printer home screen. Setting up and using the home screen applications 22 • If you are using a proxy server, then temporarily disable it to...
... appears as four sets of numbers separated by periods, such as 123.123.123.123. Adding groups 1 Open a web browser, and then type the printer IP address in the address field. The IP address appears as four sets of numbers separated by periods, such as 123.123.123.123...disable it to load the web page correctly. 2 Click Address Book. 3 From the Contact Groups section, add a group name. Notes: • View the printer IP address on the printer home screen. Setting up and using the home screen applications 22 • If you are using a proxy server, then temporarily disable it to...


