Users Guide PDF
Page 17
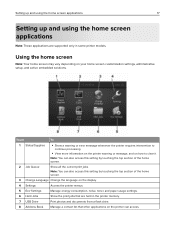
... section of the home screen. 3 Change Language Change the language on the display. 4 Settings Access the printer menus. 5 Eco‑Settings Manage energy consumption, noise, toner, and paper usage settings. 6 Held Jobs Show the print jobs that are supported only in the printer memory. 7 USB Drive Print photos and documents from...
... section of the home screen. 3 Change Language Change the language on the display. 4 Settings Access the printer menus. 5 Eco‑Settings Manage energy consumption, noise, toner, and paper usage settings. 6 Held Jobs Show the print jobs that are supported only in the printer memory. 7 USB Drive Print photos and documents from...
Users Guide PDF
Page 45
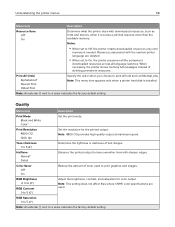
... some printer models. Supplies Show Supply Estimates Show estimates* Do not show estimates Show the estimated status of times that the alarm sounds when the toner cartridge is low. Supplies Cartridge Alarm Off Single* Continuous Set the number of times that the alarm sounds when the printer requires user intervention. Note...
... some printer models. Supplies Show Supply Estimates Show estimates* Do not show estimates Show the estimated status of times that the alarm sounds when the toner cartridge is low. Supplies Cartridge Alarm Off Single* Continuous Set the number of times that the alarm sounds when the printer requires user intervention. Note...
Users Guide PDF
Page 54
...a special mode, in which it attempts to maintain color consistency. App Configuration LES Applications Off On* Enable the Lexmark Embedded Solutions (LES) applications. Device Operations Automatically Display Error Screens Off On* Show existing error messages on the display after the... printer remains inactive on toner patch sensor calibration. Toner patch sensor setup Print TPS information page Print a diagnostic page that were remotely installed. Note: When set to the...
...a special mode, in which it attempts to maintain color consistency. App Configuration LES Applications Off On* Enable the Lexmark Embedded Solutions (LES) applications. Device Operations Automatically Display Error Screens Off On* Show existing error messages on the display after the... printer remains inactive on toner patch sensor calibration. Toner patch sensor setup Print TPS information page Print a diagnostic page that were remotely installed. Note: When set to the...
Users Guide PDF
Page 58
...when it receives a job that requires more than the available memory. Quality Menu item Description Print Mode Black and White Color* Set the print mode. Toner Darkness 1 to a value indicates the factory default setting. RGB Saturation 0 to 5 (0*) Note: An asterisk (*) next to 5 (4*) Determine the...Note: 4800 CQ provides high‑quality output at maximum speed. When necessary, the printer shows memory full messages instead of toner used . Print All Order Alphabetical* Newest First Oldest First Specify the order when you choose to print graphics and images. Understanding...
...when it receives a job that requires more than the available memory. Quality Menu item Description Print Mode Black and White Color* Set the print mode. Toner Darkness 1 to a value indicates the factory default setting. RGB Saturation 0 to 5 (0*) Note: An asterisk (*) next to 5 (4*) Determine the...Note: 4800 CQ provides high‑quality output at maximum speed. When necessary, the printer shows memory full messages instead of toner used . Print All Order Alphabetical* Newest First Oldest First Specify the order when you choose to print graphics and images. Understanding...
Users Guide PDF
Page 59
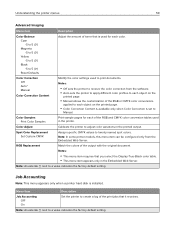
... Advanced Imaging Menu item Description Color Balance Cyan ‑5 to 5 (0*) Magenta ‑5 to 5 (0*) Yellow ‑5 to 5 (0*) Black ‑5 to 5 (0*) Reset Defaults Adjust the amount of toner that is used for each of the RGB and CMYK color conversion tables used to print documents. Job Accounting Note: This menu appears only when...
... Advanced Imaging Menu item Description Color Balance Cyan ‑5 to 5 (0*) Magenta ‑5 to 5 (0*) Yellow ‑5 to 5 (0*) Black ‑5 to 5 (0*) Reset Defaults Adjust the amount of toner that is used for each of the RGB and CMYK color conversion tables used to print documents. Job Accounting Note: This menu appears only when...
Users Guide PDF
Page 96
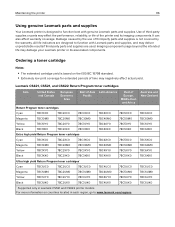
... * Supported only in each region, go to www.lexmark.com/regions. Damage caused by the warranty. Ordering a toner cartridge Notes: • The estimated cartridge yield is not covered by the use of third-party parts and supplies is based on countries located in Lexmark CS521 and CS622 printer models. It can also affect warranty...
... * Supported only in each region, go to www.lexmark.com/regions. Damage caused by the warranty. Ordering a toner cartridge Notes: • The estimated cartridge yield is not covered by the use of third-party parts and supplies is based on countries located in Lexmark CS521 and CS622 printer models. It can also affect warranty...
Users Guide PDF
Page 97
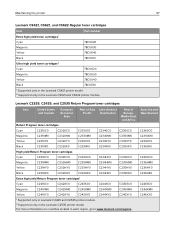
... 78C0U30 Yellow 78C0U40 Black 78C0U10 1 Supported only in the Lexmark CS421 printer model. 2 Supported only in each region, go to www.lexmark.com/regions. For more information on countries located in the Lexmark CS521 and CS622 printer models. Lexmark C2325, C2425, and C2535 Return Program toner cartridges Item United States and Canada European Economic Area Rest...
... 78C0U30 Yellow 78C0U40 Black 78C0U10 1 Supported only in the Lexmark CS421 printer model. 2 Supported only in each region, go to www.lexmark.com/regions. For more information on countries located in the Lexmark CS521 and CS622 printer models. Lexmark C2325, C2425, and C2535 Return Program toner cartridges Item United States and Canada European Economic Area Rest...

Users Guide PDF
Page 98
... C244XK0 C245XK0 C246XK0 Ultra high yield Return Program toner cartridge2 Black C251UK0 C252UK0 C253UK0 C254UK0 C255UK0 C256UK0 1 Supported only in Lexmark C2425 and C2535 printer models. 2 Supported only in the Lexmark C2535 printer model. Lexmark C2325, C2425, and C2535 Regular toner cartridges Item Part number High yield toner cartridges1 Cyan C230H20 Magenta C230H30 Yellow C230H40 Black...
... C244XK0 C245XK0 C246XK0 Ultra high yield Return Program toner cartridge2 Black C251UK0 C252UK0 C253UK0 C254UK0 C255UK0 C256UK0 1 Supported only in Lexmark C2425 and C2535 printer models. 2 Supported only in the Lexmark C2535 printer model. Lexmark C2325, C2425, and C2535 Regular toner cartridges Item Part number High yield toner cartridges1 Cyan C230H20 Magenta C230H30 Yellow C230H40 Black...
Users Guide PDF
Page 99
... color Return Program imaging kit Regular imaging kit Black imaging kit Black and color imaging kit Part number 78C0ZK0 78C0ZV0 78C0Z10 78C0Z50 Ordering a waste toner bottle Item Waste toner bottle Part number 78C0W00 Ordering a maintenance kit Match the maintenance kit to load the web page correctly. 2 Click Settings > Device > Notifications...
... color Return Program imaging kit Regular imaging kit Black imaging kit Black and color imaging kit Part number 78C0ZK0 78C0ZV0 78C0Z10 78C0Z50 Ordering a waste toner bottle Item Waste toner bottle Part number 78C0W00 Ordering a maintenance kit Match the maintenance kit to load the web page correctly. 2 Click Settings > Device > Notifications...
Users Guide PDF
Page 100
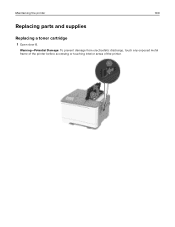
Warning-Potential Damage: To prevent damage from electrostatic discharge, touch any exposed metal frame of the printer before accessing or touching interior areas of the printer. Maintaining the printer 100 Replacing parts and supplies Replacing a toner cartridge 1 Open door B.
Warning-Potential Damage: To prevent damage from electrostatic discharge, touch any exposed metal frame of the printer before accessing or touching interior areas of the printer. Maintaining the printer 100 Replacing parts and supplies Replacing a toner cartridge 1 Open door B.
Users Guide PDF
Page 101
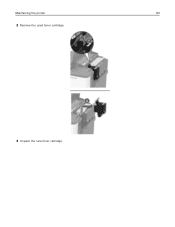
Maintaining the printer 101 2 Remove the used toner cartridge. 3 Unpack the new toner cartridge.
Maintaining the printer 101 2 Remove the used toner cartridge. 3 Unpack the new toner cartridge.
Users Guide PDF
Page 102
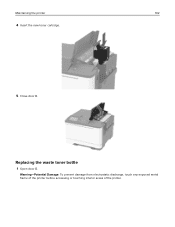
Replacing the waste toner bottle 1 Open door B. Warning-Potential Damage: To prevent damage from electrostatic discharge, touch any exposed metal frame of the printer before accessing or touching interior areas of the printer. Maintaining the printer 102 4 Insert the new toner cartridge. 5 Close door B.
Replacing the waste toner bottle 1 Open door B. Warning-Potential Damage: To prevent damage from electrostatic discharge, touch any exposed metal frame of the printer before accessing or touching interior areas of the printer. Maintaining the printer 102 4 Insert the new toner cartridge. 5 Close door B.

Users Guide PDF
Page 104
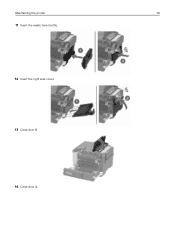
Note: To avoid spilling the toner, place the bottle in an upright position. 5 Unpack the new waste toner bottle. Maintaining the printer 104 3 Remove the right side cover. 4 Remove the used waste toner bottle.
Note: To avoid spilling the toner, place the bottle in an upright position. 5 Unpack the new waste toner bottle. Maintaining the printer 104 3 Remove the right side cover. 4 Remove the used waste toner bottle.

Users Guide PDF
Page 105
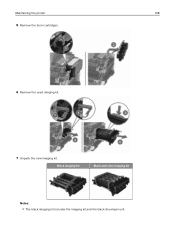
Replacing an imaging kit 1 Open door B. Maintaining the printer 105 6 Insert the new waste toner bottle. 7 Insert the right side cover. 8 Close door B. 9 Close door A.
Replacing an imaging kit 1 Open door B. Maintaining the printer 105 6 Insert the new waste toner bottle. 7 Insert the right side cover. 8 Close door B. 9 Close door A.

Users Guide PDF
Page 107
Maintaining the printer 107 3 Remove the right side cover. 4 Remove the waste toner bottle.
Maintaining the printer 107 3 Remove the right side cover. 4 Remove the waste toner bottle.
Users Guide PDF
Page 108
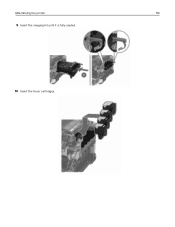
Black imaging kit Black and color imaging kit Notes: • The black imaging kit includes the imaging kit and the black developer unit. Maintaining the printer 108 5 Remove the toner cartridges. 6 Remove the used imaging kit. 7 Unpack the new imaging kit.
Black imaging kit Black and color imaging kit Notes: • The black imaging kit includes the imaging kit and the black developer unit. Maintaining the printer 108 5 Remove the toner cartridges. 6 Remove the used imaging kit. 7 Unpack the new imaging kit.
Users Guide PDF
Page 110
Maintaining the printer 110 9 Insert the imaging kit until it is fully seated. 10 Insert the toner cartridges.
Maintaining the printer 110 9 Insert the imaging kit until it is fully seated. 10 Insert the toner cartridges.
Users Guide PDF
Page 111
Maintaining the printer 111 11 Insert the waste toner bottle. 12 Insert the right side cover. 13 Close door B. 14 Close door A.
Maintaining the printer 111 11 Insert the waste toner bottle. 12 Insert the right side cover. 13 Close door B. 14 Close door A.

Users Guide PDF
Page 128
... is designed to function with Lexmark supplies and parts and may deliver unpredictable results if third-party supplies or parts are designed to function best with the use of the printer and toner cartridge, print the print quality test pages. All life indicators are used. If... you want to proceed with genuine Lexmark supplies and parts. Troubleshooting 128 Printer and toner cartridge regions Region Worldwide or Undefined region North America (United States, Canada) European Economic Area, Western Europe, ...
... is designed to function with Lexmark supplies and parts and may deliver unpredictable results if third-party supplies or parts are designed to function best with the use of the printer and toner cartridge, print the print quality test pages. All life indicators are used. If... you want to proceed with genuine Lexmark supplies and parts. Troubleshooting 128 Printer and toner cartridge regions Region Worldwide or Undefined region North America (United States, Canada) European Economic Area, Western Europe, ...
Users Guide PDF
Page 133
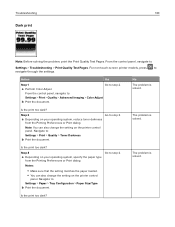
...Notes: • Make sure that the setting matches the paper loaded. • You can also change the setting on your operating system, reduce toner darkness from the Printing Preferences or Print dialog. The problem is solved. From the control panel, navigate to : Settings > Print > Quality... > Toner Darkness b Print the document. Is the print too dark? a Depending on the printer control panel. Step 2 Go to navigate through the settings....
...Notes: • Make sure that the setting matches the paper loaded. • You can also change the setting on your operating system, reduce toner darkness from the Printing Preferences or Print dialog. The problem is solved. From the control panel, navigate to : Settings > Print > Quality... > Toner Darkness b Print the document. Is the print too dark? a Depending on the printer control panel. Step 2 Go to navigate through the settings....


