
Embedded Web Server Administrator s Guide
Page 16
...;sided document. • File Name-Specify the file name for the scanned image. Web Link Setup • Server-Set the e‑mail server to use for the web link. • Login-Set the user name to use for the web link. • Password-Set the password to use for the web link. • Path-Set the printer network path to use for the web link. • File Name-Set the file name to send the images in some printer models. Configuring the FTP settings...
...;sided document. • File Name-Specify the file name for the scanned image. Web Link Setup • Server-Set the e‑mail server to use for the web link. • Login-Set the user name to use for the web link. • Password-Set the password to use for the web link. • Path-Set the printer network path to use for the web link. • File Name-Set the file name to send the images in some printer models. Configuring the FTP settings...
Embedded Web Server Administrator s Guide
Page 33
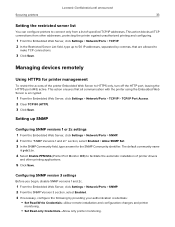
... TCP connections from a list of specified TCP/IP addresses. Managing devices remotely Using HTTPS for the SNMP Community identifier. The default community name is encrypted. 1 From the Embedded Web Server, click Settings > Network/Ports > TCP/IP > TCP/IP Port Access. 2 Clear TCP 80 (HTTP). 3 Click Save. Lexmark Confidential until announced Securing printers 33 Setting the restricted server list You can configure printers to connect only from other printing applications...
... TCP connections from a list of specified TCP/IP addresses. Managing devices remotely Using HTTPS for the SNMP Community identifier. The default community name is encrypted. 1 From the Embedded Web Server, click Settings > Network/Ports > TCP/IP > TCP/IP Port Access. 2 Clear TCP 80 (HTTP). 3 Click Save. Lexmark Confidential until announced Securing printers 33 Setting the restricted server list You can configure printers to connect only from other printing applications...
Embedded Web Server Administrator s Guide
Page 46
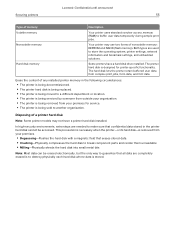
... of Service Erase-Clear all settings, applications, and pending jobs stored in the printer memory, or erase all data in the printer hard disk. • Embedded Web Server Access-Control access to the Embedded Web Server. Lexmark Confidential until announced Securing printers 46 • Change Language-Enable the Change Language option on the printer home screen. • Internal Printing Protocol (IPP)-Allow authenticated users to configure and use printer management options: • Remote Management-Access the printer remotely. • Firmware Updates-Update the printer firmware through...
... of Service Erase-Clear all settings, applications, and pending jobs stored in the printer memory, or erase all data in the printer hard disk. • Embedded Web Server Access-Control access to the Embedded Web Server. Lexmark Confidential until announced Securing printers 46 • Change Language-Enable the Change Language option on the printer home screen. • Internal Printing Protocol (IPP)-Allow authenticated users to configure and use printer management options: • Remote Management-Access the printer remotely. • Firmware Updates-Update the printer firmware through...
Embedded Web Server Administrator s Guide
Page 49
... print option. When the limit is installed. Notes: - You can disable the front USB port using access control restrictions. Configuring confidential printing Users printing confidential or sensitive information may be logged in . This setting appears only when a formatted, working printer hard disk is reached, the print jobs for that device login restrictions also comply with organizational security policies. 1 From the Embedded Web Server, click Settings > Security > Login Restrictions. 2 Set the login restrictions. • Login failures-Specify the number of times a user...
... print option. When the limit is installed. Notes: - You can disable the front USB port using access control restrictions. Configuring confidential printing Users printing confidential or sensitive information may be logged in . This setting appears only when a formatted, working printer hard disk is reached, the print jobs for that device login restrictions also comply with organizational security policies. 1 From the Embedded Web Server, click Settings > Security > Login Restrictions. 2 Set the login restrictions. • Login failures-Specify the number of times a user...

Embedded Web Server Administrator s Guide
Page 51
... the controller board. 1 From the Embedded Web Server, click Settings > Security > Miscellaneous. 2 In the Security Reset Jumper menu, select either of a forgotten administrator password or lost network connectivity, then you cannot access the security menus. Enabling the security reset jumper If the device is locked down and you can recover the device by resetting it. Warning-Potential Damage: Resetting the device deletes all customer data. Using a cable lock to secure access to print (color or black...
... the controller board. 1 From the Embedded Web Server, click Settings > Security > Miscellaneous. 2 In the Security Reset Jumper menu, select either of a forgotten administrator password or lost network connectivity, then you cannot access the security menus. Enabling the security reset jumper If the device is locked down and you can recover the device by resetting it. Warning-Potential Damage: Resetting the device deletes all customer data. Using a cable lock to secure access to print (color or black...

Embedded Web Server Administrator s Guide
Page 52
...; Copy Density-Adjust the toner density when copying documents. Lexmark Confidential until announced Securing printers 52 Securing data Configuring printer settings 1 From the Embedded Web Server, click Settings > Device > Maintenance. 2 Depending on the printer model, click Config Menu or Configuration Menu. 3 Configure the settings. Print Configuration • Font Sharpening-Set a text point-size value below which the high-frequency screens are available only in fax mode. Tray Configuration • Show Tray Insert Message-Show a message about printer menu settings, status...
...; Copy Density-Adjust the toner density when copying documents. Lexmark Confidential until announced Securing printers 52 Securing data Configuring printer settings 1 From the Embedded Web Server, click Settings > Device > Maintenance. 2 Depending on the printer model, click Config Menu or Configuration Menu. 3 Configure the settings. Print Configuration • Font Sharpening-Set a text point-size value below which the high-frequency screens are available only in fax mode. Tray Configuration • Show Tray Insert Message-Show a message about printer menu settings, status...

Embedded Web Server Administrator s Guide
Page 53
... Test-Print a Quick Test target page. To erase nonvolatile memory or individual settings, printer and network settings, security settings, and embedded solutions, do the following: 1 From the Embedded Web Server, click Settings > Device > Maintenance. 2 From the Erase Printer Memory section, select Sanitize all information on the target page is not, then the printer margins may need to show the control panel menus. • Clear Custom Status-Erase all custom messages. • Clear all remotely‑installed messages Scanner Configuration • Scanner Manual...
... Test-Print a Quick Test target page. To erase nonvolatile memory or individual settings, printer and network settings, security settings, and embedded solutions, do the following: 1 From the Embedded Web Server, click Settings > Device > Maintenance. 2 From the Erase Printer Memory section, select Sanitize all information on the target page is not, then the printer margins may need to show the control panel menus. • Clear Custom Status-Erase all custom messages. • Clear all remotely‑installed messages Scanner Configuration • Scanner Manual...

Embedded Web Server Administrator s Guide
Page 54
.... • The following instructions are available only in printer models with a hard disk installed. 1 From the Embedded Web Server, click Settings > Security > Disk Encryption. 2 Click Start encryption. Note: In the latest firmware version, disk encryption is by default enabled without the option to restore. Statement of Volatility Your printer contains various types of memory that you want to disable it. Loss of the hard disk. Configuring printer hard disk encryption Notes: • Disk encryption erases the...
.... • The following instructions are available only in printer models with a hard disk installed. 1 From the Embedded Web Server, click Settings > Security > Disk Encryption. 2 Click Start encryption. Note: In the latest firmware version, disk encryption is by default enabled without the option to restore. Statement of Volatility Your printer contains various types of memory that you want to disable it. Loss of the hard disk. Configuring printer hard disk encryption Notes: • Disk encryption erases the...
Embedded Web Server Administrator s Guide
Page 55
... its hard disk-is removed from complex print jobs, form data, and font data. Hard disk memory Some printers have a printer hard disk installed. Lexmark Confidential until announced Securing printers 55 Type of nonvolatile memory: EEPROM and NAND (flash memory). Nonvolatile memory Your printer may not have a hard disk drive installed. The printer hard disk is designed for service. • The printer is stored. In high‑security environments, extra steps are needed to make sure that all data are used to store the operating system, printer settings, network...
... its hard disk-is removed from complex print jobs, form data, and font data. Hard disk memory Some printers have a printer hard disk installed. Lexmark Confidential until announced Securing printers 55 Type of nonvolatile memory: EEPROM and NAND (flash memory). Nonvolatile memory Your printer may not have a hard disk drive installed. The printer hard disk is designed for service. • The printer is stored. In high‑security environments, extra steps are needed to make sure that all data are used to store the operating system, printer settings, network...

Universal Print Driver Version 2.0 White Paper
Page 34
... settings. Downloading the Universal Print Driver 1 From your computer, go to support printers at the Lexmark website. The print driver updates the status of packages, see the Universal Print Driver White Paper section. 4 Follow the instructions on the full list of all printer settings. The existing UPD version 1 print queues must be deleted, and then print queues using UPD version 2 must be installed through the Windows Add Printer Wizard or through the Lexmark Universal Print Driver System Administrator Installation package available at multiple locations...
... settings. Downloading the Universal Print Driver 1 From your computer, go to support printers at the Lexmark website. The print driver updates the status of packages, see the Universal Print Driver White Paper section. 4 Follow the instructions on the full list of all printer settings. The existing UPD version 1 print queues must be deleted, and then print queues using UPD version 2 must be installed through the Windows Add Printer Wizard or through the Lexmark Universal Print Driver System Administrator Installation package available at multiple locations...
Printer Drivers for UNIX & Linux Systems
Page 44
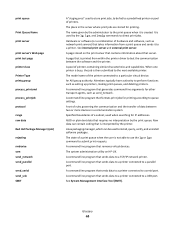
... by the printer. A command line program that is used when searching for printing according to install, query, verify, and uninstall software packages. Glossary 44 print queue Print Queue Name print server print server's Web page print test page printer class Printer Type printq group process_printcmd process_printjob protocol range raw data Red Hat Package Manager (rpm) rejecting rmdevice sam send_network send_parallel send_serial send_usb SMIT A "staging area" used to store print jobs, to be used to queue settings. The...
... by the printer. A command line program that is used when searching for printing according to install, query, verify, and uninstall software packages. Glossary 44 print queue Print Queue Name print server print server's Web page print test page printer class Printer Type printq group process_printcmd process_printjob protocol range raw data Red Hat Package Manager (rpm) rejecting rmdevice sam send_network send_parallel send_serial send_usb SMIT A "staging area" used to store print jobs, to be used to queue settings. The...

Printer Drivers for UNIX & Linux Systems
Page 46
... a user 15 changing the group name 15 removing user 15 administrator mode 32 B banner program using 27 writing 26 C collating copies 24 command line 31 creating print queues 17 creating virtual devices 16 printing from 22 CUPS 38 Customer Support, contacting 38 D default settings 32 Device Manager 16 duplex printing 24 H holding print jobs 26 hostname troubleshooting 37 I installing printer drivers before installing 6 finding space 11 on HP-UX 7 on Linpus Linux 8 on Red Flag Linux 8 on Red Hat Linux...
... a user 15 changing the group name 15 removing user 15 administrator mode 32 B banner program using 27 writing 26 C collating copies 24 command line 31 creating print queues 17 creating virtual devices 16 printing from 22 CUPS 38 Customer Support, contacting 38 D default settings 32 Device Manager 16 duplex printing 24 H holding print jobs 26 hostname troubleshooting 37 I installing printer drivers before installing 6 finding space 11 on HP-UX 7 on Linpus Linux 8 on Red Flag Linux 8 on Red Hat Linux...

Paper and Specialty Media Guide PDF
Page 24
... mono laser printers. Sheets with missing labels could void the printer and cartridge service warranties. To maintain printer feeding reliability, repeat this cleaning process every time you experience stacking problems with adhesive. Polyester labels are less heat‑sensitive but requirements for coatings and cleaning are also non‑absorbing. Oil bleed, recognizable by a discolored face sheet, can be a problem with your printer model and the number of labels being printed, printing labels may...
... mono laser printers. Sheets with missing labels could void the printer and cartridge service warranties. To maintain printer feeding reliability, repeat this cleaning process every time you experience stacking problems with adhesive. Polyester labels are less heat‑sensitive but requirements for coatings and cleaning are also non‑absorbing. Oil bleed, recognizable by a discolored face sheet, can be a problem with your printer model and the number of labels being printed, printing labels may...
Users Guide PDF
Page 16
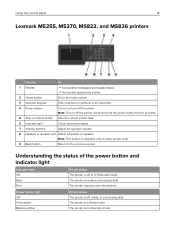
... printer units. 9 Back button Return to the home screen. 3 Numeric keypad Enter numbers or symbols in Hibernate mode. Note: To turn off or in Sleep mode. The printer is off the printer. Understanding the status of the power button and indicator light Indicator light Off Blue Red Printer status The printer is in Hibernate mode. The printer requires user intervention. Using the control panel 16 Lexmark M5255, M5270, MS822, and MS826 printers Use the To 1 Display • View printer messages and supply status...
... printer units. 9 Back button Return to the home screen. 3 Numeric keypad Enter numbers or symbols in Hibernate mode. Note: To turn off or in Sleep mode. The printer is off the printer. Understanding the status of the power button and indicator light Indicator light Off Blue Red Printer status The printer is in Hibernate mode. The printer requires user intervention. Using the control panel 16 Lexmark M5255, M5270, MS822, and MS826 printers Use the To 1 Display • View printer messages and supply status...

Users Guide PDF
Page 52
... drive. Screen Timeout 5-300 (60*) Set the idle time in some printer models. Alarm Control Off Single* Continuous Set the number of the printer speakers. Note: An asterisk (*) next to a value indicates the factory default setting. Note: This menu item appears only in seconds before the display shows the home screen, or before the printer logs out a user account automatically. Understanding the printer menus 52 Menu item Description Flash Drive Access Enabled* Disabled Enable access...
... drive. Screen Timeout 5-300 (60*) Set the idle time in some printer models. Alarm Control Off Single* Continuous Set the number of the printer speakers. Note: An asterisk (*) next to a value indicates the factory default setting. Note: This menu item appears only in seconds before the display shows the home screen, or before the printer logs out a user account automatically. Understanding the printer menus 52 Menu item Description Flash Drive Access Enabled* Disabled Enable access...
Users Guide PDF
Page 102
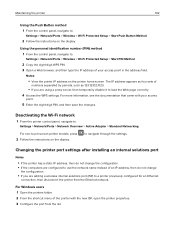
... Button Method 2 Follow the instructions on the display. For Windows users 1 Open the printers folder. 2 From the shortcut menu of an IP address, then do not change the configuration. • If you are using a proxy server, then temporarily disable it to : Settings > Network/Ports > Wireless > Wi‑Fi Protected Setup > Start PIN Method 2 Copy the eight‑digit WPS PIN. 3 Open a Web browser, and then type the IP address of your access...
... Button Method 2 Follow the instructions on the display. For Windows users 1 Open the printers folder. 2 From the shortcut menu of an IP address, then do not change the configuration. • If you are using a proxy server, then temporarily disable it to : Settings > Network/Ports > Wireless > Wi‑Fi Protected Setup > Start PIN Method 2 Copy the eight‑digit WPS PIN. 3 Open a Web browser, and then type the IP address of your access...
Users Guide PDF
Page 231
... information about the printer 9 firmware update 217 flash drive printing from 45 folder paper 161 font sample list printing 48 fuser replacing 112 G Google Cloud Print using 44 groups adding 22 deleting 22 editing 22 H hardware options installing 195, 200 memory card 191 trays 199 hardware options, adding print driver 216 held jobs 47 printing from a Macintosh computer 47 printing from Windows 47 Hibernate mode configuring 127 home screen customizing 18 showing...
... information about the printer 9 firmware update 217 flash drive printing from 45 folder paper 161 font sample list printing 48 fuser replacing 112 G Google Cloud Print using 44 groups adding 22 deleting 22 editing 22 H hardware options installing 195, 200 memory card 191 trays 199 hardware options, adding print driver 216 held jobs 47 printing from a Macintosh computer 47 printing from Windows 47 Hibernate mode configuring 127 home screen customizing 18 showing...
Users Guide PDF
Page 232
... paper jam in the output expander 139 paper jam in the staple finisher bin 141 paper jam in trays 133 paper jams avoiding 129 location 131 paper jams, clearing in the standard bin 137 personal identification number method 101 personal identification numbers enabling 25 pick roller replacing 119 pick roller in the multipurpose feeder replacing 120 power button light understanding the status 16 power cord socket 13 prepunched paper loading 34 print driver hardware options, adding 216 print jobs not printed 186 Print Quality Test Pages 96 print quality troubleshooting blank...
... paper jam in the output expander 139 paper jam in the staple finisher bin 141 paper jam in trays 133 paper jams avoiding 129 location 131 paper jams, clearing in the standard bin 137 personal identification number method 101 personal identification numbers enabling 25 pick roller replacing 119 pick roller in the multipurpose feeder replacing 120 power button light understanding the status 16 power cord socket 13 prepunched paper loading 34 print driver hardware options, adding 216 print jobs not printed 186 Print Quality Test Pages 96 print quality troubleshooting blank...
Users Guide PDF
Page 233
...replacing pick roller in the multipurpose feeder 120 replacing parts fuser 112 hot roll fuser 114 pick roller 119 transfer roller 116 replacing supplies imaging unit 109 staple cartridge 123, 124 toner cartridge 108 reserve print jobs printing from a Macintosh computer 47 printing from Windows 47 resetting supply usage counters 153 restoring factory default settings 98 running a slideshow 18 S safety information 7, 8 scheduling power modes 19 securing printer memory 98 security slot locating 97 selecting a location for the printer 10 setting the paper size 26 setting the paper type 26 setting...
...replacing pick roller in the multipurpose feeder 120 replacing parts fuser 112 hot roll fuser 114 pick roller 119 transfer roller 116 replacing supplies imaging unit 109 staple cartridge 123, 124 toner cartridge 108 reserve print jobs printing from a Macintosh computer 47 printing from Windows 47 resetting supply usage counters 153 restoring factory default settings 98 running a slideshow 18 S safety information 7, 8 scheduling power modes 19 securing printer memory 98 security slot locating 97 selecting a location for the printer 10 setting the paper size 26 setting the paper type 26 setting...

Users Guide PDF
Page 234
... streaks with print missing 181 vertical light bands 176 vertical white lines 177 troubleshooting, printer options cannot detect internal option 151 U unable to read flash drive troubleshooting, print 150 Unformatted flash detected 152 Universal paper configuring 26 unlinking trays 35 updating firmware flash file 217 USB port 13 enabling 150 using genuine Lexmark parts 104 genuine Lexmark supplies 104 using Customer Support 20 using Display Customization 18 using QR Code Generator 20 using the control panel Lexmark M5255 16 Lexmark...
... streaks with print missing 181 vertical light bands 176 vertical white lines 177 troubleshooting, printer options cannot detect internal option 151 U unable to read flash drive troubleshooting, print 150 Unformatted flash detected 152 Universal paper configuring 26 unlinking trays 35 updating firmware flash file 217 USB port 13 enabling 150 using genuine Lexmark parts 104 genuine Lexmark supplies 104 using Customer Support 20 using Display Customization 18 using QR Code Generator 20 using the control panel Lexmark M5255 16 Lexmark...


