
Sending a fax using the computer
Page 2
..." area, choose your printer model with the letters "PS" in the printer driver to the Lexmark Web site at www.lexmark.com. See "Using the World Wide Web" on page 2. 3 From the main installation dialog, click Install Printer and Software. 4 Click Agree to manually add the options in the... Print Emulation column. 9 Click Add Printer. 10 Click ...
..." area, choose your printer model with the letters "PS" in the printer driver to the Lexmark Web site at www.lexmark.com. See "Using the World Wide Web" on page 2. 3 From the main installation dialog, click Install Printer and Software. 4 Click Agree to manually add the options in the... Print Emulation column. 9 Click Add Printer. 10 Click ...

Troubleshooting Guide
Page 2
...a single envelope in the front output slot. or Click Start Control Panel Printers and Other Hardware Printers and Faxes. 2 Double-click the Lexmark X340/X340n/ X342n icon. 3 Click Printer, and make sure the guides are using the MFP. • Restart the computer. •...press Menu. 2 Press or repeatedly until MACHINE SETUP appears. 3 Press . 4 Press or repeatedly until scanning is complete before using the manual feeder, this is installed correctly. Print and copy troubleshooting MFP does not print or respond • Remove and reinstall the software. Paper ...
...a single envelope in the front output slot. or Click Start Control Panel Printers and Other Hardware Printers and Faxes. 2 Double-click the Lexmark X340/X340n/ X342n icon. 3 Click Printer, and make sure the guides are using the MFP. • Restart the computer. •...press Menu. 2 Press or repeatedly until MACHINE SETUP appears. 3 Press . 4 Press or repeatedly until scanning is complete before using the manual feeder, this is installed correctly. Print and copy troubleshooting MFP does not print or respond • Remove and reinstall the software. Paper ...

User's Guide
Page 32
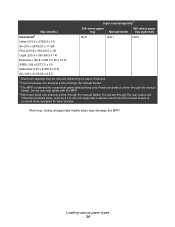
..., see Loading various paper types on acceptable print media to print transparencies, labels, envelopes, or card stock. You may also use paper designed for laser printers. • The paper is not used or damaged. • If you are using the computer. Loading paper in the control panel, or using specialty paper..., you follow the instructions that came with the leading edge first into the MFP. • Set the correct paper type and size in the manual feeder 32 The MFP automatically engages the print media. For information on page 33. 1 Make sure: • You use the...
..., see Loading various paper types on acceptable print media to print transparencies, labels, envelopes, or card stock. You may also use paper designed for laser printers. • The paper is not used or damaged. • If you are using the computer. Loading paper in the control panel, or using specialty paper..., you follow the instructions that came with the leading edge first into the MFP. • Set the correct paper type and size in the manual feeder 32 The MFP automatically engages the print media. For information on page 33. 1 Make sure: • You use the...
User's Guide
Page 34
...on paper thickness. 2 Feed envelopes one sheet at a time through the manual feeder. Feed one sheet at a time through the manual feeder. 3 The MFP is intended for laser printers. Do not use vinyl labels with the MFP. 4 Feed card stock ...Manual feeder No/0 Yes/1 550-sheet paper tray (optional) No/0 Letter (215.9 x 279/8.5 x 11) A4 (210 x 297/8.27 x 11.69) Folio (215.9 x 330.2/8.5 x 13) Legal (215.9 x 355.6/8.5 x 14) Executive (184.2 x 266.7/7.25 x 10.5) JISB5 (182 x 257/7.2 x 10) Statement (140 x 216/5.5 x 8.5) A5 (148 x 210/5.83 x 8.27) 1 Maximum capacity may damage the MFP. Lexmark...
...on paper thickness. 2 Feed envelopes one sheet at a time through the manual feeder. Feed one sheet at a time through the manual feeder. 3 The MFP is intended for laser printers. Do not use vinyl labels with the MFP. 4 Feed card stock ...Manual feeder No/0 Yes/1 550-sheet paper tray (optional) No/0 Letter (215.9 x 279/8.5 x 11) A4 (210 x 297/8.27 x 11.69) Folio (215.9 x 330.2/8.5 x 13) Legal (215.9 x 355.6/8.5 x 14) Executive (184.2 x 266.7/7.25 x 10.5) JISB5 (182 x 257/7.2 x 10) Statement (140 x 216/5.5 x 8.5) A5 (148 x 210/5.83 x 8.27) 1 Maximum capacity may damage the MFP. Lexmark...

User's Guide
Page 40
Printing multiple pages on one transparency at a time. • Make sure you use a transparency designed for laser printers. 2 With a document open, click File Æ Print. 3 Click Properties, Options, Setup, or Preferences. 4 From the Paper/Quality tab, select the paper source. 5 Select Transparency ...: • If you can choose to print each copy as a set (collated) or to print the copies as groups of a document, you are using the manual feeder, load one sheet 1 Load paper. 2 With a document open , click File Æ Print. 3 From Copies, select the Collate check box. 4 Click OK or Print....
Printing multiple pages on one transparency at a time. • Make sure you use a transparency designed for laser printers. 2 With a document open, click File Æ Print. 3 Click Properties, Options, Setup, or Preferences. 4 From the Paper/Quality tab, select the paper source. 5 Select Transparency ...: • If you can choose to print each copy as a set (collated) or to print the copies as groups of a document, you are using the manual feeder, load one sheet 1 Load paper. 2 With a document open , click File Æ Print. 3 From Copies, select the Collate check box. 4 Click OK or Print....

User's Guide
Page 84
... Start Æ Settings Æ Printers and Faxes or Printers. Disconnect the USB cable, and then reconnect it. Remove and reinstall the software. If you are scanning a document, wait until scanning is complete before using the manual feeder, this is slow. Solution See Display is installed...applications not in the document. on page 72. or Click Start Æ Control Panel Æ Printers and Other Hardware Æ Printers and Faxes. 2 Double-click the Lexmark X340/X340n/X342n icon. 3 Click Printer, and make sure no check mark appears next to Pause Printing. 4 Make sure a check ...
... Start Æ Settings Æ Printers and Faxes or Printers. Disconnect the USB cable, and then reconnect it. Remove and reinstall the software. If you are scanning a document, wait until scanning is complete before using the manual feeder, this is slow. Solution See Display is installed...applications not in the document. on page 72. or Click Start Æ Control Panel Æ Printers and Other Hardware Æ Printers and Faxes. 2 Double-click the Lexmark X340/X340n/X342n icon. 3 Click Printer, and make sure no check mark appears next to Pause Printing. 4 Make sure a check ...

User's Guide
Page 91
... to the telephone number to which you still do not hear a dial tone,connect the printer to ignore the error message. Resend the fax. Remove the defective toner cartridge, and install a new Lexmark toner cartridge. For more information, see Loading paper in the paper tray. Error messages troubleshooting...Plug a telephone into the wall jack. 2 Listen for a dial tone. 3 If you do not hear a dial tone, plug a different telephone into the manual feeder. Load print media into the jack. 4 If you want to send a fax to an analog telephone line. If the error message still appears after...
... to the telephone number to which you still do not hear a dial tone,connect the printer to ignore the error message. Resend the fax. Remove the defective toner cartridge, and install a new Lexmark toner cartridge. For more information, see Loading paper in the paper tray. Error messages troubleshooting...Plug a telephone into the wall jack. 2 Listen for a dial tone. 3 If you do not hear a dial tone, plug a different telephone into the manual feeder. Load print media into the jack. 4 If you want to send a fax to an analog telephone line. If the error message still appears after...

Service Manual
Page 4
... Toner sensor service check 2-38 Transfer roll service check 2-38 Diagnostic aids 3-1 Accessing service menus 3-1 Printing menus 3-1 Diagnostics mode 3-2 Available menu items 3-2 Serial number 3-3 USB 3-3 Printer Model 3-4 Power supply ID 3-4 Count reset 3-4 Page Count 3-4 Fax Usage 3-5 Scan Usage 3-5 Network menu 3-5 Print Debug 3-5 Force Speed 3-5 NVRAM Reset 3-6 Registration...
... Toner sensor service check 2-38 Transfer roll service check 2-38 Diagnostic aids 3-1 Accessing service menus 3-1 Printing menus 3-1 Diagnostics mode 3-2 Available menu items 3-2 Serial number 3-3 USB 3-3 Printer Model 3-4 Power supply ID 3-4 Count reset 3-4 Page Count 3-4 Fax Usage 3-5 Scan Usage 3-5 Network menu 3-5 Print Debug 3-5 Force Speed 3-5 NVRAM Reset 3-6 Registration...

Service Manual
Page 6
... card 5-6 Wiring diagram 5-7 Controller card pin assignments 5-8 J3 ADF 5-8 J 69 Modem 5-9 J5 Operator panel 5-10 J1 Flatbed motor 5-11 J4 CCD module 5-12 Preventive maintenance 6-1 Printer engine 6-1 Scanner 6-1 Parts catalog 7-1 How to use this parts catalog 7-1 Assembly 1: Covers 7-2 Assembly 2: Scanner 7-4 Assembly 3: Electronics 7-8 Assembly 4: Frame 7-10 Assembly 5: Miscellaneous 7-12 Index I-1 Part number...
... card 5-6 Wiring diagram 5-7 Controller card pin assignments 5-8 J3 ADF 5-8 J 69 Modem 5-9 J5 Operator panel 5-10 J1 Flatbed motor 5-11 J4 CCD module 5-12 Preventive maintenance 6-1 Printer engine 6-1 Scanner 6-1 Parts catalog 7-1 How to use this parts catalog 7-1 Assembly 1: Covers 7-2 Assembly 2: Scanner 7-4 Assembly 3: Electronics 7-8 Assembly 4: Frame 7-10 Assembly 5: Miscellaneous 7-12 Index I-1 Part number...

Service Manual
Page 14
... instructions for individual FRUs. Parts catalog contains illustrations and part numbers for making printer adjustments and removing and installing FRUs. 5. 7003-XXX Preface This manual contains maintenance procedures for service personnel. There are several types of caution indicates there... the connector locations and test points on the printer. 6. CAUTION This type of caution statements: CAUTION A caution identifies something that might damage the product hardware or software. xiv Service Manual manuals4you.com Connector locations uses illustrations to prevent problems...
... instructions for individual FRUs. Parts catalog contains illustrations and part numbers for making printer adjustments and removing and installing FRUs. 5. 7003-XXX Preface This manual contains maintenance procedures for service personnel. There are several types of caution indicates there... the connector locations and test points on the printer. 6. CAUTION This type of caution statements: CAUTION A caution identifies something that might damage the product hardware or software. xiv Service Manual manuals4you.com Connector locations uses illustrations to prevent problems...

Service Manual
Page 20
... and straighten paper before you load it. • Do not exceed the maximum stack height. • Push all trays firmly into the printer after loading them. • Make sure the guides in the trays are positioned snugly against the paper or specialty media. • Do not...transparencies, fan the stack to the Card Stock & Label Guide available on the Lexmark Web site at www.lexmark.com for more information about which paper provides optimum results for the current printing environment. 1-6 Service Manual manuals4you.com Contain windows, holes, perforations, cutouts, or embossing - 7003-XXX...
... and straighten paper before you load it. • Do not exceed the maximum stack height. • Push all trays firmly into the printer after loading them. • Make sure the guides in the trays are positioned snugly against the paper or specialty media. • Do not...transparencies, fan the stack to the Card Stock & Label Guide available on the Lexmark Web site at www.lexmark.com for more information about which paper provides optimum results for the current printing environment. 1-6 Service Manual manuals4you.com Contain windows, holes, perforations, cutouts, or embossing - 7003-XXX...

Service Manual
Page 22
... High Voltage High Voltage Power Supply International Liquid crystal diode Light emitting diode Low Voltage Power Supply Multi Function Printer Message handling Modified modified read Modem ready NAND (usage: NAND gate) Nonvolatile Random Access Memory Optical photo conductor... Printer Control Language Power-On Reset Power-On Self Test Personal Printer Data Stream Peoples' Republic of China Participating Standards Organization Random access memory Raster Image Processor Synchronous ...
... High Voltage High Voltage Power Supply International Liquid crystal diode Light emitting diode Low Voltage Power Supply Multi Function Printer Message handling Modified modified read Modem ready NAND (usage: NAND gate) Nonvolatile Random Access Memory Optical photo conductor... Printer Control Language Power-On Reset Power-On Self Test Personal Printer Data Stream Peoples' Republic of China Participating Standards Organization Random access memory Raster Image Processor Synchronous ...

Service Manual
Page 31
...sensor. Paper in the paper path • Paper not of the solenoids • Faulty flags or springs • Worn backup rollers at the manual feeder indicates paper is removed, the MPF sensor or controller card might be faulty. Paper is covering the paper present and paper path sensors. ...Open the rear door to the printer is displayed after clearing a different jam or problem. Remove the paper, and check the flag/sensor. See "ADF service check" on page 2-19....
...sensor. Paper in the paper path • Paper not of the solenoids • Faulty flags or springs • Worn backup rollers at the manual feeder indicates paper is removed, the MPF sensor or controller card might be faulty. Paper is covering the paper present and paper path sensors. ...Open the rear door to the printer is displayed after clearing a different jam or problem. Remove the paper, and check the flag/sensor. See "ADF service check" on page 2-19....
Service Manual
Page 32
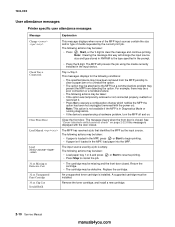
... the input device. The message clears when the front door is empty. Remove the toner cartridge, and install a new cartridge. 2-10 Service Manual manuals4you.com The following conditions: • The specified device may have been removed from the MFP, possibly to clear a paper jam or to...to cancel the job. The input source used by the current print job. Close the front door. 7003-XXX User attendance messages Printer specific user attendance messages Message Explanation Change This message displays when none of the MFP input sources contain the size and/or type of...
... the input device. The message clears when the front door is empty. Remove the toner cartridge, and install a new cartridge. 2-10 Service Manual manuals4you.com The following conditions: • The specified device may have been removed from the MFP, possibly to clear a paper jam or to...to cancel the job. The input source used by the current print job. Close the front door. 7003-XXX User attendance messages Printer specific user attendance messages Message Explanation Change This message displays when none of the MFP input sources contain the size and/or type of...

Service Manual
Page 37
...tests menu to test the input sensor and flag for correct operation. 200.13 Trailing edge of media state, x3=trailing edge state). Printer driver set to letter when A4 paper is found, it may have also reached the input sensor early. Go to "A4, oversized ... sensor. Possible causes: • Small gap • Bouncy (jammed) sensor) 200.14 Unrecoverable no gap at the manual feeder sensor never reached the input sensor. Possible causes: • Multi-sheet feed. • Paper length. Transport motor error detected 200.16 Too long of lock condition or expected a stable...
...tests menu to test the input sensor and flag for correct operation. 200.13 Trailing edge of media state, x3=trailing edge state). Printer driver set to letter when A4 paper is found, it may have also reached the input sensor early. Go to "A4, oversized ... sensor. Possible causes: • Small gap • Bouncy (jammed) sensor) 200.14 Unrecoverable no gap at the manual feeder sensor never reached the input sensor. Possible causes: • Multi-sheet feed. • Paper length. Transport motor error detected 200.16 Too long of lock condition or expected a stable...

Service Manual
Page 48
...and 27 should be ground. Check the connectors on the controller card. Update with EC1 network card firmware. 2-26 Service Manual manuals4you.com In diagnostics, ensure the PRINTER MODEL is properly connected to J44 on both cards for +5V. Ensure the modem cable is set to the top RJ-...11 jack of the network card. Are the LEDs on J69 for damage. Pin 4 is properly connected to the correct printer model. 7003-XXX Modem service check FRU Modem Controller card Network card service check FRU Network daughtercard Controller card Firmware Action Ensure the phone...
...and 27 should be ground. Check the connectors on the controller card. Update with EC1 network card firmware. 2-26 Service Manual manuals4you.com In diagnostics, ensure the PRINTER MODEL is properly connected to J44 on both cards for +5V. Ensure the modem cable is set to the top RJ-...11 jack of the network card. Are the LEDs on J69 for damage. Pin 4 is properly connected to the correct printer model. 7003-XXX Modem service check FRU Modem Controller card Network card service check FRU Network daughtercard Controller card Firmware Action Ensure the phone...

Service Manual
Page 52
...due to A4. Note: These jams can cause paper treeing problems, poor stacking, or curl. Replace the tires as the paper size in the printer driver. See "Controller card service check" on the controller card. Action Verify that the Size/Type item in the ACM assembly for the media ... Paper occasionally picks or picks multiple sheets at once FRU Tray 1 Tray 2 (option) Paper pick tires ACM clutch complete bill of material (CBM) Manual feed clutch CBM Controller card Action Check tray for more information. Check the tires in the Paper Setup menu is chosen as necessary. Replace the...
...due to A4. Note: These jams can cause paper treeing problems, poor stacking, or curl. Replace the tires as the paper size in the printer driver. See "Controller card service check" on the controller card. Action Verify that the Size/Type item in the ACM assembly for the media ... Paper occasionally picks or picks multiple sheets at once FRU Tray 1 Tray 2 (option) Paper pick tires ACM clutch complete bill of material (CBM) Manual feed clutch CBM Controller card Action Check tray for more information. Check the tires in the Paper Setup menu is chosen as necessary. Replace the...

Service Manual
Page 62
... - Go to "Page Count" on page 3-3. Test Copy ADF Registration Flatbed Registration 3-2 Service Manual manuals4you.com Go to "Network menu" on page 3-6. Go to "Printer Registration" on page 3-5. Skew Page Top Margin Left Margin Bottom Margin Scanner Registration - Print Debug... Force Speed NVRAM Reset REGISTRATION Printer Registration -Go to "Scanner Registration" on page 3-4 X340 X340n X 342n POWER SUPPLY ID - Go to "Printer Model" on page 3-7. Copy Fax Local Total Flatbed Total ADF NETWORK MENU ...
... - Go to "Page Count" on page 3-3. Test Copy ADF Registration Flatbed Registration 3-2 Service Manual manuals4you.com Go to "Network menu" on page 3-6. Go to "Printer Registration" on page 3-5. Skew Page Top Margin Left Margin Bottom Margin Scanner Registration - Print Debug... Force Speed NVRAM Reset REGISTRATION Printer Registration -Go to "Scanner Registration" on page 3-4 X340 X340n X 342n POWER SUPPLY ID - Go to "Printer Model" on page 3-7. Copy Fax Local Total Flatbed Total ADF NETWORK MENU ...

Service Manual
Page 64
... to advance to the next page count item, or press twice to return to Printer Model. 3. Enter DIAGNOSTICS. 2. Use UP or Down to scroll to the Count Reset menu item. 3-4 Service Manual manuals4you.com Page Count After selecting the Count reset menu item, Page Count is ...displayed. 3. 7003-XXX Printer Model Printer model is used to avoid flicker issues. The MFP reboots. This setting needs to...
... to advance to the next page count item, or press twice to return to Printer Model. 3. Enter DIAGNOSTICS. 2. Use UP or Down to scroll to the Count Reset menu item. 3-4 Service Manual manuals4you.com Page Count After selecting the Count reset menu item, Page Count is ...displayed. 3. 7003-XXX Printer Model Printer model is used to avoid flicker issues. The MFP reboots. This setting needs to...

Service Manual
Page 66
... margin is set automatically when the left margin. Select REGISTRATION from REGISTRATION. [Skew Page] displays. 3. Registration Printer Registration Printer registration is set the top and left ,and bottom margins of the MFP. The print registration range is prior... to version XXXX, contact your second level of support to +10-Each increment causes approximately 0.559 mm shift in the tray. T= Top margin -16 to save the margin setting. 3-6 Service Manual...
... margin is set automatically when the left margin. Select REGISTRATION from REGISTRATION. [Skew Page] displays. 3. Registration Printer Registration Printer registration is set the top and left ,and bottom margins of the MFP. The print registration range is prior... to version XXXX, contact your second level of support to +10-Each increment causes approximately 0.559 mm shift in the tray. T= Top margin -16 to save the margin setting. 3-6 Service Manual...


