
User's Guide
Page 18
Release the front cover. Understanding the parts of paper in the paper tray. Load paper automatically. Scan, copy, or fax a single-page document. Lock the scanner unit during transport. Verify the level of the MFP 18 Access the toner cartridge. Use the 7 Front output tray 8 Front cover 9 Paper tray 10 Manual feeder 11 Paper level indicator 12 Access button 13 Scanner glass 14 Scanner lock To Hold paper as it exits the MFP. Load paper manually.
Release the front cover. Understanding the parts of paper in the paper tray. Load paper automatically. Scan, copy, or fax a single-page document. Lock the scanner unit during transport. Verify the level of the MFP 18 Access the toner cartridge. Use the 7 Front output tray 8 Front cover 9 Paper tray 10 Manual feeder 11 Paper level indicator 12 Access button 13 Scanner glass 14 Scanner lock To Hold paper as it exits the MFP. Load paper manually.

User's Guide
Page 91
...and Documentation CD. 2 Install the QLINK software. Remove the defective toner cartridge, and install a new Lexmark toner cartridge. Make sure cable connections for the following hardware are secure, if applicable: • Power... a dial tone,connect the printer to the unlock position. Load print media into the jack. 4 If you want to send a fax to make sure that it locks. Resend the fax. If the... Line Detected No dial tone Line Busy No answer Fax failed Scanner Locked, Unlock Scanner 31 Defective Print Cartridge 32 Unsupported Print Cartridge 33 Change Cartridge Solution Press...
...and Documentation CD. 2 Install the QLINK software. Remove the defective toner cartridge, and install a new Lexmark toner cartridge. Make sure cable connections for the following hardware are secure, if applicable: • Power... a dial tone,connect the printer to the unlock position. Load print media into the jack. 4 If you want to send a fax to make sure that it locks. Resend the fax. If the... Line Detected No dial tone Line Busy No answer Fax failed Scanner Locked, Unlock Scanner 31 Defective Print Cartridge 32 Unsupported Print Cartridge 33 Change Cartridge Solution Press...

Service Manual
Page 19
... Document size 4.5" x 5.5" to operate. Note: Network scan is locked during POST. The MFP will display Scanner locked if the CCD is available only on the X340n, and X342n. The ScanBack utility is bundled with the Lexmark ScanBackTM utility. 7003-XXX Scanner specifications General Resolution • Optical-600 dpi • Enhanced-9600X9600 ...1200 dpi Color depth 48 bits internal/24 bit output Lamp warm up time 80% maximum output in order for the scanner to 8.5" x 14" SEF Note: The CCD module incorporates a CCD lock feature. The X340n and X342n are compatible with the...
... Document size 4.5" x 5.5" to operate. Note: Network scan is locked during POST. The MFP will display Scanner locked if the CCD is available only on the X340n, and X342n. The ScanBack utility is bundled with the Lexmark ScanBackTM utility. 7003-XXX Scanner specifications General Resolution • Optical-600 dpi • Enhanced-9600X9600 ...1200 dpi Color depth 48 bits internal/24 bit output Lamp warm up time 80% maximum output in order for the scanner to 8.5" x 14" SEF Note: The CCD module incorporates a CCD lock feature. The X340n and X342n are compatible with the...

Service Manual
Page 24
...not function. See "Cooling fan service check" on page 2-32. See "Poor fusing of image" on page 2-20. 7003-XXX Symptom tables POST symptom table These symptoms may appear during the POST (Power-on page 2-33. 2-2 Service Manual manuals4you.com If the scanner was unlocked, see if the scanner is locked. ... Symptom The main motor, cooling fan, and fuser do not come on . The paper feed picks and tries to feed paper. False Scanner Lock displayed. Action See "Controller card service check" on page 2-31. See "Black page" on page 2-21. See "Paper feed service checks" on...
...not function. See "Cooling fan service check" on page 2-32. See "Poor fusing of image" on page 2-20. 7003-XXX Symptom tables POST symptom table These symptoms may appear during the POST (Power-on page 2-33. 2-2 Service Manual manuals4you.com If the scanner was unlocked, see if the scanner is locked. ... Symptom The main motor, cooling fan, and fuser do not come on . The paper feed picks and tries to feed paper. False Scanner Lock displayed. Action See "Controller card service check" on page 2-31. See "Black page" on page 2-21. See "Paper feed service checks" on...
Service Manual
Page 30
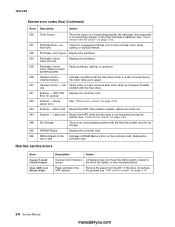
... that the lamp is bad controller card. Lamp error Restart the MFP. Non 9xx service errors Error Scanner Locked Unlock Scanner Open ADF cover Remove Paper Description Action Scanner CCD module is defective. Error for scanner 942 Scanner - 7003-XXX Service error codes (9xx) (Continued) Error Description Action 929 Toner Sensor The toner sensor is not...
... that the lamp is bad controller card. Lamp error Restart the MFP. Non 9xx service errors Error Scanner Locked Unlock Scanner Open ADF cover Remove Paper Description Action Scanner CCD module is defective. Error for scanner 942 Scanner - 7003-XXX Service error codes (9xx) (Continued) Error Description Action 929 Toner Sensor The toner sensor is not...
Service Manual
Page 40
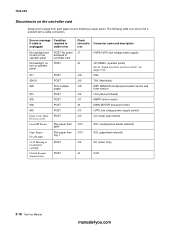
... 935 936 940 Front Cover Open Pls close cover Load MP Feeder Paper Empty Pls add paper 31.05 Missing or invalid print cartridge Unlock Scanner Scanner Lock POST POST Print multiple pages POST POST POST POST POST Pick paper from MPF Pick paper from each paper source following table is required to...
... 935 936 940 Front Cover Open Pls close cover Load MP Feeder Paper Empty Pls add paper 31.05 Missing or invalid print cartridge Unlock Scanner Scanner Lock POST POST Print multiple pages POST POST POST POST POST Pick paper from MPF Pick paper from each paper source following table is required to...

Service Manual
Page 111
Open the ADF top cover. 2. Open the green pick roll hinge (A) by pinching the hinge and gently pulling it down. While pinching the green separator pad guide locks (B) inward, lift and remove the ADF separator pad out of the ADF unit. Scanner ADF pick roll assembly removal 1. 7003-XXX 3. Repair information 4-39
Open the ADF top cover. 2. Open the green pick roll hinge (A) by pinching the hinge and gently pulling it down. While pinching the green separator pad guide locks (B) inward, lift and remove the ADF separator pad out of the ADF unit. Scanner ADF pick roll assembly removal 1. 7003-XXX 3. Repair information 4-39


