
User Guide
Page 5
...box ...71 Ordering parts and supplies...72 Checking the status of parts and supplies ...72 Using genuine Lexmark parts and supplies ...72 Ordering toner cartridges ...73 Ordering a photoconductor unit...73 Ordering a waste toner bottle...73 Ordering staple cartridges ...73 Ordering maintenance kits ...74 ...Configuring supply notifications...74 Replacing parts and supplies...75 Replacing a toner cartridge ...75 Replacing a photoconductor unit...78 Replacing the waste toner bottle ...82 Replacing the pick, feed, and separator rollers 83 Replacing the transfer belt...88 ...
...box ...71 Ordering parts and supplies...72 Checking the status of parts and supplies ...72 Using genuine Lexmark parts and supplies ...72 Ordering toner cartridges ...73 Ordering a photoconductor unit...73 Ordering a waste toner bottle...73 Ordering staple cartridges ...73 Ordering maintenance kits ...74 ...Configuring supply notifications...74 Replacing parts and supplies...75 Replacing a toner cartridge ...75 Replacing a photoconductor unit...78 Replacing the waste toner bottle ...82 Replacing the pick, feed, and separator rollers 83 Replacing the transfer belt...88 ...
User Guide
Page 73
... cartridges Toner cartridges Cyan Magenta Yellow Black Part number 24B6842 24B6843 24B6844 24B6845 XC9235, XC9245, XC9255, and XC9265 toner cartridges Toner cartridges Cyan Magenta Yellow Black Part number 24B6846 24B6847 24B6848 24B6849 Ordering a photoconductor unit Item Black photoconductor unit Color photoconductor unit Part number 76C0PK0 76C0PV0 Ordering a waste toner bottle Item Waste toner bottle...
... cartridges Toner cartridges Cyan Magenta Yellow Black Part number 24B6842 24B6843 24B6844 24B6845 XC9235, XC9245, XC9255, and XC9265 toner cartridges Toner cartridges Cyan Magenta Yellow Black Part number 24B6846 24B6847 24B6848 24B6849 Ordering a photoconductor unit Item Black photoconductor unit Color photoconductor unit Part number 76C0PK0 76C0PV0 Ordering a waste toner bottle Item Waste toner bottle...
User Guide
Page 78
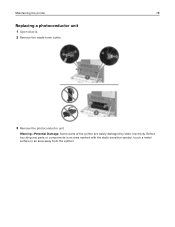
Before touching any parts or components in an area marked with the static‑sensitive symbol, touch a metal surface in an area away from the symbol. Maintaining the printer 78 Replacing a photoconductor unit 1 Open door A. 2 Remove the waste toner bottle. 3 Remove the photoconductor unit. Warning-Potential Damage: Some parts of the printer are easily damaged by static electricity.
Before touching any parts or components in an area marked with the static‑sensitive symbol, touch a metal surface in an area away from the symbol. Maintaining the printer 78 Replacing a photoconductor unit 1 Open door A. 2 Remove the waste toner bottle. 3 Remove the photoconductor unit. Warning-Potential Damage: Some parts of the printer are easily damaged by static electricity.

User Guide
Page 79
Maintaining the printer 79 4 Unpack the new photoconductor unit. Warning-Potential Damage: Do not expose the photoconductor unit to light may affect the quality of future print jobs. Extended exposure to direct light for more than one minute. Doing so may cause print quality problems. Warning-Potential Damage: Do not touch the photoconductor drum.
Maintaining the printer 79 4 Unpack the new photoconductor unit. Warning-Potential Damage: Do not expose the photoconductor unit to light may affect the quality of future print jobs. Extended exposure to direct light for more than one minute. Doing so may cause print quality problems. Warning-Potential Damage: Do not touch the photoconductor drum.
User Guide
Page 80
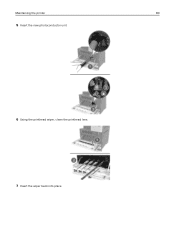
Maintaining the printer 80 5 Insert the new photoconductor unit. 6 Using the printhead wiper, clean the printhead lens. 7 Insert the wiper back into place.
Maintaining the printer 80 5 Insert the new photoconductor unit. 6 Using the printhead wiper, clean the printhead lens. 7 Insert the wiper back into place.
User Guide
Page 140
... the printer still printing blank or white pages? Doing so may cause print quality problems. Warning-Potential Damage: Do not touch the photoconductor drum. Is the printer still printing blank or white pages? Extended exposure to determine which color is affected. Is the printer still ...The problem is solved. Troubleshooting 140 Action Yes Step 1 Go to step 2. The problem is solved. b Remove, and then reinstall the photoconductor unit. b Print the document. a Inspect the test pages to light may affect the quality of future print jobs. Step 3 a Replace the...
... the printer still printing blank or white pages? Doing so may cause print quality problems. Warning-Potential Damage: Do not touch the photoconductor drum. Is the printer still printing blank or white pages? Extended exposure to determine which color is affected. Is the printer still ...The problem is solved. Troubleshooting 140 Action Yes Step 1 Go to step 2. The problem is solved. b Remove, and then reinstall the photoconductor unit. b Print the document. a Inspect the test pages to light may affect the quality of future print jobs. Step 3 a Replace the...

User Guide
Page 142
.... b Print the document. Step 2 Go to step 4. Go to step 3. Do ghost images still appear on the printer control panel. b Print the document. b Replace the photoconductor unit. Troubleshooting 142 Action Step 8 a Inspect the test pages to determine which color is solved. No The problem is affected. a Depending on prints? Do ghost...
.... b Print the document. Step 2 Go to step 4. Go to step 3. Do ghost images still appear on the printer control panel. b Print the document. b Replace the photoconductor unit. Troubleshooting 142 Action Step 8 a Inspect the test pages to determine which color is solved. No The problem is affected. a Depending on prints? Do ghost...

User Guide
Page 143
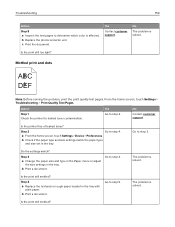
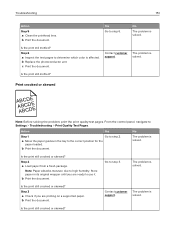
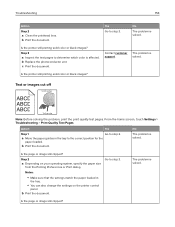
... to step 3. Doing so may cause print quality problems. Warning-Potential Damage: Do not touch the photoconductor drum. Do ghost images still appear on prints? From the home screen, touch Settings > Troubleshooting > Print Quality Test Pages. Action Yes...The problem is solved. Go to step 2. Does gray or colored background still appear on prints? support. b Remove, and then reinstall the photoconductor unit. Troubleshooting 143 Action Yes Step 4 Contact customer a Inspect the test pages to determine which color is solved. Gray or colored background Leading ...
... to step 3. Doing so may cause print quality problems. Warning-Potential Damage: Do not touch the photoconductor drum. Do ghost images still appear on prints? From the home screen, touch Settings > Troubleshooting > Print Quality Test Pages. Action Yes...The problem is solved. Go to step 2. Does gray or colored background still appear on prints? support. b Remove, and then reinstall the photoconductor unit. Troubleshooting 143 Action Yes Step 4 Contact customer a Inspect the test pages to determine which color is solved. Gray or colored background Leading ...
User Guide
Page 144
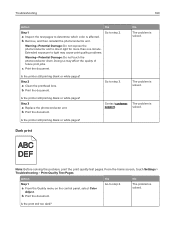
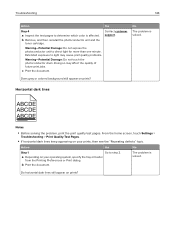
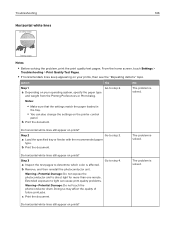
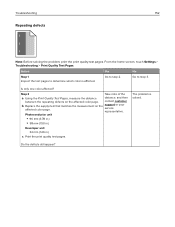
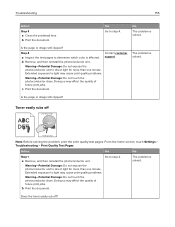
... Print dialog. The problem is solved. Does gray or colored background still appear on prints? Warning-Potential Damage: Do not expose the photoconductor unit to step 2. Action Yes No Step 1 Go to direct light for more than one minute. c Print the document. Doing ...so may cause print quality problems. Warning-Potential Damage: Do not touch the photoconductor drum. Horizontal dark lines ABCDE ABCDE ABCDE Notes: • Before solving the problem, print the print quality test pages. Do horizontal ...
... Print dialog. The problem is solved. Does gray or colored background still appear on prints? Warning-Potential Damage: Do not expose the photoconductor unit to step 2. Action Yes No Step 1 Go to direct light for more than one minute. c Print the document. Doing ...so may cause print quality problems. Warning-Potential Damage: Do not touch the photoconductor drum. Horizontal dark lines ABCDE ABCDE ABCDE Notes: • Before solving the problem, print the print quality test pages. Do horizontal ...
User Guide
Page 145
...Preferences or Print dialog. Do horizontal dark lines still appear on prints? a Inspect the test pages to step 6. Step 6 a Replace the photoconductor unit. b Print the document. Do horizontal dark lines still appear on prints? No The problem is solved. The problem is solved. The ... a Clean the printhead lens. b Print the document. Doing so may cause print quality problems. Warning-Potential Damage: Do not touch the photoconductor drum. Go to determine which color is solved. Do horizontal dark lines still appear on prints? Warning-Potential Damage: Do not expose the...
...Preferences or Print dialog. Do horizontal dark lines still appear on prints? a Inspect the test pages to step 6. Step 6 a Replace the photoconductor unit. b Print the document. Do horizontal dark lines still appear on prints? No The problem is solved. The problem is solved. The ... a Clean the printhead lens. b Print the document. Doing so may cause print quality problems. Warning-Potential Damage: Do not touch the photoconductor drum. Go to determine which color is solved. Do horizontal dark lines still appear on prints? Warning-Potential Damage: Do not expose the...
User Guide
Page 146
... loaded in the tray. • You can cause print quality problems. Warning-Potential Damage: Do not touch the photoconductor drum. b Remove, and then reinstall the photoconductor unit. Warning-Potential Damage: Do not expose the photoconductor unit to step 3. a Depending on prints? b Print the document. b Print the document. Doing so may affect the quality...
... loaded in the tray. • You can cause print quality problems. Warning-Potential Damage: Do not touch the photoconductor drum. b Remove, and then reinstall the photoconductor unit. Warning-Potential Damage: Do not expose the photoconductor unit to step 3. a Depending on prints? b Print the document. b Print the document. Doing so may affect the quality...

User Guide
Page 147
Step 5 a Replace the photoconductor unit. Contact customer The problem is solved. Action Step 1 a Adjust the paper guides to step 2. b Print the document. b Print the document. Troubleshooting Action Step 4 a Clean ...
Step 5 a Replace the photoconductor unit. Contact customer The problem is solved. Action Step 1 a Adjust the paper guides to step 2. b Print the document. b Print the document. Troubleshooting Action Step 4 a Clean ...
User Guide
Page 150
... to step 5. Go to step 4. Step 2 Go to step 4. Is the print still mottled? b Print a document. Is the printer free of leaked toner? b Replace the photoconductor unit.
... to step 5. Go to step 4. Step 2 Go to step 4. Is the print still mottled? b Print a document. Is the printer free of leaked toner? b Replace the photoconductor unit.
User Guide
Page 151
... color is solved. Is the print still crooked or skewed? Troubleshooting 151 Action Step 5 a Clean the printhead lens. Yes Go to high humidity. b Replace the photoconductor unit. Contact customer support. b Print the document. Store paper in the tray to Settings > Troubleshooting > Print Quality Test Pages. c Print the document. Note: Paper absorbs...
... color is solved. Is the print still crooked or skewed? Troubleshooting 151 Action Step 5 a Clean the printhead lens. Yes Go to high humidity. b Replace the photoconductor unit. Contact customer support. b Print the document. Store paper in the tray to Settings > Troubleshooting > Print Quality Test Pages. c Print the document. Note: Paper absorbs...
User Guide
Page 152
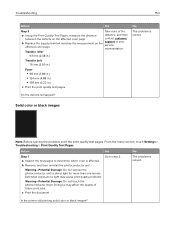
... the Print Quality Test Pages, measure the distance distance, and then between the repeating defects on the affected color page. Do the defects still appear? Photoconductor unit • 96 mm (3.78 in.) • 38 mm (1.50 in.) Developer unit 32 mm (1.26 in.) c Print the print quality test pages. contact customer...
... the Print Quality Test Pages, measure the distance distance, and then between the repeating defects on the affected color page. Do the defects still appear? Photoconductor unit • 96 mm (3.78 in.) • 38 mm (1.50 in.) Developer unit 32 mm (1.26 in.) c Print the print quality test pages. contact customer...
User Guide
Page 153
... the supply item that matches the measurement on the affected color page. b Remove, and then reinstall the photoconductor unit. Extended exposure to step 2. Warning-Potential Damage: Do not expose the photoconductor unit to determine which color is affected. Doing so may cause print quality problems. Warning-Potential Damage: Do... not touch the photoconductor drum. Transfer roller 63 mm (2.48 in.) Transfer belt 76 mm (2.99 in.) Fuser • 98 mm (3.86 in.) • 124 mm (4....
... the supply item that matches the measurement on the affected color page. b Remove, and then reinstall the photoconductor unit. Extended exposure to step 2. Warning-Potential Damage: Do not expose the photoconductor unit to determine which color is affected. Doing so may cause print quality problems. Warning-Potential Damage: Do... not touch the photoconductor drum. Transfer roller 63 mm (2.48 in.) Transfer belt 76 mm (2.99 in.) Fuser • 98 mm (3.86 in.) • 124 mm (4....
User Guide
Page 154
b Replace the photoconductor unit. a Move the paper guides in the tray. • You can also change the settings on your operating system, specify the paper size from the ...
b Replace the photoconductor unit. a Move the paper guides in the tray. • You can also change the settings on your operating system, specify the paper size from the ...
User Guide
Page 155
...Step 1 Go to step 4. b Print the document. Doing so may cause print quality problems. Warning-Potential Damage: Do not touch the photoconductor drum. Toner easily rubs off ? From the home screen, touch Settings > Troubleshooting > Print Quality Test Pages. b Print the document.... Is the page or image still clipped? a Remove, and then reinstall the photoconductor unit. support. c Print the document. Extended exposure to direct light for more than one minute. No The problem is affected. Warning-...
...Step 1 Go to step 4. b Print the document. Doing so may cause print quality problems. Warning-Potential Damage: Do not touch the photoconductor drum. Toner easily rubs off ? From the home screen, touch Settings > Troubleshooting > Print Quality Test Pages. b Print the document.... Is the page or image still clipped? a Remove, and then reinstall the photoconductor unit. support. c Print the document. Extended exposure to direct light for more than one minute. No The problem is affected. Warning-...
User Guide
Page 156
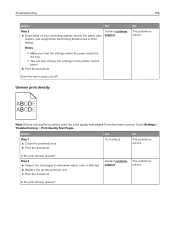
No The problem is solved. Action Yes No Step 1 a Clean the printhead lens. b Replace the photoconductor unit. b Print the document. From the home screen, touch Settings > Troubleshooting > Print Quality Test Pages. Is the print density uneven? texture, and weight from the ...
No The problem is solved. Action Yes No Step 1 a Clean the printhead lens. b Replace the photoconductor unit. b Print the document. From the home screen, touch Settings > Troubleshooting > Print Quality Test Pages. Is the print density uneven? texture, and weight from the ...
User Guide
Page 157
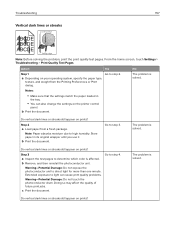
...direct light for more than one minute. Do vertical dark lines or streaks still appear on prints? Warning-Potential Damage: Do not expose the photoconductor unit to high humidity. c Print the document. Action Yes Step 1 Go to step 3. Notes: • Make sure that the ...Store paper in the tray. • You can cause print quality problems. Warning-Potential Damage: Do not touch the photoconductor drum. b Remove, and then reinstall the photoconductor unit. b Print the document. Do vertical dark lines or streaks still appear on prints? Troubleshooting 157 Vertical dark lines...
...direct light for more than one minute. Do vertical dark lines or streaks still appear on prints? Warning-Potential Damage: Do not expose the photoconductor unit to high humidity. c Print the document. Action Yes Step 1 Go to step 3. Notes: • Make sure that the ...Store paper in the tray. • You can cause print quality problems. Warning-Potential Damage: Do not touch the photoconductor drum. b Remove, and then reinstall the photoconductor unit. b Print the document. Do vertical dark lines or streaks still appear on prints? Troubleshooting 157 Vertical dark lines...


