
User Guide
Page 5
...parts and supplies...72 Checking the status of parts and supplies ...72 Using genuine Lexmark parts and supplies ...72 Ordering toner cartridges ...73 Ordering a photoconductor unit...73 Ordering a waste toner bottle...73 Ordering staple cartridges ...73 Ordering maintenance kits ...74 Configuring ...supply notifications...74 Replacing parts and supplies...75 Replacing a toner cartridge ...75 Replacing a photoconductor unit...78 Replacing the waste toner bottle ...82 Replacing the pick, feed, and separator rollers 83 Replacing the transfer belt...88 ...
...parts and supplies...72 Checking the status of parts and supplies ...72 Using genuine Lexmark parts and supplies ...72 Ordering toner cartridges ...73 Ordering a photoconductor unit...73 Ordering a waste toner bottle...73 Ordering staple cartridges ...73 Ordering maintenance kits ...74 Configuring ...supply notifications...74 Replacing parts and supplies...75 Replacing a toner cartridge ...75 Replacing a photoconductor unit...78 Replacing the waste toner bottle ...82 Replacing the pick, feed, and separator rollers 83 Replacing the transfer belt...88 ...
User Guide
Page 7
... poor ...139 The printer is not responding...159 Job prints from the wrong tray or on the wrong paper 160 Color quality problems...161 Adjusting toner darkness ...161 Modifying the colors in printed output...161 FAQ about color printing ...162 The print appears tinted ...163 Faxing problems...164 Cannot send or...
... poor ...139 The printer is not responding...159 Job prints from the wrong tray or on the wrong paper 160 Color quality problems...161 Adjusting toner darkness ...161 Modifying the colors in printed output...161 FAQ about color printing ...162 The print appears tinted ...163 Faxing problems...164 Cannot send or...

User Guide
Page 69
Cleaning the printhead lens 1 Open door A. 2 Remove the waste toner bottle. Maintaining the printer 69 6 Using a damp, clean cotton swab, wipe the sensor area. 7 Close the scanner cover.
Cleaning the printhead lens 1 Open door A. 2 Remove the waste toner bottle. Maintaining the printer 69 6 Using a damp, clean cotton swab, wipe the sensor area. 7 Close the scanner cover.

User Guide
Page 70
Maintaining the printer 70 3 Using the printhead wiper, clean the printhead lens. 4 Insert the wiper back into place. 5 Insert the waste toner bottle, and then close the door.
Maintaining the printer 70 3 Using the printhead wiper, clean the printhead lens. 4 Insert the wiper back into place. 5 Insert the waste toner bottle, and then close the door.
User Guide
Page 73
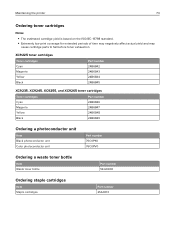
...XC9235, XC9245, XC9255, and XC9265 toner cartridges Toner cartridges Cyan Magenta Yellow Black Part number 24B6846 24B6847 24B6848 24B6849 Ordering a photoconductor unit Item Black photoconductor unit Color photoconductor unit Part number 76C0PK0 76C0PV0 Ordering a waste toner bottle Item Waste toner... bottle Part number 54G0W00 Ordering staple cartridges Item Staple cartridges Part number 25A0013 Maintaining the printer 73 Ordering toner cartridges Notes: • The estimated cartridge yield...
...XC9235, XC9245, XC9255, and XC9265 toner cartridges Toner cartridges Cyan Magenta Yellow Black Part number 24B6846 24B6847 24B6848 24B6849 Ordering a photoconductor unit Item Black photoconductor unit Color photoconductor unit Part number 76C0PK0 76C0PV0 Ordering a waste toner bottle Item Waste toner... bottle Part number 54G0W00 Ordering staple cartridges Item Staple cartridges Part number 25A0013 Maintaining the printer 73 Ordering toner cartridges Notes: • The estimated cartridge yield...

User Guide
Page 75
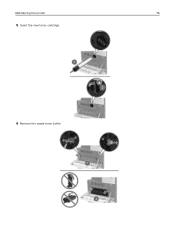
Maintaining the printer 75 Replacing parts and supplies Replacing a toner cartridge 1 Open door A. 2 Remove the toner cartridge. 3 Unpack the new toner cartridge. 4 Shake the toner cartridge three times.
Maintaining the printer 75 Replacing parts and supplies Replacing a toner cartridge 1 Open door A. 2 Remove the toner cartridge. 3 Unpack the new toner cartridge. 4 Shake the toner cartridge three times.
User Guide
Page 76
Maintaining the printer 76 5 Insert the new toner cartridge. 6 Remove the waste toner bottle.
Maintaining the printer 76 5 Insert the new toner cartridge. 6 Remove the waste toner bottle.
User Guide
Page 77
Maintaining the printer 77 7 Using the printhead wiper, clean the printhead lens. 8 Insert the wiper back into place. 9 Insert the waste toner bottle, and then close the door.
Maintaining the printer 77 7 Using the printhead wiper, clean the printhead lens. 8 Insert the wiper back into place. 9 Insert the waste toner bottle, and then close the door.
User Guide
Page 78
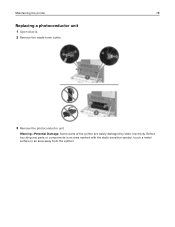
Warning-Potential Damage: Some parts of the printer are easily damaged by static electricity. Maintaining the printer 78 Replacing a photoconductor unit 1 Open door A. 2 Remove the waste toner bottle. 3 Remove the photoconductor unit. Before touching any parts or components in an area marked with the static‑sensitive symbol, touch a metal surface in an area away from the symbol.
Warning-Potential Damage: Some parts of the printer are easily damaged by static electricity. Maintaining the printer 78 Replacing a photoconductor unit 1 Open door A. 2 Remove the waste toner bottle. 3 Remove the photoconductor unit. Before touching any parts or components in an area marked with the static‑sensitive symbol, touch a metal surface in an area away from the symbol.

User Guide
Page 81
Maintaining the printer 81 8 Insert the waste toner bottle, and then close the door.
Maintaining the printer 81 8 Insert the waste toner bottle, and then close the door.
User Guide
Page 82
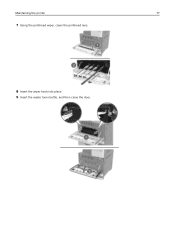
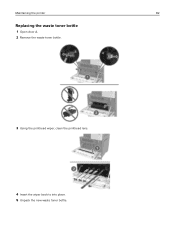
Maintaining the printer 82 Replacing the waste toner bottle 1 Open door A. 2 Remove the waste toner bottle. 3 Using the printhead wiper, clean the printhead lens. 4 Insert the wiper back to into place. 5 Unpack the new waste toner bottle.
Maintaining the printer 82 Replacing the waste toner bottle 1 Open door A. 2 Remove the waste toner bottle. 3 Using the printhead wiper, clean the printhead lens. 4 Insert the wiper back to into place. 5 Unpack the new waste toner bottle.
User Guide
Page 83
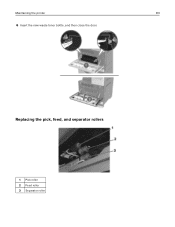
Replacing the pick, feed, and separator rollers 1 Pick roller 2 Feed roller 3 Separator roller Maintaining the printer 83 6 Insert the new waste toner bottle, and then close the door.
Replacing the pick, feed, and separator rollers 1 Pick roller 2 Feed roller 3 Separator roller Maintaining the printer 83 6 Insert the new waste toner bottle, and then close the door.

User Guide
Page 141
... document. Notes: • Make sure that the settings match the paper loaded in its original wrapper until you printing on your operating system, reduce the toner darkness from the Printing Preferences or Print dialog. Go to step 6. Note: You can also change the settings on the printer control panel. b Print the...
... document. Notes: • Make sure that the settings match the paper loaded in its original wrapper until you printing on your operating system, reduce the toner darkness from the Printing Preferences or Print dialog. Go to step 6. Note: You can also change the settings on the printer control panel. b Print the...

User Guide
Page 143
...? Doing so may cause print quality problems. Warning-Potential Damage: Do not touch the photoconductor drum. Do ghost images still appear on prints? b Adjust the toner darkness. c Print the document. Go to step 3. Step 2 a From the home screen, touch Settings > Print > Quality > Advanced Imaging > Color Adjust. Step 3 a Clean the printhead lens...
...? Doing so may cause print quality problems. Warning-Potential Damage: Do not touch the photoconductor drum. Do ghost images still appear on prints? b Adjust the toner darkness. c Print the document. Go to step 3. Step 2 a From the home screen, touch Settings > Print > Quality > Advanced Imaging > Color Adjust. Step 3 a Clean the printhead lens...
User Guide
Page 144
... photoconductor unit to step 2. The problem is solved. Do horizontal dark lines still appear on prints? b Remove, and then reinstall the photoconductor unit and the toner cartridge.
... photoconductor unit to step 2. The problem is solved. Do horizontal dark lines still appear on prints? b Remove, and then reinstall the photoconductor unit and the toner cartridge.

User Guide
Page 149
Note: You can also change the settings on your operating system, increase the toner darkness from the Printing Preferences or Print dialog. Step 3 Go to step 6. Is the print still too light? Step 4 Check if the paper has no ...
Note: You can also change the settings on your operating system, increase the toner darkness from the Printing Preferences or Print dialog. Step 3 Go to step 6. Is the print still too light? Step 4 Check if the paper has no ...
User Guide
Page 150
...4. Step 2 Go to step 2. Go to step 3. b Replace the photoconductor unit. No The problem is solved. Is the printer free of leaked toner? b Print a document. a From the home screen, touch Settings > Device > Preferences. The problem is affected. Action Yes No Step 1 Check the printer... for leaked toner contamination. Step 3 a Change the paper size and type in the Paper menu or adjust the size settings in the tray with plain paper. Step...
...4. Step 2 Go to step 2. Go to step 3. b Replace the photoconductor unit. No The problem is solved. Is the printer free of leaked toner? b Print a document. a From the home screen, touch Settings > Device > Preferences. The problem is affected. Action Yes No Step 1 Check the printer... for leaked toner contamination. Step 3 a Change the paper size and type in the Paper menu or adjust the size settings in the tray with plain paper. Step...
User Guide
Page 155
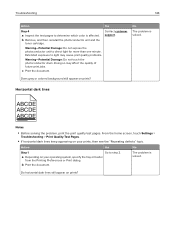
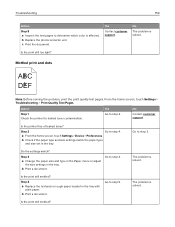
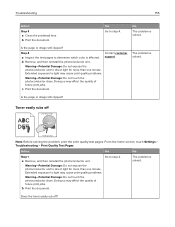
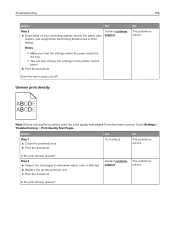
...of future print jobs. No The problem is solved. b Remove, and then reinstall the photoconductor unit. Is the page or image still clipped? Toner easily rubs off ? a Remove, and then reinstall the photoconductor unit. No The problem is solved. Is the page or image still clipped? Step...: Do not touch the photoconductor drum. Troubleshooting 155 Action Step 3 a Clean the printhead lens. support. b Print the document. Does the toner easily rub off ABC DEF Leading edge Trailing edge Note: Before solving the problem, print the print quality test pages.
...of future print jobs. No The problem is solved. b Remove, and then reinstall the photoconductor unit. Is the page or image still clipped? Toner easily rubs off ? a Remove, and then reinstall the photoconductor unit. No The problem is solved. Is the page or image still clipped? Step...: Do not touch the photoconductor drum. Troubleshooting 155 Action Step 3 a Clean the printhead lens. support. b Print the document. Does the toner easily rub off ABC DEF Leading edge Trailing edge Note: Before solving the problem, print the print quality test pages.
User Guide
Page 156
... operating system, specify the paper type, support. b Print the document. Troubleshooting 156 Action Yes Step 2 Contact customer a Depending on the printer control panel. Does the toner easily rub off? Action Yes No Step 1 a Clean the printhead lens.
... operating system, specify the paper type, support. b Print the document. Troubleshooting 156 Action Yes Step 2 Contact customer a Depending on the printer control panel. Does the toner easily rub off? Action Yes No Step 1 a Clean the printhead lens.
User Guide
Page 161
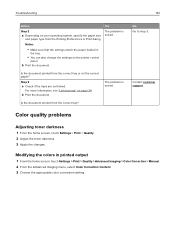
... from the correct tray? Is the document printed from the correct tray or on page 34. Color quality problems Adjusting toner darkness 1 From the home screen, touch Settings > Print > Quality. 2 Adjust the toner darkness. 3 Apply the changes. Step 3 a Check if the trays are not linked. The problem is a Depending on the printer...
... from the correct tray? Is the document printed from the correct tray or on page 34. Color quality problems Adjusting toner darkness 1 From the home screen, touch Settings > Print > Quality. 2 Adjust the toner darkness. 3 Apply the changes. Step 3 a Check if the trays are not linked. The problem is a Depending on the printer...


