

User Guide
Page 1
ProConnect® Series ProConnect® 8-Station KVM Switch Use this Guide to install: SVIEW08 v2 User Guide
ProConnect® Series ProConnect® 8-Station KVM Switch Use this Guide to install: SVIEW08 v2 User Guide

User Guide
Page 2
... PRODUCT, ITS ACCOMPANYING SOFTWARE, OR ITS DOCUMENTATION. Please direct all accompanying software, and specifically disclaims its products or the contents or use for assistance UG-SVIEW08 v2-10320NC KL FCC STATEMENT This product has been tested and complies with respect to Part 15 of this warranty period, call Linksys Customer Support in a residential installation. Microsoft, Windows, and the Windows logo are designed...
... PRODUCT, ITS ACCOMPANYING SOFTWARE, OR ITS DOCUMENTATION. Please direct all accompanying software, and specifically disclaims its products or the contents or use for assistance UG-SVIEW08 v2-10320NC KL FCC STATEMENT This product has been tested and complies with respect to Part 15 of this warranty period, call Linksys Customer Support in a residential installation. Microsoft, Windows, and the Windows logo are designed...

User Guide
Page 3
... ProConnect® 8-Station KVM Switch 5 Single Stage Installation 5 Two Stage Installation 6 Three Stage Installation 7 Using the ProConnect® 8-Station KVM Switch 10 Hot Plugging 10 Powering Off and Restarting 11 Port Selection 11 Port ID Numbering 12 Using the On-Screen Display 14 Overview 14 OSD Menu Navigation 15 OSD HotKey Navigation 15 The OSD Function Keys 16 OSD Security 21 Troubleshooting 22 Appendix 23 Computer Connection Table 23 Specifications...
... ProConnect® 8-Station KVM Switch 5 Single Stage Installation 5 Two Stage Installation 6 Three Stage Installation 7 Using the ProConnect® 8-Station KVM Switch 10 Hot Plugging 10 Powering Off and Restarting 11 Port Selection 11 Port ID Numbering 12 Using the On-Screen Display 14 Overview 14 OSD Menu Navigation 15 OSD HotKey Navigation 15 The OSD Function Keys 16 OSD Security 21 Troubleshooting 22 Appendix 23 Computer Connection Table 23 Specifications...
User Guide
Page 4
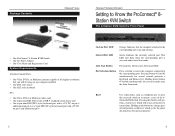
... to the corresponding port is accessed under Auto Scan mode. Selected Port LED Green. Package Contents ProConnect® Series ProConnect® 8-Station KVM Switch Getting to Know the ProConnect® 8Station KVM Switch The 8-Station KVM Switch's Front Panel • One ProConnect® 8-Station KVM Switch • One AC Power Adapter • One User Guide and Registration Card System Requirements 8-Station Console Ports: • One VGA, SVGA, or Multisync monitor capable of the 8Station KVM Switch. Reset Use a thin object, such...
... to the corresponding port is accessed under Auto Scan mode. Selected Port LED Green. Package Contents ProConnect® Series ProConnect® 8-Station KVM Switch Getting to Know the ProConnect® 8Station KVM Switch The 8-Station KVM Switch's Front Panel • One ProConnect® 8-Station KVM Switch • One AC Power Adapter • One User Guide and Registration Card System Requirements 8-Station Console Ports: • One VGA, SVGA, or Multisync monitor capable of the 8Station KVM Switch. Reset Use a thin object, such...

User Guide
Page 5
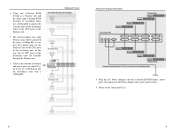
... ProConnect® Series Power Console ports CPU ports The Power Port is where you will be done in Single Station, Two Stage, or Three Stage Installation. You must also unplug the power cords or any computers that link the computers here. To prevent any PCs to the 8-Station KVM Switch, make sure that all of the KVM Switch being used as applicable) to 512 computers controlled. ProConnect® 8-Station KVM Switch Connecting...
... ProConnect® Series Power Console ports CPU ports The Power Port is where you will be done in Single Station, Two Stage, or Three Stage Installation. You must also unplug the power cords or any computers that link the computers here. To prevent any PCs to the 8-Station KVM Switch, make sure that all of the KVM Switch being used as applicable) to 512 computers controlled. ProConnect® 8-Station KVM Switch Connecting...

User Guide
Page 6
... use ProConnect® 8-Station KVM Switches when daisy-chaining them together. Power on the connected PC(s). It will create 64 open ports for controlling PCs. Plug the AC Power Adapters into the 8-Station KVM Switches' power ports, then plug each of 8-Station KVM Switches needed to control them , as Secondary units, use a Cabling Kit to connect the Console ports of the Secondary Units to a CPU port in the Appendix. Plug the AC Power Adapter into the 8-Station KVM Switch's power port...
... use ProConnect® 8-Station KVM Switches when daisy-chaining them together. Power on the connected PC(s). It will create 64 open ports for controlling PCs. Plug the AC Power Adapters into the 8-Station KVM Switches' power ports, then plug each of 8-Station KVM Switches needed to control them , as Secondary units, use a Cabling Kit to connect the Console ports of the Secondary Units to a CPU port in the Appendix. Plug the AC Power Adapter into the 8-Station KVM Switch's power port...
User Guide
Page 7
Power on the connected PC(s). 8 9 1. ProConnect® Series ProConnect® 8-Station KVM Switch 4. Connect the monitor, keyboard, and mouse ports of your PC(s), up to 64, to a CPU port in one 8-Station KVM Switch as a Primary unit and the other eight 8-Station KVM Switches as Secondary units, use a Cabling Kit to connect the Console ports of the Secondary Units to the CPU ports of the Secondary units are available through the Primary unit. 3. In...
Power on the connected PC(s). 8 9 1. ProConnect® Series ProConnect® 8-Station KVM Switch 4. Connect the monitor, keyboard, and mouse ports of your PC(s), up to 64, to a CPU port in one 8-Station KVM Switch as a Primary unit and the other eight 8-Station KVM Switches as Secondary units, use a Cabling Kit to connect the Console ports of the Secondary Units to the CPU ports of the Secondary units are available through the Primary unit. 3. In...

User Guide
Page 8
... the same time) to invoke the HotKey function. 2) Key in the Port ID number (as shown in again (to power down an 8-Station KVM Switch, you can be typed from the keyboard, instead of having to a different CPU port, the switch will immediately recognize the PC. When using the OSD function (as shown in the chain and working back to conveniently access any PCs...
... the same time) to invoke the HotKey function. 2) Key in the Port ID number (as shown in again (to power down an 8-Station KVM Switch, you can be typed from the keyboard, instead of having to a different CPU port, the switch will immediately recognize the PC. When using the OSD function (as shown in the chain and working back to conveniently access any PCs...

User Guide
Page 9
...] + [ALT] + [SHIFT] + 3 + [ENTER] 12 ProConnect® 8-Station KVM Switch 2. To access a PC attached to Port 1 of a Three Stage installation, where the PC is attached to Port 1 of a Third Stage (or Tertiary) unit that is cascaded down from Port 2 of the First Stage (or Primary) unit, key in turn , links back to a computer that links back to the Port ID number (as follows: [CTRL] + [ALT...
...] + [ALT] + [SHIFT] + 3 + [ENTER] 12 ProConnect® 8-Station KVM Switch 2. To access a PC attached to Port 1 of a Three Stage installation, where the PC is attached to Port 1 of a Third Stage (or Tertiary) unit that is cascaded down from Port 2 of the First Stage (or Primary) unit, key in turn , links back to a computer that links back to the Port ID number (as follows: [CTRL] + [ALT...
User Guide
Page 10
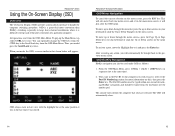
... will appear: OSD always starts in List view, with the highlight bar at the same time). 2. ProConnect® Series Using the On-Screen Display (OSD) Overview The On-Screen Display (OSD) provides a menu-driven interface to keep track of the port connection of invoking HotKey navigation and should be typed from the keyboard, not the number pad. To move up or...
... will appear: OSD always starts in List view, with the highlight bar at the same time). 2. ProConnect® Series Using the On-Screen Display (OSD) Overview The On-Screen Display (OSD) provides a menu-driven interface to keep track of the port connection of invoking HotKey navigation and should be typed from the keyboard, not the number pad. To move up or...

User Guide
Page 11
... making a choice, press the Escape key. 16 ProConnect® 8-Station KVM Switch • F2 (Scan) Pressing the F2 key initiates Quick View Scanning, in which ports the OSD lists. When you to switch directly to a port by either: a) Moving the Highlight Bar to configure and control the OSD. The submenu choices and their attached computers Powered ON. Lists only the ports that have been assigned names...
... making a choice, press the Escape key. 16 ProConnect® 8-Station KVM Switch • F2 (Scan) Pressing the F2 key initiates Quick View Scanning, in which ports the OSD lists. When you to switch directly to a port by either: a) Moving the Highlight Bar to configure and control the OSD. The submenu choices and their attached computers Powered ON. Lists only the ports that have been assigned names...

User Guide
Page 12
... the display dwells on the monitor after a port change a configuration setting: 1. Selects which choice is the CTRL key combination, but this case, the SCROLL LOCK option should be up the OSD configuration menu. and Locking/Unlocking the Console. • F4 (Quick View) ProConnect® Series Quick View allows you to select the ports you want , then press the Enter key. Type in Quick View Scan Mode. A port name can be given...
... the display dwells on the monitor after a port change a configuration setting: 1. Selects which choice is the CTRL key combination, but this case, the SCROLL LOCK option should be up the OSD configuration menu. and Locking/Unlocking the Console. • F4 (Quick View) ProConnect® Series Quick View allows you to select the ports you want , then press the Enter key. Type in Quick View Scan Mode. A port name can be given...

User Guide
Page 13
... ProConnect® Series Clear the Name List* Restore Default Values* Lock Console* Clears all settings from the Name list. FACTORY DEFAULT SETTINGS SETTING DEFAULT Display Duration Always On. To modify or delete a password: 1. To Delete the Password: Delete the password and press the Enter key To Modify the Password, Delete the previous password and type in length.) 4. Clears all Port Names from memory and returns the unit to confirm before completing the procedure. You are asked to the factory defaults. Type...
... ProConnect® Series Clear the Name List* Restore Default Values* Lock Console* Clears all settings from the Name list. FACTORY DEFAULT SETTINGS SETTING DEFAULT Display Duration Always On. To modify or delete a password: 1. To Delete the Password: Delete the password and press the Enter key To Modify the Password, Delete the previous password and type in length.) 4. Clears all Port Names from memory and returns the unit to confirm before completing the procedure. You are asked to the factory defaults. Type...

User Guide
Page 14
... Select switches to connect to a PC that is powered ON. 2) Check the cables to make sure they control: 22 23 Troubleshooting ProConnect® Series This section provides possible solutions to problems regarding the installation and operation of computers they are all properly connected. • There has been an improper keyboard reset. 1) Reset the keyboard (and mouse) simultaneously by pressing Buttons 1 and 2 on the 8-Station KVM Switch where...
... Select switches to connect to a PC that is powered ON. 2) Check the cables to make sure they control: 22 23 Troubleshooting ProConnect® Series This section provides possible solutions to problems regarding the installation and operation of computers they are all properly connected. • There has been an improper keyboard reset. 1) Reset the keyboard (and mouse) simultaneously by pressing Buttons 1 and 2 on the 8-Station KVM Switch where...
User Guide
Page 15
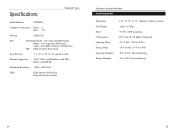
...) CPU: Eight 25-pin D Type female Scan Intervals 3, 5, 10, 15, 20, 30, 40, and 60 seconds Monitors Supported VGA, SVGA, and MultiSync with DDC, DDC2, and DDC2B Maximum Resolution 1920 x 1440 SVGA LEDs Eight Orange On-line Port Eight Green Selected Port ProConnect® 8-Station KVM Switch Environmental Dimensions: Unit Weight: Power: Certifications...14ºF to 140ºF) 10% to 85%, Non-Condensing 5% to 90%, Non-Condensing 24 25 Specifications ProConnect® Series Model Numbers SVIEW08 Computer Connections Direct: 8 Max: 512 Protocol CSMA/CD Ports Console:Keyboard -
...) CPU: Eight 25-pin D Type female Scan Intervals 3, 5, 10, 15, 20, 30, 40, and 60 seconds Monitors Supported VGA, SVGA, and MultiSync with DDC, DDC2, and DDC2B Maximum Resolution 1920 x 1440 SVGA LEDs Eight Orange On-line Port Eight Green Selected Port ProConnect® 8-Station KVM Switch Environmental Dimensions: Unit Weight: Power: Certifications...14ºF to 140ºF) 10% to 85%, Non-Condensing 5% to 90%, Non-Condensing 24 25 Specifications ProConnect® Series Model Numbers SVIEW08 Computer Connections Direct: 8 Max: 512 Protocol CSMA/CD Ports Console:Keyboard -
User Guide
Page 16
... CONSEQUENTIAL DAMAGES RESULTING FROM THE USE OF THE PRODUCT, ITS ACCOMPANYING SOFTWARE, OR ITS DOCUMENTATION. LINKSYS PAYS FOR UPS GROUND ONLY. LINKSYS DOES NOT OFFER REFUNDS FOR ANY PRODUCT. ProConnect® 8-Station KVM Switch Contact Information For help with the installation or operation of this product, contact Linksys Customer Support at one of the phone numbers or Internet addresses below. Sales Information Tech...
... CONSEQUENTIAL DAMAGES RESULTING FROM THE USE OF THE PRODUCT, ITS ACCOMPANYING SOFTWARE, OR ITS DOCUMENTATION. LINKSYS PAYS FOR UPS GROUND ONLY. LINKSYS DOES NOT OFFER REFUNDS FOR ANY PRODUCT. ProConnect® 8-Station KVM Switch Contact Information For help with the installation or operation of this product, contact Linksys Customer Support at one of the phone numbers or Internet addresses below. Sales Information Tech...


