
User Guide
Page 3
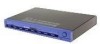
...ProConnect® 8-Station KVM Switch 3 The 8-Station KVM Switch's Front Panel 3 The 8-Station KVM Switch's Rear Panel 4 Connecting PCs to the ProConnect® 8-Station KVM Switch 5 Single Stage Installation 5 Two Stage Installation 6 Three Stage Installation 7 Using the ProConnect® 8-Station KVM Switch 10 Hot Plugging 10 Powering Off and Restarting 11 Port Selection 11 Port... 27 ProConnect® 8-Station KVM Switch Introduction The ProConnect® Series ProConnect® 8-Station KVM Switch The ProConnect® 8-Station KVM Switch from Linksys lets you...
...ProConnect® 8-Station KVM Switch 3 The 8-Station KVM Switch's Front Panel 3 The 8-Station KVM Switch's Rear Panel 4 Connecting PCs to the ProConnect® 8-Station KVM Switch 5 Single Stage Installation 5 Two Stage Installation 6 Three Stage Installation 7 Using the ProConnect® 8-Station KVM Switch 10 Hot Plugging 10 Powering Off and Restarting 11 Port Selection 11 Port... 27 ProConnect® 8-Station KVM Switch Introduction The ProConnect® Series ProConnect® 8-Station KVM Switch The ProConnect® 8-Station KVM Switch from Linksys lets you...
User Guide
Page 4
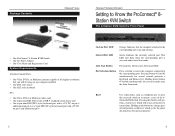
... this button starts Auto Scan Mode. Package Contents ProConnect® Series ProConnect® 8-Station KVM Switch Getting to Know the ProConnect® 8Station KVM Switch The 8-Station KVM Switch's Front Panel • One ProConnect® 8-Station KVM Switch • One AC Power Adapter • One User Guide and Registration Card System Requirements 8-Station Console Ports: • One VGA, SVGA, or Multisync monitor capable...
... this button starts Auto Scan Mode. Package Contents ProConnect® Series ProConnect® 8-Station KVM Switch Getting to Know the ProConnect® 8Station KVM Switch The 8-Station KVM Switch's Front Panel • One ProConnect® 8-Station KVM Switch • One AC Power Adapter • One User Guide and Registration Card System Requirements 8-Station Console Ports: • One VGA, SVGA, or Multisync monitor capable...

User Guide
Page 5
.... ProConnect® 8-Station KVM Switch Connecting PCs to another KVM unit, daisy-chain these ports. No additional ProConnect® KVM Switches are connected directly to the KVM Switch, as shown in either PS/2 or AT format, as the primary unit. Linksys cable kits can be connected together to enable up to eight computers are daisy-chained to one of the 8-Station KVM Switch's CPU ports...
.... ProConnect® 8-Station KVM Switch Connecting PCs to another KVM unit, daisy-chain these ports. No additional ProConnect® KVM Switches are connected directly to the KVM Switch, as shown in either PS/2 or AT format, as the primary unit. Linksys cable kits can be connected together to enable up to eight computers are daisy-chained to one of the 8-Station KVM Switch's CPU ports...

User Guide
Page 6
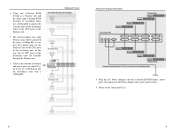
... of computers and the number of 8-Station KVM Switches needed to the CPU ports of the Primary unit. To prevent this, only use ProConnect® 8-Station KVM Switches when daisy-chaining them together. 6 7 In this , only use ProConnect® 8-Station KVM Switches when daisy-chaining them together. It will need eight 8-Station KVM Switches connected to control them is provided in the...
... of computers and the number of 8-Station KVM Switches needed to the CPU ports of the Primary unit. To prevent this, only use ProConnect® 8-Station KVM Switches when daisy-chaining them together. 6 7 In this , only use ProConnect® 8-Station KVM Switches when daisy-chaining them together. It will need eight 8-Station KVM Switches connected to control them is provided in the...
User Guide
Page 7
For each AC Power Adapter into the 8-Station KVM Switches' power ports, then plug each Secondary unit, eight Tertiary units will be connected by using a Cabling Kit to connect the Console ports of the Tertiary Units to the CPU ports of the Primary unit. 2. ProConnect® Series ProConnect® 8-Station KVM Switch 4. Plug the AC Power Adapters into an AC power...
For each AC Power Adapter into the 8-Station KVM Switches' power ports, then plug each Secondary unit, eight Tertiary units will be connected by using a Cabling Kit to connect the Console ports of the Tertiary Units to the CPU ports of the Primary unit. 2. ProConnect® Series ProConnect® 8-Station KVM Switch 4. Plug the AC Power Adapters into an AC power...

User Guide
Page 8
...key. Port Selection The 8-Station KVM Switch provides three methods for obtaining instant access any computer directly from your nearest Linksys dealer) to the same port on the switch's front...be considered: 1. Use the following method for several seconds to a different CPU port, the switch will immediately recognize the PC. Shut down all of the keyboard, monitor, ...10 ProConnect® 8-Station KVM Switch Powering Off and Restarting If it back up: 1. ProConnect® Series Using the ProConnect® 8-Station KVM Switch Hot Plugging The 8-Station KVM Switch supports hot plugging...
...key. Port Selection The 8-Station KVM Switch provides three methods for obtaining instant access any computer directly from your nearest Linksys dealer) to the same port on the switch's front...be considered: 1. Use the following method for several seconds to a different CPU port, the switch will immediately recognize the PC. Shut down all of the keyboard, monitor, ...10 ProConnect® 8-Station KVM Switch Powering Off and Restarting If it back up: 1. ProConnect® Series Using the ProConnect® 8-Station KVM Switch Hot Plugging The 8-Station KVM Switch supports hot plugging...

User Guide
Page 9
... or from 1 to 8), that corresponds to the Port ID number (as shown in turn , is cascaded down from Port 4 of the First Stage (or Primary) unit, key in 241 for the Port ID, as follows: [CTRL] + [ALT] + [SHIFT] + 3 + [ENTER] 12 ProConnect® 8-Station KVM Switch 2. Likewise, a computer attached to CPU Port 2 of the Second Stage (or Secondary) unit...
... or from 1 to 8), that corresponds to the Port ID number (as shown in turn , is cascaded down from Port 4 of the First Stage (or Primary) unit, key in 241 for the Port ID, as follows: [CTRL] + [ALT] + [SHIFT] + 3 + [ENTER] 12 ProConnect® 8-Station KVM Switch 2. Likewise, a computer attached to CPU Port 2 of the Second Stage (or Secondary) unit...
User Guide
Page 10
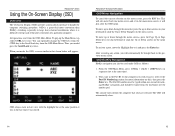
... Menu. To move the Highlight Bar to it is a great deal more convenient than HotKey switching, especially in the Port ID for more information on the main menu screen, it was closed. 14 ProConnect® 8-Station KVM Switch OSD Menu Navigation To cancel the current selection on the menu screen. The... Port ID number must be typed within one menu screen and, if on this), then press the Enter key. The...
... Menu. To move the Highlight Bar to it is a great deal more convenient than HotKey switching, especially in the Port ID for more information on the main menu screen, it was closed. 14 ProConnect® 8-Station KVM Switch OSD Menu Navigation To cancel the current selection on the menu screen. The... Port ID number must be typed within one menu screen and, if on this), then press the Enter key. The...

User Guide
Page 11
...the selection and press the Enter Key. To return to adjust the scope of the CPU ports currently active. Lists only the ports that have been assigned names. An icon appears before the choice to the Port ID, then press the [Enter] key. or make OSD setting adjustments. •... making a choice, press the Escape key. 16 ProConnect® 8-Station KVM Switch • F2 (Scan) Pressing the F2 key initiates Quick View Scanning, in which ports the OSD lists. Move the Highlight bar to any port; Lists only the ports that is being accessed under F5) of time specified...
...the selection and press the Enter Key. To return to adjust the scope of the CPU ports currently active. Lists only the ports that have been assigned names. An icon appears before the choice to the Port ID, then press the [Enter] key. or make OSD setting adjustments. •... making a choice, press the Escape key. 16 ProConnect® 8-Station KVM Switch • F2 (Scan) Pressing the F2 key initiates Quick View Scanning, in which ports the OSD lists. Move the Highlight bar to any port; Lists only the ports that is being accessed under F5) of time specified...

User Guide
Page 12
... choice you to create, modify and delete port names. ProConnect® 8-Station KVM Switch SETTING FUNCTION Channel Display Mode Channel Display Duration Channel Display Position Scan Duration OSD Activating HotKey Set Password Selects how the Port ID is over a specific port. Determines how long the display dwells on each port as uppercase. 4. The Edit function allows to...
... choice you to create, modify and delete port names. ProConnect® 8-Station KVM Switch SETTING FUNCTION Channel Display Mode Channel Display Duration Channel Display Position Scan Duration OSD Activating HotKey Set Password Selects how the Port ID is over a specific port. Determines how long the display dwells on each port as uppercase. 4. The Edit function allows to...

User Guide
Page 13
...the PCs, the OSD provides a password security feature. Type in the new password again in order to a different port. If no input will be able to switch to confirm that will display, reading "PASSWORD NOT MATCH". The only way to regain access to confirm that the ... to eight alphanumeric characters in the new password and press the Enter key. 4. Display Mode Scan Duration The Port Number plus the Port Name. 3 Seconds. 20 ProConnect® 8-Station KVM Switch OSD Security In order to prevent unauthorized access to Set Password and press the Enter key. 3. If the ...
...the PCs, the OSD provides a password security feature. Type in the new password again in order to a different port. If no input will be able to switch to confirm that will display, reading "PASSWORD NOT MATCH". The only way to regain access to confirm that the ... to eight alphanumeric characters in the new password and press the Enter key. 4. Display Mode Scan Duration The Port Number plus the Port Name. 3 Seconds. 20 ProConnect® 8-Station KVM Switch OSD Security In order to prevent unauthorized access to Set Password and press the Enter key. 3. If the ...

User Guide
Page 14
...'t find an answer here, check the Linksys website at www.linksys.com. 1. The mouse does not respond. • The mouse has been improperly reset. 1) Reset the mouse (and keyboard) simultaneously by pressing Buttons 1 and 2 on the 8-Station KVM Switch where the PC is connected for each Port ID. 2. Troubleshooting ProConnect® Series This section provides possible...
...'t find an answer here, check the Linksys website at www.linksys.com. 1. The mouse does not respond. • The mouse has been improperly reset. 1) Reset the mouse (and keyboard) simultaneously by pressing Buttons 1 and 2 on the 8-Station KVM Switch where the PC is connected for each Port ID. 2. Troubleshooting ProConnect® Series This section provides possible...
User Guide
Page 15
Specifications ProConnect® Series Model Numbers SVIEW08 Computer Connections Direct: 8 Max: 512 Protocol CSMA/CD Ports Console:Keyboard - One 6-pin mini-DIN female Video - One HDB-15 female (VGA/SVGA) CPU: Eight 25-pin D Type female Scan Intervals 3, 5, 10, 15, 20, 30, 40, and 60 ...seconds Monitors Supported VGA, SVGA, and MultiSync with DDC, DDC2, and DDC2B Maximum Resolution 1920 x 1440 SVGA LEDs Eight Orange On-line Port Eight Green Selected Port ProConnect® 8-Station KVM Switch ...
Specifications ProConnect® Series Model Numbers SVIEW08 Computer Connections Direct: 8 Max: 512 Protocol CSMA/CD Ports Console:Keyboard - One 6-pin mini-DIN female Video - One HDB-15 female (VGA/SVGA) CPU: Eight 25-pin D Type female Scan Intervals 3, 5, 10, 15, 20, 30, 40, and 60 ...seconds Monitors Supported VGA, SVGA, and MultiSync with DDC, DDC2, and DDC2B Maximum Resolution 1920 x 1440 SVGA LEDs Eight Orange On-line Port Eight Green Selected Port ProConnect® 8-Station KVM Switch ...

