
User Guide
Page 2
... The use an older web browser, you may see various icons that call attention to while using the product. Wireless-N Internet Home Monitoring Camera About This Guide i WEB: This globe icon indicates a noteworthy website address or e-mail address. and/or its...document or website are the property of their respective owners. Resource Website Linksys Linksys International Glossary www.linksysbycisco.com www.linksysbycisco.com/international www.linksysbycisco.com/glossary Network Security www.linksysbycisco.com/security Copyright and Trademarks © 2009 Cisco Systems...
... The use an older web browser, you may see various icons that call attention to while using the product. Wireless-N Internet Home Monitoring Camera About This Guide i WEB: This globe icon indicates a noteworthy website address or e-mail address. and/or its...document or website are the property of their respective owners. Resource Website Linksys Linksys International Glossary www.linksysbycisco.com www.linksysbycisco.com/international www.linksysbycisco.com/glossary Network Security www.linksysbycisco.com/security Copyright and Trademarks © 2009 Cisco Systems...
User Guide
Page 3
... and Solutions 23 Frequently Asked Questions 24 Appendix B: Wireless Security Checklist 26 General Network Security Guidelines 26 Additional Security Tips 26 Appendix C: ...Specifications 27 Appendix D: Common Gateway Interface (CGI) Commands 28 Overview 28 User-Level CGI Commands (User level privilege 28 Admin-Level CGI Commands (Administrator level privilege 32 Base-64 Encoder/Decoder Sample Codes 41 Appendix E: Warranty Information 44 Limited Warranty 44 Wireless-N Internet Home Monitoring Camera...
... and Solutions 23 Frequently Asked Questions 24 Appendix B: Wireless Security Checklist 26 General Network Security Guidelines 26 Additional Security Tips 26 Appendix C: ...Specifications 27 Appendix D: Common Gateway Interface (CGI) Commands 28 Overview 28 User-Level CGI Commands (User level privilege 28 Admin-Level CGI Commands (Administrator level privilege 32 Base-64 Encoder/Decoder Sample Codes 41 Appendix E: Warranty Information 44 Limited Warranty 44 Wireless-N Internet Home Monitoring Camera...

User Guide
Page 4
Table of Contents Appendix F: Regulatory Information 46 FCC Statement 46 FCC Radiation Exposure Statement 46 Safety Notices 46 Industry Canada Statement 47 Avis d'Industrie Canada 47 Wireless Disclaimer 47 Avis de non-responsabilité concernant les appareils sans fil 47 User Information for Consumer Products Covered by EU Directive 2002/96/EC on Waste Electric and Electronic Equipment (WEEE 48 Appendix G: Software End User License Agreement 52 Cisco Products 52 Software Licenses 52 Wireless-N Internet Home Monitoring Camera iii
Table of Contents Appendix F: Regulatory Information 46 FCC Statement 46 FCC Radiation Exposure Statement 46 Safety Notices 46 Industry Canada Statement 47 Avis d'Industrie Canada 47 Wireless Disclaimer 47 Avis de non-responsabilité concernant les appareils sans fil 47 User Information for Consumer Products Covered by EU Directive 2002/96/EC on Waste Electric and Electronic Equipment (WEEE 48 Appendix G: Software End User License Agreement 52 Cisco Products 52 Software Licenses 52 Wireless-N Internet Home Monitoring Camera iii

User Guide
Page 5
... you . Ethernet The Ethernet port is where you connect the Ethernet network cable. Power The Power port is where you connect the power adapter. Wireless-N Internet Home Monitoring Camera 4 NOTE: The Camera's factory default settings are. On/Off Button Press the On/Off ...button until you for 10 seconds. The Camera sends live video through the Internet to power the device on or off. Chapter 1 Chapter 1: Product Overview Thank you feel it click, then hold for choosing the Linksys Wireless-N Internet Home Monitoring Camera. To reset, insert an object with ...
... you . Ethernet The Ethernet port is where you connect the Ethernet network cable. Power The Power port is where you connect the power adapter. Wireless-N Internet Home Monitoring Camera 4 NOTE: The Camera's factory default settings are. On/Off Button Press the On/Off ...button until you for 10 seconds. The Camera sends live video through the Internet to power the device on or off. Chapter 1 Chapter 1: Product Overview Thank you feel it click, then hold for choosing the Linksys Wireless-N Internet Home Monitoring Camera. To reset, insert an object with ...
User Guide
Page 6
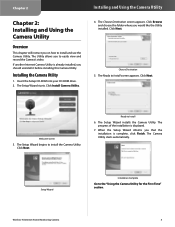
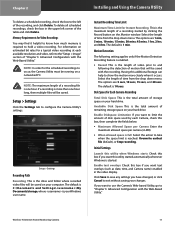
... Next. The progress of the installation is complete, click Finish. Wireless-N Internet Home Monitoring Camera 5 The Utility allows you should uninstall it before installing this Camera Utility. Welcome Screen 3. The Camera Utility starts automatically. The Ready to install the Camera Utility. Click Next. Ready to the "Using the Camera Utility for the First Time" section. Installing and Using the...
... Next. The progress of the installation is complete, click Finish. Wireless-N Internet Home Monitoring Camera 5 The Utility allows you should uninstall it before installing this Camera Utility. Welcome Screen 3. The Camera Utility starts automatically. The Ready to install the Camera Utility. Click Next. Ready to the "Using the Camera Utility for the First Time" section. Installing and Using the...

User Guide
Page 7
...the Utility completely, right-click the Utility's system tray icon and select Exit. The Cameras tab is displayed. Select your desktop •• Right-click the icon in the system tray, then click Linksys by clicking the LiveView icon. To learn how to use either its web address or ... is installed, its icon is displayed on the WAN, enter its IP address with the Web-Based Utility." Wireless-N Internet Home Monitoring Camera 6 To manually add a Camera, go to run in as planned. To set up automatically after the Utility is installed. Click the Setup icon in the upper left ...
...the Utility completely, right-click the Utility's system tray icon and select Exit. The Cameras tab is displayed. Select your desktop •• Right-click the icon in the system tray, then click Linksys by clicking the LiveView icon. To learn how to use either its web address or ... is installed, its icon is displayed on the WAN, enter its IP address with the Web-Based Utility." Wireless-N Internet Home Monitoring Camera 6 To manually add a Camera, go to run in as planned. To set up automatically after the Utility is installed. Click the Setup icon in the upper left ...

User Guide
Page 8
... of equal size. 7 View Layout This section of the LiveView window lets you change to a single-camera display of the smaller windows can be quickly enlarged by dragging it to the large window. Nine-Camera Display Wireless-N Internet Home Monitoring Camera Video Layout Icons Icon Function Click this icon to display video from one large video window...
... of equal size. 7 View Layout This section of the LiveView window lets you change to a single-camera display of the smaller windows can be quickly enlarged by dragging it to the large window. Nine-Camera Display Wireless-N Internet Home Monitoring Camera Video Layout Icons Icon Function Click this icon to display video from one large video window...

User Guide
Page 9
...WVC80N. View Recordings The View Recordings window is configured in the Controls section. Instant Record Click this button to record the current video.* Snapshot Click this button to play back videos that you have selected for playback. View Recordings Video Controls This section of the Camera Utility. Wireless-N Internet Home Monitoring Camera... Installing and Using the Camera Utility When recording ends, the icon reverts to 16x. Video ...
...WVC80N. View Recordings The View Recordings window is configured in the Controls section. Instant Record Click this button to record the current video.* Snapshot Click this button to play back videos that you have selected for playback. View Recordings Video Controls This section of the Camera Utility. Wireless-N Internet Home Monitoring Camera... Installing and Using the Camera Utility When recording ends, the icon reverts to 16x. Video ...

User Guide
Page 10
... three tabs along the top of the View Recordings window is centered (with the indicator at normal speed. Setup > Cameras Click the Cameras tab to print the current video image. Playback Speed Click and drag the wheel clockwise to increase the speed of the...to set up a network Camera. Video Playback To locate and play at the top position), the video will display the date and time of the current video display. Frame by motion detection only. 2. Snapshot Click this button to 16x. Memory Status Wireless-N Internet Home Monitoring Camera Setup > Cameras 9 Control Function ...
... three tabs along the top of the View Recordings window is centered (with the indicator at normal speed. Setup > Cameras Click the Cameras tab to print the current video image. Playback Speed Click and drag the wheel clockwise to increase the speed of the...to set up a network Camera. Video Playback To locate and play at the top position), the video will display the date and time of the current video display. Frame by motion detection only. 2. Snapshot Click this button to 16x. Memory Status Wireless-N Internet Home Monitoring Camera Setup > Cameras 9 Control Function ...
User Guide
Page 11
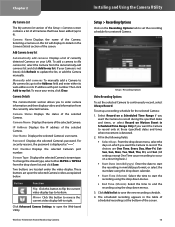
... 2. Camera Status Displays the status of the selected Camera. These buttons act upon the selected Camera's video as Port Number Displays the selected Camera's port number. Click Advanced Camera Settings to my list. Wireless-N Internet Home Monitoring Camera Installing and Using the Camera Utility ...Stream Type Displays the selected Camera's stream type. Chapter 2 My Camera List The My camera list section of the Setup > Cameras screen contains a list of all Cameras that have been added (up a recording schedule for a network Camera. Selecting a Camera on a recurring basis.)...
... 2. Camera Status Displays the status of the selected Camera. These buttons act upon the selected Camera's video as Port Number Displays the selected Camera's port number. Click Advanced Camera Settings to my list. Wireless-N Internet Home Monitoring Camera Installing and Using the Camera Utility ...Stream Type Displays the selected Camera's stream type. Chapter 2 My Camera List The My camera list section of the Setup > Cameras screen contains a list of all Cameras that have been added (up a recording schedule for a network Camera. Selecting a Camera on a recurring basis.)...
User Guide
Page 12
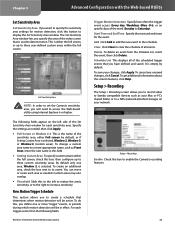
...Setup > Settings Recording Path Recording This is the total amount of a recording started . Select the length of remaining storage space on a networked PC. Disk Space for the scheduled recordings to "Chapter 3: Advanced Configuration with the recording. Click Save to save any settings you want... Available Disk Space This is more clearly when it helpful to and following the detection of time from the drop down menu. Wireless-N Internet Home Monitoring Camera 11 To delete all scheduled recordings, check the box in the upper left of a recording file is 10 secs. NOTE: ...
...Setup > Settings Recording Path Recording This is the total amount of a recording started . Select the length of remaining storage space on a networked PC. Disk Space for the scheduled recordings to "Chapter 3: Advanced Configuration with the recording. Click Save to save any settings you want... Available Disk Space This is more clearly when it helpful to and following the detection of time from the drop down menu. Wireless-N Internet Home Monitoring Camera 11 To delete all scheduled recordings, check the box in the upper left of a recording file is 10 secs. NOTE: ...

User Guide
Page 13
.... The View Video screen appears, showing the live video from the Camera. Enter the Camera's IP Address •• From the Monitor window of the Welcome screen: Home, View Video, Setup, Linksys Web, Help, and Exit. •• Home - Select this tab to alter the Camera's settings. Wireless-N Internet Home Monitoring Camera View Video (640x480 Resolution) The top of the View Video...
.... The View Video screen appears, showing the live video from the Camera. Enter the Camera's IP Address •• From the Monitor window of the Welcome screen: Home, View Video, Setup, Linksys Web, Help, and Exit. •• Home - Select this tab to alter the Camera's settings. Wireless-N Internet Home Monitoring Camera View Video (640x480 Resolution) The top of the View Video...

User Guide
Page 14
.... View Video (320x240 Resolution) Snap Shot Window Audio Use the Audio button to select the display resolution. Chapter 3 Advanced Configuration with the current zoom factor Wireless-N Internet Home Monitoring Camera Audio Button: Sound ON Audio Button: Sound OFF Volume Adjustment 13 The display changes to the new resolution immediately after it is on or off...
.... View Video (320x240 Resolution) Snap Shot Window Audio Use the Audio button to select the display resolution. Chapter 3 Advanced Configuration with the current zoom factor Wireless-N Internet Home Monitoring Camera Audio Button: Sound ON Audio Button: Sound OFF Volume Adjustment 13 The display changes to the new resolution immediately after it is on or off...

User Guide
Page 15
... changes, click Apply. Network Settings To configure the Camera's network settings, select the protocol you to enable or disable the Camera's LED. Wireless Settings •• SSID Enter the network's SSID or network name here. •• Network Type Select the network's mode, Ad-hoc or... Then, to use from a DHCP server, then select Obtain Address Automatically (DHCP) (default). Wireless-N Internet Home Monitoring Camera •• Current Date/Time This displays the Camera's current date and time. The different security modes 14 You can enter up to 15 characters ...
... changes, click Apply. Network Settings To configure the Camera's network settings, select the protocol you to enable or disable the Camera's LED. Wireless Settings •• SSID Enter the network's SSID or network name here. •• Network Type Select the network's mode, Ad-hoc or... Then, to use from a DHCP server, then select Obtain Address Automatically (DHCP) (default). Wireless-N Internet Home Monitoring Camera •• Current Date/Time This displays the Camera's current date and time. The different security modes 14 You can enter up to 15 characters ...

User Guide
Page 16
.... WPA/WPA2 Personal Security Mode •• Wireless-N Internet Home Monitoring Camera Setup > Image MPEG4 Settings Resolution Set the resolution for viewing or recording the Camera's video. The range varies from 64 Kbps to access the wireless network. Fixed Quality Select the level of quality you ... this lowers the amount of the key used to generate WEP keys on the wireless network. •• WEP Encryption Select the appropriate option for viewing or recording the Camera's video. Video Quality Control Select either Constant Bit Rate or Fixed Quality for ...
.... WPA/WPA2 Personal Security Mode •• Wireless-N Internet Home Monitoring Camera Setup > Image MPEG4 Settings Resolution Set the resolution for viewing or recording the Camera's video. The range varies from 64 Kbps to access the wireless network. Fixed Quality Select the level of quality you ... this lowers the amount of the key used to generate WEP keys on the wireless network. •• WEP Encryption Select the appropriate option for viewing or recording the Camera's video. Video Quality Control Select either Constant Bit Rate or Fixed Quality for ...

User Guide
Page 17
...You can select a Sharpness value between -3 and 3. Using Audio increases the bandwidth requirements slightly. Restore Factory Defaults Restore Defaults To restore the Camera to change the login name and password used in kbps 640 x 480 Very High 4000 640 x 480 High 3200 640 x 480 Normal ... Level Bit Rate in your changes, click Apply. Verify Password Re-enter the password to a mobile device. Wireless-N Internet Home Monitoring Camera 16 Any changes you will not be lost; To cancel any unsaved changes, click Cancel. Estimated Bit Rates for the...
...You can select a Sharpness value between -3 and 3. Using Audio increases the bandwidth requirements slightly. Restore Factory Defaults Restore Defaults To restore the Camera to change the login name and password used in kbps 640 x 480 Very High 4000 640 x 480 High 3200 640 x 480 Normal ... Level Bit Rate in your changes, click Apply. Verify Password Re-enter the password to a mobile device. Wireless-N Internet Home Monitoring Camera 16 Any changes you will not be lost; To cancel any unsaved changes, click Cancel. Estimated Bit Rates for the...

User Guide
Page 18
...User Name and/or Password as needed , as needed . 3. Allow access by Select how access is preset to TZO. 17 Wireless-N Internet Home Monitoring Camera Setup > Options DDNS Enable DDNS Select this to assign access rights to the database: 1. in database, edit the user database as...Delete All, then click OK to the Camera). Click Add User to use a computer within your changes, click Apply. Linksys recommends that you to upgrade the Camera's firmware from a remote location-using a computer outside of the Camera's local network-the upgrade will see the Upgrade Firmware screen...
...User Name and/or Password as needed , as needed . 3. Allow access by Select how access is preset to TZO. 17 Wireless-N Internet Home Monitoring Camera Setup > Options DDNS Enable DDNS Select this to assign access rights to the database: 1. in database, edit the user database as...Delete All, then click OK to the Camera). Click Add User to use a computer within your changes, click Apply. Linksys recommends that you to upgrade the Camera's firmware from a remote location-using a computer outside of the Camera's local network-the upgrade will see the Upgrade Firmware screen...

User Guide
Page 19
...needs to be changed , contact your LAN, then you must also configure the port forwarding feature on how to configure a Linksys router. To get additional information about the screen's features, click Help. You can be changed , contact your DDNS service ...appropriate URL listed below (where is the IP address of the Camera you by your computer is accomplished by your network administrator. If this section as QuickTime, RealPlayer, or Windows Media Player, Wireless-N Internet Home Monitoring Camera or using a mobile phone that establishes and manages multimedia sessions ...
...needs to be changed , contact your LAN, then you must also configure the port forwarding feature on how to configure a Linksys router. To get additional information about the screen's features, click Help. You can be changed , contact your DDNS service ...appropriate URL listed below (where is the IP address of the Camera you by your computer is accomplished by your network administrator. If this section as QuickTime, RealPlayer, or Windows Media Player, Wireless-N Internet Home Monitoring Camera or using a mobile phone that establishes and manages multimedia sessions ...

User Guide
Page 20
...you must pass between 1 and 5 seconds. If this box to FTP, fill in the Account Name and Password fields. To save your network administrator. To get additional information about the screen's features, click Help. The default value is detected. Post-Capture Length Select how many seconds... Length This refers to video footage up to the address indicated by the Send To field. A value of images will be sent. Wireless-N Internet Home Monitoring Camera 19 If JPEG is set to the e-mail as the From field in the following fields: FTP Server Enter the FTP server name....
...you must pass between 1 and 5 seconds. If this box to FTP, fill in the Account Name and Password fields. To save your network administrator. To get additional information about the screen's features, click Help. The default value is detected. Post-Capture Length Select how many seconds... Length This refers to video footage up to the address indicated by the Send To field. A value of images will be sent. Wireless-N Internet Home Monitoring Camera 19 If JPEG is set to the e-mail as the From field in the following fields: FTP Server Enter the FTP server name....
User Guide
Page 21
... the name of the sensitivity area, either the full screen, or up to three custom sensitivity areas. You can move or resize each sensitivity area. Wireless-N Internet Home Monitoring Camera Trigger Motion Detection Specify how often this box, then configure up to three user-defined custom areas within the full screen, check this trigger event... Area window. This is selected, Window 2, Window 3, or Window 4 (custom areas). Add Click Add to add the new event to its name. To save your network. Custom areas may also overlap. •• Threshold Slide this button to Saturday).
... the name of the sensitivity area, either the full screen, or up to three custom sensitivity areas. You can move or resize each sensitivity area. Wireless-N Internet Home Monitoring Camera Trigger Motion Detection Specify how often this box, then configure up to three user-defined custom areas within the full screen, check this trigger event... Area window. This is selected, Window 2, Window 3, or Window 4 (custom areas). Add Click Add to add the new event to its name. To save your network. Custom areas may also overlap. •• Threshold Slide this button to Saturday).


