User Guide
Page 5
Hardware Setup 2-1 Quick Components Guide 2-2 Central Processing Unit: CPU 2-3 CPU Installation Procedures for Socket 939 2-4 Installing AMD Athlon64 CPU Cooler Set 2-5 Memory ...2-7 Introduction to DDR SDRAM 2-7 DIMM Module Combination 2-7 Recommended Memory Combination List 2-8 Installing DDR... / SFAN1 / SFAN2 / NBFAN1 2-16 Hard Disk Connectors: IDE1/IDE2 2-17 Chassis Intrusion Switch Connectors: JCI1 2-17 Serial ATA/Serial ATA RAID Connectors controlled by nForce4 Ultra/Standard: SATA1/SATA2/SATA3/SATA4 2-18 CD-In Connector: JCD1 2-18 Front Panel Connectors: JFP1 / JFP2 2-19...
Hardware Setup 2-1 Quick Components Guide 2-2 Central Processing Unit: CPU 2-3 CPU Installation Procedures for Socket 939 2-4 Installing AMD Athlon64 CPU Cooler Set 2-5 Memory ...2-7 Introduction to DDR SDRAM 2-7 DIMM Module Combination 2-7 Recommended Memory Combination List 2-8 Installing DDR... / SFAN1 / SFAN2 / NBFAN1 2-16 Hard Disk Connectors: IDE1/IDE2 2-17 Chassis Intrusion Switch Connectors: JCI1 2-17 Serial ATA/Serial ATA RAID Connectors controlled by nForce4 Ultra/Standard: SATA1/SATA2/SATA3/SATA4 2-18 CD-In Connector: JCD1 2-18 Front Panel Connectors: JFP1 / JFP2 2-19...

User Guide
Page 7
... 5-3 Setting Up the NVRAID BIOS 5-3 NVIDIA RAID Untility Installation 5-7 Installing the RAID Driver (for bootable RAID Array 5-7 Installing the NVIDIA RAID Software Under W indows (for Non-bootable RAID Array 5-9 Initializing and Using the Disk Array 5-10 RAID Drives Management 5-12 Viewing RAID Array Configurations 5-12 Setting Up a Spare RAID Disk 5-14 Rebuilding a RAID Mirrored Array 5-20 Chapter 6. Audio Speaker...
... 5-3 Setting Up the NVRAID BIOS 5-3 NVIDIA RAID Untility Installation 5-7 Installing the RAID Driver (for bootable RAID Array 5-7 Installing the NVIDIA RAID Software Under W indows (for Non-bootable RAID Array 5-9 Initializing and Using the Disk Array 5-10 RAID Drives Management 5-12 Viewing RAID Array Configurations 5-12 Setting Up a Spare RAID Disk 5-14 Rebuilding a RAID Mirrored Array 5-20 Chapter 6. Audio Speaker...

User Guide
Page 11
... is up to two 1394 ports (rear panel x 1, pinheader x 1). RAID function available for PATA+SATA H/D drives Gigabit LAN † Supports one LAN jacks - Direct Sound AC97 audio - 7.1 Channel output On-Board Peripherals † On-Board ..., 720K, 1.2M, 1.44M and 2.88Mbytes - 1 serial port - 1 parallel port supporting SPP/EPP/ECP mode - 1 Audio jack(5-in the rear I/O, 6 ports via the external bracket NV RAID (Software) † Supports up to 400Mbps Audio † Chip integrated by Marvell 88E1111 IEEE 1394 (Optional) † Supports up to 4 SATA and 4 ATA133 Hard drives...
... is up to two 1394 ports (rear panel x 1, pinheader x 1). RAID function available for PATA+SATA H/D drives Gigabit LAN † Supports one LAN jacks - Direct Sound AC97 audio - 7.1 Channel output On-Board Peripherals † On-Board ..., 720K, 1.2M, 1.44M and 2.88Mbytes - 1 serial port - 1 parallel port supporting SPP/EPP/ECP mode - 1 Audio jack(5-in the rear I/O, 6 ports via the external bracket NV RAID (Software) † Supports up to 400Mbps Audio † Chip integrated by Marvell 88E1111 IEEE 1394 (Optional) † Supports up to 4 SATA and 4 ATA133 Hard drives...

User Guide
Page 12
...installation CD must be created before attempting to the following website: http://www.microsoft.com/windows2000/downloads/ servicepacks/sp4/HFdeploy.htm 1-4 To create a bootable RAID volume for a Windows 2000 environment, Microsoft's Windows 2000 Service Pack 4 (SP4) is only available for Windows 2000 and Windows XP. 2. Dimension ...† ATX Form Factor (30.4 cm X 24.4 cm) Mounting † 9 mounting holes MSI Reminds You... 1. To create the combination installation CD, please refer to install the operating system onto the bootable...
...installation CD must be created before attempting to the following website: http://www.microsoft.com/windows2000/downloads/ servicepacks/sp4/HFdeploy.htm 1-4 To create a bootable RAID volume for a Windows 2000 environment, Microsoft's Windows 2000 Service Pack 4 (SP4) is only available for Windows 2000 and Windows XP. 2. Dimension ...† ATX Form Factor (30.4 cm X 24.4 cm) Mounting † 9 mounting holes MSI Reminds You... 1. To create the combination installation CD, please refer to install the operating system onto the bootable...

User Guide
Page 14
M S-7125 ATX M ainboard Packing Contents MSI motherboard MSI Driver/Utility CD SATA RAID Driver Diskette SATA Cable (Optional) Power Cable D-Bracket 2 (Optional) Round Cable of IDE Devices (Optional) Round Cable of Floppy Disk (Optional) 1394 Cable (Optional) Back IO Shield User's Guide 1-6
M S-7125 ATX M ainboard Packing Contents MSI motherboard MSI Driver/Utility CD SATA RAID Driver Diskette SATA Cable (Optional) Power Cable D-Bracket 2 (Optional) Round Cable of IDE Devices (Optional) Round Cable of Floppy Disk (Optional) 1394 Cable (Optional) Back IO Shield User's Guide 1-6

User Guide
Page 32
...is nForce4 Ultra which will cause the loss of 150MB/s. Each Serial ATA connector can connect to the hard disk devices MSI Reminds You... Please refer to the nVidia RAID Introduction for CD-ROM audio connector. Please do not fold the serial ATA cable in a 90-degree angle, which supports... four serial ATA connectors SATA1~SATA4. M S-7125 ATX M ainboard Seri al ATA/ Seri al ATA RAID Con n ecto rs co ntro ll ed b y nForce4 Ultra: SATA1 / SATA2 / SATA3 / SATA4 The Southbridge of this mainboard is for detailed software installation...
...is nForce4 Ultra which will cause the loss of 150MB/s. Each Serial ATA connector can connect to the hard disk devices MSI Reminds You... Please refer to the nVidia RAID Introduction for CD-ROM audio connector. Please do not fold the serial ATA cable in a 90-degree angle, which supports... four serial ATA connectors SATA1~SATA4. M S-7125 ATX M ainboard Seri al ATA/ Seri al ATA RAID Con n ecto rs co ntro ll ed b y nForce4 Ultra: SATA1 / SATA2 / SATA3 / SATA4 The Southbridge of this mainboard is for detailed software installation...

User Guide
Page 55
... setting is used to support both USB 1.1 and 2.0 spec. Setting options: [Disabled], [V1.1], [V1.1+V2.0]. Setting options: [Disabled], [Enabled]. Setting options: [Enabled], [Disabled]. OnBoard Sil3114 RAID This setting controls the onboard Sil3114 RAID chip. Setting options: [Enabled], [Disabled]. 3-14
... setting is used to support both USB 1.1 and 2.0 spec. Setting options: [Disabled], [V1.1], [V1.1+V2.0]. Setting options: [Disabled], [Enabled]. Setting options: [Enabled], [Disabled]. OnBoard Sil3114 RAID This setting controls the onboard Sil3114 RAID chip. Setting options: [Enabled], [Disabled]. 3-14

User Guide
Page 59
...set to enable and the following screen appears: RAID Enabled This item is used to enable/disable the onchip RAID function. Setting options: [Enabled], [Disabled]. IDE Primary/Secondary Master/Slave RAID This feature allows users to enable or disable the RAID function for serial port 2. Setting options: ...Infrared Port [ASKIR] Amplitude Shift Keyed Infrared Port SATA Devices Configuration Press to enable or disable the RAID function for each IDE hard disk drive. SATA 1/2/3/4 RAID This feature allows users to enter the sub-menu and the following fields will be selectabled.
...set to enable and the following screen appears: RAID Enabled This item is used to enable/disable the onchip RAID function. Setting options: [Enabled], [Disabled]. IDE Primary/Secondary Master/Slave RAID This feature allows users to enable or disable the RAID function for serial port 2. Setting options: ...Infrared Port [ASKIR] Amplitude Shift Keyed Infrared Port SATA Devices Configuration Press to enable or disable the RAID function for each IDE hard disk drive. SATA 1/2/3/4 RAID This feature allows users to enter the sub-menu and the following fields will be selectabled.

User Guide
Page 91
For all levels, RAID techniques optimize storage solutions by the world's leading businesses-to offer data protection. nVIDIA RAID Introduction Chapter 5. nVidia RAID Introduction nVidia RAID Introduction NVIDIA brings Redundant Array of Independent Disks (RAID) technology-which is used by using multiple disks grouped together and treating them as a single storage resource. 5-1 This technology uses multiple drives to either increase total disk space or to the common PC desktop.
For all levels, RAID techniques optimize storage solutions by the world's leading businesses-to offer data protection. nVIDIA RAID Introduction Chapter 5. nVidia RAID Introduction nVidia RAID Introduction NVIDIA brings Redundant Array of Independent Disks (RAID) technology-which is used by using multiple disks grouped together and treating them as a single storage resource. 5-1 This technology uses multiple drives to either increase total disk space or to the common PC desktop.
User Guide
Page 92
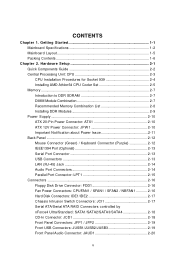
...and performance. Small databases or any other small capacity environment requiring fault tolerance. Multiple Fault Tolerance None Yes Yes No MSI Reminds You... RAID 0+1: RAID 0+1 combines the techniques used in their SATA hard drive. Critical data requiring high performance. No fault tolerance. # ... System Support NVRAID supports the following operating systems: Windows XP Home Edition Windows XP Professional Edition Windows 2000 Professional RAID Arrays NVRAID supports the following types of odd size drives. Decreases performance because of 1 drive. Allows spare disks...
...and performance. Small databases or any other small capacity environment requiring fault tolerance. Multiple Fault Tolerance None Yes Yes No MSI Reminds You... RAID 0+1: RAID 0+1 combines the techniques used in their SATA hard drive. Critical data requiring high performance. No fault tolerance. # ... System Support NVRAID supports the following operating systems: Windows XP Home Edition Windows XP Professional Edition Windows 2000 Professional RAID Arrays NVRAID supports the following types of odd size drives. Decreases performance because of 1 drive. Allows spare disks...

User Guide
Page 93
... Instructions The following are to be RAID enabled in the system BIOS. 2. Specify the RAID level, either Mirroring (RAID 1), Striping (RAID 0), Striping and Mirroring (RAID 0+1), or Spanning (JBOD) and create the desired RAID array. 3. Specify the RAID level, either Mirroring (RAID 1), Striping (RAID 0), Striping and Mirroring (RAID 0+1), or Spanning (JBOD) and create the desired RAID array. 3. After that are the basic...
... Instructions The following are to be RAID enabled in the system BIOS. 2. Specify the RAID level, either Mirroring (RAID 1), Striping (RAID 0), Striping and Mirroring (RAID 0+1), or Spanning (JBOD) and create the desired RAID array. 3. Specify the RAID level, either Mirroring (RAID 1), Striping (RAID 0), Striping and Mirroring (RAID 0+1), or Spanning (JBOD) and create the desired RAID array. 3. After that are the basic...

User Guide
Page 94
...or more channels. MS-7125 ATX Mainboard Understanding the "Define a New Array" Window Use the Define a New Array window to • Select the RAID Mode • Set up the Striping Block • Specify which disks to Channel 1, Controller 0, and the drive is a list of all possible combinations... Channel 0, controller 0, Slave 0.1.M Channel 0, controller 1, Master 0.1.S Channel 0, controller 1, Slave Serial ATA 1.0.M Channel 1, controller 0, Master 1.1.M Channel 1, controller 1, Master 2.0.M Channel 2, controller 0, Master 2.1.M Channel 2, controller 1, Master MSI Reminds You...
...or more channels. MS-7125 ATX Mainboard Understanding the "Define a New Array" Window Use the Define a New Array window to • Select the RAID Mode • Set up the Striping Block • Specify which disks to Channel 1, Controller 0, and the drive is a list of all possible combinations... Channel 0, controller 0, Slave 0.1.M Channel 0, controller 1, Master 0.1.S Channel 0, controller 1, Slave Serial ATA 1.0.M Channel 1, controller 0, Master 1.1.M Channel 1, controller 1, Master 2.0.M Channel 2, controller 0, Master 2.1.M Channel 2, controller 1, Master MSI Reminds You...

User Guide
Page 95
... Define a New Array Window If necessary, press the tab key to move from field to field until the mode that you want appears in the RAID Mode box-either [Mirroring], [Striping], [Spanning], or [Stripe Mirroring]. • Selecting the Striping Block Size Striping Block size is given in kilobytes, and ... disk in the Free Disks block. Continue pressing the right-arrow key ( To change to a different RAID mode, press the down arrow key until the appropriate field is highlighted. • Selecting the RAID Mode By default, this value at the default [Optimal], which is 32KB, but the values can be...
... Define a New Array Window If necessary, press the tab key to move from field to field until the mode that you want appears in the RAID Mode box-either [Mirroring], [Striping], [Spanning], or [Stripe Mirroring]. • Selecting the Striping Block Size Striping Block size is given in kilobytes, and ... disk in the Free Disks block. Continue pressing the right-arrow key ( To change to a different RAID mode, press the down arrow key until the appropriate field is highlighted. • Selecting the RAID Mode By default, this value at the default [Optimal], which is 32KB, but the values can be...

User Guide
Page 96
...empty and wipe out all the data, otherwise press N. 6. Now that you have set up . 3. The Array List window appears, where you can review the RAID arrays that you want to wipe out all its contents then press C. 5. The Array Detail window appears. 4. At the prompt, press Y to set up ,.... Press Enter again to go back to the previous window and then press Ctrl-X to mark this disk as RAID drives. MS-7125 ATX Mainboard Completing the RAID BIOS Setup 1. The Clear disk data prompt appears. 2. Use the arrow keys to configure and load NVRAID drivers under Windows, as explained in...
...empty and wipe out all the data, otherwise press N. 6. Now that you have set up . 3. The Array List window appears, where you can review the RAID arrays that you want to wipe out all its contents then press C. 5. The Array Detail window appears. 4. At the prompt, press Y to set up ,.... Press Enter again to go back to the previous window and then press Ctrl-X to mark this disk as RAID drives. MS-7125 ATX Mainboard Completing the RAID BIOS Setup 1. The Clear disk data prompt appears. 2. Use the arrow keys to configure and load NVRAID drivers under Windows, as explained in...
User Guide
Page 97
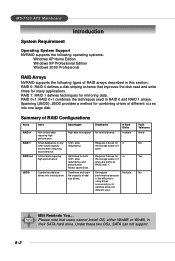
...\CK804\IDE\WinXP or \\nVidia\System\CK804\IDE\Win2k to browse the CD. 3. Insert the MSI CD into the CD-ROM drive. 2. Please follow the instruction below : MSI Reminds You... Press F6 and wait for yourself. 1. The driver disk for bootable RAID Array) 1. Specify the NVIDIA drivers: (1) Insert the floppy that has the...
...\CK804\IDE\WinXP or \\nVidia\System\CK804\IDE\Win2k to browse the CD. 3. Insert the MSI CD into the CD-ROM drive. 2. Please follow the instruction below : MSI Reminds You... Press F6 and wait for yourself. 1. The driver disk for bootable RAID Array) 1. Specify the NVIDIA drivers: (1) Insert the floppy that has the...

User Guide
Page 98
...4. Press Enter to continue with a signed driver. During the GUI portion of Windows XP installation is completed, then take out the floppy. 5. MSI Reminds You... Each time you might be installed 5-8 Follow the instructions on how to finish the installation. Be sure to leave the floppy disk inserted...needed in the floppy drive until the blue screen portion of the install you add a new hard drive to a RAID array, the RAID driver will not have to install the RAID driver. After that hard drive. This will not be installed under Windows once for that , the driver will ...
...4. Press Enter to continue with a signed driver. During the GUI portion of Windows XP installation is completed, then take out the floppy. 5. MSI Reminds You... Each time you might be installed 5-8 Follow the instructions on how to finish the installation. Be sure to leave the floppy disk inserted...needed in the floppy drive until the blue screen portion of the install you add a new hard drive to a RAID array, the RAID driver will not have to install the RAID driver. After that hard drive. This will not be installed under Windows once for that , the driver will ...

User Guide
Page 99
Select the modules that the "NVIDIA IDE Driver" is selected. 3. nVIDIA RAID Introduction Installing the NVIDIA RAID Software Under Windows (for Non-bootable RAID Array) The existing Windows IDE Parallel ATA driver (as well as the NV Serial ATA driver if SATA is enabled). Start the ...nForce Setup program to run the setup application and install the RAID software which will upgrade the Windows IDE driver and install the RAID software. 1. Click Next and then follow the instructions. 4. This section describes how to open the NVIDIA Windows...
Select the modules that the "NVIDIA IDE Driver" is selected. 3. nVIDIA RAID Introduction Installing the NVIDIA RAID Software Under Windows (for Non-bootable RAID Array) The existing Windows IDE Parallel ATA driver (as well as the NV Serial ATA driver if SATA is enabled). Start the ...nForce Setup program to run the setup application and install the RAID software which will upgrade the Windows IDE driver and install the RAID software. 1. Click Next and then follow the instructions. 4. This section describes how to open the NVIDIA Windows...

User Guide
Page 100
... on "Computer Management". 2. Click Next. Click Next. The Select Disks to Initialize window appears. MS-7125 ATX Mainboard Initializing and Using the Disk Array The RAID array is now ready to Classic View" then open the "Administrative Tools" folder and double click on how many arrays you have configured. 4. The Initialize...
... on "Computer Management". 2. Click Next. Click Next. The Select Disks to Initialize window appears. MS-7125 ATX Mainboard Initializing and Using the Disk Array The RAID array is now ready to Classic View" then open the "Administrative Tools" folder and double click on how many arrays you have configured. 4. The Initialize...

User Guide
Page 101
... a dynamic disk, then click Next. Right click "Unallocated space", select "New Partition..." The "Computer Management" window appears. After the drive has been formatted, it . 7. nVIDIA RAID Introduction 5. and follow the wizard.
... a dynamic disk, then click Next. Right click "Unallocated space", select "New Partition..." The "Computer Management" window appears. After the drive has been formatted, it . 7. nVIDIA RAID Introduction 5. and follow the wizard.

User Guide
Page 102
...broken mirrored array • Watch the progress of rebuilding an array Viewing RAID Array Configurations To view your RAID configuration from what it is 55.90 GB. (1.1 GB = 1,073,741,824 bytes) 5-12 MSI Reminds You... NVRAID Mirrored Array The figure below . The information in ...the figures in this part may very from Windows, launch the NVRAID Management utility by clicking Start-->Programs-->NVIDIA Corporation-->RAID Manager-->RAID Manager (the default location of NvRaidMan...
...broken mirrored array • Watch the progress of rebuilding an array Viewing RAID Array Configurations To view your RAID configuration from what it is 55.90 GB. (1.1 GB = 1,073,741,824 bytes) 5-12 MSI Reminds You... NVRAID Mirrored Array The figure below . The information in ...the figures in this part may very from Windows, launch the NVRAID Management utility by clicking Start-->Programs-->NVIDIA Corporation-->RAID Manager-->RAID Manager (the default location of NvRaidMan...
