
User Guide
Page 2
...AMD, Athlon™, Athlon™ XP, Thoroughbred™, and Duron™ are under continual improvement and we reserve the right to the correctness of its contents. Award® is a registered trademark of American Megatrends Inc. Copyright Notice The material in this document, but no solution can be obtained from the user's manual...NVIDIA, the NVIDIA logo, DualNet, and nForce are registered trademarks of Intel Corporation. Visit the MSI website for further guidance. Trademarks All trademarks are registered trademarks of International Business Machines Corporation. func=service...
...AMD, Athlon™, Athlon™ XP, Thoroughbred™, and Duron™ are under continual improvement and we reserve the right to the correctness of its contents. Award® is a registered trademark of American Megatrends Inc. Copyright Notice The material in this document, but no solution can be obtained from the user's manual...NVIDIA, the NVIDIA logo, DualNet, and nForce are registered trademarks of Intel Corporation. Visit the MSI website for further guidance. Trademarks All trademarks are registered trademarks of International Business Machines Corporation. func=service...

User Guide
Page 3
... be - ment from humidity. 4. Place the power cord such a way that could damage or cause electrical s h oc k . 11. Keep this User's Manual for air convection hence protects the equip- fore connecting the equipment to moisture. † The equipment has not work according to User...'s Manual. † The equipment has dropped and damaged. † The equipment has obvious sign of the power source and adjust properly 110/220V ...
... be - ment from humidity. 4. Place the power cord such a way that could damage or cause electrical s h oc k . 11. Keep this User's Manual for air convection hence protects the equip- fore connecting the equipment to moisture. † The equipment has not work according to User...'s Manual. † The equipment has dropped and damaged. † The equipment has obvious sign of the power source and adjust properly 110/220V ...

User Guide
Page 21
... and density in the right orientation. 2. Volt Notch Important - The plastic clip at the sides. Insert the memory module vertically into the DIM M1 first. 2-7 Manually check if the memory module has been locked in the DIMM slot. 3. Important You can barely see the golden finger if the memory module is...
... and density in the right orientation. 2. Volt Notch Important - The plastic clip at the sides. Insert the memory module vertically into the DIM M1 first. 2-7 Manually check if the memory module has been locked in the DIMM slot. 3. Important You can barely see the golden finger if the memory module is...

User Guide
Page 23
... an all-digital audio/video interface capable of the cable is for a PS/2® mouse/keyboard. To connect an LCD monitor, simply plug your monitor manual for digital audio transmission to connect a LCD monitor. PS/2 port The standard PS/2® mouse/keyboard DIN connector is properly connected to your monitor (refer...
... an all-digital audio/video interface capable of the cable is for a PS/2® mouse/keyboard. To connect an LCD monitor, simply plug your monitor manual for digital audio transmission to connect a LCD monitor. PS/2 port The standard PS/2® mouse/keyboard DIN connector is properly connected to your monitor (refer...

User Guide
Page 29
... 2-15 Please refer to a TPM (Trusted Platform Module) module (optional). Hardware Setup TPM Module connector: JTPM1(optional) This connector connects to the TPM security platform manual for more details and usages. 14 13 21 Pin Signal Description 1 LCLK LPC clock 3 LRST# LPC reset 5 LAD0 LPC address & data pin0 7 LAD1 LPC address...
... 2-15 Please refer to a TPM (Trusted Platform Module) module (optional). Hardware Setup TPM Module connector: JTPM1(optional) This connector connects to the TPM security platform manual for more details and usages. 14 13 21 Pin Signal Description 1 LCLK LPC clock 3 LRST# LPC reset 5 LAD0 LPC address & data pin0 7 LAD1 LPC address...
User Guide
Page 36
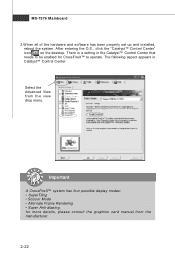
... • Scissor Mode • Alternate Frame Rendering • Super Anti-aliasing. for CrossFireX™ to be enabled for more details, please consult the graphics card manual from the view drop menu.
... • Scissor Mode • Alternate Frame Rendering • Super Anti-aliasing. for CrossFireX™ to be enabled for more details, please consult the graphics card manual from the view drop menu.

User Guide
Page 94
...down menu will appear. Simply click the right side of CPU temperature & CPU FAN speed. The system will popup a warning message to warning you when the temperature/ fan speed is over/ lower the values you can select desired values for manual overclocking. In the "System W arning" block, you ...set the maximum CPU/ system temperature and the minimum CPU/ system fan speed by using the scroll bar. Overclocking Center In each setting menu, you...
...down menu will appear. Simply click the right side of CPU temperature & CPU FAN speed. The system will popup a warning message to warning you when the temperature/ fan speed is over/ lower the values you can select desired values for manual overclocking. In the "System W arning" block, you ...set the maximum CPU/ system temperature and the minimum CPU/ system fan speed by using the scroll bar. Overclocking Center In each setting menu, you...

User Guide
Page 99
... . 3. On the next screen, use the space key to choose a RAID mode (RAID 0/ 1/ 0+1/ 5) and use the arrow key to move to allow the greatest flexibility, manually. 1. RAID 1 or 10 only. RAID sets can be based upon factors including performance, data security, and the number of drives available. MS-7576 Mainboard Define...
... . 3. On the next screen, use the space key to choose a RAID mode (RAID 0/ 1/ 0+1/ 5) and use the arrow key to move to allow the greatest flexibility, manually. 1. RAID 1 or 10 only. RAID sets can be based upon factors including performance, data security, and the number of drives available. MS-7576 Mainboard Define...

User Guide
Page 100
Then press [Ctrl+Y] to save the configuration or press [Ctrl-Y] to allocate the RAID capacity manually. C-5 SATA RAID • Stripe Block Size, the default 64KB is the full capacity of slightly smaller replacement drives. • Cache Mode, W riteThru or W riteBack. 4. A ... to change the assignment to save the configuration. 5. Important 1. The default capacity is best for most applications. If you allocate the first LD capacity manually, you want to choose the hard drives which you can create second LD with remaining capacity of the LD, use of the selected hard drives...
Then press [Ctrl+Y] to save the configuration or press [Ctrl-Y] to allocate the RAID capacity manually. C-5 SATA RAID • Stripe Block Size, the default 64KB is the full capacity of slightly smaller replacement drives. • Cache Mode, W riteThru or W riteBack. 4. A ... to change the assignment to save the configuration. 5. Important 1. The default capacity is best for most applications. If you allocate the first LD capacity manually, you want to choose the hard drives which you can create second LD with remaining capacity of the LD, use of the selected hard drives...


