
User Guide
Page 9
Appendix B Overclocking Center B-1 Activating Overclocking Center B-2 System Info ...B-3 DOT ...B-5 Appendix C SATA RAID C-1 RAID Configuration C-2 ix
Appendix B Overclocking Center B-1 Activating Overclocking Center B-2 System Info ...B-3 DOT ...B-5 Appendix C SATA RAID C-1 RAID Configuration C-2 ix
User Guide
Page 11
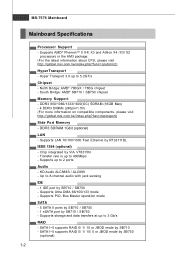
...ex. php ?func = c pufor m 2) HyperTransport - North Bridge: AMD® 790GX / 780G chipset - Transfer rate is up to 400Mbps - Supports PIO, Bus Master operation mode SATA - 5 SATA II ports by SB710 / SB750 - 1 eSATA port by SB750 (opt ional) 1-2 SATA1~5 supports RAID 0/ 1/ 10/ 5 or JBOD mode by SB710 / SB750 - t...optional) - Supports storage and data transfers at up to 3 Gb/s RAID - Supports AMD® PhenomTM II X4/ X3 and Athlon X4 /X3/ X2 processors in the AM3 package. (For the latest information about CPU, please visit ht t p : / / global. Supports LAN 10/...
...ex. php ?func = c pufor m 2) HyperTransport - North Bridge: AMD® 790GX / 780G chipset - Transfer rate is up to 400Mbps - Supports PIO, Bus Master operation mode SATA - 5 SATA II ports by SB710 / SB750 - 1 eSATA port by SB750 (opt ional) 1-2 SATA1~5 supports RAID 0/ 1/ 10/ 5 or JBOD mode by SB710 / SB750 - t...optional) - Supports storage and data transfers at up to 3 Gb/s RAID - Supports AMD® PhenomTM II X4/ X3 and Athlon X4 /X3/ X2 processors in the AM3 package. (For the latest information about CPU, please visit ht t p : / / global. Supports LAN 10/...

User Guide
Page 23
...) connector allows you to IEEE1394 devices. eSATA Port The eSATA port is provided for attaching the eSATA external hard drive. Important eSATA port only supports RAID and AHCI mode (does not support IDE mode) 2-9 VGA Port The DB15-pin female connector is for monitor. To connect an LCD monitor, simply plug...
...) connector allows you to IEEE1394 devices. eSATA Port The eSATA port is provided for attaching the eSATA external hard drive. Important eSATA port only supports RAID and AHCI mode (does not support IDE mode) 2-9 VGA Port The DB15-pin female connector is for monitor. To connect an LCD monitor, simply plug...

User Guide
Page 26
... device via an optional IEEE1394 bracket. Please do not fold the Serial ATA cable into 90-degree angle. SATA1 SATA4_5 SATA2_3 Important 1. SATA5 only supports RAID and AHCI mode (does not support IDE mode) 2. Otherwise, data loss may occur during transmission. MS-7576 Mainboard Serial ATA Connector: SATA1~5 This connector is...
... device via an optional IEEE1394 bracket. Please do not fold the Serial ATA cable into 90-degree angle. SATA1 SATA4_5 SATA2_3 Important 1. SATA5 only supports RAID and AHCI mode (does not support IDE mode) 2. Otherwise, data loss may occur during transmission. MS-7576 Mainboard Serial ATA Connector: SATA1~5 This connector is...

User Guide
Page 52
I/O Devices Configuration Press to enable or disable the SATA controller. RAID Mode This item is used PCI busmastering for reading/ writing to IDE drives. OnChip SATA Controller This item allows users to enter the sub-menu and the following screen appears: COM Port 1 Select an address and corresponding interrupt for the serial port. 3-13 BIOS Setup PCI IDE BusMaster This item allows you to enable/ disable BIOS to used to select mode for SATA connectors.
I/O Devices Configuration Press to enable or disable the SATA controller. RAID Mode This item is used PCI busmastering for reading/ writing to IDE drives. OnChip SATA Controller This item allows users to enter the sub-menu and the following screen appears: COM Port 1 Select an address and corresponding interrupt for the serial port. 3-13 BIOS Setup PCI IDE BusMaster This item allows you to enable/ disable BIOS to used to select mode for SATA connectors.

User Guide
Page 96
... needs at least four drives to form a RAID 1 set , while drives configured for performance and reliability. RAID 0+1 is simultaneously written to form a RAID 0 set . RAID 5 defines techniques for RAID 0 (Striping), RAID 1 (Mirroring), RAID 0+1 (Striping & Mirroring) & RAID 5 (striping with parity). SATA RAID provides support for parity data. *Only 750 supports RAID 5. RAID 1 makes sure data is not lost if a drive f ails as...
... needs at least four drives to form a RAID 1 set , while drives configured for performance and reliability. RAID 0+1 is simultaneously written to form a RAID 0 set . RAID 5 defines techniques for RAID 0 (Striping), RAID 1 (Mirroring), RAID 0+1 (Striping & Mirroring) & RAID 5 (striping with parity). SATA RAID provides support for parity data. *Only 750 supports RAID 5. RAID 1 makes sure data is not lost if a drive f ails as...

User Guide
Page 97
Press to be performed. C-2 The FastBuild menu screen will appear for SATA device in the RAID BIOS. MS-7576 Mainboard RAID Configuration Creating and deleting RAID set and performing other RAID setting up operations are done in BIOS before configuring the Fastbuild Utility. Important Be sure to the one below will appear. During bootup, a screen similar to enable the RAID function for about few seconds. The Main Menu is used to choose the operation to enter FastBuild utility.
Press to be performed. C-2 The FastBuild menu screen will appear for SATA device in the RAID BIOS. MS-7576 Mainboard RAID Configuration Creating and deleting RAID set and performing other RAID setting up operations are done in BIOS before configuring the Fastbuild Utility. Important Be sure to the one below will appear. During bootup, a screen similar to enable the RAID function for about few seconds. The Main Menu is used to choose the operation to enter FastBuild utility.

User Guide
Page 98
SATA RAID View Drives Assignments This window displays the model number, capacities and assignment of the drives physically attached to the SATA host adapter. C-3
SATA RAID View Drives Assignments This window displays the model number, capacities and assignment of the drives physically attached to the SATA host adapter. C-3

User Guide
Page 99
... keys to highlight an logical drive number you want to define and press Enter to select it . and press Enter to select it . 3. RAID sets can be based upon factors including performance, data security, and the number of the system and plan the data storage strategy.... RAID 1 or 10 only. It is best to allow the greatest flexibility, manually. 1. C-4 MS-7576 Mainboard Define LD (Creating RAID) The selection of the RAID configuration should be created either automatically, or to carefully consider the long-term role...
... keys to highlight an logical drive number you want to define and press Enter to select it . and press Enter to select it . 3. RAID sets can be based upon factors including performance, data security, and the number of the system and plan the data storage strategy.... RAID 1 or 10 only. It is best to allow the greatest flexibility, manually. 1. C-4 MS-7576 Mainboard Define LD (Creating RAID) The selection of the RAID configuration should be created either automatically, or to carefully consider the long-term role...

User Guide
Page 100
RAID 0 or 10 only. • Gigabyte Boundary, allows use the space key to change the assignment to make part of the LD, use of slightly smaller ... you can create second LD with remaining capacity of the selected hard drives. If you allocate the first LD capacity manually, you want to "Y". SATA RAID • Stripe Block Size, the default 64KB is the full capacity of the selected hard drives. 2. Then press [Ctrl+Y] to allocate the...
RAID 0 or 10 only. • Gigabyte Boundary, allows use the space key to change the assignment to make part of the LD, use of slightly smaller ... you can create second LD with remaining capacity of the selected hard drives. If you allocate the first LD capacity manually, you want to "Y". SATA RAID • Stripe Block Size, the default 64KB is the full capacity of the selected hard drives. 2. Then press [Ctrl+Y] to allocate the...

User Guide
Page 102
On the next screen, a message will display to inform you want to delete and press "Del" or "Alt+D" delete the RAID set or other key to abort it. C-7 Select "Delete LD" on the main screen. 2. Choose a LD No you , press "Ctrl+Y" to complete the deletion. Press "Ctrl+Y" to delete the RAID set . 3. SATA RAID Delete LD (Deleting RAID) 1.
On the next screen, a message will display to inform you want to delete and press "Del" or "Alt+D" delete the RAID set or other key to abort it. C-7 Select "Delete LD" on the main screen. 2. Choose a LD No you , press "Ctrl+Y" to complete the deletion. Press "Ctrl+Y" to delete the RAID set . 3. SATA RAID Delete LD (Deleting RAID) 1.

User Guide
Page 103
... CD, and the W indows XP Setup program starts. 2. Insert the MSI DVD into the DVD-ROM drive. 2. Copy all the contents in the floppy drive until the system reboots itself. The next screen should confirm that contains the RAID driver, press the "S" key to select "Specify Additional Device". Leave the... disk in the : \\ChipSet\AMD\XP\SBDrv\RAID7xx\x86 (for Windows XP 32-bit) or X64 (for Windows XP 64-bit)...
... CD, and the W indows XP Setup program starts. 2. Insert the MSI DVD into the DVD-ROM drive. 2. Copy all the contents in the floppy drive until the system reboots itself. The next screen should confirm that contains the RAID driver, press the "S" key to select "Specify Additional Device". Leave the... disk in the : \\ChipSet\AMD\XP\SBDrv\RAID7xx\x86 (for Windows XP 32-bit) or X64 (for Windows XP 64-bit)...

User Guide
Page 104
The driver will appear. 3. The ATI System Driver includes RAID Driver. 4. SATA RAID Installing the RAID Driver Under Windows (for Non-bootable RAID Array) 1. Insert the MSI DVD into the DVD-ROM drive. 2. The DVD will auto-run and the setup screen will be automatically installed. Under the Driver tab, click on ATI System Driver by your need. Important You must install the RAID driver to enable RAID. C-9
The driver will appear. 3. The ATI System Driver includes RAID Driver. 4. SATA RAID Installing the RAID Driver Under Windows (for Non-bootable RAID Array) 1. Insert the MSI DVD into the DVD-ROM drive. 2. The DVD will auto-run and the setup screen will be automatically installed. Under the Driver tab, click on ATI System Driver by your need. Important You must install the RAID driver to enable RAID. C-9
