

User Manual
Page 3
......1-9 Upgrade and Warranty 1-10 Acquisition of Replaceable Parts 1-10 Safety Instructions...1-11 MSI Highlights ...1-14 Introductions 2-1 Unpacking...2-2 Product Overview...2-3 Top-open View...2-3 Front Side View...2-6 Right Side View...2-7 Left Side View...2-8 Rear Side View...2-10 Bottom Side View 2-11 How to Use the Keyboard 2-12 Windows Key...2-12 Quick Launch Keys 2-13 Disable or Enable Touchpad 2-14 Enter Sleep Mode 2-14 Switch Display...2-14 Use Multiple Monitors 2-14 Adjust the Brightness Level of the Display...
......1-9 Upgrade and Warranty 1-10 Acquisition of Replaceable Parts 1-10 Safety Instructions...1-11 MSI Highlights ...1-14 Introductions 2-1 Unpacking...2-2 Product Overview...2-3 Top-open View...2-3 Front Side View...2-6 Right Side View...2-7 Left Side View...2-8 Rear Side View...2-10 Bottom Side View 2-11 How to Use the Keyboard 2-12 Windows Key...2-12 Quick Launch Keys 2-13 Disable or Enable Touchpad 2-14 Enter Sleep Mode 2-14 Switch Display...2-14 Use Multiple Monitors 2-14 Adjust the Brightness Level of the Display...
User Manual
Page 4
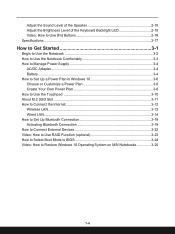
... Adjust the Brightness Level of the Keyboard Backlight LED 2-15 Video: How to Use [Fn] Buttons 2-16 Specifications...2-17 How to Get Started 3-1 Begin to Use the Notebook 3-2 How to Use the Notebook Comfortably 3-3 How to Manage Power Supply 3-4 AC/DC Adapter...3-4 Battery...3-4 How to Set Up a Power Plan in Windows 10 3-6 Choose or Customize a Power Plan 3-6 Create Your Own Power Plan 3-8 How to Use the Touchpad 3-10 About M.2 SSD Slot...3-11 How to Connect the Internet 3-12 Wireless LAN...3-12...
... Adjust the Brightness Level of the Keyboard Backlight LED 2-15 Video: How to Use [Fn] Buttons 2-16 Specifications...2-17 How to Get Started 3-1 Begin to Use the Notebook 3-2 How to Use the Notebook Comfortably 3-3 How to Manage Power Supply 3-4 AC/DC Adapter...3-4 Battery...3-4 How to Set Up a Power Plan in Windows 10 3-6 Choose or Customize a Power Plan 3-6 Create Your Own Power Plan 3-8 How to Use the Touchpad 3-10 About M.2 SSD Slot...3-11 How to Connect the Internet 3-12 Wireless LAN...3-12...
User Manual
Page 10
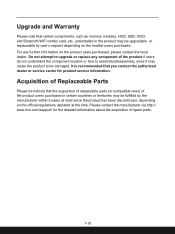
.... Do not attempt to upgrade or replace any further information on the models users purchased. Upgrade and Warranty Please note that certain components, such as memory modules, HDD, SSD, ODD, and Bluetooth/WiFi combo card, etc., preinstalled in certain countries or territories may cause the product to be damaged. Please contact the manufacturer via http:// www.msi.com/support/ for product service information.
.... Do not attempt to upgrade or replace any further information on the models users purchased. Upgrade and Warranty Please note that certain components, such as memory modules, HDD, SSD, ODD, and Bluetooth/WiFi combo card, etc., preinstalled in certain countries or territories may cause the product to be damaged. Please contact the manufacturer via http:// www.msi.com/support/ for product service information.
User Manual
Page 11
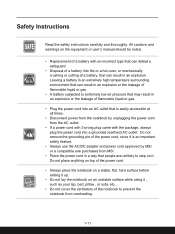
...equipment or user's manual should be noted. • Replacement of a battery with the package, always plug the power cord into an AC outlet that may result in an explosion. Safety Instructions Read the safety instructions carefully and thoroughly. Leaving a battery in an...using it , such as your lap, bed, pillow , or sofa, etc... • Do not cover the ventilators of flammable liquid or gas. • Plug the power cord into a grounded (earthed) AC outlet. Do not remove the grounding pin of the power cord. • Always place the notebook on a stable, flat, hard surface before setting...
...equipment or user's manual should be noted. • Replacement of a battery with the package, always plug the power cord into an AC outlet that may result in an explosion. Safety Instructions Read the safety instructions carefully and thoroughly. Leaving a battery in an...using it , such as your lap, bed, pillow , or sofa, etc... • Do not cover the ventilators of flammable liquid or gas. • Plug the power cord into a grounded (earthed) AC outlet. Do not remove the grounding pin of the power cord. • Always place the notebook on a stable, flat, hard surface before setting...

User Manual
Page 18
...-in optionally supported discrete GPU mode. • LED flashes when the notebook goes to force a shutdown, if needed. Webcam/ Webcam LED/ Internal Microphone • This built-in game playing. • Use this button to bring up the system from sleep state. • Long press this key to activate the specific applications or tools. The following quick launch buttons will only be functioning in the operating system with a gaming utility, Dragon Center, providing users an...
...-in optionally supported discrete GPU mode. • LED flashes when the notebook goes to force a shutdown, if needed. Webcam/ Webcam LED/ Internal Microphone • This built-in game playing. • Use this button to bring up the system from sleep state. • Long press this key to activate the specific applications or tools. The following quick launch buttons will only be functioning in the operating system with a gaming utility, Dragon Center, providing users an...
User Manual
Page 19
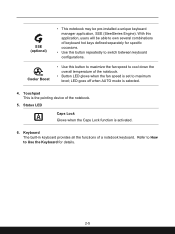
... device of keyboard hot keys defined separately for details. 2-5 Refer to How to Use the Keyboard for specific occasions. • Use this application, users will be pre-installed a unique keyboard manager application, SSE (SteelSeries Engine). SSE (optional) • This notebook may be able to own several combinations of the notebook. 5. With this button repeatedly to maximum level; LED goes off when AUTO mode is activated. 6. Touchpad This is set to switch between keyboard configurations...
... device of keyboard hot keys defined separately for details. 2-5 Refer to How to Use the Keyboard for specific occasions. • Use this application, users will be pre-installed a unique keyboard manager application, SSE (SteelSeries Engine). SSE (optional) • This notebook may be able to own several combinations of the notebook. 5. With this button repeatedly to maximum level; LED goes off when AUTO mode is activated. 6. Touchpad This is set to switch between keyboard configurations...
User Manual
Page 20
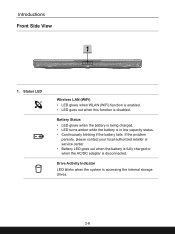
... LED Wireless LAN (WiFi) • LED glows when WLAN (WiFi) function is enabled. • LED goes out when this function is in low capacity status. • Continuously blinking if the battery fails. Battery Status • LED glows when the battery is being charged. • LED turns amber while the battery is disabled. Drive Activity Indicator LED blinks when the system is disconnected. If the problem persists, please contact your local authorized retailer or service center. • Battery LED goes...
... LED Wireless LAN (WiFi) • LED glows when WLAN (WiFi) function is enabled. • LED goes out when this function is in low capacity status. • Continuously blinking if the battery fails. Battery Status • LED glows when the battery is being charged. • LED turns amber while the battery is disabled. Drive Activity Indicator LED blinks when the system is disconnected. If the problem persists, please contact your local authorized retailer or service center. • Battery LED goes...

User Manual
Page 22
... connecting various devices, such as storage devices, hard drives, or video cameras, and offers more advantages over high-speed data transferring. USB 3.2 Gen 1 Port (Type-C) USB 3.2 Gen 1, the SuperSpeed USB, delivers the higher interface speeds for air circulation. 6. Ventilator The ventilator is used to cool the system. Kensington Lock This notebook provides a Kensington lock hole, which allows users to connect a LAN cable for network connection. 3. RJ-45 Connector The Ethernet connector, with optionally supported...
... connecting various devices, such as storage devices, hard drives, or video cameras, and offers more advantages over high-speed data transferring. USB 3.2 Gen 1 Port (Type-C) USB 3.2 Gen 1, the SuperSpeed USB, delivers the higher interface speeds for air circulation. 6. Ventilator The ventilator is used to cool the system. Kensington Lock This notebook provides a Kensington lock hole, which allows users to connect a LAN cable for network connection. 3. RJ-45 Connector The Ethernet connector, with optionally supported...
User Manual
Page 25
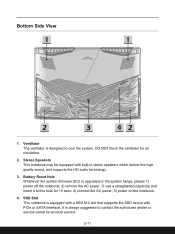
... is upgraded or the system hangs, please 1) power off the notebook; 2) remove the AC power; 3) use a straightened paperclip and insert it to this hole for 10 secs; 4) connect the AC power; 5) power on the notebook. 4. Bottom Side View 1. Battery Reset Hole Whenever the system firmware (EC) is always suggested to cool the system. Ventilator The ventilator is equipped with a SSD M.2 slot that supports the SSD device...
... is upgraded or the system hangs, please 1) power off the notebook; 2) remove the AC power; 3) use a straightened paperclip and insert it to this hole for 10 secs; 4) connect the AC power; 5) power on the notebook. 4. Bottom Side View 1. Battery Reset Hole Whenever the system firmware (EC) is always suggested to cool the system. Ventilator The ventilator is equipped with a SSD M.2 slot that supports the SSD device...

User Manual
Page 26
Windows Key You can find the Windows Logo key on the keyboard to Use the Keyboard This notebook provides a full functioned keyboard. With the help of these keys, users will be able to perform Windows-specific functions, such as opening the Start menu and launching the shortcut menu. 2-12 Use the FN keys on the keyboard which is a must to install the necessary applications before using the keyboard function keys. To ensure that the keyboard will be functioning properly, it is used to work more efficiently. Introductions How to activate the specific applications or tools.
Windows Key You can find the Windows Logo key on the keyboard to Use the Keyboard This notebook provides a full functioned keyboard. With the help of these keys, users will be able to perform Windows-specific functions, such as opening the Start menu and launching the shortcut menu. 2-12 Use the FN keys on the keyboard which is a must to install the necessary applications before using the keyboard function keys. To ensure that the keyboard will be functioning properly, it is used to work more efficiently. Introductions How to activate the specific applications or tools.
User Manual
Page 27
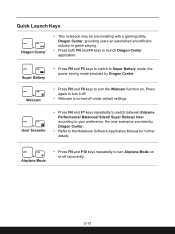
... keys to switch to Super Battery mode, the power saving mode provided by Dragon Center. • Refer to the Notebook Software Application Manual for further details. + Airplane Mode • Press FN and F10 keys repeatedly to turn Airplane Mode on . Press again to turn it off. • Webcam is turned off under default settings. + User Scenario • Press FN and F7 keys repeatedly to switch between Extreme Performance/ Balanced/ Silent/ Super Battery/ User...
... keys to switch to Super Battery mode, the power saving mode provided by Dragon Center. • Refer to the Notebook Software Application Manual for further details. + Airplane Mode • Press FN and F10 keys repeatedly to turn Airplane Mode on . Press again to turn it off. • Webcam is turned off under default settings. + User Scenario • Press FN and F7 keys repeatedly to switch between Extreme Performance/ Balanced/ Silent/ Super Battery/ User...

User Manual
Page 28
... press [P] key to + bring up [Project]. • Select how you want your display to wake up the system + from the selections of PC screen only, Duplicate, Extend, and Second screen only. 2-14 Users will automatically detect the external monitor connected. Press the Power button to project on the system configuration). Switch Display Switch the display output mode between the LCD, external + monitor and both. Introductions Disable or Enable Touchpad Enable or disable the touchpad function. + Enter Sleep Mode Force...
... press [P] key to + bring up [Project]. • Select how you want your display to wake up the system + from the selections of PC screen only, Duplicate, Extend, and Second screen only. 2-14 Users will automatically detect the external monitor connected. Press the Power button to project on the system configuration). Switch Display Switch the display output mode between the LCD, external + monitor and both. Introductions Disable or Enable Touchpad Enable or disable the touchpad function. + Enter Sleep Mode Force...

User Manual
Page 31
... device I/O Port USB Audio 3 x USB 3.2 Gen 1 1 x USB 3.2 Gen 1 Type C 1 x Headphone-out (S/PDIF-Out supported) Video 1 x HDMI 1 x Mini-Display LAN Card Reader 1 x RJ-45 1 x SD3.0/ SD/ MMC 2-17 Physical Characteristic Dimension 398.5 (W) x 272 (D) x 28.15 (H) mm Weight 2.6 kg CPU Package Mobile Processor FP6 The latest AMD® RyzenTM Processor Family Memory Technology Memory Maximum DDR4, 3200 2 x SO-DIMM slots Up to learn about the details of the product you purchased. Specifications The specifications listed...
... device I/O Port USB Audio 3 x USB 3.2 Gen 1 1 x USB 3.2 Gen 1 Type C 1 x Headphone-out (S/PDIF-Out supported) Video 1 x HDMI 1 x Mini-Display LAN Card Reader 1 x RJ-45 1 x SD3.0/ SD/ MMC 2-17 Physical Characteristic Dimension 398.5 (W) x 272 (D) x 28.15 (H) mm Weight 2.6 kg CPU Package Mobile Processor FP6 The latest AMD® RyzenTM Processor Family Memory Technology Memory Maximum DDR4, 3200 2 x SO-DIMM slots Up to learn about the details of the product you purchased. Specifications The specifications listed...

User Manual
Page 32
TPM functionalities can be de/activated in BIOS settings where appropriate. With professional versions of Windows, BitLocker is a hardware-based encryption device that collaborates with software measures to form a more advanced and secure data protection. Introductions Communication Port LAN Wireless LAN Bluetooth Display LCD Type Video Graphics VRAM Webcam Resolution Audio Internal Speakers Security Trusted Platform Module (optional) Supported Supported Supported 17.3" FHD LED panel Supports UMA graphics GDDR6, based on GPU structure HD 2 x stereo speakers TPM 2.0 is the default console...
TPM functionalities can be de/activated in BIOS settings where appropriate. With professional versions of Windows, BitLocker is a hardware-based encryption device that collaborates with software measures to form a more advanced and secure data protection. Introductions Communication Port LAN Wireless LAN Bluetooth Display LCD Type Video Graphics VRAM Webcam Resolution Audio Internal Speakers Security Trusted Platform Module (optional) Supported Supported Supported 17.3" FHD LED panel Supports UMA graphics GDDR6, based on GPU structure HD 2 x stereo speakers TPM 2.0 is the default console...

User Manual
Page 38
... notebook. • Always keep the notebook and its battery away from the in use AC/DC adapter. • Unplug the AC power cord before disassembly the notebook. ▶▶ Don'ts • Cover an in order to cause system failure. How to Get Started How to Manage Power Supply This section provides users basic safety precautions to an AC power source via the AC adapter before turning...
... notebook. • Always keep the notebook and its battery away from the in use AC/DC adapter. • Unplug the AC power cord before disassembly the notebook. ▶▶ Don'ts • Cover an in order to cause system failure. How to Get Started How to Manage Power Supply This section provides users basic safety precautions to an AC power source via the AC adapter before turning...
User Manual
Page 39
... recharging the battery: • If a charged battery pack is not available, save your work and close all running programs and shut down the system. • Plug in use the system, suspend system operation or shut down and turn off the system if you have. • The rechargeable battery pack is an internal power source of the notebook. ▶▶ Battery charging behavior To...
... recharging the battery: • If a charged battery pack is not available, save your work and close all running programs and shut down the system. • Plug in use the system, suspend system operation or shut down and turn off the system if you have. • The rechargeable battery pack is an internal power source of the notebook. ▶▶ Battery charging behavior To...

User Manual
Page 42
Change the settings for the plan. Click [Create] to continue. 3. Select an existing plan that is automatically set as active. 3-8 Now you have a new power plan that meets your own Power Plan and customize it to meet personal requirements. 1. Click [Next] to make the customized power plan taking effect. 4. How to Get Started Create Your Own Power Plan You are allowed to create your needs most, and give the new power plan a name. Click [Create a power plan] in Power Options. 2.
Change the settings for the plan. Click [Create] to continue. 3. Select an existing plan that is automatically set as active. 3-8 Now you have a new power plan that meets your own Power Plan and customize it to meet personal requirements. 1. Click [Next] to make the customized power plan taking effect. 4. How to Get Started Create Your Own Power Plan You are allowed to create your needs most, and give the new power plan a name. Click [Create a power plan] in Power Options. 2.

User Manual
Page 44
...Mouse Properties in Control Panel allows you can use the standard Microsoft or IBM PS/2 driver in your notebook is a pointing device that is compatible with standard mouse, allowing you may want to swap the functions of the pad, lift your finger and place it on the screen. ▶▶ Configure the Touchpad You can change the configuration... device to meet your personal needs. How to Get Started How to Use the Touchpad The touchpad integrated in your Windows operating system. For example, if you are a left-handed user, you to control the notebook by pointing the location ...
...Mouse Properties in Control Panel allows you can use the standard Microsoft or IBM PS/2 driver in your notebook is a pointing device that is compatible with standard mouse, allowing you may want to swap the functions of the pad, lift your finger and place it on the screen. ▶▶ Configure the Touchpad You can change the configuration... device to meet your personal needs. How to Get Started How to Use the Touchpad The touchpad integrated in your Windows operating system. For example, if you are a left-handed user, you to control the notebook by pointing the location ...

User Manual
Page 46
... one Wireless LAN connection from the network list to connect to continue. 8. Select [Wi-Fi] within the Network & Internet selection menu. 3. Follow the instructions as below to set to [Off]. 4. How to Get Started How to Connect the Internet Wireless LAN Wireless LAN is a wireless broadband connection that allows you to connect to open up Settings, find and click [Network & Internet]. 2. Select [Show available networks] to the Internet without using any cables. A security key may be required for connecting the selected network.
... one Wireless LAN connection from the network list to connect to continue. 8. Select [Wi-Fi] within the Network & Internet selection menu. 3. Follow the instructions as below to set to [Off]. 4. How to Get Started How to Connect the Internet Wireless LAN Wireless LAN is a wireless broadband connection that allows you to connect to open up Settings, find and click [Network & Internet]. 2. Select [Show available networks] to the Internet without using any cables. A security key may be required for connecting the selected network.
User Manual
Page 48
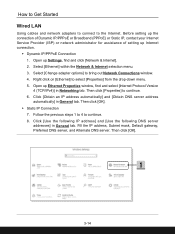
... Broadband (PPPoE) or Static IP, contact your Internet Service Provider (ISP) or network administrator for assistance of setting up Ethernet Properties window, find and click [Network & Internet]. 2. Select [Ethernet] within the Network & Internet selection menu. 3. Select [Change adapter options] to the Internet. Then click [OK]. 3-14 How to Get Started Wired LAN Using cables and network adapters to connect to bring out Network Connections window. 4. Open up Settings, find and select [Internet Protocol Version 4 (TCP/IPv4)] in...
... Broadband (PPPoE) or Static IP, contact your Internet Service Provider (ISP) or network administrator for assistance of setting up Ethernet Properties window, find and click [Network & Internet]. 2. Select [Ethernet] within the Network & Internet selection menu. 3. Select [Change adapter options] to the Internet. Then click [OK]. 3-14 How to Get Started Wired LAN Using cables and network adapters to connect to bring out Network Connections window. 4. Open up Settings, find and select [Internet Protocol Version 4 (TCP/IPv4)] in...

