

User Manual
Page 3
......2-17 Rear Side View...2-20 Bottom SideView ...2-22 Getting Started Power Management ...3-2 AC Adapter ...3-2 Battery Pack ...3-4 Using the Battery Pack...3-7 Basic Operations ...3-9 Safety and Comfort Tips...3-9 Having a Good Work Habit...3-10 Knowing the Keyboard ...3-11 Knowing the Touchpad ...3-15 About Hard Disk Drive...3-18 Using the Optical Storage Device 3-19 Connecting the External Devices 3-22 Connecting the Peripheral Devices 3-22 Connecting the Communication Devices 3-27 Express Card Installation...3-29 Removing the Express card 3-29 Installing the Express card ...3-29
......2-17 Rear Side View...2-20 Bottom SideView ...2-22 Getting Started Power Management ...3-2 AC Adapter ...3-2 Battery Pack ...3-4 Using the Battery Pack...3-7 Basic Operations ...3-9 Safety and Comfort Tips...3-9 Having a Good Work Habit...3-10 Knowing the Keyboard ...3-11 Knowing the Touchpad ...3-15 About Hard Disk Drive...3-18 Using the Optical Storage Device 3-19 Connecting the External Devices 3-22 Connecting the Peripheral Devices 3-22 Connecting the Communication Devices 3-27 Express Card Installation...3-29 Removing the Express card 3-29 Installing the Express card ...3-29
User Manual
Page 20
... than a cordless type) during an electrical storm. To use the telephone function to disassemble the enclosure. There may be a remote risk of the leak. Preface 1-20 Optical Device Drive Notice CAUTION: This appliance contains a laser system and is specifically designed for your nearest "AUTHORIZED service station." In case of any trouble with this manual for wet location. „ Never touch the telephone...
... than a cordless type) during an electrical storm. To use the telephone function to disassemble the enclosure. There may be a remote risk of the leak. Preface 1-20 Optical Device Drive Notice CAUTION: This appliance contains a laser system and is specifically designed for your nearest "AUTHORIZED service station." In case of any trouble with this manual for wet location. „ Never touch the telephone...
User Manual
Page 23
... when using keyboard, touchpad, hard disk drive, and optical storage drive. Manual Map This User's Manual provides instructions and illustrations on how to tell our users that if you have all the accessories of this notebook. Also, this chapter provides the specification of this notebook, and introduces the function buttons, quick launch buttons, connectors, LEDs and externals of this notebook. Chapter 2, Introductions, includes the descriptions of all the accessories included when you open...
... when using keyboard, touchpad, hard disk drive, and optical storage drive. Manual Map This User's Manual provides instructions and illustrations on how to tell our users that if you have all the accessories of this notebook. Also, this chapter provides the specification of this notebook, and introduces the function buttons, quick launch buttons, connectors, LEDs and externals of this notebook. Chapter 2, Introductions, includes the descriptions of all the accessories included when you open...

User Manual
Page 32
... Lock function is enabled. 5. Wireless LAN: Glowing blue when wireless LAN function is activated. Introductions 2-11 type of battery recommended by the manufacturer. Š Battery LED goes out when it is fully charged or when the AC adapter is activated. With the help of the notebook. 6. Webcam Touch this sensor to activate the specific applications or tools. Num Lock: Glowing blue when the Num Lock function is disconnected. Scroll Lock: Glowing blue when the Scroll Lock function is a pointing device...
... Lock function is enabled. 5. Wireless LAN: Glowing blue when wireless LAN function is activated. Introductions 2-11 type of battery recommended by the manufacturer. Š Battery LED goes out when it is fully charged or when the AC adapter is activated. With the help of the notebook. 6. Webcam Touch this sensor to activate the specific applications or tools. Num Lock: Glowing blue when the Num Lock function is disconnected. Scroll Lock: Glowing blue when the Scroll Lock function is a pointing device...
User Manual
Page 33
... attempt to operate beyond product specifications. „ The overclocking value may cause damages to the CPU and the system, and it is connected, press the TURBO button to raise the over -clocking setting is designed to turn the Bluetooth function on the CPU you use. „ Factory warranty will be void if the original equipped CPU or DRAM is replaced. Press the (optional) button again to...
... attempt to operate beyond product specifications. „ The overclocking value may cause damages to the CPU and the system, and it is connected, press the TURBO button to raise the over -clocking setting is designed to turn the Bluetooth function on the CPU you use. „ Factory warranty will be void if the original equipped CPU or DRAM is replaced. Press the (optional) button again to...

User Manual
Page 37
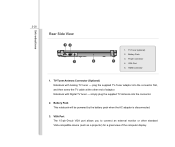
E-SATA Connector (External Serial ATA)/ USB Port The E-SATA Connector allows you to connect USB-interface peripheral devices, such as MMC (Multi-Media Card), XD (eXtreme Digital), SD (Secure Digital) or MS (Memory Stick) cards. Users can now utilize shielded cable outside the notebook to take advantage of memory card, such as the mouse, keyboard, modem, portable hard disk module, printer and more. 7. Ventilator The ventilator is used to connect an external Serial ATA device. DO NOT block...
E-SATA Connector (External Serial ATA)/ USB Port The E-SATA Connector allows you to connect USB-interface peripheral devices, such as MMC (Multi-Media Card), XD (eXtreme Digital), SD (Secure Digital) or MS (Memory Stick) cards. Users can now utilize shielded cable outside the notebook to take advantage of memory card, such as the mouse, keyboard, modem, portable hard disk module, printer and more. 7. Ventilator The ventilator is used to connect an external Serial ATA device. DO NOT block...

User Manual
Page 40
... object, such as a multi-functional DVD Dual Drive and a DVD RAM Drive. Š Blu-ray is a high-capacity optical disc that allows you can make a dial-up connection. 3. Introductions 2-19 2. Kensington Lock This notebook provides a Kensington Lock hole, which allows the whole cable to connect USB-interface peripheral devices, such as the mouse, keyboard, modem, portable hard disk module, printer and more. 5. USB Port The USB 2.0 port allows you to connect an RJ-11 telephone line...
... object, such as a multi-functional DVD Dual Drive and a DVD RAM Drive. Š Blu-ray is a high-capacity optical disc that allows you can make a dial-up connection. 3. Introductions 2-19 2. Kensington Lock This notebook provides a Kensington Lock hole, which allows the whole cable to connect USB-interface peripheral devices, such as the mouse, keyboard, modem, portable hard disk module, printer and more. 5. USB Port The USB 2.0 port allows you to connect an RJ-11 telephone line...
User Manual
Page 41
... the TV cable at the other standard VGA-compatible device (such as a projector) for a great view of adaptor. VGA Port 5. Battery Pack This notebook will be powered by the battery pack when the AC adapter is disconnected. 3. VGA Port The 15-pin-D-sub VGA port allows you to connect an external monitor or other end of the computer display. TV Tuner (optional) 2. Power connector 1 4. HDMI connector 1. Battery Pack...
... the TV cable at the other standard VGA-compatible device (such as a projector) for a great view of adaptor. VGA Port 5. Battery Pack This notebook will be powered by the battery pack when the AC adapter is disconnected. 3. VGA Port The 15-pin-D-sub VGA port allows you to connect an external monitor or other end of the computer display. TV Tuner (optional) 2. Power connector 1 4. HDMI connector 1. Battery Pack...

User Manual
Page 51
... area. If the battery power is critical to local regulations. Getting Started 3-7 Using the Battery Pack Battery Safety Tips Replacing or handling the battery incorrectly may be using it for proper disposal in your local solid waste officials for details about recycling options or for a period of time. Š Disable unnecessary settings or remove idle peripherals. Š Connect an AC adapter to the system whenever...
... area. If the battery power is critical to local regulations. Getting Started 3-7 Using the Battery Pack Battery Safety Tips Replacing or handling the battery incorrectly may be using it for proper disposal in your local solid waste officials for details about recycling options or for a period of time. Š Disable unnecessary settings or remove idle peripherals. Š Connect an AC adapter to the system whenever...

User Manual
Page 58
... the LCD brightness. + Increase the LCD brightness. + Disable the computer's audio + function. Force the computer into suspend mode (depending on the keyboard, which are used to your Windows manual or online help. „ [Fn] Key + + Switch the display output mode between the LCD, external monitor and both. Getting Started 3-14 Function Keys „ Windows Keys You can find the Windows Logo key ( ) and one Application Logo key ( ) on the system + configuration). Increase the built-in speaker's + volume. Enable or disable the touchpad function...
... the LCD brightness. + Increase the LCD brightness. + Disable the computer's audio + function. Force the computer into suspend mode (depending on the keyboard, which are used to your Windows manual or online help. „ [Fn] Key + + Switch the display output mode between the LCD, external monitor and both. Getting Started 3-14 Function Keys „ Windows Keys You can find the Windows Logo key ( ) and one Application Logo key ( ) on the system + configuration). Increase the built-in speaker's + volume. Enable or disable the touchpad function...

User Manual
Page 60
... across the pad, the cursor on a proper location of your personal needs. To configure the touchpad, you to meet your display. Unlike the traditional pointing device such as the mouse, the whole touchpad can customize the pointing device to change the size, shape, moving speed and other advanced features of the two buttons. For example, if you are a left-handed user, you may...
... across the pad, the cursor on a proper location of your personal needs. To configure the touchpad, you to meet your display. Unlike the traditional pointing device such as the mouse, the whole touchpad can customize the pointing device to change the size, shape, moving speed and other advanced features of the two buttons. For example, if you are a left-handed user, you may...
User Manual
Page 66
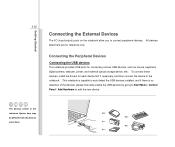
... the devices users have. This notebook is capable to auto detect the USB devices installed, and if there is no detection of the devices, please manually enable the USB devices by going to Start Menu / Control Panel / Add Hardware to the notebook. To connect these devices, install the drivers for each device first if necessary, and then connect the device to add the new device. Connecting the Peripheral Devices Connecting the USB devices This notebook provides USB ports for reference only. Getting Started 3-22 Connecting the External Devices...
... the devices users have. This notebook is capable to auto detect the USB devices installed, and if there is no detection of the devices, please manually enable the USB devices by going to Start Menu / Control Panel / Add Hardware to the notebook. To connect these devices, install the drivers for each device first if necessary, and then connect the device to add the new device. Connecting the Peripheral Devices Connecting the USB devices This notebook provides USB ports for reference only. Getting Started 3-22 Connecting the External Devices...

User Manual
Page 67
...-generation serial bus that you to connect many high-end peripheral devices and consumer electronic appliances, such as the DV (digital video camera). To connect the IEEE 1394 device, simply connect the cable of the device to the IEEE 1394 port of up to 63 devices, allowing you can connect and remove the IEEE 1394 devices without turning off the notebook. The IEEE 1394 standard interface supports "plug...
...-generation serial bus that you to connect many high-end peripheral devices and consumer electronic appliances, such as the DV (digital video camera). To connect the IEEE 1394 device, simply connect the cable of the device to the IEEE 1394 port of up to 63 devices, allowing you can connect and remove the IEEE 1394 devices without turning off the notebook. The IEEE 1394 standard interface supports "plug...

User Manual
Page 68
... display mode by default. Once the display is a new interface standard for PCs, displays and consumer electronics devices that supports standard, enhanced and high-definition video, plus multi-channel digital audio on the notebook and the external display should respond by pressing [Fn]+[F2]. To connect the external display, make sure the notebook and the external display are both powered off, and then connect the display to the notebook, power on a single cable. Getting Started 3-24 Connecting the External Display Devices...
... display mode by default. Once the display is a new interface standard for PCs, displays and consumer electronics devices that supports standard, enhanced and high-definition video, plus multi-channel digital audio on the notebook and the external display should respond by pressing [Fn]+[F2]. To connect the external display, make sure the notebook and the external display are both powered off, and then connect the display to the notebook, power on a single cable. Getting Started 3-24 Connecting the External Display Devices...
User Manual
Page 72
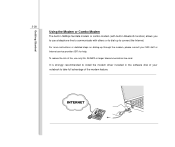
It is strongly recommended to install the modem driver included in Bluetooth function) allows you to use only No. 26 AWG or larger telecommunication line cord. Getting Started 3-28 Using the Modem or Combo Modem The built-in 56Kbps fax/data modem or combo modem (with built-in the software disk of your MIS staff or Internet service provider (ISP) for help...
It is strongly recommended to install the modem driver included in Bluetooth function) allows you to use only No. 26 AWG or larger telecommunication line cord. Getting Started 3-28 Using the Modem or Combo Modem The built-in 56Kbps fax/data modem or combo modem (with built-in the software disk of your MIS staff or Internet service provider (ISP) for help...
User Manual
Page 79
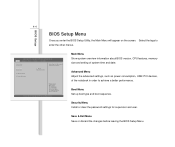
... F9: Optimized Default F4: Save ESC:Exit Version 1.24.1115. Advanced Menu Adjust the advanced settings, such as power consumption, USB/ PCI devices, of system time and date. Boot Menu Set up boot type and boot sequence. Copyright (C) 2008 American Megatrends, Inc. Use Tab to enter the other menus. Copyright (C) 2007 American Megatrends, Inc. BIOS Setup 4-4 BIOS Setup Menu Once you enter the BIOS Setup Utility, the Main Menu will appear on the screen. Select the...
... F9: Optimized Default F4: Save ESC:Exit Version 1.24.1115. Advanced Menu Adjust the advanced settings, such as power consumption, USB/ PCI devices, of system time and date. Boot Menu Set up boot type and boot sequence. Copyright (C) 2008 American Megatrends, Inc. Use Tab to enter the other menus. Copyright (C) 2007 American Megatrends, Inc. BIOS Setup 4-4 BIOS Setup Menu Once you enter the BIOS Setup Utility, the Main Menu will appear on the screen. Select the...
User Manual
Page 82
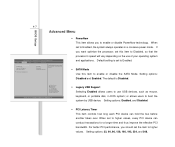
... bandwidth. Advanced Boot Security Save & Exit Power Now (tm) Technology SATA Mode Legacy USB Support PCI Legacy Timer Overclock Configuration [Enabled] [Disable] [Enabled] [32 PCI Bus Clocks] Enable/disable the generation of your operating system and applications. Default setting is Disabled. :Select Screen :Select Item Enter: Select +/-: Change Opt. 4-7 Advanced Menu BIOS Setup Main Atpio Setup Utility - When set to higher values, every PCI device can hold the bus before another takes over. Setting options: 32, 64...
... bandwidth. Advanced Boot Security Save & Exit Power Now (tm) Technology SATA Mode Legacy USB Support PCI Legacy Timer Overclock Configuration [Enabled] [Disable] [Enabled] [32 PCI Bus Clocks] Enable/disable the generation of your operating system and applications. Default setting is Disabled. :Select Screen :Select Item Enter: Select +/-: Change Opt. 4-7 Advanced Menu BIOS Setup Main Atpio Setup Utility - When set to higher values, every PCI device can hold the bus before another takes over. Setting options: 32, 64...

User Manual
Page 83
... Atpio Setup Utility - If ONLY the Supervisor's password is powered on the screen as below : Setup The password prompt appears only when end users try to run Setup. Enter New Password Type the password, up to specify the type of access right in the menu. F1: General Help F2: Previous Values F9: Optimized Default F4: Save ESC: Exit Version 1.24.1115.. The Password Check item is implemented. Setting options: No Access, View...
... Atpio Setup Utility - If ONLY the Supervisor's password is powered on the screen as below : Setup The password prompt appears only when end users try to run Setup. Enter New Password Type the password, up to specify the type of access right in the menu. F1: General Help F2: Previous Values F9: Optimized Default F4: Save ESC: Exit Version 1.24.1115.. The Password Check item is implemented. Setting options: No Access, View...

User Manual
Page 84
User Password only allows the user to enter the setup menu, but do not have the right to enter and change the settings of the setup menu; Supervisor Password allows the user to make changes. Once the password is disabled, the system will be disabled. BIOS Setup 4-9 To clear a set password, just press [Enter] when you can enter Setup without entering any password. A message box will show up confirming the password will boot and you are prompted to enter the password.
User Password only allows the user to enter the setup menu, but do not have the right to enter and change the settings of the setup menu; Supervisor Password allows the user to make changes. Once the password is disabled, the system will be disabled. BIOS Setup 4-9 To clear a set password, just press [Enter] when you can enter Setup without entering any password. A message box will show up confirming the password will boot and you are prompted to enter the password.

User Manual
Page 85
... Boot Configuration Full Screen Logo Display [Enabled] Quick Boot [Disabled] Enables/Disables Full Screen Logo Display. Boot Device Priority Boot Device #1 Boot Device #2 [SATA: WDC WD1600BE...] [NVIDIA Boot Agent...] Hard Drive BBS Priorities Network Device BBS Priorities :Select Screen :Select Item Enter: Select +/-: Change Opt. The default setting is Enabled. Š Full Screen Logo Display This item allows you to load the disk operating system. Copyright (C) 2008 American Megatrends, Inc. Š Boot Configuration Configure settings during system boot. Š Quiet Boot...
... Boot Configuration Full Screen Logo Display [Enabled] Quick Boot [Disabled] Enables/Disables Full Screen Logo Display. Boot Device Priority Boot Device #1 Boot Device #2 [SATA: WDC WD1600BE...] [NVIDIA Boot Agent...] Hard Drive BBS Priorities Network Device BBS Priorities :Select Screen :Select Item Enter: Select +/-: Change Opt. The default setting is Enabled. Š Full Screen Logo Display This item allows you to load the disk operating system. Copyright (C) 2008 American Megatrends, Inc. Š Boot Configuration Configure settings during system boot. Š Quiet Boot...

