
User Manual
Page 2
... of hazardous substances 1-7 Vietnam RoHS...1-7 Upgrade and Warranty 1-8 Acquisition of Replaceable Parts 1-8 Safety Instructions...1-9 MSI Highlights ...1-11 Introductions 2-1 Unpacking...2-2 Product Overview...2-3 Top-open View...2-3 Front Side View...2-5 Right Side View...2-6 Left Side View...2-7 Rear Side View...2-8 Bottom Side View...2-9 How to Use the Keyboard 2-10 Windows Key...2-10 Enable Quick Fn Launch Keys 2-11 Use Quick Fn Launch Keys 2-11 Snip and Sketch...2-12 Use Multiple Monitors 2-13 Specifications...2-14 1-2
... of hazardous substances 1-7 Vietnam RoHS...1-7 Upgrade and Warranty 1-8 Acquisition of Replaceable Parts 1-8 Safety Instructions...1-9 MSI Highlights ...1-11 Introductions 2-1 Unpacking...2-2 Product Overview...2-3 Top-open View...2-3 Front Side View...2-5 Right Side View...2-6 Left Side View...2-7 Rear Side View...2-8 Bottom Side View...2-9 How to Use the Keyboard 2-10 Windows Key...2-10 Enable Quick Fn Launch Keys 2-11 Use Quick Fn Launch Keys 2-11 Snip and Sketch...2-12 Use Multiple Monitors 2-13 Specifications...2-14 1-2
User Manual
Page 3
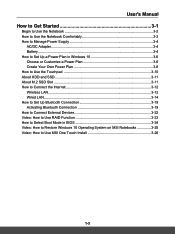
... or Customize a Power Plan 3-6 Create Your Own Power Plan 3-8 How to Use the Touchpad 3-10 About HDD and SSD 3-11 About M.2 SSD Slot...3-11 How to Connect the Internet 3-12 Wireless LAN...3-12 Wired LAN...3-14 How to Set Up Bluetooth Connection 3-19 Activating Bluetooth Connection 3-19 How to Connect External Devices 3-22 Video: How to Use RAID Function 3-23 How to Select Boot Mode in BIOS 3-24 Video: How to Restore Windows 10 Operating System on MSI Notebooks 3-25 Video: How to Use MSI One Touch Install 3-26 1-3
... or Customize a Power Plan 3-6 Create Your Own Power Plan 3-8 How to Use the Touchpad 3-10 About HDD and SSD 3-11 About M.2 SSD Slot...3-11 How to Connect the Internet 3-12 Wireless LAN...3-12 Wired LAN...3-14 How to Set Up Bluetooth Connection 3-19 Activating Bluetooth Connection 3-19 How to Connect External Devices 3-22 Video: How to Use RAID Function 3-23 How to Select Boot Mode in BIOS 3-24 Video: How to Restore Windows 10 Operating System on MSI Notebooks 3-25 Video: How to Use MSI One Touch Install 3-26 1-3
User Manual
Page 8
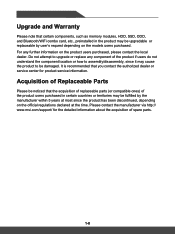
... the time. Acquisition of Replaceable Parts Please be damaged. Please contact the manufacturer via http:// www.msi.com/support/ for product service information. It is recommended that the acquisition of replaceable parts (or compatible ones) of the product if users do not understand the component location or how to upgrade or replace any further information on the models users purchased. For any component...
... the time. Acquisition of Replaceable Parts Please be damaged. Please contact the manufacturer via http:// www.msi.com/support/ for product service information. It is recommended that the acquisition of replaceable parts (or compatible ones) of the product if users do not understand the component location or how to upgrade or replace any further information on the models users purchased. For any component...
User Manual
Page 9
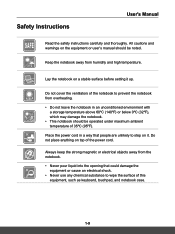
... of the power cord. Do not place anything on top of the notebook to prevent the notebook from overheating. • Do not leave the notebook in a way that could damage the equipment or cause an electrical shock. • Never use any chemical substance to step on a stable surface before setting it . Safety Instructions User's Manual Read the safety instructions carefully...
... of the power cord. Do not place anything on top of the notebook to prevent the notebook from overheating. • Do not leave the notebook in a way that could damage the equipment or cause an electrical shock. • Never use any chemical substance to step on a stable surface before setting it . Safety Instructions User's Manual Read the safety instructions carefully...

User Manual
Page 16
... to force a shutdown, if needed. Webcam/ Webcam LED/ Internal Microphone • This built-in microphone shares the same function with an external one. 2. Power LED/ GPU Mode LED • Glowing white when the notebook power is turned on . • Webcam LED indicator, next to the sleep state. • LED goes off . • The built-in webcam can be used for details. 4. Refer to How to Use the Keyboard for picture taking, video recording or conferencing, and...
... to force a shutdown, if needed. Webcam/ Webcam LED/ Internal Microphone • This built-in microphone shares the same function with an external one. 2. Power LED/ GPU Mode LED • Glowing white when the notebook power is turned on . • Webcam LED indicator, next to the sleep state. • LED goes off . • The built-in webcam can be used for details. 4. Refer to How to Use the Keyboard for picture taking, video recording or conferencing, and...
User Manual
Page 18
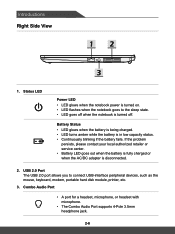
... AC/DC adapter is in low capacity status. • Continuously blinking if the battery fails. USB 2.0 Port The USB 2.0 port allows you to the sleep state. • LED goes off when the notebook is turned off. Introductions Right Side View 1. Status LED Power LED • LED glows when the notebook power is turned on. • LED flashes when the notebook goes to connect USB-interface peripheral devices, such as the mouse, keyboard, modem, portable hard disk module, printer, etc...
... AC/DC adapter is in low capacity status. • Continuously blinking if the battery fails. USB 2.0 Port The USB 2.0 port allows you to the sleep state. • LED goes off when the notebook is turned off. Introductions Right Side View 1. Status LED Power LED • LED glows when the notebook power is turned on. • LED flashes when the notebook goes to connect USB-interface peripheral devices, such as the mouse, keyboard, modem, portable hard disk module, printer, etc...
User Manual
Page 19
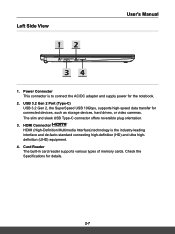
Left Side View User's Manual 1. HDMI Connector HDMI (High-Definition Multimedia Interface) technology is to connect the AC/DC adapter and supply power for the notebook. 2. USB 3.2 Gen 2 Port (Type-C) USB 3.2 Gen 2, the SuperSpeed USB 10Gbps, supports high-speed data transfer for details. 2-7 The slim and sleek USB Type-C connector offers reversible plug orientation. 3. Card Reader The built-in card reader supports various types of memory cards. Power Connector This connector is the industry-leading interface...
Left Side View User's Manual 1. HDMI Connector HDMI (High-Definition Multimedia Interface) technology is to connect the AC/DC adapter and supply power for the notebook. 2. USB 3.2 Gen 2 Port (Type-C) USB 3.2 Gen 2, the SuperSpeed USB 10Gbps, supports high-speed data transfer for details. 2-7 The slim and sleek USB Type-C connector offers reversible plug orientation. 3. Card Reader The built-in card reader supports various types of memory cards. Power Connector This connector is the industry-leading interface...
User Manual
Page 21
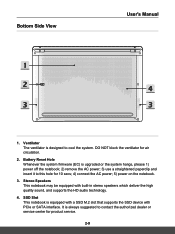
... View User's Manual 1. Battery Reset Hole Whenever the system firmware (EC) is equipped with a SSD M.2 slot that supports the SSD device with built-in stereo speakers which deliver the high quality sound, and supports the HD audio technology. 4. SSD Slot This notebook is upgraded or the system hangs, please 1) power off the notebook; 2) remove the AC power; 3) use a straightened paperclip and insert it to contact the authorized dealer or service...
... View User's Manual 1. Battery Reset Hole Whenever the system firmware (EC) is equipped with a SSD M.2 slot that supports the SSD device with built-in stereo speakers which deliver the high quality sound, and supports the HD audio technology. 4. SSD Slot This notebook is upgraded or the system hangs, please 1) power off the notebook; 2) remove the AC power; 3) use a straightened paperclip and insert it to contact the authorized dealer or service...

User Manual
Page 22
With the help of these keys, users will be able to Use the Keyboard This notebook provides a full functioned keyboard. To ensure that the keyboard will be functioning properly, it is used to activate the specific applications or tools. Windows Key You can find the Windows Logo key on the keyboard to perform Windows-specific functions, such as opening the Start menu and launching the shortcut menu. 2-10 Use the Fn keys on the keyboard which is a must to install the necessary applications before using the keyboard function keys. Introductions How to work more efficiently.
With the help of these keys, users will be able to Use the Keyboard This notebook provides a full functioned keyboard. To ensure that the keyboard will be functioning properly, it is used to activate the specific applications or tools. Windows Key You can find the Windows Logo key on the keyboard to perform Windows-specific functions, such as opening the Start menu and launching the shortcut menu. 2-10 Use the Fn keys on the keyboard which is a must to install the necessary applications before using the keyboard function keys. Introductions How to work more efficiently.

User Manual
Page 23
... to enable Quick Fn Launch Keys. Webcam • Enable or disable the Webcam function. • Webcam is available to use with an easy single press. • Users can disable the normal fn keys by press Fn and ESC keys to Use Quick Fn Launch Keys for details. + • The Fn Lock LED indicator, located on the f5 keycap, glows when the microphone function is enabled . Touchpad Enable or disable the touchpad function. Each function key, F1 to restore the default fn keys, and Fn Lock LED indicator...
... to enable Quick Fn Launch Keys. Webcam • Enable or disable the Webcam function. • Webcam is available to use with an easy single press. • Users can disable the normal fn keys by press Fn and ESC keys to Use Quick Fn Launch Keys for details. + • The Fn Lock LED indicator, located on the f5 keycap, glows when the microphone function is enabled . Touchpad Enable or disable the touchpad function. Each function key, F1 to restore the default fn keys, and Fn Lock LED indicator...

User Manual
Page 24
... a backlight LED level according to rotate the screen upside down for 180 degrees. Introductions Creator Center • This notebook may be pre-installing with a versatile utility, Creator Center, providing users an astonished and efficient solution in multitasking. • Use this key to its default position. LCD Brightness Settings • f9: Decrease the LCD brightness • f10: Increase the LCD brightness Switch Display Switch the display output mode between the LCD, external monitor and both...
... a backlight LED level according to rotate the screen upside down for 180 degrees. Introductions Creator Center • This notebook may be pre-installing with a versatile utility, Creator Center, providing users an astonished and efficient solution in multitasking. • Use this key to its default position. LCD Brightness Settings • f9: Decrease the LCD brightness • f10: Increase the LCD brightness Switch Display Switch the display output mode between the LCD, external monitor and both...
User Manual
Page 25
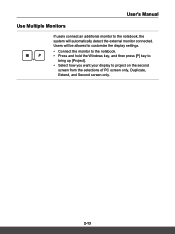
Users will be allowed to customize the display settings. • Connect the monitor to the notebook. • Press and hold the Windows key, and then press [P] key to + bring up [Project]. • Select how you want your display to the notebook, the system will automatically detect the external monitor connected. User's Manual Use Multiple Monitors If users connect an additional monitor to project on the second screen from the selections of PC screen only, Duplicate, Extend, and Second screen only. 2-13
Users will be allowed to customize the display settings. • Connect the monitor to the notebook. • Press and hold the Windows key, and then press [P] key to + bring up [Project]. • Select how you want your display to the notebook, the system will automatically detect the external monitor connected. User's Manual Use Multiple Monitors If users connect an additional monitor to project on the second screen from the selections of PC screen only, Duplicate, Extend, and Second screen only. 2-13
User Manual
Page 27
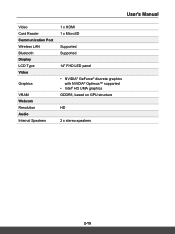
User's Manual Video Card Reader Communication Port Wireless LAN Bluetooth Display LCD Type Video Graphics VRAM Webcam Resolution Audio Internal Speakers 1 x HDMI 1 x MicroSD Supported Supported 14" FHD LED panel • NVIDIA® GeForce® discrete graphics with NVIDIA® Optimus™ supported • Intel® HD UMA graphics GDDR5, based on GPU structure HD 2 x stereo speakers 2-15
User's Manual Video Card Reader Communication Port Wireless LAN Bluetooth Display LCD Type Video Graphics VRAM Webcam Resolution Audio Internal Speakers 1 x HDMI 1 x MicroSD Supported Supported 14" FHD LED panel • NVIDIA® GeForce® discrete graphics with NVIDIA® Optimus™ supported • Intel® HD UMA graphics GDDR5, based on GPU structure HD 2 x stereo speakers 2-15

User Manual
Page 32
... low battery power, it is likely to the notebook. ▶▶ Battery type • This notebook may not be equipped with a non-removable battery, follow the local regulations while discarding the notebook. • Always keep the notebook and its battery away from the in use AC/DC adapter. • Unplug the AC power cord before disassembly the notebook. ▶▶ Don'ts • Cover an in order to...
... low battery power, it is likely to the notebook. ▶▶ Battery type • This notebook may not be equipped with a non-removable battery, follow the local regulations while discarding the notebook. • Always keep the notebook and its battery away from the in use AC/DC adapter. • Unplug the AC power cord before disassembly the notebook. ▶▶ Don'ts • Cover an in order to...

User Manual
Page 33
... the battery power completely once a month is necessary. • The actual charging time will be using it for a period of time. • Disable unnecessary settings or remove idle peripherals. • Connect an AC/DC adapter to the system whenever possible. ▶▶ How to charge the battery properly Please pay attention to the following tips before recharging the battery: • If a charged battery pack...
... the battery power completely once a month is necessary. • The actual charging time will be using it for a period of time. • Disable unnecessary settings or remove idle peripherals. • Connect an AC/DC adapter to the system whenever possible. ▶▶ How to charge the battery properly Please pay attention to the following tips before recharging the battery: • If a charged battery pack...

User Manual
Page 36
How to Get Started Create Your Own Power Plan You are allowed to create your needs most, and give the new power plan a name. Click [Next] to make the customized power plan taking effect. 4. Now you have a new power plan that meets your own Power Plan and customize it to meet personal requirements. 1. Change the settings for the plan. Click [Create a power plan] in Power Options. 2. Select an existing plan that is automatically set as active. 3-8 Click [Create] to continue. 3.
How to Get Started Create Your Own Power Plan You are allowed to create your needs most, and give the new power plan a name. Click [Next] to make the customized power plan taking effect. 4. Now you have a new power plan that meets your own Power Plan and customize it to meet personal requirements. 1. Change the settings for the plan. Click [Create a power plan] in Power Options. 2. Select an existing plan that is automatically set as active. 3-8 Click [Create] to continue. 3.

User Manual
Page 38
... across the pad, the cursor on the screen will act as a miniature duplicate of your Windows operating system. How to Get Started How to Use the Touchpad The touchpad integrated in your notebook is a pointing device that is compatible with standard mouse, allowing you to control the notebook by pointing the location of the cursor on the screen. ▶▶ Configure the Touchpad You can change the configuration. ▶...
... across the pad, the cursor on the screen will act as a miniature duplicate of your Windows operating system. How to Get Started How to Use the Touchpad The touchpad integrated in your notebook is a pointing device that is compatible with standard mouse, allowing you to control the notebook by pointing the location of the cursor on the screen. ▶▶ Configure the Touchpad You can change the configuration. ▶...

User Manual
Page 39
... notebook may be equipped with the touchpad on the second tap. The hard disk drive and solid state drive are compatible with M.2 SSD slots for the replacement of operating your finger to the desired location; Consult an authorized retailer or service center for storing and retrieving digital information. User's Manual ▶▶ Point and Click When you have higher data transfer rates, lower power...
... notebook may be equipped with the touchpad on the second tap. The hard disk drive and solid state drive are compatible with M.2 SSD slots for the replacement of operating your finger to the desired location; Consult an authorized retailer or service center for storing and retrieving digital information. User's Manual ▶▶ Point and Click When you have higher data transfer rates, lower power...

User Manual
Page 40
... to Connect the Internet Wireless LAN Wireless LAN is a wireless broadband connection that allows you to connect to continue. 8. Open up a Wireless LAN connection. 1. Make sure [Airplane mode] is set to set up Settings, find and click [Network & Internet]. 2. A security key may be required for connecting the selected network. Click [Connect] to the Internet without using any cables. Follow the instructions as below to [Off]. 4. Select [Wi-Fi] within the Network & Internet selection menu. 3. Switch [ON] the Wi-Fi function if it is turn...
... to Connect the Internet Wireless LAN Wireless LAN is a wireless broadband connection that allows you to connect to continue. 8. Open up a Wireless LAN connection. 1. Make sure [Airplane mode] is set to set up Settings, find and click [Network & Internet]. 2. A security key may be required for connecting the selected network. Click [Connect] to the Internet without using any cables. Follow the instructions as below to [Off]. 4. Select [Wi-Fi] within the Network & Internet selection menu. 3. Switch [ON] the Wi-Fi function if it is turn...
User Manual
Page 42
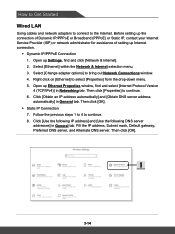
...]. 3-14 Select [Change adapter options] to continue. 6. Then click [Properties] to bring out Network Connections window. 4. Fill the IP address, Subnet mask, Default gateway, Preferred DNS server, and Alternate DNS server. How to Get Started Wired LAN Using cables and network adapters to connect to the Internet. Before setting up the connection of Dynamic IP/PPPoE or Broadband (PPPoE) or Static IP, contact your Internet Service Provider (ISP) or network administrator...
...]. 3-14 Select [Change adapter options] to continue. 6. Then click [Properties] to bring out Network Connections window. 4. Fill the IP address, Subnet mask, Default gateway, Preferred DNS server, and Alternate DNS server. How to Get Started Wired LAN Using cables and network adapters to connect to the Internet. Before setting up the connection of Dynamic IP/PPPoE or Broadband (PPPoE) or Static IP, contact your Internet Service Provider (ISP) or network administrator...

