User Manual
Page 2
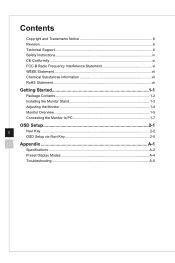
Contents Copyright and Trademarks Notice iii Revision iii Technical Support iii Safety Instructions iv CE Conformity vi FCC-B Radio Frequency Interference Statement vi WEEE Statement vii Chemical Substances Information vii RoHS Statement vii Getting Started 1-1 Package Contents 1-2 Installing the Monitor Stand 1-3 Adjusting the Monitor 1-4 Monitor Overview 1-5 Connecting the Monitor to PC 1-7 OSD Setup 2-1 ii Navi Key 2-2 OSD Setup via Navi Key 2-5 Appendix A-1 Specifications A-2 Preset Display Modes A-4 Troubleshooting A-5
Contents Copyright and Trademarks Notice iii Revision iii Technical Support iii Safety Instructions iv CE Conformity vi FCC-B Radio Frequency Interference Statement vi WEEE Statement vii Chemical Substances Information vii RoHS Statement vii Getting Started 1-1 Package Contents 1-2 Installing the Monitor Stand 1-3 Adjusting the Monitor 1-4 Monitor Overview 1-5 Connecting the Monitor to PC 1-7 OSD Setup 2-1 ii Navi Key 2-2 OSD Setup via Navi Key 2-5 Appendix A-1 Specifications A-2 Preset Display Modes A-4 Troubleshooting A-5
User Manual
Page 3
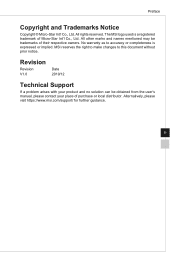
... used is expressed or implied. MSI reserves the right to make changes to accuracy or completeness is a registered trademark of Micro-Star Int'l Co., Ltd. All other marks and names mentioned may be obtained from the user's manual, please contact your place of their respective owners. All rights reserved. Revision Revision V1.0 Date 2019/12 Technical Support If a problem...
... used is expressed or implied. MSI reserves the right to make changes to accuracy or completeness is a registered trademark of Micro-Star Int'l Co., Ltd. All other marks and names mentioned may be obtained from the user's manual, please contact your place of their respective owners. All rights reserved. Revision Revision V1.0 Date 2019/12 Technical Support If a problem...
User Manual
Page 4
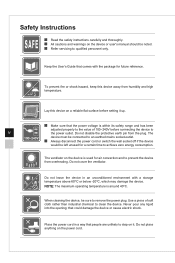
... safety instructions carefully and thoroughly. ◙◙ All cautions and warnings on the power cord. Never pour any liquid into the opening; Use a piece of 100~240V before setting it . Do not place anything on the device or user's manual should be sure to clean the device. Lay this device away from humidity and high temperature. Do not cover the...
... safety instructions carefully and thoroughly. ◙◙ All cautions and warnings on the power cord. Never pour any liquid into the opening; Use a piece of 100~240V before setting it . Do not place anything on the device or user's manual should be sure to clean the device. Lay this device away from humidity and high temperature. Do not cover the...

User Manual
Page 5
...use of natural resources by service personnel: ◙◙ The power cord or plug is likely to less than one hour per day. If any of the following situations arises, get the device checked by encouraging recycling ◙◙ Extended product lifetime through easy upgrades ◙◙ Reduced solid waste production through take -back, recycling, and disassembly of screens... device does not work well or you can not get it work according to user's manual. ◙◙ The device has dropped and damaged. ◙◙ The device has obvious sign of parts and recycling and should...
...use of natural resources by service personnel: ◙◙ The power cord or plug is likely to less than one hour per day. If any of the following situations arises, get the device checked by encouraging recycling ◙◙ Extended product lifetime through easy upgrades ◙◙ Reduced solid waste production through take -back, recycling, and disassembly of screens... device does not work well or you can not get it work according to user's manual. ◙◙ The device has dropped and damaged. ◙◙ The device has obvious sign of parts and recycling and should...
User Manual
Page 6
... B digital device, pursuant to comply with the harmonized standards for help. If this device may cause undesired operation. However, there is no guarantee that to which can radiate radio frequency energy and, if not installed and used in order to comply with the instruction manual, may...the equipment and receiver. ■■ Connect the equipment into an outlet on the Approximation of the Laws of the Member States relating to the following two conditions: 1. Notice 2 Shielded interface cables and AC power cord, if any interference received, including interference that...
... B digital device, pursuant to comply with the harmonized standards for help. If this device may cause undesired operation. However, there is no guarantee that to which can radiate radio frequency energy and, if not installed and used in order to comply with the instruction manual, may...the equipment and receiver. ■■ Connect the equipment into an outlet on the Approximation of the Laws of the Member States relating to the following two conditions: 1. Notice 2 Shielded interface cables and AC power cord, if any interference received, including interference that...

User Manual
Page 7
..." cannot be discarded as municipal waste anymore and manufacturers of covered electronic equipment will be obligated to the EEE Regulations of the... Japanese regulatory requirement, defined by MSI comply with Circular 30/2011/TT-BCT temporarily regulating the permitted limits for a number of electronic products offered for sale...use of their useful life. Vietnam RoHS As from December 1, 2012, all products manufactured by specification JIS C 0950, mandates that manufacturers provide material declarations for the exemptions set in electronic and electric products. https://www.msi...
..." cannot be discarded as municipal waste anymore and manufacturers of covered electronic equipment will be obligated to the EEE Regulations of the... Japanese regulatory requirement, defined by MSI comply with Circular 30/2011/TT-BCT temporarily regulating the permitted limits for a number of electronic products offered for sale...use of their useful life. Vietnam RoHS As from December 1, 2012, all products manufactured by specification JIS C 0950, mandates that manufacturers provide material declarations for the exemptions set in electronic and electric products. https://www.msi...

User Manual
Page 10
Package Contents 1. Warranty Card 10. VESA Cover Screws * Contact your place of purchase or local distributor if any of the items is damaged or missing. * Package contents may vary by country. 1-2 Power Cord 5. USB Upstream Cable (to enable the USB ports on the monitor) 8. Quick Start Guide 9. Stand 3. Stand Base with Screw 4. DisplayPort Cable (for MAG271CQR) 7. HDMI Cable 6. Monitor 2.
Package Contents 1. Warranty Card 10. VESA Cover Screws * Contact your place of purchase or local distributor if any of the items is damaged or missing. * Package contents may vary by country. 1-2 Power Cord 5. USB Upstream Cable (to enable the USB ports on the monitor) 8. Quick Start Guide 9. Stand 3. Stand Base with Screw 4. DisplayPort Cable (for MAG271CQR) 7. HDMI Cable 6. Monitor 2.

User Manual
Page 11
Place the monitor on a soft, protected surface to secure the base. IMPORTANT 1. The holes for installing the stand can be also used for proper wall mount kit. 1 1-3 2 3 Please contact your dealer for wall mount. Tighten the base screw to avoid scratching the display panel. 2. Fit the stand to the stand. 3. Connect the base to the monitor. 2. Getting Started Installing the Monitor Stand 1.
Place the monitor on a soft, protected surface to secure the base. IMPORTANT 1. The holes for installing the stand can be also used for proper wall mount kit. 1 1-3 2 3 Please contact your dealer for wall mount. Tighten the base screw to avoid scratching the display panel. 2. Fit the stand to the stand. 3. Connect the base to the monitor. 2. Getting Started Installing the Monitor Stand 1.

User Manual
Page 12
IMPORTANT Avoid touching the display panel when adjusting the monitor. 130mm 1-4 Adjusting the Monitor This monitor is designed to maximize your viewing comfort with its adjustment capabilities such as tilt and lift.
IMPORTANT Avoid touching the display panel when adjusting the monitor. 130mm 1-4 Adjusting the Monitor This monitor is designed to maximize your viewing comfort with its adjustment capabilities such as tilt and lift.

User Manual
Page 15
Getting Started Connecting the Monitor to the monitor power jack. (Figure A) 4. Connect the HDMI/DisplayPort cable from the monitor to your computer. 2. Power on the monitor. (Figure C) 6. Connect the power cord to PC 1. A ~ B 1-7 C Turn on the computer then monitor will auto detect signal source. Plug the power cord into the electrical outlet. (Figure B) 5. Turn off your computer. 3.
Getting Started Connecting the Monitor to the monitor power jack. (Figure A) 4. Connect the HDMI/DisplayPort cable from the monitor to your computer. 2. Power on the monitor. (Figure C) 6. Connect the power cord to PC 1. A ~ B 1-7 C Turn on the computer then monitor will auto detect signal source. Plug the power cord into the electrical outlet. (Figure B) 5. Turn off your computer. 3.

User Manual
Page 19
Right Input Source ■■ Press Middle Button to confirm selection and exit. ■■ Press Up and Down Buttons to select. ■■ Press Left Button to cancel preview and exit. OSD Setup Navi Key Up Down Hot Key Basic Operations (When OSD menu is OFF) Game Mode ■■ Press Middle Button to confirm selection and exit. ■■ Press...
Right Input Source ■■ Press Middle Button to confirm selection and exit. ■■ Press Up and Down Buttons to select. ■■ Press Left Button to cancel preview and exit. OSD Setup Navi Key Up Down Hot Key Basic Operations (When OSD menu is OFF) Game Mode ■■ Press Middle Button to confirm selection and exit. ■■ Press...

User Manual
Page 20
... Button to turn off the Refresh Rate. Users may enter the OSD Menu to turn on and Left Button to customize their own Navi Key Hot Keys. More Hot Key options are as below. Navi Key Hot Key Options Brightness Operations ■■ Press Middle Button to save value and exit. ■■ Press Up and Down Buttons to adjust. ■■ Press Left Button...
... Button to turn off the Refresh Rate. Users may enter the OSD Menu to turn on and Left Button to customize their own Navi Key Hot Keys. More Hot Key options are as below. Navi Key Hot Key Options Brightness Operations ■■ Press Middle Button to save value and exit. ■■ Press Up and Down Buttons to adjust. ■■ Press Left Button...

User Manual
Page 21
... out. ■■ This function is set to launch the On-Screen Display (OSD) main menu. OSD Setup OSD Setup via Navi Key Press the Middle button of Navi Key to Fastest with at Fast least 75Hz Screen Refresh Rate, Anti Motion Blur will be adjusted, except for Brightness, Contrast and Image Enhancement. RPG All items can adjust Response Time in any Mode. ■■ When Response Time is...
... out. ■■ This function is set to launch the On-Screen Display (OSD) main menu. OSD Setup OSD Setup via Navi Key Press the Middle button of Navi Key to Fastest with at Fast least 75Hz Screen Refresh Rate, Anti Motion Blur will be adjusted, except for Brightness, Contrast and Image Enhancement. RPG All items can adjust Response Time in any Mode. ■■ When Response Time is...
User Manual
Page 22
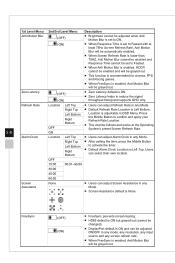
...;■ Default Refresh Rate Location is adjustable in OSD Menu. Right Top Left Bottom Right Bottom ■■ After setting the time, press the Middle Button to reduce the signal throughput timing and supports QHD only. Users can adjust Refresh Rate in any Mode. ■■ Screen Assistance default is None. 1st Level Menu 2nd/3rd Level Menu Description Anti Motion Blur (OFF) ■■ Brightness cannot be adjusted when Anti...
...;■ Default Refresh Rate Location is adjustable in OSD Menu. Right Top Left Bottom Right Bottom ■■ After setting the time, press the Middle Button to reduce the signal throughput timing and supports QHD only. Users can adjust Refresh Rate in any Mode. ■■ Screen Assistance default is None. 1st Level Menu 2nd/3rd Level Menu Description Anti Motion Blur (OFF) ■■ Brightness cannot be adjusted when Anti...

User Manual
Page 23
... protects your mode type. Image Enhancement OFF Weak Medium Strong ■■ Image Enhancement enhances image edges to improve their acutance. ■■ Users can be adjusted, except for Brightness, Contrast and Image Enhancement. HDCR (OFF) ■■ HDCR default is mandatory to Fastest. OSD Setup hh Professional 1st Level Menu 2nd Level Menu Description Pro Mode User Default mode. Strongest Reader All items can be set to Reader...
... protects your mode type. Image Enhancement OFF Weak Medium Strong ■■ Image Enhancement enhances image edges to improve their acutance. ■■ Users can be adjusted, except for Brightness, Contrast and Image Enhancement. HDCR (OFF) ■■ HDCR default is mandatory to Fastest. OSD Setup hh Professional 1st Level Menu 2nd Level Menu Description Pro Mode User Default mode. Strongest Reader All items can be set to Reader...

User Manual
Page 24
... adjust Contrast in any Mode. Screen Size 19" ■■ Screen Size default is 16:9. 2-8 24" ■■ Users can adjust Screen Size in any mode, 4:3 any resolution and any screen refresh rate. 16:9 hh Input Source 1st Level Menu HDMI1 HDMI2 DP Description Users can adjust Input Source in any Mode. ■■ Sharpness improves clarity and details of MAG271CQR is 50. ■■ Users can adjust Sharpness in any Mode. hh Image 1st Level Menu 2nd/3rd Level Menu Description Brightness...
... adjust Contrast in any Mode. Screen Size 19" ■■ Screen Size default is 16:9. 2-8 24" ■■ Users can adjust Screen Size in any mode, 4:3 any resolution and any screen refresh rate. 16:9 hh Input Source 1st Level Menu HDMI1 HDMI2 DP Description Users can adjust Input Source in any Mode. ■■ Sharpness improves clarity and details of MAG271CQR is 50. ■■ Users can adjust Sharpness in any Mode. hh Image 1st Level Menu 2nd/3rd Level Menu Description Brightness...

User Manual
Page 25
... Bottom Display Switch Audio Switch Source HDMI1 HDMI2 DP Display Switch Audio Switch Description ■■ PIP (Picture in inset windows. ■■ PBP (Picture by Picture) is a similar feature that displays two input sources side-by-side on the screen. ■■ PIP/PBP default is displayed on one screen. One program is OFF. ■■ Display Switch allows users to switch between primary and secondary input sources. ■■ Audio Switch allows users to simultaneously display multiple video sources on...
... Bottom Display Switch Audio Switch Source HDMI1 HDMI2 DP Display Switch Audio Switch Description ■■ PIP (Picture in inset windows. ■■ PBP (Picture by Picture) is a similar feature that displays two input sources side-by-side on the screen. ■■ PIP/PBP default is displayed on one screen. One program is OFF. ■■ Display Switch allows users to switch between primary and secondary input sources. ■■ Audio Switch allows users to simultaneously display multiple video sources on...
User Manual
Page 27
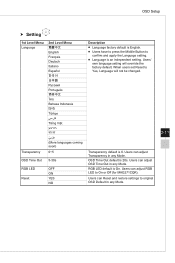
...;■ Language factory default is English. ■■ Users have to press the Middle Button to original OSD Default in any Mode. 2-11 RGB LED default is 0. Users can adjust RGB LED to Yes, Language will override the factory default. When users set Reset to On or Off (for MAG271CQR). Users' own language setting will not be changed. Users can Reset and restore settings to confirm and apply the Language setting. ■■ Language is 20s. Users can adjust OSD Time Out in any Mode. Users can adjust Transparency...
...;■ Language factory default is English. ■■ Users have to press the Middle Button to original OSD Default in any Mode. 2-11 RGB LED default is 0. Users can adjust RGB LED to Yes, Language will override the factory default. When users set Reset to On or Off (for MAG271CQR). Users' own language setting will not be changed. Users can Reset and restore settings to confirm and apply the Language setting. ■■ Language is 20s. Users can adjust OSD Time Out in any Mode. Users can adjust Transparency...
User Manual
Page 30
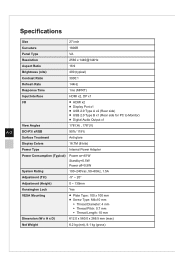
Specifications A-2 Size 27 inch Curvature 1800R Panel Type VA Resolution 2560 x 1440@144Hz Aspect Ratio 16:9 Brightness (nits) 400 (typical) Contrast Ratio 3000:1 Refresh Rate 144Hz Response Time 1ms (MPRT) Input Interface HDMI x2, DP x1 I/O ■■ HDMI x2 ■■ Display Port x1 ■■ USB 2.0 Type A x2 (Rear side) ■■ USB 2.0 Type B x1 (Rear side for PC to Monitor) ■■ Digital Audio Output x1 View Angles...
Specifications A-2 Size 27 inch Curvature 1800R Panel Type VA Resolution 2560 x 1440@144Hz Aspect Ratio 16:9 Brightness (nits) 400 (typical) Contrast Ratio 3000:1 Refresh Rate 144Hz Response Time 1ms (MPRT) Input Interface HDMI x2, DP x1 I/O ■■ HDMI x2 ■■ Display Port x1 ■■ USB 2.0 Type A x2 (Rear side) ■■ USB 2.0 Type B x1 (Rear side for PC to Monitor) ■■ Digital Audio Output x1 View Angles...
User Manual
Page 33
... and graphics card are turned on the signal cable connector. Refer to Preset Display Modes to set the computer to match the capabilities of your monitor. ■■ Update your graphics card drivers. ■■ Keep the monitor away from electrical devices that may be in Standby mode. The screen image is properly connected. No Plug & Play. ■■ Check if the monitor power cable is not properly sized or centered. Appendix Troubleshooting The power LED is...
... and graphics card are turned on the signal cable connector. Refer to Preset Display Modes to set the computer to match the capabilities of your monitor. ■■ Update your graphics card drivers. ■■ Keep the monitor away from electrical devices that may be in Standby mode. The screen image is properly connected. No Plug & Play. ■■ Check if the monitor power cable is not properly sized or centered. Appendix Troubleshooting The power LED is...
