
User Manual
Page 11
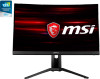
Fit the stand to secure the base. Tighten the base screw to the monitor. 2. IMPORTANT 1. Please contact your dealer for wall mount. Connect the base to avoid scratching the display panel. 2. The holes for installing the stand can be also used for proper wall mount kit. 1 1-3 2 3 Getting Started Installing the Monitor Stand 1. Place the monitor on a soft, protected surface to the stand. 3.
Fit the stand to secure the base. Tighten the base screw to the monitor. 2. IMPORTANT 1. Please contact your dealer for wall mount. Connect the base to avoid scratching the display panel. 2. The holes for installing the stand can be also used for proper wall mount kit. 1 1-3 2 3 Getting Started Installing the Monitor Stand 1. Place the monitor on a soft, protected surface to the stand. 3.

User Manual
Page 12
IMPORTANT Avoid touching the display panel when adjusting the monitor. 130mm 1-4 Adjusting the Monitor This monitor is designed to maximize your viewing comfort with its adjustment capabilities such as tilt and lift.
IMPORTANT Avoid touching the display panel when adjusting the monitor. 130mm 1-4 Adjusting the Monitor This monitor is designed to maximize your viewing comfort with its adjustment capabilities such as tilt and lift.
User Manual
Page 30
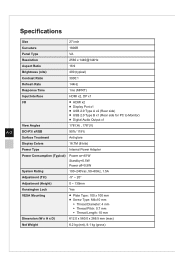
Specifications A-2 Size 27 inch Curvature 1800R Panel Type VA Resolution 2560 x 1440@144Hz Aspect Ratio 16:9 Brightness (nits) 400 (typical) Contrast Ratio 3000:1 Refresh Rate 144Hz Response Time 1ms (MPRT) Input Interface ...
Specifications A-2 Size 27 inch Curvature 1800R Panel Type VA Resolution 2560 x 1440@144Hz Aspect Ratio 16:9 Brightness (nits) 400 (typical) Contrast Ratio 3000:1 Refresh Rate 144Hz Response Time 1ms (MPRT) Input Interface ...
