

User Manual
Page 1
PRO B660M-A WIFI DDR4 PRO B660M-A DDR4 Motherboard User Guide Manuel d'utilisation Benutzerhandbuch
PRO B660M-A WIFI DDR4 PRO B660M-A DDR4 Motherboard User Guide Manuel d'utilisation Benutzerhandbuch
User Manual
Page 2
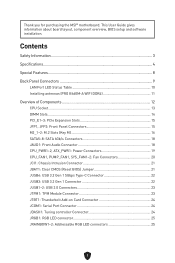
... Panel Connectors 9 LAN Port LED Status Table 10 Installing antennas (PRO B660M-A WIFI DDR4 11 Overview of Components 12 CPU Socket...13 DIMM Slots...14 PCI_E1~3: PCIe Expansion Slots 15 JFP1, JFP2: Front Panel Connectors 15 M2_1~2: M.2 Slots (Key M 16 SATA5~8: SATA 6Gb/s Connectors 18 JAUD1: Front Audio Connector 18 CPU_PWR1~2, ATX_PWR1: Power Connectors 19 CPU_FAN1, PUMP_FAN1, SYS_FAN1~2: Fan Connectors 20 JCI1: Chassis Intrusion Connector 21 JBAT1: Clear CMOS (Reset BIOS) Jumper 21 JUSB4: USB 3.2 Gen 1 5Gbps Type-C Connector 22 JUSB3: USB 3.2 Gen 1 Connector 22 JUSB1~2: USB...
... Panel Connectors 9 LAN Port LED Status Table 10 Installing antennas (PRO B660M-A WIFI DDR4 11 Overview of Components 12 CPU Socket...13 DIMM Slots...14 PCI_E1~3: PCIe Expansion Slots 15 JFP1, JFP2: Front Panel Connectors 15 M2_1~2: M.2 Slots (Key M 16 SATA5~8: SATA 6Gb/s Connectors 18 JAUD1: Front Audio Connector 18 CPU_PWR1~2, ATX_PWR1: Power Connectors 19 CPU_FAN1, PUMP_FAN1, SYS_FAN1~2: Fan Connectors 20 JCI1: Chassis Intrusion Connector 21 JBAT1: Clear CMOS (Reset BIOS) Jumper 21 JUSB4: USB 3.2 Gen 1 5Gbps Type-C Connector 22 JUSB3: USB 3.2 Gen 1 Connector 22 JUSB1~2: USB...
User Manual
Page 4
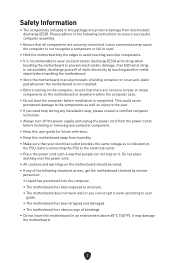
... the motherboard checked by service personnel: • Liquid has penetrated into the computer. • The motherboard has been exposed to moisture. • The motherboard does not work well or you need help during any installation step, please consult a certified computer technician. ∙∙Always turn off the power supply and unplug the power cord from electrostatic discharge (ESD). Loose connections may...
... the motherboard checked by service personnel: • Liquid has penetrated into the computer. • The motherboard has been exposed to moisture. • The motherboard does not work well or you need help during any installation step, please consult a certified computer technician. ∙∙Always turn off the power supply and unplug the power cord from electrostatic discharge (ESD). Loose connections may...
User Manual
Page 5
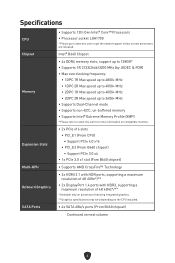
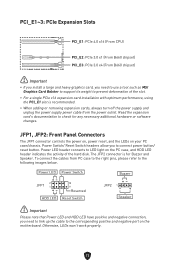
.... Specifications CPU Chipset Memory Expansion Slots Multi-GPU Onboard Graphics SATA Ports ∙∙Supports 12th Gen Intel® Core™ Processors ∙∙Processor socket LGA1700 * Please go to www.msi.com to www.msi.com for more information on compatible memory. ∙∙2x PCIe x16 slots • PCI_E1 (From CPU) • Support PCIe 4.0 x16 • PCI_E3 (From B660 chipset) • Support PCIe 3.0 x4 ∙∙1x PCIe 3.0 x1 slot (Fom B660 chipset) ∙∙Supports AMD CrossFire™ Technology...
.... Specifications CPU Chipset Memory Expansion Slots Multi-GPU Onboard Graphics SATA Ports ∙∙Supports 12th Gen Intel® Core™ Processors ∙∙Processor socket LGA1700 * Please go to www.msi.com to www.msi.com for more information on compatible memory. ∙∙2x PCIe x16 slots • PCI_E1 (From CPU) • Support PCIe 4.0 x16 • PCI_E3 (From B660 chipset) • Support PCIe 3.0 x4 ∙∙1x PCIe 3.0 x1 slot (Fom B660 chipset) ∙∙Supports AMD CrossFire™ Technology...

User Manual
Page 6
...; Memory • Support Intel® Smart Response Technology for Intel Core™ processors * SATA8 will be unavailable when installing M.2 SATA SSD in the M2_2 slot. RAID ∙∙Supports RAID 0, RAID 1, RAID 5 and RAID 10 for SATA storage devices Audio Realtek® ALC897 Codec ∙∙7.1-Channel High Definition Audio LAN 1x Realtek® RTL8125BG 2.5Gbps LAN controller Wi-Fi & Bluetooth® (PRO B660M-A WIFI DDR4) Intel® Wi-Fi 6 ∙∙The Wireless module is pre-installed in the M.2 (Key-E) slot...
...; Memory • Support Intel® Smart Response Technology for Intel Core™ processors * SATA8 will be unavailable when installing M.2 SATA SSD in the M2_2 slot. RAID ∙∙Supports RAID 0, RAID 1, RAID 5 and RAID 10 for SATA storage devices Audio Realtek® ALC897 Codec ∙∙7.1-Channel High Definition Audio LAN 1x Realtek® RTL8125BG 2.5Gbps LAN controller Wi-Fi & Bluetooth® (PRO B660M-A WIFI DDR4) Intel® Wi-Fi 6 ∙∙The Wireless module is pre-installed in the M.2 (Key-E) slot...
User Manual
Page 7
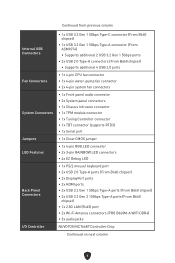
...USB 2.0 Type-A connectors (From B660 chipset) • Supports additional 4 USB 2.0 ports Fan Connectors ∙∙1x 4-pin CPU fan connector ∙∙1x 4-pin water-pump fan connector ∙∙2x 4-pin system fan connectors System Connectors ∙∙1x Front panel audio connector ∙∙2x System panel connectors ∙∙1x Chassis Intrusion connector ∙∙1x TPM module connector ∙∙1x Tuning Controller connector ∙∙1x TBT connector (supports RTD3) ∙∙1x Serial port Jumpers ∙∙1x Clear CMOS jumper LED...
...USB 2.0 Type-A connectors (From B660 chipset) • Supports additional 4 USB 2.0 ports Fan Connectors ∙∙1x 4-pin CPU fan connector ∙∙1x 4-pin water-pump fan connector ∙∙2x 4-pin system fan connectors System Connectors ∙∙1x Front panel audio connector ∙∙2x System panel connectors ∙∙1x Chassis Intrusion connector ∙∙1x TPM module connector ∙∙1x Tuning Controller connector ∙∙1x TBT connector (supports RTD3) ∙∙1x Serial port Jumpers ∙∙1x Clear CMOS jumper LED...
User Manual
Page 8
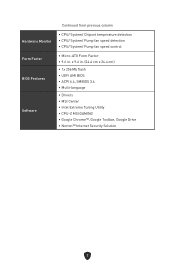
Hardware Monitor Form Factor BIOS Features Software Continued from previous column ∙∙CPU/ System/ Chipset temperature detection ∙∙CPU/ System/ Pump fan speed detection ∙∙CPU/ System/ Pump fan speed control ∙∙Micro-ATX Form Factor ∙∙9.6 in . (24.4 cm x 24.4 cm) ∙∙1x 256 Mb flash ∙∙UEFI AMI BIOS ∙∙ACPI 6.4, SMBIOS 3.4 ∙∙ Multi-language ∙∙ Drivers ∙...
Hardware Monitor Form Factor BIOS Features Software Continued from previous column ∙∙CPU/ System/ Chipset temperature detection ∙∙CPU/ System/ Pump fan speed detection ∙∙CPU/ System/ Pump fan speed control ∙∙Micro-ATX Form Factor ∙∙9.6 in . (24.4 cm x 24.4 cm) ∙∙1x 256 Mb flash ∙∙UEFI AMI BIOS ∙∙ACPI 6.4, SMBIOS 3.4 ∙∙ Multi-language ∙∙ Drivers ∙...
User Manual
Page 9
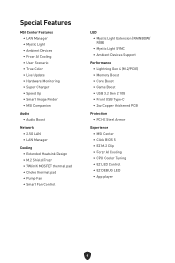
...; MSI Companion Audio • Audio Boost Network • 2.5G LAN • LAN Manager Cooling • Extended Heatsink Design • M.2 Shield Frozr • 7W/mK MOSFET thermal pad • Choke thermal pad • Pump Fan • Smart Fan Control LED • Mystic Light Extension (RAINBOW/ RGB) • Mystic Light SYNC • Ambient Devices Support Performance • Lightning Gen 4 (M.2/PCIE) • Memory Boost • Core Boost • Game Boost • USB 3.2 Gen...
...; MSI Companion Audio • Audio Boost Network • 2.5G LAN • LAN Manager Cooling • Extended Heatsink Design • M.2 Shield Frozr • 7W/mK MOSFET thermal pad • Choke thermal pad • Pump Fan • Smart Fan Control LED • Mystic Light Extension (RAINBOW/ RGB) • Mystic Light SYNC • Ambient Devices Support Performance • Lightning Gen 4 (M.2/PCIE) • Memory Boost • Core Boost • Game Boost • USB 3.2 Gen...
User Manual
Page 14
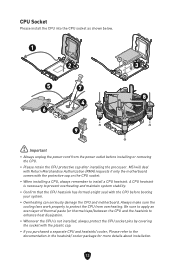
... unplug the power cord from overheating. A CPU heatsink is not installed, always protect the CPU socket pins by covering the socket with the CPU before installing or removing the CPU. ∙∙Please retain the CPU protective cap after installing the processor. MSI will deal with Return Merchandise Authorization (RMA) requests if only the motherboard comes with the protective cap on the CPU socket. ∙∙When installing a CPU, always remember...
... unplug the power cord from overheating. A CPU heatsink is not installed, always protect the CPU socket pins by covering the socket with the CPU before installing or removing the CPU. ∙∙Please retain the CPU protective cap after installing the processor. MSI will deal with Return Merchandise Authorization (RMA) requests if only the motherboard comes with the protective cap on the CPU socket. ∙∙When installing a CPU, always remember...
User Manual
Page 15
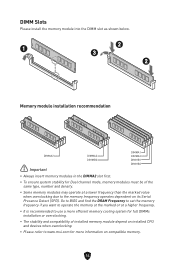
... compatibility of installed memory module depend on installed CPU and devices when overclocking. ∙∙Please refer to the memory frequency operates dependent on compatible memory. 14 Go to BIOS and find the DRAM Frequency to set the memory frequency if you want to operate the memory at the marked or at a lower frequency than the marked value when overclocking due to www.msi.com for more efficient memory cooling system for Dual channel mode, memory...
... compatibility of installed memory module depend on installed CPU and devices when overclocking. ∙∙Please refer to the memory frequency operates dependent on compatible memory. 14 Go to BIOS and find the DRAM Frequency to set the memory frequency if you want to operate the memory at the marked or at a lower frequency than the marked value when overclocking due to www.msi.com for more efficient memory cooling system for Dual channel mode, memory...
User Manual
Page 16
... removing expansion cards, always turn off the power supply and unplug the power supply power cable from PC case to the right pins, please refer to connect power button/ reset button. Power LED Power Switch Buzzer JFP1 2 1 HDD LED 10 9 Reserved Reset Switch JFP2 1 Speaker ⚠⚠Important Please note that Power LED and HDD LED have positive and negative connection, you need to use a tool such as MSI Graphics Card Bolster to support its weight to prevent deformation of the hard disk. Power LED header connects to LED light on your PC case/chassis...
... removing expansion cards, always turn off the power supply and unplug the power supply power cable from PC case to the right pins, please refer to connect power button/ reset button. Power LED Power Switch Buzzer JFP1 2 1 HDD LED 10 9 Reserved Reset Switch JFP2 1 Speaker ⚠⚠Important Please note that Power LED and HDD LED have positive and negative connection, you need to use a tool such as MSI Graphics Card Bolster to support its weight to prevent deformation of the hard disk. Power LED header connects to LED light on your PC case/chassis...
User Manual
Page 22
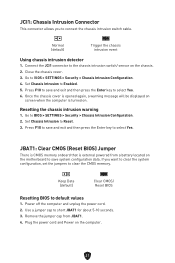
... and then press the Enter key to select Yes. 6. Connect the JCI1 connector to the chassis intrusion switch/ sensor on . Set Chassis Intrusion to BIOS > SETTINGS > Security > Chassis Intrusion Configuration. 4. JBAT1: Clear CMOS (Reset BIOS) Jumper There is CMOS memory onboard that is turned on the chassis. 2. Plug the power cord and Power on the motherboard to save system configuration data. Keep Data (default) Clear CMOS/ Reset BIOS Resetting BIOS to BIOS > SETTINGS > Security > Chassis Intrusion Configuration. 2. Remove the jumper cap from a battery located on the computer...
... and then press the Enter key to select Yes. 6. Connect the JCI1 connector to the chassis intrusion switch/ sensor on . Set Chassis Intrusion to BIOS > SETTINGS > Security > Chassis Intrusion Configuration. 4. JBAT1: Clear CMOS (Reset BIOS) Jumper There is CMOS memory onboard that is turned on the chassis. 2. Plug the power cord and Power on the motherboard to save system configuration data. Keep Data (default) Clear CMOS/ Reset BIOS Resetting BIOS to BIOS > SETTINGS > Security > Chassis Intrusion Configuration. 2. Remove the jumper cap from a battery located on the computer...
User Manual
Page 25
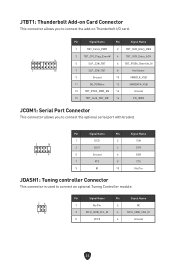
... to connect an optional Tuning Controller module. 26 15 Pin Signal Name Pin Signal Name 1 No Pin 2 NC 3 MCU_SMB_SCL_M 4 MCU_SMB_SDA_M 5 VCC5 6 Ground 24 JTBT1: Thunderbolt Add-on Card Connector This connector allows you to connect the optional serial port with bracket. 2 10 1 9 Pin Signal Name Pin Signal Name 1 DCD 2 SIN 3 SOUT 4 DTR 5 Ground 6 DSR 7 RTS 8 CTS 9 RI 10 No Pin JDASH1: Tuning controller Connector This connector is used to connect the...
... to connect an optional Tuning Controller module. 26 15 Pin Signal Name Pin Signal Name 1 No Pin 2 NC 3 MCU_SMB_SCL_M 4 MCU_SMB_SDA_M 5 VCC5 6 Ground 24 JTBT1: Thunderbolt Add-on Card Connector This connector allows you to connect the optional serial port with bracket. 2 10 1 9 Pin Signal Name Pin Signal Name 1 DCD 2 SIN 3 SOUT 4 DTR 5 Ground 6 DSR 7 RTS 8 CTS 9 RI 10 No Pin JDASH1: Tuning controller Connector This connector is used to connect the...

User Manual
Page 27
... the computer POST (Power-On Self Test) to install Windows 10/ Windows 11. Select the Windows 10/ Windows 11 installation disc/USB from CD or DVD... Press any key if screen shows Press any key to finish. 8. Power on the computer case. 4. The installer will prompt you can still manually execute the DVDSetup.exe from the Windows Control Panel, you easily optimize game settings and smoothly use content creation softwares. MSI Center User Guide If you...
... the computer POST (Power-On Self Test) to install Windows 10/ Windows 11. Select the Windows 10/ Windows 11 installation disc/USB from CD or DVD... Press any key if screen shows Press any key to finish. 8. Power on the computer case. 4. The installer will prompt you can still manually execute the DVDSetup.exe from the Windows Control Panel, you easily optimize game settings and smoothly use content creation softwares. MSI Center User Guide If you...
User Manual
Page 28
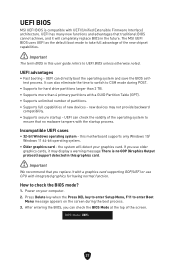
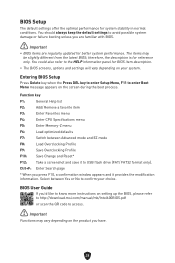
...;Supports full capabilities of the screen. Power on the screen during POST. ∙∙Supports for having normal function. The MSI UEFI BIOS uses UEFI as the default boot mode to CSM mode during the boot process. 3. How to enter Boot Menu message appears on your graphics card. After entering the BIOS, you replace it will detect your computer. 2. UEFI advantages ∙∙Fast booting - new devices may display a warning message There is compatible with UEFI (Unified Extensible Firmware Interface) architecture. UEFI BIOS MSI UEFI BIOS...
...;Supports full capabilities of the screen. Power on the screen during POST. ∙∙Supports for having normal function. The MSI UEFI BIOS uses UEFI as the default boot mode to CSM mode during the boot process. 3. How to enter Boot Menu message appears on your graphics card. After entering the BIOS, you replace it will detect your computer. 2. UEFI advantages ∙∙Fast booting - new devices may display a warning message There is compatible with UEFI (Unified Extensible Firmware Interface) architecture. UEFI BIOS MSI UEFI BIOS...
User Manual
Page 29
... or failure booting unless you 'd like to know more instructions on setting up the BIOS, please refer to http://download.msi.com/manual/mb/Intel600BIOS.pdf or scan the QR code to enter Boot Menu message appears on your choice. You could also refer to confirm your system. Function key F1: General Help list F2: Add/ Remove a favorite item F3: Enter Favorites menu F4: Enter CPU Specifications menu F5: Enter Memory-Z menu F6: Load optimized defaults F7: Switch...
... or failure booting unless you 'd like to know more instructions on setting up the BIOS, please refer to http://download.msi.com/manual/mb/Intel600BIOS.pdf or scan the QR code to enter Boot Menu message appears on your choice. You could also refer to confirm your system. Function key F1: General Help list F2: Add/ Remove a favorite item F3: Enter Favorites menu F4: Enter CPU Specifications menu F5: Enter Memory-Z menu F6: Load optimized defaults F7: Switch...
User Manual
Page 30
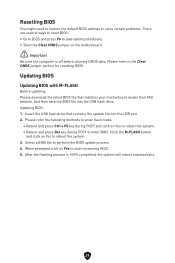
... system. 3. And then save the BIOS file into the USB port. 2. Updating BIOS Updating BIOS with M-FLASH Before updating: Please download the latest BIOS file that contains the update file into the USB flash drive. Resetting BIOS You might need to restore the default BIOS settings to solve certain problems. There are several ways to reset BIOS: ∙∙Go to BIOS and press F6 to load optimized defaults. ∙∙Short the Clear CMOS jumper on the motherboard. ⚠⚠Important Be sure...
... system. 3. And then save the BIOS file into the USB port. 2. Updating BIOS Updating BIOS with M-FLASH Before updating: Please download the latest BIOS file that contains the update file into the USB flash drive. Resetting BIOS You might need to restore the default BIOS settings to solve certain problems. There are several ways to reset BIOS: ∙∙Go to BIOS and press F6 to load optimized defaults. ∙∙Short the Clear CMOS jumper on the motherboard. ⚠⚠Important Be sure...

User Manual
Page 161
特殊功能 MSI Center RGB LED True Color • Live Update MSI Companion 网络 • 2.5G LAN M.2 7W/mK MOSFET LED RAINBOW/RGB 性能 • Lightning Gen 4 (M.2/PCIE Game Boost USB 3.2 Gen 2 10G • 前置 USB Type-C • 2 PCB设计 防护 • PCI-E 体验 • MSI Center BIOS • 简易 M.2 CPU LED LED 灯 • App 播放器 8
特殊功能 MSI Center RGB LED True Color • Live Update MSI Companion 网络 • 2.5G LAN M.2 7W/mK MOSFET LED RAINBOW/RGB 性能 • Lightning Gen 4 (M.2/PCIE Game Boost USB 3.2 Gen 2 10G • 前置 USB Type-C • 2 PCB设计 防护 • PCI-E 体验 • MSI Center BIOS • 简易 M.2 CPU LED LED 灯 • App 播放器 8
User Manual
Page 247
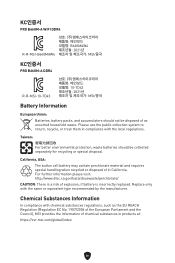
... special disposal. Please use the public collection system to return, recycle, or treat them in compliance with chemical substances regulations, such as unsorted household waste. KC인증서 PRO B660M-A WIFI DDR4 R-R-MSI-B660MAW4 B660MAW4 2021 MSI/중국 KC인증서 PRO B660M-A DDR4 R-R-MSI-10-7D43 10-7D43 2021 MSI/중국 Battery Information European Union: Batteries, battery packs, and accumulators...
... special disposal. Please use the public collection system to return, recycle, or treat them in compliance with chemical substances regulations, such as unsorted household waste. KC인증서 PRO B660M-A WIFI DDR4 R-R-MSI-B660MAW4 B660MAW4 2021 MSI/중국 KC인증서 PRO B660M-A DDR4 R-R-MSI-10-7D43 10-7D43 2021 MSI/중국 Battery Information European Union: Batteries, battery packs, and accumulators...

User Manual
Page 253
... guide, BIOS updates, driver updates, and other marks and names mentioned may be obtained from the user guide, please contact your product at: http://register.msi.com Revision History ∙∙Version 1.0, 2021/12, First release. ∙∙Version 1.1, 2022/1, Add multi-GPU spec. x Copyright and Trademarks Notice Copyright © Micro-Star Int'l Co., Ltd. All rights reserved. The MSI logo used is expressed...
... guide, BIOS updates, driver updates, and other marks and names mentioned may be obtained from the user guide, please contact your product at: http://register.msi.com Revision History ∙∙Version 1.0, 2021/12, First release. ∙∙Version 1.1, 2022/1, Add multi-GPU spec. x Copyright and Trademarks Notice Copyright © Micro-Star Int'l Co., Ltd. All rights reserved. The MSI logo used is expressed...

