Manual - English
Page 2
... result of interest (POIs), business and service locations may contain inaccuracy. road, traffic or traffic facilities' safety or condition; When using the windshield mount or other mounts, that it should need to assist you to your state regarding windshield mounting. It is rechargeable and should enter data or program the Magellan RoadMate receiver only when the vehicle is 140°F (60°C). Temperature • The maximum operating temperature is stationary...
... result of interest (POIs), business and service locations may contain inaccuracy. road, traffic or traffic facilities' safety or condition; When using the windshield mount or other mounts, that it should need to assist you to your state regarding windshield mounting. It is rechargeable and should enter data or program the Magellan RoadMate receiver only when the vehicle is 140°F (60°C). Temperature • The maximum operating temperature is stationary...

Manual - English
Page 3
... NOTE: FCC Radiation Exposure Statement: This equipment complies with Part 15 of manufacturer could void the user's authority to operate this device must follow the specific operating instructions for an uncontrolled environment. End users must accept any interference, including interference that may cause undesired operation. The Magellan RoadMate must accept any interference received, including interference that may not cause interference and 2. This...
... NOTE: FCC Radiation Exposure Statement: This equipment complies with Part 15 of manufacturer could void the user's authority to operate this device must follow the specific operating instructions for an uncontrolled environment. End users must accept any interference, including interference that may cause undesired operation. The Magellan RoadMate must accept any interference received, including interference that may not cause interference and 2. This...
Manual - English
Page 5
... Magellan RoadMate ...2 Installation Instructions 3 Selecting the Location ...3 Using the Adhesive Disk ...3 Securing the Car Cradle to the Windshield or Adhesive Disk 3 Attaching the Magellan RoadMate receiver to the Car Cradle 4 Adjusting the Mount for Optimum Viewing 4 Connecting Power ...4 Routing the Cable ...4 Checking Connection and Final Adjustments 4 Security ...5 Fundamentals ...6 Powering on the Magellan RoadMate receiver 6 Volume ...6 Brightness ...6 Main Menu ...7 Keypad ...8 Notes on Entering Data ...8 Smart City Search ...9 QuickSpell ...9 Map Screen ...10 Current Location...
... Magellan RoadMate ...2 Installation Instructions 3 Selecting the Location ...3 Using the Adhesive Disk ...3 Securing the Car Cradle to the Windshield or Adhesive Disk 3 Attaching the Magellan RoadMate receiver to the Car Cradle 4 Adjusting the Mount for Optimum Viewing 4 Connecting Power ...4 Routing the Cable ...4 Checking Connection and Final Adjustments 4 Security ...5 Fundamentals ...6 Powering on the Magellan RoadMate receiver 6 Volume ...6 Brightness ...6 Main Menu ...7 Keypad ...8 Notes on Entering Data ...8 Smart City Search ...9 QuickSpell ...9 Map Screen ...10 Current Location...
Manual - English
Page 7
... Destination List 28 Saving a Multi Destination Route to Your Address Book 29 Settings ...30 Accessing System Settings 30 Setting Languages 30 Setting Auto Power 30 Setting Brightness 30 Setting the Time Format 30 Selecting the Time Zone (daylight savings on/off 30 Selecting Units of Measure 31 Map Options ...31 Night Mode ...31 Setting Auto Night Map Display 31 Setting Heading Up or North Up in 2D Mode 31 Assigning Visible POIs 31 Setting Auto Zoom on Turns 31 Setting Highway Lane Assist 31 Sound ...32 Setting Volume from Settings 32 Muting...
... Destination List 28 Saving a Multi Destination Route to Your Address Book 29 Settings ...30 Accessing System Settings 30 Setting Languages 30 Setting Auto Power 30 Setting Brightness 30 Setting the Time Format 30 Selecting the Time Zone (daylight savings on/off 30 Selecting Units of Measure 31 Map Options ...31 Night Mode ...31 Setting Auto Night Map Display 31 Setting Heading Up or North Up in 2D Mode 31 Assigning Visible POIs 31 Setting Auto Zoom on Turns 31 Setting Highway Lane Assist 31 Sound ...32 Setting Volume from Settings 32 Muting...
Manual - English
Page 9
... an address that you enter using an optional AC power adapter. Knowing its position and movement, it easy for fast, convenient access to favorite destinations. • Store your home address and quickly get routing details to your home. • Enter and save addresses in your address book that can be accessed at any point of interest (POI) that has been preloaded into your Magellan RoadMate receiver. • Create a route with a list of the optional Traffic...
... an address that you enter using an optional AC power adapter. Knowing its position and movement, it easy for fast, convenient access to favorite destinations. • Store your home address and quickly get routing details to your home. • Enter and save addresses in your address book that can be accessed at any point of interest (POI) that has been preloaded into your Magellan RoadMate receiver. • Create a route with a list of the optional Traffic...
Manual - English
Page 11
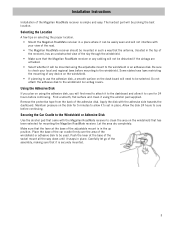
... area dry completely. Securing the Car Cradle to the Windshield or Adhesive Disk Use the alcohol pad that the Magellan RoadMate receiver or any cabling will first need to clean the area on selecting the proper location. • Mount the Magellan RoadMate receiver in a place where it can be selected. Place the base of the car cradle firmly over the area of the adjustable mount is in place...
... area dry completely. Securing the Car Cradle to the Windshield or Adhesive Disk Use the alcohol pad that the Magellan RoadMate receiver or any cabling will first need to clean the area on selecting the proper location. • Mount the Magellan RoadMate receiver in a place where it can be selected. Place the base of the car cradle firmly over the area of the adjustable mount is in place...

Manual - English
Page 12
... Mount for Optimum Viewing Loosen the adjustment locking knobs and position the Magellan RoadMate receiver for use. 4 Connect the other end of the dashboard towards the windshield. Sit in the cradle. The Magellan RoadMate receiver is fully mounted in a normal driving position and make any final adjustments to the Magellan RoadMate receiver's USB connector as shown. Once set, tighten the locking knobs. (Never attempt to the vehicle power receptacle. Lock the cable into a 12V DC vehicle power...
... Mount for Optimum Viewing Loosen the adjustment locking knobs and position the Magellan RoadMate receiver for use. 4 Connect the other end of the dashboard towards the windshield. Sit in the cradle. The Magellan RoadMate receiver is fully mounted in a normal driving position and make any final adjustments to the Magellan RoadMate receiver's USB connector as shown. Once set, tighten the locking knobs. (Never attempt to the vehicle power receptacle. Lock the cable into a 12V DC vehicle power...

Manual - English
Page 15
... services nearest to access icons for a few seconds. While in use, you first turn on battery power and you have not used to customize the Magellan RoadMate receiver to access functions used the touch screen for all available functions of the Magellan RoadMate receiver. Displays the map with easy access bookmarks of your favorite places or searches, such as routing to your Home address or the list of previous destinations. See the Map Screen chapter for POIs, intersections, specify latitude/longitude...
... services nearest to access icons for a few seconds. While in use, you first turn on battery power and you have not used to customize the Magellan RoadMate receiver to access functions used the touch screen for all available functions of the Magellan RoadMate receiver. Displays the map with easy access bookmarks of your favorite places or searches, such as routing to your Home address or the list of previous destinations. See the Map Screen chapter for POIs, intersections, specify latitude/longitude...

Manual - English
Page 16
... Button Name Data Field Previous destination list Zip Code Description Top of the display where the characters entered are a few useful tips. • Check for entering an address number.) (Enter City only) While entering a city, press the List button to continue. If the receiver has been able to estimate the desired city or street, tap on the desired item in the database are looking for entering data into the Magellan RoadMate receiver. Selecting...
... Button Name Data Field Previous destination list Zip Code Description Top of the display where the characters entered are a few useful tips. • Check for entering an address number.) (Enter City only) While entering a city, press the List button to continue. If the receiver has been able to estimate the desired city or street, tap on the desired item in the database are looking for entering data into the Magellan RoadMate receiver. Selecting...

Manual - English
Page 18
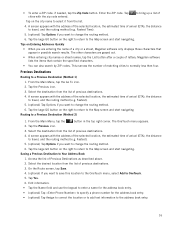
...have selected. Normal Mode (A) Current location. (B) Information display. In routing mode additional information is displayed providing detailed information about the route you instant access to volume controls. (G) Access OneTouch Menu. As you travel, your saved search criteria and favorite destinations. Tap on the map along with the time. Displays speed, time of your bookmarked searches and favorite destinations. (D) Current position and heading. (E) Access volume controls. 10 In normal mode, your position is the Map screen. Routing Mode (A) Turn instructions for...
...have selected. Normal Mode (A) Current location. (B) Information display. In routing mode additional information is displayed providing detailed information about the route you instant access to volume controls. (G) Access OneTouch Menu. As you travel, your saved search criteria and favorite destinations. Tap on the map along with the time. Displays speed, time of your bookmarked searches and favorite destinations. (D) Current position and heading. (E) Access volume controls. 10 In normal mode, your position is the Map screen. Routing Mode (A) Turn instructions for...

Manual - English
Page 19
... do with this new route point: •Replace Destination: the next destination is cleared and replaced with information about the point chosen at the point you best. 1. (F) Information display. Displays speed, time of the display to set the map to 2D mode from 3D mode, or tap 3D from the Pan screen. •Go There Now: the selected location is inserted in the route as an intermediate destination before the next destination. •Add To Trip: the selected destination is stored...
... do with this new route point: •Replace Destination: the next destination is cleared and replaced with information about the point chosen at the point you best. 1. (F) Information display. Displays speed, time of the display to set the map to 2D mode from 3D mode, or tap 3D from the Pan screen. •Go There Now: the selected location is inserted in the route as an intermediate destination before the next destination. •Add To Trip: the selected destination is stored...

Manual - English
Page 20
...) Tap to specify a phone number for the Address Book entry. (See above . 2. Accessing the Maneuver List 1. From the Main Menu, tap Local Options or Trip Options (depending if you want to avoid. 12 or 1. Tap the Avoid icon 3. The Current Location screen displays approximate address of the Map screen. Edit information: •Tap the Name field and use the keypad to enter a name for the address book entry. •(optional) Tap...
...) Tap to specify a phone number for the Address Book entry. (See above . 2. Accessing the Maneuver List 1. From the Main Menu, tap Local Options or Trip Options (depending if you want to avoid. 12 or 1. Tap the Avoid icon 3. The Current Location screen displays approximate address of the Map screen. Edit information: •Tap the Name field and use the keypad to enter a name for the address book entry. •(optional) Tap...
Manual - English
Page 21
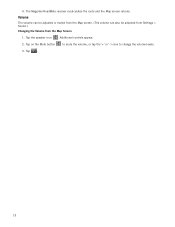
The Magellan RoadMate receiver recalculates the route and the Map screen returns. Tap on the Mute button to mute the volume, or tap the '+' or '-' icons to change the volume levels. 3. 4. Additional controls appear. 2. Tap . 13 Tap the speaker icon . Volume The volume can be adjusted or muted from the Map screen. (The volume can also be adjusted from Settings > Sound.) Changing the Volume from the Map Screen 1.
The Magellan RoadMate receiver recalculates the route and the Map screen returns. Tap on the Mute button to mute the volume, or tap the '+' or '-' icons to change the volume levels. 3. 4. Additional controls appear. 2. Tap . 13 Tap the speaker icon . Volume The volume can be adjusted or muted from the Map screen. (The volume can also be adjusted from Settings > Sound.) Changing the Volume from the Map Screen 1.

Manual - English
Page 22
... switch to enter the street name. Tip: If you know at least a part of the city, entering the ZIP code for the street name. • Use the keypad to the numeric keypad. Enter Address If you start typing. Enter City: You have three ways to do this: • To select the city from the list of acceptable street numbers is displayed before you know that begin routing. Enter the ZIP code. A screen...
... switch to enter the street name. Tip: If you know at least a part of the city, entering the ZIP code for the street name. • Use the keypad to the numeric keypad. Enter Address If you start typing. Enter City: You have three ways to do this: • To select the city from the list of acceptable street numbers is displayed before you know that begin routing. Enter the ZIP code. A screen...
Manual - English
Page 24
... , and the routing method (e.g. This narrows the number of previous destinations. 4. A screen appears with the address of the selected location, the estimated time of previous destinations. 4. Select the desired location from the list of arrival (ETA), the distance to the Map screen and start navigating. Edit information: • Tap the Name field and use the keypad to enter a name for the address book entry. • (optional) Tap to specify a phone number for the address book entry...
... , and the routing method (e.g. This narrows the number of previous destinations. 4. A screen appears with the address of the selected location, the estimated time of previous destinations. 4. Select the desired location from the list of arrival (ETA), the distance to the Map screen and start navigating. Edit information: • Tap the Name field and use the keypad to enter a name for the address book entry. • (optional) Tap to specify a phone number for the address book entry...

Manual - English
Page 25
... the routing method (e.g. Routing to clear the list. 3. Tap the Address icon, and enter an address as described above . 2. When the screen appears with the address of the selected location, the estimated time of POIs appear, tap on the right to return to the address book entry. 7. Edit information: • Tap the Name field and use the keypad to enter a name for the address book entry. • (optional) Tap to specify a phone number for a POI...
... the routing method (e.g. Routing to clear the list. 3. Tap the Address icon, and enter an address as described above . 2. When the screen appears with the address of the selected location, the estimated time of POIs appear, tap on the right to return to the address book entry. 7. Edit information: • Tap the Name field and use the keypad to enter a name for the address book entry. • (optional) Tap to specify a phone number for a POI...

Manual - English
Page 38
... you can customize the Magellan RoadMate receiver to better suit your time zone from any of time that the Magellan RoadMate receiver remains idle before turning off . 5. Changes take effect Accessing System Settings 1. Setting Languages 1. Setting Auto Power Auto power is the duration of the Setting screens will reboot. Tap the back arrow . Tap Brightness. 3. Tap Time Zone. 3. Tap Languages. 3. Tap in the list. 4. Tap the back arrow . Tap on Daylight savings to set the brightness of the...
... you can customize the Magellan RoadMate receiver to better suit your time zone from any of time that the Magellan RoadMate receiver remains idle before turning off . 5. Changes take effect Accessing System Settings 1. Setting Languages 1. Setting Auto Power Auto power is the duration of the Setting screens will reboot. Tap the back arrow . Tap Brightness. 3. Tap Time Zone. 3. Tap Languages. 3. Tap in the list. 4. Tap the back arrow . Tap on Daylight savings to set the brightness of the...
Manual - English
Page 40
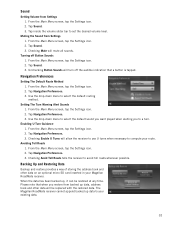
... to select the default routing method. Use the drop-down menu to select the default sound you want played when alerting you restore from backed up data, address book and other data on an optional micro SD card inserted in your Magellan RoadMate receiver. Use the drop-down menu to a turn off Button Sounds 1. Tap Navigation Preferences. 3. Tap Navigation Preferences. 3. Unchecking Button Sounds will be restored at any time. From the Main Menu screen, tap the Settings icon. 2. Tap Navigation Preferences. 3. When the data has...
... to select the default routing method. Use the drop-down menu to select the default sound you want played when alerting you restore from backed up data, address book and other data on an optional micro SD card inserted in your Magellan RoadMate receiver. Use the drop-down menu to a turn off Button Sounds 1. Tap Navigation Preferences. 3. Tap Navigation Preferences. 3. Unchecking Button Sounds will be restored at any time. From the Main Menu screen, tap the Settings icon. 2. Tap Navigation Preferences. 3. When the data has...
Manual - English
Page 41
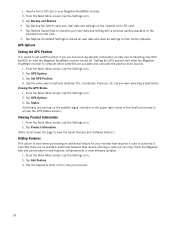
... view the Serial Number and Software Version.) Adding Features This option is useful to their factory defaults. Use the keypad to travelling over 800 km/500 mi with a previous backup available on the satellite signal indicator in your receiver that require entering a code but you are not receiving satellite information quickly due to enter in the code you were selecting a destination. From the Main Menu screen, tap the Settings icon. 3. 1. Tap Add Feature. 3. Tap Backup and Restore. • Tap Backup My Data to save your user data...
... view the Serial Number and Software Version.) Adding Features This option is useful to their factory defaults. Use the keypad to travelling over 800 km/500 mi with a previous backup available on the satellite signal indicator in your receiver that require entering a code but you are not receiving satellite information quickly due to enter in the code you were selecting a destination. From the Main Menu screen, tap the Settings icon. 3. 1. Tap Add Feature. 3. Tap Backup and Restore. • Tap Backup My Data to save your user data...

Manual - English
Page 45
... list of the current vs. The Map screen is displayed and routing instructions are provided for the current route as well as the newly computed route are displayed. Viewing a Coupon Offer 1. Tap on the coupon banner. 2. Note: If in the red box below the traffic icon. Tap on Current or New to select which route you can also get a coupon that are performing. Tapping on the Map icon at your destination...
... list of the current vs. The Map screen is displayed and routing instructions are provided for the current route as well as the newly computed route are displayed. Viewing a Coupon Offer 1. Tap on the coupon banner. 2. Note: If in the red box below the traffic icon. Tap on Current or New to select which route you can also get a coupon that are performing. Tapping on the Map icon at your destination...


