
User Manual
Page 3
CONTENTS PRODUCT REGISTRATION 2 IMPORTANT SAFETY INSTRUCTIONS 4 SPECIFICATIONS 6 INSTALLATION INSTRUCTIONS 7 BEFORE USE 10 OPERATION INSTRUCTIONS 11 WASH CYCLE PARAMETERS 1 CARE AND MAINTENANCE TROUBLESHOOTING 2 LIMITED WARRANTY 2 3
CONTENTS PRODUCT REGISTRATION 2 IMPORTANT SAFETY INSTRUCTIONS 4 SPECIFICATIONS 6 INSTALLATION INSTRUCTIONS 7 BEFORE USE 10 OPERATION INSTRUCTIONS 11 WASH CYCLE PARAMETERS 1 CARE AND MAINTENANCE TROUBLESHOOTING 2 LIMITED WARRANTY 2 3
User Manual
Page 4
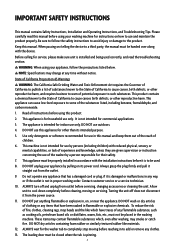
... than its power cord. IMPORTANT SAFETY INSTRUCTIONS This manual contains Safety Instructions, Installation and Operating Instructions, and Troubleshooting Tips. Keep this manual before servicing, changing accessories or cleaning the unit. DO NOT unplug your appliance by pulling on , or near the appliance. Do not operate any time without notice. Turning the unit off and unplug from the outlet. 9. DO NOT wash or dry articles of the washer by...
... than its power cord. IMPORTANT SAFETY INSTRUCTIONS This manual contains Safety Instructions, Installation and Operating Instructions, and Troubleshooting Tips. Keep this manual before servicing, changing accessories or cleaning the unit. DO NOT unplug your appliance by pulling on , or near the appliance. Do not operate any time without notice. Turning the unit off and unplug from the outlet. 9. DO NOT wash or dry articles of the washer by...

User Manual
Page 5
... the wash tub when the agitator is equipped with water when cleaning. 23. Hydrogen gas is required. 21. The appliance must be plugged into a properly installed and grounded outlet that meets the voltage requirements listed on or in or on all enclosure panels are properly installed. 15. ALWAYS be very hot during the operation. READ AND FOLLOW THIS SAFETY INFORMATION CAREFULLY SAVE THESE INSTRUCTIONS 5 Contact customer service...
... the wash tub when the agitator is equipped with water when cleaning. 23. Hydrogen gas is required. 21. The appliance must be plugged into a properly installed and grounded outlet that meets the voltage requirements listed on or in or on all enclosure panels are properly installed. 15. ALWAYS be very hot during the operation. READ AND FOLLOW THIS SAFETY INFORMATION CAREFULLY SAVE THESE INSTRUCTIONS 5 Contact customer service...
User Manual
Page 7
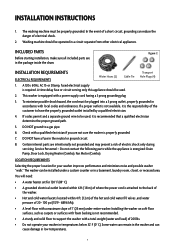
... to support the washer with foam backing.is the responsibility of where the power cord is required. Certain internal parts are in a basement, laundry room, closet, or recessed area. INSTALLATION INSTRUCTIONS 1. Washing machine should be properly grounded. This washer is properly grounded. 7. DO NOT ground to the back of the washer. • Hot and cold water faucets located within 6 ft.( 1.8 m) of the customer to have a fuse in low temperatures. 7 Check...
... to support the washer with foam backing.is the responsibility of where the power cord is required. Certain internal parts are in a basement, laundry room, closet, or recessed area. INSTALLATION INSTRUCTIONS 1. Washing machine should be properly grounded. This washer is properly grounded. 7. DO NOT ground to the back of the washer. • Hot and cold water faucets located within 6 ft.( 1.8 m) of the customer to have a fuse in low temperatures. 7 Check...

User Manual
Page 8
... in close to the cabinet with one hand and tighten the locking nut close to reduce noise transfer. • Additional clearances might be removed from the backside of washing machine. Repeat steps 2 and 3 as needed . INSTALLATION CAUTION: Packing materials may be fully opened. Before using this machine. If not, turn the leg by hand or with a wrench and tighten the nuts...
... in close to the cabinet with one hand and tighten the locking nut close to reduce noise transfer. • Additional clearances might be removed from the backside of washing machine. Repeat steps 2 and 3 as needed . INSTALLATION CAUTION: Packing materials may be fully opened. Before using this machine. If not, turn the leg by hand or with a wrench and tighten the nuts...

User Manual
Page 9
... of the laundry tub must be a minimum of 28" ( 71 cm) from the bottom of the washing machine and turn on the water valve to the . min. 28" (71 cm) NOTE: Images are present, and repeat the procedure. appropriate Hot and Cold water tap. Connector to tighten. DRAIN SYSTEM STANDPIPE DRAIN SYSTEM - The top of the water inlet hose to check for leaks If any leaks are found...
... of the laundry tub must be a minimum of 28" ( 71 cm) from the bottom of the washing machine and turn on the water valve to the . min. 28" (71 cm) NOTE: Images are present, and repeat the procedure. appropriate Hot and Cold water tap. Connector to tighten. DRAIN SYSTEM STANDPIPE DRAIN SYSTEM - The top of the water inlet hose to check for leaks If any leaks are found...

User Manual
Page 10
... balance the load to allow smooth and complete draining. 10 NOTE: New, colored fabrics should also be separated. BEFORE USE CHECK LIST AND PREPARATION BEFORE WASHING Read all pockets/compartments of clothes to be washed and remove any loose items such as coins. Washing method is not recommended to wash water-proof fabrics as detergent, bleach, or liquid fabric softener, on clothing articles for long periods of your washer/dryer combo unit. Light and dark clothes...
... balance the load to allow smooth and complete draining. 10 NOTE: New, colored fabrics should also be separated. BEFORE USE CHECK LIST AND PREPARATION BEFORE WASHING Read all pockets/compartments of clothes to be washed and remove any loose items such as coins. Washing method is not recommended to wash water-proof fabrics as detergent, bleach, or liquid fabric softener, on clothing articles for long periods of your washer/dryer combo unit. Light and dark clothes...

User Manual
Page 11
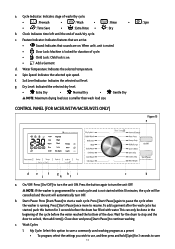
... dirty quickly. 3. OPERATING INSTRUCTIONS CONTROL PANEL (FOR MCSCWD27W5/MCSCWD27S5/MCSCWD27G5 ONLY) Figure 13 a Press 3 sec. Wait for regularly used washing program as dress shirts, nylons, etc. • Wash cycle operates at a lower temperature. 4. Quick Wash: Select this option to save . 2. b. Start/Pause: Press [Start/Pause] to set My Cycle ef gh i j d k lm n c b a. Press [Start/Pause] again to wash wool clothing articles labeled "Machine Washable". • Proper detergent and water temperature must be done in detergent to work...
... dirty quickly. 3. OPERATING INSTRUCTIONS CONTROL PANEL (FOR MCSCWD27W5/MCSCWD27S5/MCSCWD27G5 ONLY) Figure 13 a Press 3 sec. Wait for regularly used washing program as dress shirts, nylons, etc. • Wash cycle operates at a lower temperature. 4. Quick Wash: Select this option to save . 2. b. Start/Pause: Press [Start/Pause] to set My Cycle ef gh i j d k lm n c b a. Press [Start/Pause] again to wash wool clothing articles labeled "Machine Washable". • Proper detergent and water temperature must be done in detergent to work...
User Manual
Page 12
... temperature. DO NOT cut off water supply or remove hose attachments during dry cycles. The dryer is a ventless unit that can use . f. Tub Clean: Select this option to rinse and spin a load separately from a regular wash cycle. • This can be drained before spinning. 13. Be sure to note the drying load size when using. • Auto Dry: Select this option to have dry cycle automatically set a delay time for the wash to...
... temperature. DO NOT cut off water supply or remove hose attachments during dry cycles. The dryer is a ventless unit that can use . f. Tub Clean: Select this option to rinse and spin a load separately from a regular wash cycle. • This can be drained before spinning. 13. Be sure to note the drying load size when using. • Auto Dry: Select this option to have dry cycle automatically set a delay time for the wash to...
User Manual
Page 13
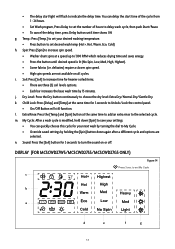
... to set desired wash temp (Hot+, Hot, Warm, Eco, Cold) h. to turn the sound on all cycles. You can quickly choose this cycle for 3 seconds to Unlock/Lock the control panel. • On/Off Button will flash to the selected cycle. i. Child Lock: Press [Delay] and [Temp] at the same time to add an extra rinse to indicate the delay time. My Cycle: After a wash cycle is lit (No Spin, Low, Med, High, Highest). • Some fabrics (i.e. m. n. Extra Rinse...
... to set desired wash temp (Hot+, Hot, Warm, Eco, Cold) h. to turn the sound on all cycles. You can quickly choose this cycle for 3 seconds to Unlock/Lock the control panel. • On/Off Button will flash to the selected cycle. i. Child Lock: Press [Delay] and [Temp] at the same time to add an extra rinse to indicate the delay time. My Cycle: After a wash cycle is lit (No Spin, Low, Med, High, Highest). • Some fabrics (i.e. m. n. Extra Rinse...
User Manual
Page 14
... level. Dry Level: Indicated the selected dry level. • Extra Dry • Normal Dry • Gentle Dry NOTE: Maximum drying load size is on . c. Close door and press [Start/Pause] to resume. My Cycle: Select this button for the drum to stop and the door to save. 14 Cycle Indicator: Indicates stage of wash/dry cycle. f. b. When unlit, unit is muted. • Door Lock: Machine is locked for 3 seconds to unlock...
... level. Dry Level: Indicated the selected dry level. • Extra Dry • Normal Dry • Gentle Dry NOTE: Maximum drying load size is on . c. Close door and press [Start/Pause] to resume. My Cycle: Select this button for the drum to stop and the door to save. 14 Cycle Indicator: Indicates stage of wash/dry cycle. f. b. When unlit, unit is muted. • Door Lock: Machine is locked for 3 seconds to unlock...
User Manual
Page 15
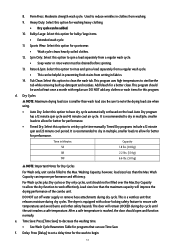
Cold Wash: Only uses cold water. 8. This program uses high temperatures to sterilize the tub while removing built up to 1300 RPM which reduces drying time and saves energy. • Press the button until time shows 0H. Heavy Duty: Select this option for sportswear. • Wash cycle cleans heavily soiled clothes. 14. Drain Only: Used to drain any clothes or wash items for this option to set the number of clothing that can be used cottons and fabrics. •...
Cold Wash: Only uses cold water. 8. This program uses high temperatures to sterilize the tub while removing built up to 1300 RPM which reduces drying time and saves energy. • Press the button until time shows 0H. Heavy Duty: Select this option for sportswear. • Wash cycle cleans heavily soiled clothes. 14. Drain Only: Used to drain any clothes or wash items for this option to set the number of clothing that can be used cottons and fabrics. •...
User Manual
Page 16
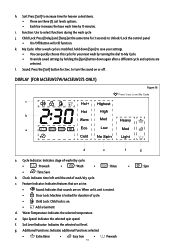
... cycle and options are on . • Add a Garment d. g. l. Function: Use to set My Cycle b a d e f a. to select functions during the wash cycle j. Child Lock: Press [Delay] and [Temp] at the same time for 3sec. Cycle Indicator: Indicates stage of wash/dry cycle. • : Prewash • : Wash • : Rinse • • : Time Save b. Spin Speed: Indicates the selected spin speed. Soil Level Indicator: Indicates the selected soil level. Water Temperature: Indicates the selected temperature. DISPLAY...
... cycle and options are on . • Add a Garment d. g. l. Function: Use to set My Cycle b a d e f a. to select functions during the wash cycle j. Child Lock: Press [Delay] and [Temp] at the same time for 3sec. Cycle Indicator: Indicates stage of wash/dry cycle. • : Prewash • : Wash • : Rinse • • : Time Save b. Spin Speed: Indicates the selected spin speed. Soil Level Indicator: Indicates the selected soil level. Water Temperature: Indicates the selected temperature. DISPLAY...
User Manual
Page 17
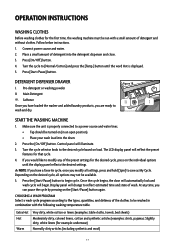
... that cycle. 4. OPERATION INSTRUCTIONS WASHING CLOTHES Before washing clothes for the first time, the washing machine must be turned on (in an open position). Press [Start/Pause] button. Pre-detergent or washing powder II. Press the [Start/Pause] button to a power source and water lines. DETERGENT DISPENSER DRAWER I. Press the [On/Off] button. Control panel will begin cycle. Follow below instructions. 1. Press [On/Off] button. 4. At any of detergent and without clothes. Place a small amount of wash. Make sure the unit is displayed. 5. Turn the cycle...
... that cycle. 4. OPERATION INSTRUCTIONS WASHING CLOTHES Before washing clothes for the first time, the washing machine must be turned on (in an open position). Press [Start/Pause] button. Pre-detergent or washing powder II. Press the [Start/Pause] button to a power source and water lines. DETERGENT DISPENSER DRAWER I. Press the [On/Off] button. Control panel will begin cycle. Follow below instructions. 1. Press [On/Off] button. 4. At any of detergent and without clothes. Place a small amount of wash. Make sure the unit is displayed. 5. Turn the cycle...
User Manual
Page 19
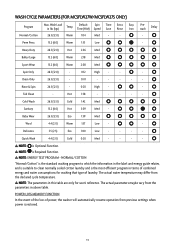
... for washing that type of power, the washer will automatically resume operation from previous settings when power is the most efficient program in above table. Quick Wash 4.4 (2.0) Cold 0:20 Med - - - - NOTE: The parameters in lbs (kgs) Temp Default Time (H:M) Spin Speed Time Save Extra Rinse Easy Iron Prewash Delay Normal/Cotton 26.5 (12.0) Warm 1:04 Med - - - The actual parameters maybe vary from the declared cycle temperature. The actual water temperature...
... for washing that type of power, the washer will automatically resume operation from previous settings when power is the most efficient program in above table. Quick Wash 4.4 (2.0) Cold 0:20 Med - - - - NOTE: The parameters in lbs (kgs) Temp Default Time (H:M) Spin Speed Time Save Extra Rinse Easy Iron Prewash Delay Normal/Cotton 26.5 (12.0) Warm 1:04 Med - - - The actual parameters maybe vary from the declared cycle temperature. The actual water temperature...

User Manual
Page 20
...: Drain Pump, Door Lock, Drying Heater (Combo), Fan Motor (Combo). DO NOT contact the following parts while the appliance is opened. DO NOT allow sharp items to remove the power plug from the outlet and close the tap. Service Personnel - CLEAN DETERGENT BOX 1. Replace the softener cover and push the drawer back into position. (Figure 17-3) Figure 17-1 Figure 17-2 Figure 17 Figure 17-3 CLEAN INLET FILTER Inlet filter maybe need to clean...
...: Drain Pump, Door Lock, Drying Heater (Combo), Fan Motor (Combo). DO NOT contact the following parts while the appliance is opened. DO NOT allow sharp items to remove the power plug from the outlet and close the tap. Service Personnel - CLEAN DETERGENT BOX 1. Replace the softener cover and push the drawer back into position. (Figure 17-3) Figure 17-1 Figure 17-2 Figure 17 Figure 17-3 CLEAN INLET FILTER Inlet filter maybe need to clean...

User Manual
Page 21
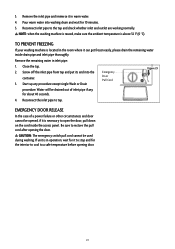
... 3. Open the tap and make sure there is empty. Press the button "Start/Pause" and keep the procedure running for the washing machine. 2. Remove the inlet pipe from the rear of washing machine. Wash the tap connection with warm water to ensure the normal operation of the machine. 2. Clean the filter periodically to loosen inlet pipe. 2 Disconnect the power supply for about 40 seconds. 4. THAW A FROZEN WASHING MACHINE If the temperature drops...
... 3. Open the tap and make sure there is empty. Press the button "Start/Pause" and keep the procedure running for the washing machine. 2. Remove the inlet pipe from the rear of washing machine. Wash the tap connection with warm water to ensure the normal operation of the machine. 2. Clean the filter periodically to loosen inlet pipe. 2 Disconnect the power supply for about 40 seconds. 4. THAW A FROZEN WASHING MACHINE If the temperature drops...
User Manual
Page 22
... inlet pipe if any procedure except single Wash or Drain Emergency Door Pull Cord Figure 23 procedure. If unit is located in warm water. 4. Pour warm water into the container. 3. Remove the remaining water in operation, wait for it is above 32 °F (0 °C). Reconnect the inlet pipe to the tap and check whether inlet and outlet are working normally. Close the tap. 2. Water will be used during washing...
... inlet pipe if any procedure except single Wash or Drain Emergency Door Pull Cord Figure 23 procedure. If unit is located in warm water. 4. Pour warm water into the container. 3. Remove the remaining water in operation, wait for it is above 32 °F (0 °C). Reconnect the inlet pipe to the tap and check whether inlet and outlet are working normally. Close the tap. 2. Water will be used during washing...
User Manual
Page 23
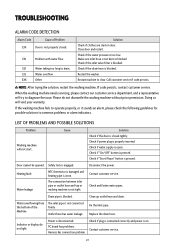
.... Check if "Start/Pause" button is blocked. Disconnect the power. PC board has problems. Contact customer service. Make sure inlet hose is engaged. Water overflowing from the bottom of Problem E30 Door is closed . Replace the drain hose. Safety lock is not bent or blocked. Fix the inlet pipe. Check if plug is connected correctly and power is disconnected. Restart the washer. If code persists, contact customer service. E12 Water overflow. When the washing machine needs servicing, please contact our customer service...
.... Check if "Start/Pause" button is blocked. Disconnect the power. PC board has problems. Contact customer service. Make sure inlet hose is engaged. Water overflowing from the bottom of Problem E30 Door is closed . Replace the drain hose. Safety lock is not bent or blocked. Fix the inlet pipe. Check if plug is connected correctly and power is disconnected. Restart the washer. If code persists, contact customer service. E12 Water overflow. When the washing machine needs servicing, please contact our customer service...
User Manual
Page 25
... Remedies and Exclusions: Product repair in use of the product or improper installation. • Replacement or resetting of house fuses or circuit breakers. • Failure of this unit for non repairable products are hereby limited to one year from defects in material and workmanship, and agrees to request warranty service or order parts. 2 Service may also have other liability in nontraditional housing locations (ie. boats, etc...
... Remedies and Exclusions: Product repair in use of the product or improper installation. • Replacement or resetting of house fuses or circuit breakers. • Failure of this unit for non repairable products are hereby limited to one year from defects in material and workmanship, and agrees to request warranty service or order parts. 2 Service may also have other liability in nontraditional housing locations (ie. boats, etc...


