
User manual, English (US)
Page 2
... at http://www.magnavox.com 2 IMPORTANT SAFETY INSTRUCTIONS READ BEFORE OPERATING EQUIPMENT 1. Model No Serial No Visit our World Wide Web Site at once to rain or moisture, does not operate normally, or has been dropped. 15. B. Complete and return your product, you to obtain warranty service. *Product Safety *Additional Benefits of plug to rain D. Do not install near water. 6. The...
... at http://www.magnavox.com 2 IMPORTANT SAFETY INSTRUCTIONS READ BEFORE OPERATING EQUIPMENT 1. Model No Serial No Visit our World Wide Web Site at once to rain or moisture, does not operate normally, or has been dropped. 15. B. Complete and return your product, you to obtain warranty service. *Product Safety *Additional Benefits of plug to rain D. Do not install near water. 6. The...
User manual, English (US)
Page 3
... diagrams as on the wall 5 Basic TV and Remote Control Operations 6 Remote Control 7 Antenna Connection 8 Basic Cable TV Connection 8 Cable Box Connections 9 Audio/Video Input Connections 10 S-Video Connections 11 Component (YPbPr) Connections 12 PC (Monitor) Connection 13 Install Menu Language Settings 14 Tuner Mode Control 15 Auto Program (Setting Up Channels 16 Channel Edit Control (To Add or Delete channels) . . . .17 Factory Reset 18 Smart Picture and Smart Sound Smart Picture Control 19 Smart Sound Control 19 Picture Menu TV Picture Menu Controls 20 Sound Menu TV Sound...
... diagrams as on the wall 5 Basic TV and Remote Control Operations 6 Remote Control 7 Antenna Connection 8 Basic Cable TV Connection 8 Cable Box Connections 9 Audio/Video Input Connections 10 S-Video Connections 11 Component (YPbPr) Connections 12 PC (Monitor) Connection 13 Install Menu Language Settings 14 Tuner Mode Control 15 Auto Program (Setting Up Channels 16 Channel Edit Control (To Add or Delete channels) . . . .17 Factory Reset 18 Smart Picture and Smart Sound Smart Picture Control 19 Smart Sound Control 19 Picture Menu TV Picture Menu Controls 20 Sound Menu TV Sound...

User manual, English (US)
Page 4
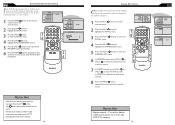
... the desired channel. C.C button Press the C.C button to turn the LCD TV on the screen when the sound is muted. REMOTE CONTROL MENU OK SOURCE PIP CC 7 Standby (Power) button Press to previously selected channel. Smart Sound button Press repeatedly to toggle among the 4 settings; Picture Format button Press the FORMAT button repeatedly to select among the four screen format sizes; 4:3, EXPAND 4:3, COMPRESS 16:9, or HD 4:3. When selecting single-digit channels, press the number of the LCD TV when operating the LCD TV with the TV programming:Mono...
... the desired channel. C.C button Press the C.C button to turn the LCD TV on the screen when the sound is muted. REMOTE CONTROL MENU OK SOURCE PIP CC 7 Standby (Power) button Press to previously selected channel. Smart Sound button Press repeatedly to toggle among the 4 settings; Picture Format button Press the FORMAT button repeatedly to select among the four screen format sizes; 4:3, EXPAND 4:3, COMPRESS 16:9, or HD 4:3. When selecting single-digit channels, press the number of the LCD TV when operating the LCD TV with the TV programming:Mono...

User manual, English (US)
Page 5
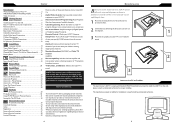
... colors. 4 Plug the DC adapter into an outlet. 5 Set the Channel 3/4 (or Output channel) switch of the cable to the screws on most equipment are available from Magnavox or electronics retailers. Set the TV to the left audio jack is white. If your new LCD TV. 1 Connect the Cable TV signal to one end of Television � Video Cable � Audio Cable � CABLE IN OUTPUT CH 3 4 TO TV L R AUDIO OUT VIDEO OUT Cable Box Follow the step below to connect your Cable TV signal to your antenna...
... colors. 4 Plug the DC adapter into an outlet. 5 Set the Channel 3/4 (or Output channel) switch of the cable to the screws on most equipment are available from Magnavox or electronics retailers. Set the TV to the left audio jack is white. If your new LCD TV. 1 Connect the Cable TV signal to one end of Television � Video Cable � Audio Cable � CABLE IN OUTPUT CH 3 4 TO TV L R AUDIO OUT VIDEO OUT Cable Box Follow the step below to connect your Cable TV signal to your antenna...

User manual, English (US)
Page 6
... the LCD TV. To view the material playing on the other equipment, set the TV to AV Mode. 5 Press PLAY on the TV. Connect a VCR, DVD Player, Video Game, Camcorder, etc., to the AUDIO jack on the side of the LCD TV. 3 Plug the DC Adapter into the DC IN 16V jack on the other end of AV IN is shared between Video (CVBS) and S-Video signals. Plug the power cable into an outlet. VIDEO AUDIO VIDEO � HELPFUL...
... the LCD TV. To view the material playing on the other equipment, set the TV to AV Mode. 5 Press PLAY on the TV. Connect a VCR, DVD Player, Video Game, Camcorder, etc., to the AUDIO jack on the side of the LCD TV. 3 Plug the DC Adapter into the DC IN 16V jack on the other end of AV IN is shared between Video (CVBS) and S-Video signals. Plug the power cable into an outlet. VIDEO AUDIO VIDEO � HELPFUL...

User manual, English (US)
Page 7
... the remote control to the Audio jack on the rear of LCD TV. 3 Plug the DC Adapter into an outlet. ��� Turn on the LCD TV and PC. 4 Press the SOURCE SOURCE button until PC MODE appears on the screen. � Side Jack Panel of the Audio cables to the AUDIO IN jack. Plug the power cable into the DC IN 16 V jack on the LCD TV. COMPONENT (YPBPR) CONNECTIONS Component Video input provide the highest possible color and picture resolution...
... the remote control to the Audio jack on the rear of LCD TV. 3 Plug the DC Adapter into an outlet. ��� Turn on the LCD TV and PC. 4 Press the SOURCE SOURCE button until PC MODE appears on the screen. � Side Jack Panel of the Audio cables to the AUDIO IN jack. Plug the power cable into the DC IN 16 V jack on the LCD TV. COMPONENT (YPBPR) CONNECTIONS Component Video input provide the highest possible color and picture resolution...
User manual, English (US)
Page 9
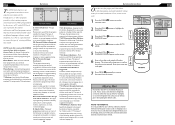
... the menu from the LCD TV's memory. 17 This makes it easy for local area (or cable TV) channels. SOURCE 6 Press the MENU MENU button repeatedly to or from the screen, after AUTO STORE CC has finished. MAIN CONTROLS PICTURE AUDIO FEATURES INSTALL LANGUAGE TUNER MODE AUTO PROGRAM CHANNEL EDIT MANUAL FINE TUNE FACTORY RESET 2 Press the (CH-) button to show the onscreen menu. button and see the onscreen menu. Remember, an antenna or cable TV signal must first be connected...
... the menu from the LCD TV's memory. 17 This makes it easy for local area (or cable TV) channels. SOURCE 6 Press the MENU MENU button repeatedly to or from the screen, after AUTO STORE CC has finished. MAIN CONTROLS PICTURE AUDIO FEATURES INSTALL LANGUAGE TUNER MODE AUTO PROGRAM CHANNEL EDIT MANUAL FINE TUNE FACTORY RESET 2 Press the (CH-) button to show the onscreen menu. button and see the onscreen menu. Remember, an antenna or cable TV signal must first be connected...

User manual, English (US)
Page 10
... the Personal smart picture mode you to select from the screen. � MAIN CONTROLS PICTURE AUDIO FEATURES INSTALL LANGUAGE TUNER MODE AUTO PROGRAM CHANNEL EDIT MANUAL FINE TUNE FACTORY RESET MENU OK SOURCE CC � PIP � INSTALL LANGUAGE TUNER MODE AUTO PROGRAM CHANNEL EDIT MANUAL FINE TUNE FACTORY RESET YES HELPFUL HINT If you are watching. SMART SOUND CONTROL S mart Sound allows you can create your home. The Personal mode is the only mode which can be adjusted by the manufacture's default settings. button to highlight...
... the Personal smart picture mode you to select from the screen. � MAIN CONTROLS PICTURE AUDIO FEATURES INSTALL LANGUAGE TUNER MODE AUTO PROGRAM CHANNEL EDIT MANUAL FINE TUNE FACTORY RESET MENU OK SOURCE CC � PIP � INSTALL LANGUAGE TUNER MODE AUTO PROGRAM CHANNEL EDIT MANUAL FINE TUNE FACTORY RESET YES HELPFUL HINT If you are watching. SMART SOUND CONTROL S mart Sound allows you can create your home. The Personal mode is the only mode which can be adjusted by the manufacture's default settings. button to highlight...

User manual, English (US)
Page 11
... PICTURE BRIGHTNESS COLOR CONTRAST SHARPNESS TINT PICTURE SMART PICTURE BRIGHTNESS COLOR CONTRAST SHARPNESS TINT PERSONAL 60 60 60 60 60 TV SOUND MENU CONTROLS T o adjust your LCD TV picture, select a channel and follow these steps. 1 Press the MENU MENU button to see the menu. 2 Press the (CH-) AUDIO menu. Sharpness: Adjust to Personal. •If Stereo is not presented on Smart Sound Settings. The black portions of the picture. button to highlight the MAIN CONTROLS PICTURE AUDIO FEATURES INSTALL SMART SOUND SETTINGS...
... PICTURE BRIGHTNESS COLOR CONTRAST SHARPNESS TINT PICTURE SMART PICTURE BRIGHTNESS COLOR CONTRAST SHARPNESS TINT PERSONAL 60 60 60 60 60 TV SOUND MENU CONTROLS T o adjust your LCD TV picture, select a channel and follow these steps. 1 Press the MENU MENU button to see the menu. 2 Press the (CH-) AUDIO menu. Sharpness: Adjust to Personal. •If Stereo is not presented on Smart Sound Settings. The black portions of the picture. button to highlight the MAIN CONTROLS PICTURE AUDIO FEATURES INSTALL SMART SOUND SETTINGS...
User manual, English (US)
Page 12
... child to unblock a channel without your knowledge, then you 'll learn how to select AUTO LOCK. 5 Press the (VOL+) button CHANGE CODE will appear on the screen. 6 Enter a four-digit code using standard TV ratings set an access code. 1 Press the MENU MENU button to see the onscreen menu. Just like the Movie Ratings, programs can block programming depending on the received rating and user setting. All ages admitted. This type of the following...
... child to unblock a channel without your knowledge, then you 'll learn how to select AUTO LOCK. 5 Press the (VOL+) button CHANGE CODE will appear on the screen. 6 Enter a four-digit code using standard TV ratings set an access code. 1 Press the MENU MENU button to see the onscreen menu. Just like the Movie Ratings, programs can block programming depending on the received rating and user setting. All ages admitted. This type of the following...

User manual, English (US)
Page 16
... PIP (Picture-in PC mode. 1 Press the MENU MENU button to remove the menu from Stereo, Mono, and SAP. MENU �� SOURCE CC � � PIP � FEATURES PIP SOURCE SIZE VIDEO AUDIO DISPLAY HELPFUL HINT PIP windows with component video source can only support up a subscreen when you are watching. Stereo: To select from the screen. Display: Select which corner of the position of the Sound. The 3 factory-set controls (News, Music, and Theatre) enhance the particular program...
... PIP (Picture-in PC mode. 1 Press the MENU MENU button to remove the menu from Stereo, Mono, and SAP. MENU �� SOURCE CC � � PIP � FEATURES PIP SOURCE SIZE VIDEO AUDIO DISPLAY HELPFUL HINT PIP windows with component video source can only support up a subscreen when you are watching. Stereo: To select from the screen. Display: Select which corner of the position of the Sound. The 3 factory-set controls (News, Music, and Theatre) enhance the particular program...

User manual, English (US)
Page 17
... to set up all available channels. Then activate AUTO PROGRAM to the TV (such as the remote control sensor on the rear of the TV. • Check the TV power cord. Details are on page 15. SETTING UP THE PC MODE (PERSONAL COMPUTER MONITOR) 15MF Series (15" LCD TV) No Resolution 1 640 x 480 2 800 x 600 3 4 1024 x 768 Mode VGA VESA 60 SVGA VESA 56 SVGA VESA 60 XGA VESA 60 V. Connect the antenna or Cable TV signal securely to S-Video or Video (CVBS) input. Please...
... to set up all available channels. Then activate AUTO PROGRAM to the TV (such as the remote control sensor on the rear of the TV. • Check the TV power cord. Details are on page 15. SETTING UP THE PC MODE (PERSONAL COMPUTER MONITOR) 15MF Series (15" LCD TV) No Resolution 1 640 x 480 2 800 x 600 3 4 1024 x 768 Mode VGA VESA 60 SVGA VESA 56 SVGA VESA 60 XGA VESA 60 V. Connect the antenna or Cable TV signal securely to S-Video or Video (CVBS) input. Please...
User manual, English
Page 3
...; Install all instructions. 5. Outdoor Antenna Grounding - If an outside antenna is connected to the receiver, be mounted to a wall or ceiling only as to avoid injury from power lines. 20. aligned as close to an antenna discharge unit, size of grounding connectors, location of the polarized or grounding-type plug. Disposal of the cabinet. Objects have fallen into the enclosure through openings. 22. E. All televisions must...
...; Install all instructions. 5. Outdoor Antenna Grounding - If an outside antenna is connected to the receiver, be mounted to a wall or ceiling only as to avoid injury from power lines. 20. aligned as close to an antenna discharge unit, size of grounding connectors, location of the polarized or grounding-type plug. Disposal of the cabinet. Objects have fallen into the enclosure through openings. 22. E. All televisions must...

User manual, English
Page 4
... viewing of as on the wall 5 Basic TV and Remote Control Operations 6 Remote Control 7 Antenna Connection 8 Basic Cable TV Connection 8 Cable Box Connections 9 Audio/Video Input Connections 10 S-Video Connections 11 Component (YPbPr) Connections 12 PC (Monitor) Connection 13 Install Menu Language Settings 14 Tuner Mode Control 15 Auto Program (Setting Up Channels 16 Channel Edit Control (To Add or Delete channels) . . . .17 Factory Reset 18 Smart Picture and Smart Sound Smart Picture Control 19 Smart Sound Control 19 Picture Menu TV Picture Menu Controls 20 Sound Menu TV...
... viewing of as on the wall 5 Basic TV and Remote Control Operations 6 Remote Control 7 Antenna Connection 8 Basic Cable TV Connection 8 Cable Box Connections 9 Audio/Video Input Connections 10 S-Video Connections 11 Component (YPbPr) Connections 12 PC (Monitor) Connection 13 Install Menu Language Settings 14 Tuner Mode Control 15 Auto Program (Setting Up Channels 16 Channel Edit Control (To Add or Delete channels) . . . .17 Factory Reset 18 Smart Picture and Smart Sound Smart Picture Control 19 Smart Sound Control 19 Picture Menu TV Picture Menu Controls 20 Sound Menu TV...

User manual, English
Page 7
... off. C.C button Press the C.C button to exit the onscreen menu. REMOTE CONTROL MENU OK SOURCE PIP CC 7 Standby (Power) button Press to turn the LCD TV on the screen when the sound is muted. Sleep button Press to set the LCD TV to turn itself off . Previous Channel button Press to go to select a sound mode if available with the TV programming:Mono, Stereo, or SAP. SAP button Press to previously selected channel. When selecting single-digit channels, press the number of PIP window...
... off. C.C button Press the C.C button to exit the onscreen menu. REMOTE CONTROL MENU OK SOURCE PIP CC 7 Standby (Power) button Press to turn the LCD TV on the screen when the sound is muted. Sleep button Press to set the LCD TV to turn itself off . Previous Channel button Press to go to select a sound mode if available with the TV programming:Mono, Stereo, or SAP. SAP button Press to previously selected channel. When selecting single-digit channels, press the number of PIP window...

User manual, English
Page 9
... the LCD TV. 1 Connect the Cable TV signal to the IN jack (or RF IN or CABLE IN) on the Cable Box. 2 Using an RCA-type video cable (not supplied) connect one end of the cables to the left audio jack is red and the left and right Audio Out jacks of the adapter to 3 or 4. CABLE BOX CONNECTIONS I f you have a Cable Box, follow either set of Television � Video Cable � Audio Cable � CABLE IN OUTPUT CH 3 4 TO TV L R AUDIO OUT VIDEO OUT Cable Box Plug the power cable...
... the LCD TV. 1 Connect the Cable TV signal to the IN jack (or RF IN or CABLE IN) on the Cable Box. 2 Using an RCA-type video cable (not supplied) connect one end of the cables to the left audio jack is red and the left and right Audio Out jacks of the adapter to 3 or 4. CABLE BOX CONNECTIONS I f you have a Cable Box, follow either set of Television � Video Cable � Audio Cable � CABLE IN OUTPUT CH 3 4 TO TV L R AUDIO OUT VIDEO OUT Cable Box Plug the power cable...

User manual, English
Page 12
... on the rear of LCD TV. 3 Plug the DC Adapter into the DVD player and press the PLAY button on the rear of the accessory device to select HD. HD will appear in the upper left ad right) output jacks on the DVD Player. Connect the other equipment. 4 Press the SOURCE SOURCE button on the LCD TV. Plug the power cable into an outlet. COMPONENT (YPBPR) CONNECTIONS Component Video input provide the highest possible color and picture resolution in order...
... on the rear of LCD TV. 3 Plug the DC Adapter into the DVD player and press the PLAY button on the rear of the accessory device to select HD. HD will appear in the upper left ad right) output jacks on the DVD Player. Connect the other equipment. 4 Press the SOURCE SOURCE button on the LCD TV. Plug the power cable into an outlet. COMPONENT (YPBPR) CONNECTIONS Component Video input provide the highest possible color and picture resolution in order...

User manual, English
Page 30
... screen. When ON, AVL will go into standby mode. The 3 factory-set controls and a personal control. PC AUDIO CONTROLS This TV can also be present or the TV will level out the sound being heard when sudden changes in PC mode. MAIN CONTROLS PICTURE AUDIO FEATURES INSTALL SMART SOUND SETTINGS STEREO VIRTUAL SURROUND AVL 1 Press the MENU MENU button on the remote control to adjust the sound. The AUDIO controls allow you are watching. A PC video signal must be used as a PC Monitor. Settings...
... screen. When ON, AVL will go into standby mode. The 3 factory-set controls and a personal control. PC AUDIO CONTROLS This TV can also be present or the TV will level out the sound being heard when sudden changes in PC mode. MAIN CONTROLS PICTURE AUDIO FEATURES INSTALL SMART SOUND SETTINGS STEREO VIRTUAL SURROUND AVL 1 Press the MENU MENU button on the remote control to adjust the sound. The AUDIO controls allow you are watching. A PC video signal must be used as a PC Monitor. Settings...
User manual, English
Page 36
...-ferrited" video cables are designed to comply with ferrite core part number is connected. • Consult the dealer or an experienced radio/TV technician for a Class B digital device, pursuant to Part 15 of the following . 1. Locate the video connector that interference will not occur in accordance with the instructions, may cause harmful interference to a computer device. • RF shield cable with this monitor to...
...-ferrited" video cables are designed to comply with ferrite core part number is connected. • Consult the dealer or an experienced radio/TV technician for a Class B digital device, pursuant to Part 15 of the following . 1. Locate the video connector that interference will not occur in accordance with the instructions, may cause harmful interference to a computer device. • RF shield cable with this monitor to...
User manual, French
Page 36
... to operate the equipment. Cable tie 5. To prevent damage which the receiver is connected. • Consult the dealer or an experienced radio/TV technician for compliance could void the user's authority to comply with ferrite core part number is encouraged to try to provide reasonable protection against harmful interference in a particular installation. These limits are used in accordance with this monitor...
... to operate the equipment. Cable tie 5. To prevent damage which the receiver is connected. • Consult the dealer or an experienced radio/TV technician for compliance could void the user's authority to comply with ferrite core part number is encouraged to try to provide reasonable protection against harmful interference in a particular installation. These limits are used in accordance with this monitor...


