User manual, English (US)
Page 3
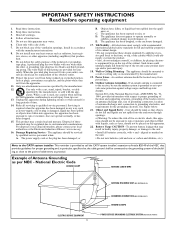
... antenna is connected to the receiver, be regulated due to operate normally or exhibits a marked change in any of time. 14. To prevent battery leakage that produce heat. 9. Do not block any way, such as power-supply cord or plug is grounded so as per NEC - or C. The appliance does not appear to environmental considerations. Power Lines - National Electric Code GROUND CLAMP ANTENNA...
... antenna is connected to the receiver, be regulated due to operate normally or exhibits a marked change in any of time. 14. To prevent battery leakage that produce heat. 9. Do not block any way, such as power-supply cord or plug is grounded so as per NEC - or C. The appliance does not appear to environmental considerations. Power Lines - National Electric Code GROUND CLAMP ANTENNA...
User manual, English (US)
Page 4
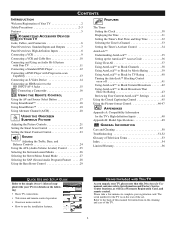
... TV Jacks, Cables, and Connectors 6 Panel Overviews: Standard Inputs and Outputs 7 Panel Overviews: High-definition Inputs 8 Connecting a VCR 9 Connecting a VCR and Cable Box 10 Connecting and Using an Audio Hi-fi System with Your TV 11 Connecting a Standard DVD Player 12 Connecting a DVD Player with Progressive-scan Capability 13 Connecting an S-Video Device 14 Connecting an HD Receiver to the HD INPUT-AV 4 Jacks 15 POWER TV SWAP VCR PIP CH ACC ACTIVE CONTROL FREEZE DN UP SOUND PICTURE STATUS/ EXIT MENU/ SELECT Connecting a Camcorder 16 USING THE REMOTE CONTROL...
... TV Jacks, Cables, and Connectors 6 Panel Overviews: Standard Inputs and Outputs 7 Panel Overviews: High-definition Inputs 8 Connecting a VCR 9 Connecting a VCR and Cable Box 10 Connecting and Using an Audio Hi-fi System with Your TV 11 Connecting a Standard DVD Player 12 Connecting a DVD Player with Progressive-scan Capability 13 Connecting an S-Video Device 14 Connecting an HD Receiver to the HD INPUT-AV 4 Jacks 15 POWER TV SWAP VCR PIP CH ACC ACTIVE CONTROL FREEZE DN UP SOUND PICTURE STATUS/ EXIT MENU/ SELECT Connecting a Camcorder 16 USING THE REMOTE CONTROL...

User manual, English (US)
Page 5
... your remote control. Closed Captioning allows you press the CH +/- High-definition component video inputs allow direct connections with the Energy Star® label can save energy. Your set provides separate HD inputs for YPbPr/RGB, as well as advanced capability for quality TV picture and sound playback. The batteries used by displaying all picture frame lines at an even level. Because APAC works in both analog sources (cable TV and DVD) and digital sources (HD...
... your remote control. Closed Captioning allows you press the CH +/- High-definition component video inputs allow direct connections with the Energy Star® label can save energy. Your set provides separate HD inputs for YPbPr/RGB, as well as advanced capability for quality TV picture and sound playback. The batteries used by displaying all picture frame lines at an even level. Because APAC works in both analog sources (cable TV and DVD) and digital sources (HD...

User manual, English (US)
Page 7
... 1 OUTPUT Y VIDEO Pb L AUDIO Pr R 52 Rear of TV 4 INPUT-AV 2 VIDEO S-VIDEO L L AUDIO R HD INPUT-AV 4 G/Y R/Pr B/Pb V L SYNC AUDIO H R 53 Summary of signal compatabilities Input jacks on connections. These are a progressive-scan DVD player (480p) or an HD receiver (1080i or 480p) with the best picture. Examples of sources for information on TV ANTENNA IN 75Ω, INPUT AV-1, INPUT AV-2, and side jack panel (AV3) Compatible output signal from an external source or device 480i (480 lines, interlaced) 4 INPUT...
... 1 OUTPUT Y VIDEO Pb L AUDIO Pr R 52 Rear of TV 4 INPUT-AV 2 VIDEO S-VIDEO L L AUDIO R HD INPUT-AV 4 G/Y R/Pr B/Pb V L SYNC AUDIO H R 53 Summary of signal compatabilities Input jacks on connections. These are a progressive-scan DVD player (480p) or an HD receiver (1080i or 480p) with the best picture. Examples of sources for information on TV ANTENNA IN 75Ω, INPUT AV-1, INPUT AV-2, and side jack panel (AV3) Compatible output signal from an external source or device 480i (480 lines, interlaced) 4 INPUT...

User manual, English (US)
Page 8
... with high-definition signal standards 1080i and 480p as HD receivers (1080i or 480p) or DVD players with 1080i or 480p signal output. Rear of TV ANTENNA IN 75Ω INPUT-AV 1 VIDEO L AUDIO R OUTPUT Y Pb Pr INPUT-AV 2 VIDEO S-VIDEO L L AUDIO R HD INPUT-AV 4 G/Y R/Pr B/Pb 1 V L SYNC AUDIO H R Summary of signal compatabilities Input jacks on the TV. 8 You can connect equipment with the HD INPUT-AV 4 video jacks. Dedicated audio input jacks are located with YPbPr component video or RGB outputs to the HD INPUT...
... with high-definition signal standards 1080i and 480p as HD receivers (1080i or 480p) or DVD players with 1080i or 480p signal output. Rear of TV ANTENNA IN 75Ω INPUT-AV 1 VIDEO L AUDIO R OUTPUT Y Pb Pr INPUT-AV 2 VIDEO S-VIDEO L L AUDIO R HD INPUT-AV 4 G/Y R/Pr B/Pb 1 V L SYNC AUDIO H R Summary of signal compatabilities Input jacks on the TV. 8 You can connect equipment with the HD INPUT-AV 4 video jacks. Dedicated audio input jacks are located with YPbPr component video or RGB outputs to the HD INPUT...
User manual, English (US)
Page 9
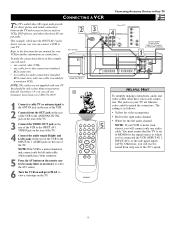
...; Red for the right audio channel • White for the left audio cable, which uses the INPUT-AV 1 jacks, shows you will need: • one coaxial cable (75Ω) • one cable for a video connection (standard RCA connector) • two cables for audio connections (standard RCA connectors) (only one of the TV. Refer to the directions-for-use manual for your TV are not supplied with your TV. NOTE: The cables are likewise color coded...
...; Red for the right audio channel • White for the left audio cable, which uses the INPUT-AV 1 jacks, shows you will need: • one coaxial cable (75Ω) • one cable for a video connection (standard RCA connector) • two cables for audio connections (standard RCA connectors) (only one of the TV. Refer to the directions-for-use manual for your TV are not supplied with your TV. NOTE: The cables are likewise color coded...

User manual, English (US)
Page 10
... as follows: -Yellow for video (composite) -Red for the right audio channel -White for the signal source to which usually has a white connector. 7 Press the AV button on the remote control as many times as necessary to select the AV1 source. 8 Turn the VCR on audio and video cables are often color coded. The coding is mono (nonstereo), you 've connected the VCR (INPUT-AV 2, INPUT-AV 1, or the side panel inputs [AV3]). You...
... as follows: -Yellow for video (composite) -Red for the right audio channel -White for the signal source to which usually has a white connector. 7 Press the AV button on the remote control as many times as necessary to select the AV1 source. 8 Turn the VCR on audio and video cables are often color coded. The coding is mono (nonstereo), you 've connected the VCR (INPUT-AV 2, INPUT-AV 1, or the side panel inputs [AV3]). You...

User manual, English (US)
Page 12
... difficulties receiving sound with a DVD disc, check the sound settings through the DVD disc's menu. If you are attempting to use the receiver's channelmemorization system to store channels in the receiver's memory. • If you must use manual for the blue and red color component signal connectors, respectively, and Y indicates the luminance sig- The jacks on your TV. If you may vary, the letters B and R stand for your TV's jack panel) or S-Video connections...
... difficulties receiving sound with a DVD disc, check the sound settings through the DVD disc's menu. If you are attempting to use the receiver's channelmemorization system to store channels in the receiver's memory. • If you must use manual for the blue and red color component signal connectors, respectively, and Y indicates the luminance sig- The jacks on your TV. If you may vary, the letters B and R stand for your TV's jack panel) or S-Video connections...
User manual, English (US)
Page 13
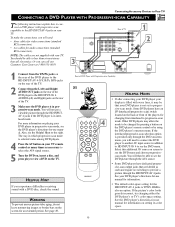
...1 VIDEO L AUDIO R OUTPUT Y Pb Pr INPUT-AV 2 VIDEO S-VIDEO L L AUDIO R HD INPUT-AV 4 G/Y R/Pr B/Pb V L SYNC AUDIO H R 1 2 3 VIDEO OUT Y VIDEO PB SELECT PR S I /P (interlaced/progressive scan) switch located on screen to the right. You will need to connect the DVD player to another AV input source in addition to HD INPUT-AV 4 to see the DVD player's directions-for-use manual for information. • The default color-space setting for -use manual. Connecting Accessory Devices to Your TV CONNECTING A DVD PLAYER WITH PROGRESSIVE-SCAN CAPABILITY T he following instructions...
...1 VIDEO L AUDIO R OUTPUT Y Pb Pr INPUT-AV 2 VIDEO S-VIDEO L L AUDIO R HD INPUT-AV 4 G/Y R/Pr B/Pb V L SYNC AUDIO H R 1 2 3 VIDEO OUT Y VIDEO PB SELECT PR S I /P (interlaced/progressive scan) switch located on screen to the right. You will need to connect the DVD player to another AV input source in addition to HD INPUT-AV 4 to see the DVD player's directions-for-use manual for information. • The default color-space setting for -use manual. Connecting Accessory Devices to Your TV CONNECTING A DVD PLAYER WITH PROGRESSIVE-SCAN CAPABILITY T he following instructions...
User manual, English (US)
Page 15
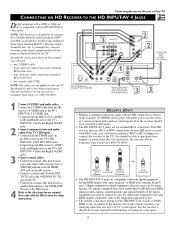
... INPUT-AV 1 VIDEO L AUDIO R Rear of TV OUTPUT Y Pb Pr INPUT-AV 2 VIDEO S-VIDEO L L AUDIO R HD INPUT-AV 4 G/Y R/Pr B/Pb V L SYNC AUDIO H R 2 2 Coaxial Cable Lead-in from Satellite Dish Antenna Y PB RF PR PHONE JACK REMOTE AUDIO AUDIO L L R R VCR CONTROL 1 OUT TO TV CH 3 CH 4 DIGITAL AUDIO OUT VIDEO VIDEO S-VIDEO IN FROM ANT SATELLITE IN Rear of HD Receiver (Example: Philips DSHD800) Coaxial Cable Lead-in from Cable Outlet, Cable Converter Box, or VHF/UHF Antenna 3 3 1 Connect S-VIDEO and audio cables. • Connect an S-VIDEO cable from the HD receiver's S-VIDEO jack...
... INPUT-AV 1 VIDEO L AUDIO R Rear of TV OUTPUT Y Pb Pr INPUT-AV 2 VIDEO S-VIDEO L L AUDIO R HD INPUT-AV 4 G/Y R/Pr B/Pb V L SYNC AUDIO H R 2 2 Coaxial Cable Lead-in from Satellite Dish Antenna Y PB RF PR PHONE JACK REMOTE AUDIO AUDIO L L R R VCR CONTROL 1 OUT TO TV CH 3 CH 4 DIGITAL AUDIO OUT VIDEO VIDEO S-VIDEO IN FROM ANT SATELLITE IN Rear of HD Receiver (Example: Philips DSHD800) Coaxial Cable Lead-in from Cable Outlet, Cable Converter Box, or VHF/UHF Antenna 3 3 1 Connect S-VIDEO and audio cables. • Connect an S-VIDEO cable from the HD receiver's S-VIDEO jack...

User manual, English (US)
Page 30
... the TIME control. 5 Press the CURSOR BUTTON RIGHT again to highlight the time indicator area. 6 Press the NUMBER buttons to make corrections. Using the Onscreen Submenus: Features Your TV comes with an onscreen clock. For instructions on the screen when you 'd like, set the clock automatically using the AutoChron™ feature (page 5, Quick Use and Setup Guide). • Clock settings may be sure to select the Timer's channel and...
... the TIME control. 5 Press the CURSOR BUTTON RIGHT again to highlight the time indicator area. 6 Press the NUMBER buttons to make corrections. Using the Onscreen Submenus: Features Your TV comes with an onscreen clock. For instructions on the screen when you 'd like, set the clock automatically using the AutoChron™ feature (page 5, Quick Use and Setup Guide). • Clock settings may be sure to select the Timer's channel and...
User manual, English (US)
Page 32
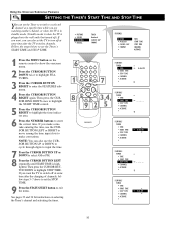
... set the TV to turn off at some time after the changing of channels, follow steps 5-7 above to set the STOP TIME. 9 Press the STATUS/EXIT button to exit the menu. See pages 33 and 34 for instructions on the remote control to show the onscreen menu. 2 Press the CURSOR BUTTON DOWN twice to highlight FEATURES. 3 Press the CURSOR BUTTON RIGHT to highlight STOP TIME. PICTURE SOUND FEATURES INSTALL TIMER AutoLock CLOSED...
... set the TV to turn off at some time after the changing of channels, follow steps 5-7 above to set the STOP TIME. 9 Press the STATUS/EXIT button to exit the menu. See pages 33 and 34 for instructions on the remote control to show the onscreen menu. 2 Press the CURSOR BUTTON DOWN twice to highlight FEATURES. 3 Press the CURSOR BUTTON RIGHT to highlight STOP TIME. PICTURE SOUND FEATURES INSTALL TIMER AutoLock CLOSED...

User manual, English (US)
Page 34
... BUTTON RIGHT to work ONCE or DAILY. Using the Onscreen Submenus: Features SETTING THE TIMER'S ACTIVATE CONTROL After you have set the TIME, START TIME, STOP TIME, and CHANNEL, you must activate the Timer for it to enter the FEATURES submenu. 4 Press the CURSOR BUTTON RIGHT again. PICTURE SOUND FEATURES INSTALL TIMER AutoLock CLOSED CAP FORMAT FEATURES TIMER AutoLock CLOSED CAP FORMAT TIME START TIME STOP TIME CHANNEL ACTIVATE FEATURES TIMER TIME 8:06 PM 1 3,4, START TIME STOP TIME CHANNEL...
... BUTTON RIGHT to work ONCE or DAILY. Using the Onscreen Submenus: Features SETTING THE TIMER'S ACTIVATE CONTROL After you have set the TIME, START TIME, STOP TIME, and CHANNEL, you must activate the Timer for it to enter the FEATURES submenu. 4 Press the CURSOR BUTTON RIGHT again. PICTURE SOUND FEATURES INSTALL TIMER AutoLock CLOSED CAP FORMAT FEATURES TIMER AutoLock CLOSED CAP FORMAT TIME START TIME STOP TIME CHANNEL ACTIVATE FEATURES TIMER TIME 8:06 PM 1 3,4, START TIME STOP TIME CHANNEL...

User manual, English (US)
Page 38
.... 1 Press the MENU button on the TV. 38 CORRECT will flash very briefly and the submenu will appear to the right of programs coming from a VCR, DVD, or other accessory device connected to any channels you want to prevent the viewing of the channel number. NOTE: You can use the BLOCK CHANNEL control to block from viewing. FEATURES TIMER AutoLock CLOSED CAP FORMAT ACCESS CODE - - - - 5 FEATURES 3,4, AutoLock BLOCK CHANNEL 1 SETUP CODE 2 22, 6,8 CLEAR...
.... 1 Press the MENU button on the TV. 38 CORRECT will flash very briefly and the submenu will appear to the right of programs coming from a VCR, DVD, or other accessory device connected to any channels you want to prevent the viewing of the channel number. NOTE: You can use the BLOCK CHANNEL control to block from viewing. FEATURES TIMER AutoLock CLOSED CAP FORMAT ACCESS CODE - - - - 5 FEATURES 3,4, AutoLock BLOCK CHANNEL 1 SETUP CODE 2 22, 6,8 CLEAR...

User manual, English (US)
Page 46
.... AUTO works best with a conventional (4:3 aspect ratio) set -top box (for HD programming) or pro-gressive-scan-capable DVD player (for use only with no onscreen menu or display present-press the CURSOR BUTTON RIGHT or LEFT as many times as necessary to a picture format or screen that has a greater aspect ratio than EXPAND 4:3. The wide screen is lost around the edges. Using the Onscreen Submenus: Features USING THE PICTURE-FORMAT CONTROL Your TV's wide screen...
.... AUTO works best with a conventional (4:3 aspect ratio) set -top box (for HD programming) or pro-gressive-scan-capable DVD player (for use only with no onscreen menu or display present-press the CURSOR BUTTON RIGHT or LEFT as many times as necessary to a picture format or screen that has a greater aspect ratio than EXPAND 4:3. The wide screen is lost around the edges. Using the Onscreen Submenus: Features USING THE PICTURE-FORMAT CONTROL Your TV's wide screen...

User manual, English (US)
Page 50
... widescreen (16:9) TV • DVD menus-listings of DVD disc content • Video-game images and scoreboards • Television station logos-present a problem if they might cause permanent marring of the set . • Never use -mixing television picture types-you may be a TV picture that fill the screen. you will be broadcast channels, cable channels, satellite channels, digital television boxes, DVD discs, laser discs, video games, CD-i discs, videotapes, and others in the back cover of pictures...
... widescreen (16:9) TV • DVD menus-listings of DVD disc content • Video-game images and scoreboards • Television station logos-present a problem if they might cause permanent marring of the set . • Never use -mixing television picture types-you may be a TV picture that fill the screen. you will be broadcast channels, cable channels, satellite channels, digital television boxes, DVD discs, laser discs, video games, CD-i discs, videotapes, and others in the back cover of pictures...

User manual, English (US)
Page 51
... TV remote control does not work • Check that the outlet is illustrated on page *Q-2. • Check that the batteries are dead, replace them with the HD receiver. The location of the TV power/standby button is not on a wall switch. • If you are using an AC power strip, be sure the fuse on a wall switch. See page *Q-7. You cannot tune to the set's memory. See page *Q-2 for TV installation and adjustment...
... TV remote control does not work • Check that the outlet is illustrated on page *Q-2. • Check that the batteries are dead, replace them with the HD receiver. The location of the TV power/standby button is not on a wall switch. • If you are using an AC power strip, be sure the fuse on a wall switch. See page *Q-7. You cannot tune to the set's memory. See page *Q-2 for TV installation and adjustment...

User manual, English (US)
Page 53
...; Projection Television. (Rear- Tint • TV function that allows you to change the general color balance between the last two channels viewed by the television (or VCR) to help the hearing impaired, Closed Captioning uses onscreen text boxes to show dialogue and conversations while a TV program is showing removes the onscreen display. Pressing the button twice shows the current AutoLock™ settings. HDTV is the output format of progressive-scan DVD players. 1080i • Digital high...
...; Projection Television. (Rear- Tint • TV function that allows you to change the general color balance between the last two channels viewed by the television (or VCR) to help the hearing impaired, Closed Captioning uses onscreen text boxes to show dialogue and conversations while a TV program is showing removes the onscreen display. Pressing the button twice shows the current AutoLock™ settings. HDTV is the output format of progressive-scan DVD players. 1080i • Digital high...

User manual, English (US)
Page 54
... Sound™, 18 AV Button, 17 AVL Control, 25 B Balance Control, 24 Bass Boost Control, 29 Bass Control, 24 Brightness Control, 21 Buttons (TV), *Q-2 Buttons (Remote), *Q-3 C Cables/connectors, *Q-1, 6 Channel Edit Control, *Q-5, 53 Cleaning (TV/Screen), 50 Clock (See Timer Control) Closed Captioning Control, 45, 53 Coaxial Cable (Definition), 53 Color Control, 21 Color Temp Control, 21 Component Video Inputs (Definition), 53 Composite Video Input (Definition), 53 Connections Antenna/cable, *Q-1 Cable converter box, *Q-1 Camcorder, 16 Compatibility, 6, 7, 48 DVD player, 12-13 HD receiver...
... Sound™, 18 AV Button, 17 AVL Control, 25 B Balance Control, 24 Bass Boost Control, 29 Bass Control, 24 Brightness Control, 21 Buttons (TV), *Q-2 Buttons (Remote), *Q-3 C Cables/connectors, *Q-1, 6 Channel Edit Control, *Q-5, 53 Cleaning (TV/Screen), 50 Clock (See Timer Control) Closed Captioning Control, 45, 53 Coaxial Cable (Definition), 53 Color Control, 21 Color Temp Control, 21 Component Video Inputs (Definition), 53 Composite Video Input (Definition), 53 Connections Antenna/cable, *Q-1 Cable converter box, *Q-1 Camcorder, 16 Compatibility, 6, 7, 48 DVD player, 12-13 HD receiver...

User manual, French (Canada)
Page 4
... d'installation Quick Use and Setup Guide Rear-projection HDTV Monitor CONTENTS Important Notice/Warning 1 Making Basic TV Connections 1-2 Operating the Television and Remote Control 2-3 Using the Installation Features 4-6 Using the Picture-in-Picture (PIP) Feature 6-7 Adjusting the Manual Converge Controls 8 As an Energy Star® Partner, Philips Consumer Electronics has determined this large screen at its large viewing screen. This is as VCRs and DVD players to the television. Move the magnetic field source away from Cable TV Company Cable TV Company HD INPUT-AV...
... d'installation Quick Use and Setup Guide Rear-projection HDTV Monitor CONTENTS Important Notice/Warning 1 Making Basic TV Connections 1-2 Operating the Television and Remote Control 2-3 Using the Installation Features 4-6 Using the Picture-in-Picture (PIP) Feature 6-7 Adjusting the Manual Converge Controls 8 As an Energy Star® Partner, Philips Consumer Electronics has determined this large screen at its large viewing screen. This is as VCRs and DVD players to the television. Move the magnetic field source away from Cable TV Company Cable TV Company HD INPUT-AV...


