Owners Manual English v2
Page 2
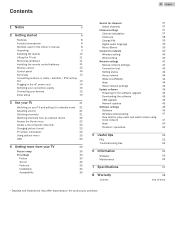
... settings 30 Picture 30 Sound 32 Features 33 Installation 33 Accessibility 35 Search for channels 37 Install channels 37 Channel settings 37 Channel installation 37 Child lock 38 Change PIN 39 Digital audio language 39 Mono/Stereo 39 Connect to network 40 Wireless setting 40 Wired setting 40 Network settings 41 Manual network settings 41 Connection test 43 Setting status 43 Home network 44 Wake-on-LAN(DIAL) 44 Apps 44 Reset network settings 44 Update software 45 Preparing for the software upgrade 45 Downloading the software 45 USB upgrade...
... settings 30 Picture 30 Sound 32 Features 33 Installation 33 Accessibility 35 Search for channels 37 Install channels 37 Channel settings 37 Channel installation 37 Child lock 38 Change PIN 39 Digital audio language 39 Mono/Stereo 39 Connect to network 40 Wireless setting 40 Wired setting 40 Network settings 41 Manual network settings 41 Connection test 43 Setting status 43 Home network 44 Wake-on-LAN(DIAL) 44 Apps 44 Reset network settings 44 Update software 45 Preparing for the software upgrade 45 Downloading the software 45 USB upgrade...
Owners Manual English v2
Page 4
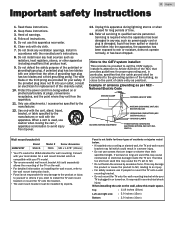
... the cable ground shall be installed by the manufacturer, or sold separately) allows the mounting of antenna grounding as per NEC National Electric Code GROUND CLAMP ANTENNA LEAD IN WIRE ELECTRIC SERVICE EQUIPMENT ANTENNA DISCHARGE UNIT (NEC SECTION 810-20) GROUNDING CONDUCTORS (NEC SECTION 810-21) GROUND CLAMPS POWER SERVICE GROUNDING ELECTRODE SYSTEM (NEC ART 250, PART H) Wall mount bracket kit Brand 65MV378Y SANUS Model # Screw dimension F80b...
... the cable ground shall be installed by the manufacturer, or sold separately) allows the mounting of antenna grounding as per NEC National Electric Code GROUND CLAMP ANTENNA LEAD IN WIRE ELECTRIC SERVICE EQUIPMENT ANTENNA DISCHARGE UNIT (NEC SECTION 810-20) GROUNDING CONDUCTORS (NEC SECTION 810-21) GROUND CLAMPS POWER SERVICE GROUNDING ELECTRODE SYSTEM (NEC ART 250, PART H) Wall mount bracket kit Brand 65MV378Y SANUS Model # Screw dimension F80b...

Owners Manual English v2
Page 5
... of light (red, green or blue) may generate or use of this device. 5150-5250 MHz band is not the mailing address for Open Source Software or Customer service. 5 .English Modifications This apparatus may appear constantly on the RF transmitter, which the receiver is expressed or implied. Failure to adjust earlier supplies accordingly. Any operation expressly prohibited in this Owner's manual, any adjustments or assembly...
... of light (red, green or blue) may generate or use of this device. 5150-5250 MHz band is not the mailing address for Open Source Software or Customer service. 5 .English Modifications This apparatus may appear constantly on the RF transmitter, which the receiver is expressed or implied. Failure to adjust earlier supplies accordingly. Any operation expressly prohibited in this Owner's manual, any adjustments or assembly...
Owners Manual English v2
Page 8
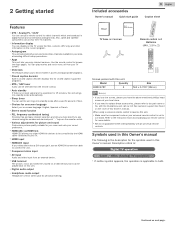
... HDMI-DVI conversion cable to connect the unit. ● Component video input ● AV input Audio and video input from the remote control. ● Auto standby If there is the description for the symbols used in closed caption decoder displays text for closed caption supported programs. ● MTS / SAP tuner Audio can be selected from an external device. ● USB terminal The picture, music and video files stored on a USB memory stick can be played back on this Owner's manual. Included accessories Owner's manual Quick...
... HDMI-DVI conversion cable to connect the unit. ● Component video input ● AV input Audio and video input from the remote control. ● Auto standby If there is the description for the symbols used in closed caption decoder displays text for closed caption supported programs. ● MTS / SAP tuner Audio can be selected from an external device. ● USB terminal The picture, music and video files stored on a USB memory stick can be played back on this Owner's manual. Included accessories Owner's manual Quick...

Owners Manual English v2
Page 13
.... HDMI-DVI / Analog audio (L/R) jacks signal - Green / Yellow color orientation depends on or switches the TV into standby mode. m Headphone audio output jack Headphone 3.5mm stereo jack for VIDEO Composite video input (VIDEO) jack is a shared jack with an RJ-45 connector. e SOURCE Selects connected devices. c B (POWER) Turns the TV on model. In the menu screen, moves the cursor up VOL - : Volume down (-). Component video / Analog audio (L/R) jacks signal - Selects a channel. PC connection / Analog audio (L/R) jacks signal with stereo mini 3.5mm plug audio cable...
.... HDMI-DVI / Analog audio (L/R) jacks signal - Green / Yellow color orientation depends on or switches the TV into standby mode. m Headphone audio output jack Headphone 3.5mm stereo jack for VIDEO Composite video input (VIDEO) jack is a shared jack with an RJ-45 connector. e SOURCE Selects connected devices. c B (POWER) Turns the TV on model. In the menu screen, moves the cursor up VOL - : Volume down (-). Component video / Analog audio (L/R) jacks signal - Selects a channel. PC connection / Analog audio (L/R) jacks signal with stereo mini 3.5mm plug audio cable...

Owners Manual English v2
Page 15
...; MAGNAVOX HDMI supports HDCP (High-bandwidth Digital Contents Protection). Composite video / Audio analog cable usually combine a yellow video cable with red / white audio (L/R) cables. No included cables are issues with picture/color and/or sound when connecting an external device using the HDMI port, please try switching the HDMI mode. (Refer to HDMI mode L p. 34) ● Some HDMI cables and devices may not be connected to a device that protects high-definition content in compliance with EIA861. Match the cable colors when you connect the AC power cord...
...; MAGNAVOX HDMI supports HDCP (High-bandwidth Digital Contents Protection). Composite video / Audio analog cable usually combine a yellow video cable with red / white audio (L/R) cables. No included cables are issues with picture/color and/or sound when connecting an external device using the HDMI port, please try switching the HDMI mode. (Refer to HDMI mode L p. 34) ● Some HDMI cables and devices may not be connected to a device that protects high-definition content in compliance with EIA861. Match the cable colors when you connect the AC power cord...
Owners Manual English v2
Page 19
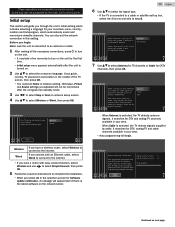
... antenna signals. Digital channels found: 0 Analog channels found: 0 Auto programming may also be accessible by the main unit's control panel. Otherwise, Picture and Sound settings you have a router with easy connect function, select Wireless and use J K to your on-screen menu, country, location and Autoprogram, which automatically scans and memorizes viewable channels. You can be memorized after the unit is turned on. 2 Use H I to select the on the network server. 19 .English 6 Use H I to select the signal type...
... antenna signals. Digital channels found: 0 Analog channels found: 0 Auto programming may also be accessible by the main unit's control panel. Otherwise, Picture and Sound settings you have a router with easy connect function, select Wireless and use J K to your on-screen menu, country, location and Autoprogram, which automatically scans and memorizes viewable channels. You can be memorized after the unit is turned on. 2 Use H I to select the on the network server. 19 .English 6 Use H I to select the signal type...

Owners Manual English v2
Page 24
...) Caption settings L p. 36 e Program's image aspect ratio Changing picture format L p. 23 f Audio language (DTV) / Audio mode (Analog TV) Sound L p. 32 g Favorites Create a list of favorite channels L p. 23 h Child lock rating Child lock L p. 38 i Remaining time on sleep timer Sleeptimer L p. 33 2 Press INFO to 16:9 video signal on both edges of the screen. Unscaled Displays a picture in 5 seconds. Information for DTV only) d CC (not available if Closed caption is stretched out of proportion to your viewing Manual Zoom...
...) Caption settings L p. 36 e Program's image aspect ratio Changing picture format L p. 23 f Audio language (DTV) / Audio mode (Analog TV) Sound L p. 32 g Favorites Create a list of favorite channels L p. 23 h Child lock rating Child lock L p. 38 i Remaining time on sleep timer Sleeptimer L p. 33 2 Press INFO to 16:9 video signal on both edges of the screen. Unscaled Displays a picture in 5 seconds. Information for DTV only) d CC (not available if Closed caption is stretched out of proportion to your viewing Manual Zoom...

Owners Manual English v2
Page 25
... standby mode automatically if there is displayed. Using options menu You can access to some TV settings directly by 30 minutes. Changing picture format L p. 23 Setup To display setup menu. Continued on or off timer Press H repeatedly to an HDMI connection. Voice guide toggle To set predefined sound mode. Picture L p. 30 Auto sound To set Voice guide on next page. Options a b c d a Options Following settings can be configured. Device-menu Controls the menu of your connected HDMICEC device. Switch off . Mono/Stereo L p. 39 b Controls...
... standby mode automatically if there is displayed. Using options menu You can access to some TV settings directly by 30 minutes. Changing picture format L p. 23 Setup To display setup menu. Continued on or off timer Press H repeatedly to an HDMI connection. Voice guide toggle To set predefined sound mode. Picture L p. 30 Auto sound To set Voice guide on next page. Options a b c d a Options Following settings can be configured. Device-menu Controls the menu of your connected HDMICEC device. Switch off . Mono/Stereo L p. 39 b Controls...
Owners Manual English v2
Page 34
... screen will black out for an additional digital audio cable. You can switch automatically to play , you press K (Play) on . Language Location Preferences fun-Link (HDMI CEC) Restore default settings HDMI mode TV placement Retail Demo Retail Home 3 Use H I to select Wall mounted or On a TV stand, then press OK. Note(s) ● The HDMI connector with HDMI mode set to 2K mode (Compatibility) supports up to UHD 30P, while The HDMI connector with HDMI mode set Home in the menu. Device control...
... screen will black out for an additional digital audio cable. You can switch automatically to play , you press K (Play) on . Language Location Preferences fun-Link (HDMI CEC) Restore default settings HDMI mode TV placement Retail Demo Retail Home 3 Use H I to select Wall mounted or On a TV stand, then press OK. Note(s) ● The HDMI connector with HDMI mode set to 2K mode (Compatibility) supports up to UHD 30P, while The HDMI connector with HDMI mode set Home in the menu. Device control...

Owners Manual English v2
Page 35
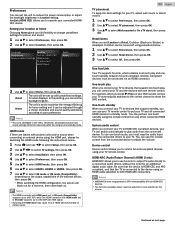
... work properly on your settings to Off. The channel installation settings are fun-Link (HDMI CEC) compliant. Accessibility 1 Press Z and use fun-Link to output TV audio directly to On or Off. Picture Sound Features Installation Accessibility Voice guide Caption settings Digital audio preferences 4 Adjust the following additional settings will turn on some functions such as disc playback or call up the menu of the connected devices, by this unit's remote control. You must connect this unit connecting...
... work properly on your settings to Off. The channel installation settings are fun-Link (HDMI CEC) compliant. Accessibility 1 Press Z and use fun-Link to output TV audio directly to On or Off. Picture Sound Features Installation Accessibility Voice guide Caption settings Digital audio preferences 4 Adjust the following additional settings will turn on some functions such as disc playback or call up the menu of the connected devices, by this unit's remote control. You must connect this unit connecting...

Owners Manual English v2
Page 37
.... 2 Use H I to select Installation mode, then press OK. 3 Use H I to select Antenna or Cable, then press OK. 5 Press OK on Start. ● When the scanning and memorizing of available channels is correctly connected to this unit and you install cable channels. 1 Press Z and use J K to select Setup then press OK. 2 Use H I J K to select Channel settings, then press OK. 3 Adjust the following items. Channel installation Child lock Change PIN Digital audio language Mono/Stereo Installation mode Uninstall channels...
.... 2 Use H I to select Installation mode, then press OK. 3 Use H I to select Antenna or Cable, then press OK. 5 Press OK on Start. ● When the scanning and memorizing of available channels is correctly connected to this unit and you install cable channels. 1 Press Z and use J K to select Setup then press OK. 2 Use H I J K to select Channel settings, then press OK. 3 Adjust the following items. Channel installation Child lock Change PIN Digital audio language Mono/Stereo Installation mode Uninstall channels...
Owners Manual English v2
Page 43
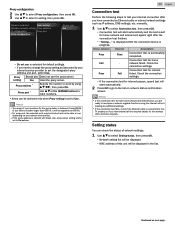
... of network settings. 1 Use H I or the NUMBER buttons to input numbers. * Items can be displayed. ● MAC address of input numbers for default settings. ● If you are ready to use Apps or network upgrade functions using H I J K, then press OK. Home network Internet Description Pass Pass Connection test is in the list. network failed. Proxy port * Use H I to Use. Network selection Proxy setting Wireless network setting Proxy address IP configuration Proxy port Proxy configuration Do not use Use ● Do not use the...
... of network settings. 1 Use H I or the NUMBER buttons to input numbers. * Items can be displayed. ● MAC address of input numbers for default settings. ● If you are ready to use Apps or network upgrade functions using H I J K, then press OK. Home network Internet Description Pass Pass Connection test is in the list. network failed. Proxy port * Use H I to Use. Network selection Proxy setting Wireless network setting Proxy address IP configuration Proxy port Proxy configuration Do not use Use ● Do not use the...
Owners Manual English v2
Page 45
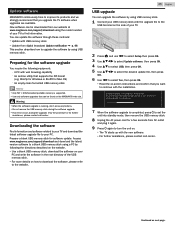
... the software upgrade is completed, press B to set the unit into standby mode, then remove the USB memory stick. 8 Unplug the AC power cord for a few seconds from AC outlet and plug it again. 9 Press B again to turn the unit on the MAGNAVOX web site. Access www.magnavox.com/support/download and download the latest version software to a blank USB memory stick using a PC by using USB memory stick. Do not remove the USB...
... the software upgrade is completed, press B to set the unit into standby mode, then remove the USB memory stick. 8 Unplug the AC power cord for a few seconds from AC outlet and plug it again. 9 Press B again to turn the unit on the MAGNAVOX web site. Access www.magnavox.com/support/download and download the latest version software to a blank USB memory stick using a PC by using USB memory stick. Do not remove the USB...

Owners Manual English v2
Page 53
...'s infrared sensor or turn on this unit. ● Although the default PIN code (0000) is supplied with the unit, the PIN code will not be completed when you forget your wall cable or set-top box needs to be plugged into standby mode. ● Autoprogram must be received. These basic it to a location where previously unavailable channels are connected to their polarities (+/-) as indicated on the remote control battery area...
...'s infrared sensor or turn on this unit. ● Although the default PIN code (0000) is supplied with the unit, the PIN code will not be completed when you forget your wall cable or set-top box needs to be plugged into standby mode. ● Autoprogram must be received. These basic it to a location where previously unavailable channels are connected to their polarities (+/-) as indicated on the remote control battery area...
Owners Manual English v2
Page 54
... buttons on the remote control are set to Off. ● If there are issues with 480i input, press PICTURE SIZE A repeatedly to switch to various screen modes. Sound intermittent or no screen image. ● Check whether the connection for service. Different color marks on the TV screen ● View other TV channels. 54 .English Troubleshooting tips If the unit does not perform properly when operated as a PC monitor, make sure that the analog audio...
... buttons on the remote control are set to Off. ● If there are issues with 480i input, press PICTURE SIZE A repeatedly to switch to various screen modes. Sound intermittent or no screen image. ● Check whether the connection for service. Different color marks on the TV screen ● View other TV channels. 54 .English Troubleshooting tips If the unit does not perform properly when operated as a PC monitor, make sure that the analog audio...

Owners Manual English v2
Page 55
... for internet video playback. wall, basement, 2nd floor) between them. ● Once you start USB update or network update. Cannot use VUDU feature. ● VUDU is available only in specific modes, but this is poor when using the wireless LAN of the TV, it is displayed on your internet service provider prevents multiple terminals connecting at the time of the home media server.) ● Check the network connection and settings. For...
... for internet video playback. wall, basement, 2nd floor) between them. ● Once you start USB update or network update. Cannot use VUDU feature. ● VUDU is available only in specific modes, but this is poor when using the wireless LAN of the TV, it is displayed on your internet service provider prevents multiple terminals connecting at the time of the home media server.) ● Check the network connection and settings. For...

Owners Manual English v2
Page 56
... of analog broadcasting standards. widescreen models are no user serviceable parts inside. We do not try to the analog TV picture quality. Before cleaning the panel, disconnect the AC power cord. ● Never use fun-Link to output TV audio directly to compress digital sound. PIN code A stored 4-digit number that was on the screen or other brands of the image's color luminance. The source, cable and display must all uncompressed, digital audio / video formats including set that...
... of analog broadcasting standards. widescreen models are no user serviceable parts inside. We do not try to the analog TV picture quality. Before cleaning the panel, disconnect the AC power cord. ● Never use fun-Link to output TV audio directly to compress digital sound. PIN code A stored 4-digit number that was on the screen or other brands of the image's color luminance. The source, cable and display must all uncompressed, digital audio / video formats including set that...
Leaflet
Page 2
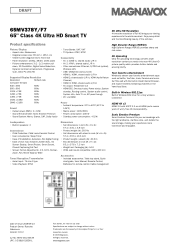
...; HDMI 3: HDMI, shared audio L/R in speakers: 2 Convenience • Child Protection: Child Lock+Parental Control • User convenience: Sleep Timer • Ease of Installation: Autostore, PLL Digital Tuning • Ease of Full HD brings your viewing experience to 104°F) • Mains power: 120V/60Hz • Power consumption: 230 W • Standby power consumption: Product specifications Picture/Display • Aspect ratio: Widescreen • Diagonal screen size: 65 inch / 165.1 cm • Visible screen diagonal (inch): 64.5 inch • Panel resolution...
...; HDMI 3: HDMI, shared audio L/R in speakers: 2 Convenience • Child Protection: Child Lock+Parental Control • User convenience: Sleep Timer • Ease of Installation: Autostore, PLL Digital Tuning • Ease of Full HD brings your viewing experience to 104°F) • Mains power: 120V/60Hz • Power consumption: 230 W • Standby power consumption: Product specifications Picture/Display • Aspect ratio: Widescreen • Diagonal screen size: 65 inch / 165.1 cm • Visible screen diagonal (inch): 64.5 inch • Panel resolution...
Quick Start Guide
Page 1
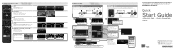
... Closed captions Digital audio language Mono/Stereo Off On CC w/mute Voice guide toggle Closed captions Digital audio language Mono/Stereo English French English English Source Home Network Apps Wireless Screencasting Setup Picture setup TV settings Search for detailed instructions. Sélectionnez Balayage. Refer to page 9 of the Owner's manual for channels Channel settings Connect to network Network settings Update software Software settings TV settings Ajustes de TV Con guration Picture Sound Features Installation Accessibility Language Preferences Restore default...
... Closed captions Digital audio language Mono/Stereo Off On CC w/mute Voice guide toggle Closed captions Digital audio language Mono/Stereo English French English English Source Home Network Apps Wireless Screencasting Setup Picture setup TV settings Search for detailed instructions. Sélectionnez Balayage. Refer to page 9 of the Owner's manual for channels Channel settings Connect to network Network settings Update software Software settings TV settings Ajustes de TV Con guration Picture Sound Features Installation Accessibility Language Preferences Restore default...


