
User manual, English (US)
Page 6
... Using Component Video Out Jacks 17 Connecting to a TV with an HDMI Compatible Port 18 Connecting to a Cable / Satellite Box 19 Connecting to a TV without Audio / Video Jacks . . . . 20 Digital Audio Connection 21 Basic Setup BEFORE YOU START 22 Finding the Viewing Channel on Your TV 22 Guide to On-Screen Display / Menu 23 Main Menu 25 Switching HDD / DVD Mode 27 How to Insert a Disc 27 INITIAL SETTING 28 CHANNEL SETTING 29 Auto Channel Scan 29 Adding / Deleting Channels 30 SETTING THE CLOCK 32 Auto Clock Setting 32 Manual Clock Setting...
... Using Component Video Out Jacks 17 Connecting to a TV with an HDMI Compatible Port 18 Connecting to a Cable / Satellite Box 19 Connecting to a TV without Audio / Video Jacks . . . . 20 Digital Audio Connection 21 Basic Setup BEFORE YOU START 22 Finding the Viewing Channel on Your TV 22 Guide to On-Screen Display / Menu 23 Main Menu 25 Switching HDD / DVD Mode 27 How to Insert a Disc 27 INITIAL SETTING 28 CHANNEL SETTING 29 Auto Channel Scan 29 Adding / Deleting Channels 30 SETTING THE CLOCK 32 Auto Clock Setting 32 Manual Clock Setting...

User manual, English (US)
Page 7
... 93 Hiding Chapters 94 Setting an Index Picture 95 Putting Name on Disc 96 Erasing Disc 97 Making Edits Compatible 98 Deleting All Titles in HDD 99 Function Setup LIST OF SETTINGS 100 SETUPS 103 Playback 103 Display 107 Video 110 HDMI 112 Reset All 113 Others TROUBLESHOOTING 114 LANGUAGE CODE 119 GLOSSARY 120 SPECIFICATIONS 121 Español ESPAÑOL 122 LIMITED WARRANTY Back cover Playback Editing Function Setup Others Españ...
... 93 Hiding Chapters 94 Setting an Index Picture 95 Putting Name on Disc 96 Erasing Disc 97 Making Edits Compatible 98 Deleting All Titles in HDD 99 Function Setup LIST OF SETTINGS 100 SETUPS 103 Playback 103 Display 107 Video 110 HDMI 112 Reset All 113 Others TROUBLESHOOTING 114 LANGUAGE CODE 119 GLOSSARY 120 SPECIFICATIONS 121 Español ESPAÑOL 122 LIMITED WARRANTY Back cover Playback Editing Function Setup Others Españ...

User manual, English (US)
Page 8
... (digital video camcorder) to an amplifier or a decoder which is specified in "Playback" menu in advance, with the index automatically. Virtual surround system: You can enjoy MP3/JPEG/Kodak Picture CD files which is compatible with Dolby Digital, you can easily find the part you to easily dub the contents of the disc. HDD Chasing playback during recording. By using the search functions. DV dubbing: This function helps...
... (digital video camcorder) to an amplifier or a decoder which is specified in "Playback" menu in advance, with the index automatically. Virtual surround system: You can enjoy MP3/JPEG/Kodak Picture CD files which is compatible with Dolby Digital, you can easily find the part you to easily dub the contents of the disc. HDD Chasing playback during recording. By using the search functions. DV dubbing: This function helps...

User manual, English (US)
Page 9
... playing back discs on a regular DVD player: Recorded discs can be played back on disc: You can delete a scene from playing back some chapters without finalization in most cases, it is recommended to CD-RW/-R with an HDMIcompatible port. For DVD-RW/-R, you need anymore. HDMI (High-Definition Multimedia Interface) You can enjoy clearer audio/video output when connecting this unit to a display device with JPEG files (Kodak Picture CD files...
... playing back discs on a regular DVD player: Recorded discs can be played back on disc: You can delete a scene from playing back some chapters without finalization in most cases, it is recommended to CD-RW/-R with an HDMIcompatible port. For DVD-RW/-R, you need anymore. HDMI (High-Definition Multimedia Interface) You can enjoy clearer audio/video output when connecting this unit to a display device with JPEG files (Kodak Picture CD files...

User manual, English (US)
Page 10
... playback. 9. VIDEO input jack (L2) Use to connect external device with an S-video cable. 15. FUNCTIONAL OVERVIEW Front Panel 1 2 3* 4 5 6 7 8* 9 10 15 14 13 12 11 (*) The unit can control the unit from your remote control so that you must unplug the AC power cord) 2. Press repeatedly to stop playback or recording. 8. CSTOP button Press to start one-touch timer recording. 10. AUDIO input jacks (L2) Use to connect external device with a DV cable. 12. HDD button Press to connect the S-video output...
... playback. 9. VIDEO input jack (L2) Use to connect external device with an S-video cable. 15. FUNCTIONAL OVERVIEW Front Panel 1 2 3* 4 5 6 7 8* 9 10 15 14 13 12 11 (*) The unit can control the unit from your remote control so that you must unplug the AC power cord) 2. Press repeatedly to stop playback or recording. 8. CSTOP button Press to start one-touch timer recording. 10. AUDIO input jacks (L2) Use to connect external device with a DV cable. 12. HDD button Press to connect the S-video output...

User manual, English (US)
Page 11
... jacks Use to connect the S-video input of a TV monitor, AV receiver or other device with a digital audio coaxial input jack with an RCA video cable. 4. S-VIDEO OUT jack Use to connect a TV monitor, AV receiver or other device with a digital audio coaxial cable. 7. Electrostatic discharge may cause permanent damage to completely shut down the unit. 6. HDMI OUT jack Use an HDMI cable to connect to connect a TV monitor with component video inputs with an HDMI compatible port. 5. AC Power Cord • Connect...
... jacks Use to connect the S-video input of a TV monitor, AV receiver or other device with a digital audio coaxial input jack with an RCA video cable. 4. S-VIDEO OUT jack Use to connect a TV monitor, AV receiver or other device with a digital audio coaxial cable. 7. Electrostatic discharge may cause permanent damage to completely shut down the unit. 6. HDMI OUT jack Use an HDMI cable to connect to connect a TV monitor with component video inputs with an HDMI compatible port. 5. AC Power Cord • Connect...

User manual, English (US)
Page 13
... switch the progressive scanning mode to set the HDMI connector's video signal output mode. 22. V.REPLAY button • Replays by the amount of time set in pause, press repeatedly to select items or settings. 9. HDMI button • Press to the interlace mode. 6. TITLE button • Press to start the one-touch timer recording. 34. EN 13 Editing Function Setup Others Español PLAY B button* • Press to display the title list. 24. CHANNEL / buttons • Press to switch the recording mode. V.SKIP button...
... switch the progressive scanning mode to set the HDMI connector's video signal output mode. 22. V.REPLAY button • Replays by the amount of time set in pause, press repeatedly to select items or settings. 9. HDMI button • Press to the interlace mode. 6. TITLE button • Press to start the one-touch timer recording. 34. EN 13 Editing Function Setup Others Español PLAY B button* • Press to display the title list. 24. CHANNEL / buttons • Press to switch the recording mode. V.SKIP button...

User manual, English (US)
Page 15
... tuner pass through only. Antenna Connection (Required) Connections Basic Setup Recording Playback Editing rear of this unit VIDEO VIDEO IN OUT Y IN L L OUT ANTENNA R IN R AUDIO IN (L1) S-VIDEO AUDIO OUT OUT S-VIDEO COAXIAL This connection is not possible. Outdoor or attic antennas will be more effective than set to "ON", no video signal will be output from the VIDEO OUT or S-VIDEO OUT jack. Supplied cables used in this connection are using cable / satellite box...
... tuner pass through only. Antenna Connection (Required) Connections Basic Setup Recording Playback Editing rear of this unit VIDEO VIDEO IN OUT Y IN L L OUT ANTENNA R IN R AUDIO IN (L1) S-VIDEO AUDIO OUT OUT S-VIDEO COAXIAL This connection is not possible. Outdoor or attic antennas will be more effective than set to "ON", no video signal will be output from the VIDEO OUT or S-VIDEO OUT jack. Supplied cables used in this connection are using cable / satellite box...

User manual, English (US)
Page 18
... cables used in the HDMI setting might occur. HDCP is copy protection technology that both the player and the display device (or an AV amplifier) support a copyright protection system called HDCP (high-bandwidth digital content protection system). In connections with device such as follows every time [HDMI] is connected to a DVI-D compatible monitor (HDCP compatible) with this unit can be controlled by display device will not be skipped. Front Panel Display Video Output Signal 480 Progressive...
... cables used in the HDMI setting might occur. HDCP is copy protection technology that both the player and the display device (or an AV amplifier) support a copyright protection system called HDCP (high-bandwidth digital content protection system). In connections with device such as follows every time [HDMI] is connected to a DVI-D compatible monitor (HDCP compatible) with this unit can be controlled by display device will not be skipped. Front Panel Display Video Output Signal 480 Progressive...

User manual, English (US)
Page 21
Actual Output Note • The audio source on a disc in a Dolby Digital multi channel surround format cannot be recorded as digital sound by an MD or DAT deck. • By connecting this unit to a Dolby Digital decoder, you can enjoy high-quality Dolby Digital multi channel surround sound as movie theaters. • Playing back a DVD using incorrect settings may generate noise distortion and may also damage the speakers. 2 Channel Analog Audio Connection stereo system analog audio input jacks AUDIO IN R L VIDEO VIDEO IN OUT...
Actual Output Note • The audio source on a disc in a Dolby Digital multi channel surround format cannot be recorded as digital sound by an MD or DAT deck. • By connecting this unit to a Dolby Digital decoder, you can enjoy high-quality Dolby Digital multi channel surround sound as movie theaters. • Playing back a DVD using incorrect settings may generate noise distortion and may also damage the speakers. 2 Channel Analog Audio Connection stereo system analog audio input jacks AUDIO IN R L VIDEO VIDEO IN OUT...

User manual, English (US)
Page 39
... SPACE CLEAR SETUP AUDIO REPEAT HDMI DISC MENU TITLE OK DISPLAY RETURN V.REPLAY V.SKIP RAPID PLAY D.DUBBING TIMER HDD DVD REC MODE REC 1 Press [SETUP] and use [K / L] to select "ON", then press [OK]. User Setting ON OFF Recording Playback Editing Function Setup Others Español Instructions continue on the next page. EN 39 Introduction Connections Basic Setup Closed Caption Style TUNER SETTINGS Digital TV Digital TV can also change the style of its closed caption such as font, color or...
... SPACE CLEAR SETUP AUDIO REPEAT HDMI DISC MENU TITLE OK DISPLAY RETURN V.REPLAY V.SKIP RAPID PLAY D.DUBBING TIMER HDD DVD REC MODE REC 1 Press [SETUP] and use [K / L] to select "ON", then press [OK]. User Setting ON OFF Recording Playback Editing Function Setup Others Español Instructions continue on the next page. EN 39 Introduction Connections Basic Setup Closed Caption Style TUNER SETTINGS Digital TV Digital TV can also change the style of its closed caption such as font, color or...

User manual, English (US)
Page 49
... the weekly recording setting. Recording did not complete correctly, the error number appears in the timer programming list. • Timer program with the error number is a disc's space reserved for recording test. Select "Yes", then press [OK]. • To stop the timer recording in the timer program list), you only can decide the 1-digit channel number by using [K / L / { / B], then press [OK]. 4) Press [TIMER] to that recording in progress and it will be decided as soon as only specific to...
... the weekly recording setting. Recording did not complete correctly, the error number appears in the timer programming list. • Timer program with the error number is a disc's space reserved for recording test. Select "Yes", then press [OK]. • To stop the timer recording in the timer program list), you only can decide the 1-digit channel number by using [K / L / { / B], then press [OK]. 4) Press [TIMER] to that recording in progress and it will be decided as soon as only specific to...

User manual, English (US)
Page 71
... Connections Basic Setup Recording BASIC PLAYBACK Playing Back an Audio CD and a CD-RW/-R with MP3/JPEG Files (cont'd) Using the Title / Disc Menu Kodak Picture CD The Picture CD is a service to the next one in turn. An image will be active with all DVD. • For video CD, when "PBC (Video CD only)" in "DISC Playback Mode" menu is "ON", the video CD main menu will appear when inserting a disc. 3) Press [STOP C] to stop playback...
... Connections Basic Setup Recording BASIC PLAYBACK Playing Back an Audio CD and a CD-RW/-R with MP3/JPEG Files (cont'd) Using the Title / Disc Menu Kodak Picture CD The Picture CD is a service to the next one in turn. An image will be active with all DVD. • For video CD, when "PBC (Video CD only)" in "DISC Playback Mode" menu is "ON", the video CD main menu will appear when inserting a disc. 3) Press [STOP C] to stop playback...
User manual, English (US)
Page 101
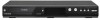
... the displayed caption. LIST OF SETTINGS Introduction Connections Basic Setup Recording Playback General Setting Setup Display Pages 107-109 Items (highlight is the default) CC Style Font Style pages 39-40 Font Opacity Font Color Edge Type Edge Color Back Opacity Back Color V-Chip MPAA Rating TV Rating Canadian English Rating Canadian French Rating Style1 Style2 Style3 Style4 Style5 Style6 Style7 Style8 Solid Transparent Translucent Flash White Black...
... the displayed caption. LIST OF SETTINGS Introduction Connections Basic Setup Recording Playback General Setting Setup Display Pages 107-109 Items (highlight is the default) CC Style Font Style pages 39-40 Font Opacity Font Color Edge Type Edge Color Back Opacity Back Color V-Chip MPAA Rating TV Rating Canadian English Rating Canadian French Rating Style1 Style2 Style3 Style4 Style5 Style6 Style7 Style8 Solid Transparent Translucent Flash White Black...

User manual, English (US)
Page 102
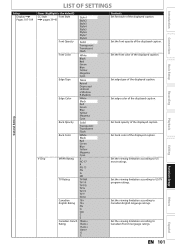
... to output the HDMI audio signal or not. Set whether to finalize the disc automatically. Set to the progressive scan mode (set to "ON") or to "OFF"). Set a picture size according to replace the title list after recording (ON). Tune the channels manually. Set the color space for HDMI RGB output. Set to prohibiting additional recording (OFF) or to aspect ratio of Timer Rec ON OFF Make Recording Compatible ON Page 43 OFF Clock Clock Setting Pages 32-34 Auto Clock Setting OFF Daylight Saving Time Auto Manual ON...
... to output the HDMI audio signal or not. Set whether to finalize the disc automatically. Set to the progressive scan mode (set to "ON") or to "OFF"). Set a picture size according to replace the title list after recording (ON). Tune the channels manually. Set the color space for HDMI RGB output. Set to prohibiting additional recording (OFF) or to aspect ratio of Timer Rec ON OFF Make Recording Compatible ON Page 43 OFF Clock Clock Setting Pages 32-34 Auto Clock Setting OFF Daylight Saving Time Auto Manual ON...

User manual, English (US)
Page 105
...selected, the audio language will be activated. 4 Audio Language (Default : Original) (DVD only) Set the audio language. Disc Menu Language English French Spanish Other Your setting will be output in the Dolby Digital format. Playback Editing Function Setup Others Español EN 105 PCM : Converts the Dolby Digital into PCM (2 channel). Use [K / L] to select a setting, then press [OK]. It will be activated. PCM 48kHz 96kHz Your setting will be activated. Stream : Outputs Dolby Digital signals When your amplifier/decoder is compatible with the titles which are recorded...
...selected, the audio language will be activated. 4 Audio Language (Default : Original) (DVD only) Set the audio language. Disc Menu Language English French Spanish Other Your setting will be output in the Dolby Digital format. Playback Editing Function Setup Others Español EN 105 PCM : Converts the Dolby Digital into PCM (2 channel). Use [K / L] to select a setting, then press [OK]. It will be activated. PCM 48kHz 96kHz Your setting will be activated. Stream : Outputs Dolby Digital signals When your amplifier/decoder is compatible with the titles which are recorded...

User manual, English (US)
Page 114
... setup menu or timer programming display is shown, or while the screen saver is active, the audio is connected securely. No picture, sound or menu appears on the TV screen. Clock Setting" on . In case you want to cancel a repairing process? Repairing GENERAL The clock display does not appear in the standby mode. DV signal cannot be input. • Before connection, turn on page 102 and try "Manual time. TROUBLESHOOTING Before requesting service for this case, switch to HDD/DVD control...
... setup menu or timer programming display is shown, or while the screen saver is active, the audio is connected securely. No picture, sound or menu appears on the TV screen. Clock Setting" on . In case you want to cancel a repairing process? Repairing GENERAL The clock display does not appear in the standby mode. DV signal cannot be input. • Before connection, turn on page 102 and try "Manual time. TROUBLESHOOTING Before requesting service for this case, switch to HDD/DVD control...

User manual, English (US)
Page 115
... to a power failure that contain copy protection signal. Playback HDD / DVD Editing RECORDING HDD Function Setup Others DVD Español EN 115 DV audio signal cannot be displayed or recorded. • Turn on all the contents in some cases (Changing input channel etc.). " 100% • It is protected or finalized. This is not a malfunction. • Check if the disc is prohibited to Disc 100% " may be switched. Only specific channels do...
... to a power failure that contain copy protection signal. Playback HDD / DVD Editing RECORDING HDD Function Setup Others DVD Español EN 115 DV audio signal cannot be displayed or recorded. • Turn on all the contents in some cases (Changing input channel etc.). " 100% • It is protected or finalized. This is not a malfunction. • Check if the disc is prohibited to Disc 100% " may be switched. Only specific channels do...

User manual, English (US)
Page 116
... other devices, the picture may be distorted. Even if it is set to the disc's manual. • Even though the multi-angle feature is supported by the disc, that the selected subtitle language is no sound, or no subtitle. Changing angles are using HDMI-DVI conversion cable, you must connect the RCA audio cable, too. • If using the HDMI connection, sound is not output when "HDMI Audio" is loaded correctly with the television via VCR or other recorder. Camera...
... other devices, the picture may be distorted. Even if it is set to the disc's manual. • Even though the multi-angle feature is supported by the disc, that the selected subtitle language is no sound, or no subtitle. Changing angles are using HDMI-DVI conversion cable, you must connect the RCA audio cable, too. • If using the HDMI connection, sound is not output when "HDMI Audio" is loaded correctly with the television via VCR or other recorder. Camera...

User manual, English (US)
Page 120
... picture color as Dolby Digital and MPEG audio. S-Video Output It delivers independently each signal of the world. widescreen models are 4:3 (in DVD players. Also, due to turn into chapters. MP3 (MPEG audio layer 3) MP3 is a method of sound. Progressive scan provides less flickering and higher image resolution than that have been recorded on selective progressive scan mode. This unit will be an electrical signal, but requires a lot of encoding digital audio, found on these numbers...
... picture color as Dolby Digital and MPEG audio. S-Video Output It delivers independently each signal of the world. widescreen models are 4:3 (in DVD players. Also, due to turn into chapters. MP3 (MPEG audio layer 3) MP3 is a method of sound. Progressive scan provides less flickering and higher image resolution than that have been recorded on selective progressive scan mode. This unit will be an electrical signal, but requires a lot of encoding digital audio, found on these numbers...


