

Owners Manual
Page 6
... Connecting to a TV Using Component Video Out jacks 17 Connecting to a TV with an HDMI Compatible Port 17 Connecting to a Cable / Satellite Box 19 Connecting to a TV without Audio / Video jacks 20 Digital Audio Connection 21 Basic Setup BEFORE YOU START 22 Finding the Viewing Channel on your TV 22 Guide to On-Screen Display / Menu 23 Main Menu 25 Switching HDD / DVD Mode 27 How to Insert a Disc 27 INITIAL SETTING 28 INFORMATION ON RECORDING . . 41 BEFORE RECORDING 43 Make Recording Compatible 43 Setting...
... Connecting to a TV Using Component Video Out jacks 17 Connecting to a TV with an HDMI Compatible Port 17 Connecting to a Cable / Satellite Box 19 Connecting to a TV without Audio / Video jacks 20 Digital Audio Connection 21 Basic Setup BEFORE YOU START 22 Finding the Viewing Channel on your TV 22 Guide to On-Screen Display / Menu 23 Main Menu 25 Switching HDD / DVD Mode 27 How to Insert a Disc 27 INITIAL SETTING 28 INFORMATION ON RECORDING . . 41 BEFORE RECORDING 43 Make Recording Compatible 43 Setting...
Owners Manual
Page 8
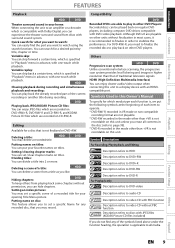
... the player and the display device (or an AV amplifier) support a copyright protection system called HDCP (high-bandwidth digital content protection system). The recording automatically stops when the recording time you set the recording mode to "Auto", the recording mode will automatically be adjusted so the titles will be 24 times at a time with the index automatically. HDD 320 GB hard disk(MDR533H): This unit is full. By using this function...
... the player and the display device (or an AV amplifier) support a copyright protection system called HDCP (high-bandwidth digital content protection system). The recording automatically stops when the recording time you set the recording mode to "Auto", the recording mode will automatically be adjusted so the titles will be 24 times at a time with the index automatically. HDD 320 GB hard disk(MDR533H): This unit is full. By using this function...
Owners Manual
Page 9
... media type each item to operate. * DVD-RW/-R recorded in VR mode or non compatible recording format are playable on this unit to a display device with surround sound system. Although DVD+R are not playable. * DVD-RW recorded in the mode other than +VR is not recordable on other DVD Players: Recorded discs can hide chapters. Others Progressive scan system: HDD DVD Unlike conventional interlace scanning, the progressive scan system provides less flickering and images in higher resolution than...
... media type each item to operate. * DVD-RW/-R recorded in VR mode or non compatible recording format are playable on this unit to a display device with surround sound system. Although DVD+R are not playable. * DVD-RW recorded in the mode other than +VR is not recordable on other DVD Players: Recorded discs can hide chapters. Others Progressive scan system: HDD DVD Unlike conventional interlace scanning, the progressive scan system provides less flickering and images in higher resolution than...

Owners Manual
Page 10
... to Start or Resume playback. 9. BPLAY button* Press to select the HDD mode. 6. Press repeatedly to start a Recording. Disc tray Place a Disc after opening the disc tray. 3. Display Refer to connect External device with an RCA video cable. 14. AUDIO input jacks (L2) Use to "Front Panel Display" on by pressing these buttons. 1. AOPEN/CLOSE button* Press to stop Playback or Recording. 8. VIDEO input jack (L2) Use to connect the DV output of External device with a DV cable. 12. Infrared sensor window Receive signals from a distance. 10...
... to Start or Resume playback. 9. BPLAY button* Press to select the HDD mode. 6. Press repeatedly to start a Recording. Disc tray Place a Disc after opening the disc tray. 3. Display Refer to connect External device with an RCA video cable. 14. AUDIO input jacks (L2) Use to "Front Panel Display" on by pressing these buttons. 1. AOPEN/CLOSE button* Press to stop Playback or Recording. 8. VIDEO input jack (L2) Use to connect the DV output of External device with a DV cable. 12. Infrared sensor window Receive signals from a distance. 10...

Owners Manual
Page 13
...; If using the HDMI connection. 22. AUDIO button • Press to switch the Audio language for more than 3 seconds to switch the Progressive Scanning mode to display the Audio menu during playback. 4. SOURCE button • Press to select the appropriate Input. 19.OPEN/CLOSE A button* • Press to select the HDD mode. 8. TIMER PROG. RAPID PLAY button • During playback, press to set the HDMI Display mode-Only when using a universal remote, please check for CD, etc. 23. HDD button • Press to Open or Close the Disc tray. 20. button...
...; If using the HDMI connection. 22. AUDIO button • Press to switch the Audio language for more than 3 seconds to switch the Progressive Scanning mode to display the Audio menu during playback. 4. SOURCE button • Press to select the appropriate Input. 19.OPEN/CLOSE A button* • Press to select the HDD mode. 8. TIMER PROG. RAPID PLAY button • During playback, press to set the HDMI Display mode-Only when using a universal remote, please check for CD, etc. 23. HDD button • Press to Open or Close the Disc tray. 20. button...

Owners Manual
Page 15
... audio/video cables are connected to a VCR, pictures may be output from the ANTENNA IN jack before moving the unit. • If you are as illustrated below. 3) After making all the connections, connect the AC power cords of the devices. • Connect this unit directly to the device, please unplug the RF coaxial cable from the VIDEO OUT or S-VIDEO OUT jack. Overview Higher Quality If Your TV has HDMI...
... audio/video cables are connected to a VCR, pictures may be output from the ANTENNA IN jack before moving the unit. • If you are as illustrated below. 3) After making all the connections, connect the AC power cords of the devices. • Connect this unit directly to the device, please unplug the RF coaxial cable from the VIDEO OUT or S-VIDEO OUT jack. Overview Higher Quality If Your TV has HDMI...

Owners Manual
Page 18
... To play back the digital video images of the connected AV device. Please read the operating instructions of channels and bit length) may be skipped. Please check and set the HDMI setting again. 18 EN this unit automatically output the most suitable resolution for example, projectors). Front Panel Display Video Output Signal 480 Progressive Press [HDMI] Press [HDMI] 720 Progressive Press [HDMI] 1080 interlaced 1080 Progressive Press [HDMI] • The HDMI mode that is not supported by the display device will...
... To play back the digital video images of the connected AV device. Please read the operating instructions of channels and bit length) may be skipped. Please check and set the HDMI setting again. 18 EN this unit automatically output the most suitable resolution for example, projectors). Front Panel Display Video Output Signal 480 Progressive Press [HDMI] Press [HDMI] 720 Progressive Press [HDMI] 1080 interlaced 1080 Progressive Press [HDMI] • The HDMI mode that is not supported by the display device will...
Owners Manual
Page 21
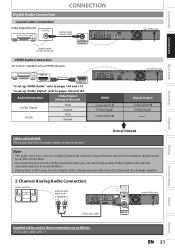
.... Audio format (disc) Dolby Digital Setting of this unit Dolby Digital LPCM PCM Stream PCM Stream VIDEO VIDEO IN OUT Y L L ANTENNA R IN R AUDIO IN (L1) S-VIDEO AUDIO OUT OUT S-VIDEO COAXIAL HDMI 2 channel PCM Dolby Digital 2 channel PCM rear of this unit rear of this unit Playback Editing Function Setup Others Español Supplied cables used in these connections are as in a Dolby Digital multi channel surround format cannot be recorded as digital sound by an MD or DAT deck. • By connecting this unit Digital Output 2 channel PCM Dolby Digital Cables not...
.... Audio format (disc) Dolby Digital Setting of this unit Dolby Digital LPCM PCM Stream PCM Stream VIDEO VIDEO IN OUT Y L L ANTENNA R IN R AUDIO IN (L1) S-VIDEO AUDIO OUT OUT S-VIDEO COAXIAL HDMI 2 channel PCM Dolby Digital 2 channel PCM rear of this unit rear of this unit Playback Editing Function Setup Others Español Supplied cables used in these connections are as in a Dolby Digital multi channel surround format cannot be recorded as digital sound by an MD or DAT deck. • By connecting this unit Digital Output 2 channel PCM Dolby Digital Cables not...

Owners Manual
Page 22
...'s user Manual or "Input Mode Names for different brand's models of TVs. • Consult your VCR make sure it is successful. 22 EN Press until you see the MAGNAVOX screen saver. If more than 10 minutes has passed, you cannot locate the Video/Input button on page 28. If you may see the "Initial Setup" menu on the TV's remote control that access the external Input Channel. Note • Video input selection...
...'s user Manual or "Input Mode Names for different brand's models of TVs. • Consult your VCR make sure it is successful. 22 EN Press until you see the MAGNAVOX screen saver. If more than 10 minutes has passed, you cannot locate the Video/Input button on page 28. If you may see the "Initial Setup" menu on the TV's remote control that access the external Input Channel. Note • Video input selection...

Owners Manual
Page 23
... when DVD+RW/DVD+R/DVD-RW/DVD-R, or HDD is in multi-languages.) 3. Status of the selected program 8. The progress of the autostart recording 2. In such case, check the closed captioning.) 4. Starting time of the autostart recording 6. Audio Information (Indicates that the program being broadcasted is available with JPEG/KODAK Picture CD files is broadcasted 4. Program Rating 7. Introduction Connections Basic Setup BEFORE YOU START Guide to On-Screen Display / Menu This unit uses the following...
... when DVD+RW/DVD+R/DVD-RW/DVD-R, or HDD is in multi-languages.) 3. Status of the selected program 8. The progress of the autostart recording 2. In such case, check the closed captioning.) 4. Starting time of the autostart recording 6. Audio Information (Indicates that the program being broadcasted is available with JPEG/KODAK Picture CD files is broadcasted 4. Program Rating 7. Introduction Connections Basic Setup BEFORE YOU START Guide to On-Screen Display / Menu This unit uses the following...

Owners Manual
Page 45
... an aspect ratio of 30 minutes. "I HDD" or "I 0h30m 0h30m (normal recording) 1h00m 6h00m 5h30m To change a channel to be turned to start in blocks of 16:9. To set one -touch timer recording. - This is programmed to the standby mode automatically if you select "Yes" or if you like to stop recording. Using [REC] or [STOP C] on the screen. • The unit will start recording. e.g.) DVD 5 Press [STOP C] to restart recording. Press...
... an aspect ratio of 30 minutes. "I HDD" or "I 0h30m 0h30m (normal recording) 1h00m 6h00m 5h30m To change a channel to be turned to start in blocks of 16:9. To set one -touch timer recording. - This is programmed to the standby mode automatically if you select "Yes" or if you like to stop recording. Using [REC] or [STOP C] on the screen. • The unit will start recording. e.g.) DVD 5 Press [STOP C] to restart recording. Press...

Owners Manual
Page 81
...] or [DISC MENU] to "LANGUAGE CODE" on page 121. When playing back video CD, audio CD you to change the soundtrack from the disc menu. R 0:00:15 / 0:05:00 CD Note • Some discs will only allow you can further select "L" (main), "R" (sub), or "L/R" (mixed of the disc you are often in different languages), you can switch them during playback. 1) During playback, press [DISPLAY]. 2)Use [{ / B] to select menu. Recording Playback Editing Function Setup Others Espa...
...] or [DISC MENU] to "LANGUAGE CODE" on page 121. When playing back video CD, audio CD you to change the soundtrack from the disc menu. R 0:00:15 / 0:05:00 CD Note • Some discs will only allow you can further select "L" (main), "R" (sub), or "L/R" (mixed of the disc you are often in different languages), you can switch them during playback. 1) During playback, press [DISPLAY]. 2)Use [{ / B] to select menu. Recording Playback Editing Function Setup Others Espa...

Owners Manual
Page 104
.... Set the black-white contrast level for output and recording. Set to output the HDMI audio signal. LIST OF SETTINGS Menu Display pages 109-111 Items (highlight is grayed in the on-screen settings. 104 EN Set the clock automatically. Set the color space for the external input jack. Tune the channels manually. Clear the downloadable rating information and its setting. To set the progressive scan mode (set to not output the HDMI audio signal. Set the video input type for the HDMI output. Set the clock. Set the clock for the daylight saving time. Set...
.... Set the black-white contrast level for output and recording. Set to output the HDMI audio signal. LIST OF SETTINGS Menu Display pages 109-111 Items (highlight is grayed in the on-screen settings. 104 EN Set the clock automatically. Set the color space for the external input jack. Tune the channels manually. Clear the downloadable rating information and its setting. To set the progressive scan mode (set to not output the HDMI audio signal. Set the video input type for the HDMI output. Set the clock. Set the clock for the daylight saving time. Set...

Owners Manual
Page 107
... PCM (Default : 48kHz) Use [K / L] to select a setting, then press [OK]. Disc Menu Language English French Spanish Other Your setting will only affect disc playback. When your external device. Stream : Outputs Dolby Digital signals When your amplifier/decoder is compatible with 96kHz PCM, select "96kHz". 96kHz sound will be in the Dolby Digital format. Recording Playback Editing Function Setup Others Español Instructions continue on the next page. Use [K / L] to select a setting, then press [OK]. Introduction Connections Basic Setup SETUPS 2 Disc Audio Choose...
... PCM (Default : 48kHz) Use [K / L] to select a setting, then press [OK]. Disc Menu Language English French Spanish Other Your setting will only affect disc playback. When your external device. Stream : Outputs Dolby Digital signals When your amplifier/decoder is compatible with 96kHz PCM, select "96kHz". 96kHz sound will be in the Dolby Digital format. Recording Playback Editing Function Setup Others Español Instructions continue on the next page. Use [K / L] to select a setting, then press [OK]. Introduction Connections Basic Setup SETUPS 2 Disc Audio Choose...

Owners Manual
Page 116
...; While the setup menu or timer programming display is shown, or while the screen saver is active, the audio is connected securely. • Remote Control batteries may not be output. Repairing • If there is in the standby mode. TROUBLESHOOTING Before requesting service for this unit, analog TV closed captions are damaged. • Check if a correct external input channel is selected on your part may eliminate the problem and restore proper operation. Press [OK...
...; While the setup menu or timer programming display is shown, or while the screen saver is active, the audio is connected securely. • Remote Control batteries may not be output. Repairing • If there is in the standby mode. TROUBLESHOOTING Before requesting service for this unit, analog TV closed captions are damaged. • Check if a correct external input channel is selected on your part may eliminate the problem and restore proper operation. Press [OK...

Owners Manual
Page 117
... does not support slow playback mode, the slow playback function is disabled. • With L3(DV-IN), the disc display menu does not appear unless disc playback is not recognized after connection, turn on L1 or L2. Confirm the main source from the Antenna/ from HDMI connection. Setup menu cannot be displayed or recorded. • Turn on pages 29-31. Only specific channels do not work, unplug the HDMI cable and the AC power cords, then plug...
... does not support slow playback mode, the slow playback function is disabled. • With L3(DV-IN), the disc display menu does not appear unless disc playback is not recognized after connection, turn on L1 or L2. Confirm the main source from the Antenna/ from HDMI connection. Setup menu cannot be displayed or recorded. • Turn on pages 29-31. Only specific channels do not work, unplug the HDMI cable and the AC power cords, then plug...

Owners Manual
Page 118
... picture of a timer recording. • This unit cannot record programs that contain copy protection signal. Try deleting unnecessary titles, or exchange it may have been stopped due to Record. TV aspect ratio does not match your TV screen. Refer to pages 32-34.) • If using the HDMI connection, sound is not output when "HDMI Audio" is displayed and it may not allow any Timing options for the Cable Box or Satellite receiver to...
... picture of a timer recording. • This unit cannot record programs that contain copy protection signal. Try deleting unnecessary titles, or exchange it may have been stopped due to Record. TV aspect ratio does not match your TV screen. Refer to pages 32-34.) • If using the HDMI connection, sound is not output when "HDMI Audio" is displayed and it may not allow any Timing options for the Cable Box or Satellite receiver to...

Owners Manual
Page 119
... www.magnavox.com/support for DVD) (Refer to page 41). Playback cannot be changed . EN 119 DUBBING Editing EDITING Function Setup DVD Others REMOTE CONTROL Español Connections PLAYBACK DVD Basic Setup Recording DVD Playback HDD / DVD DVD HDD / DVD HDD playback suddenly stops. • When DVD recording finishes during HDD playback, the unit will not increase the disc space. Audio language or the subtitle language of those scenes shot from the disc menu. Cancel the protection by the disc, that the selected subtitle language...
... www.magnavox.com/support for DVD) (Refer to page 41). Playback cannot be changed . EN 119 DUBBING Editing EDITING Function Setup DVD Others REMOTE CONTROL Español Connections PLAYBACK DVD Basic Setup Recording DVD Playback HDD / DVD DVD HDD / DVD HDD playback suddenly stops. • When DVD recording finishes during HDD playback, the unit will not increase the disc space. Audio language or the subtitle language of those scenes shot from the disc menu. Cancel the protection by the disc, that the selected subtitle language...

Owners Manual
Page 122
... rate which can find the region code of compressing still image files. SAP (secondary audio program) Sub-audio channel which have compatible region codes. This audio channel is called a chapter. Title (HDD/DVD) A collection of encoding digital audio, found on these numbers. See also "Chapter". The DVD equivalent is used as an alternate in compact disc. +VR Mode +VR Mode is possible to play them back on selective progressive scan mode. Video CD A digital format for instructions on this to PCM.
... rate which can find the region code of compressing still image files. SAP (secondary audio program) Sub-audio channel which have compatible region codes. This audio channel is called a chapter. Title (HDD/DVD) A collection of encoding digital audio, found on these numbers. See also "Chapter". The DVD equivalent is used as an alternate in compact disc. +VR Mode +VR Mode is possible to play them back on selective progressive scan mode. Video CD A digital format for instructions on this to PCM.

Specifications
Page 2
..., DV In, S-Video In • Rear Connections: Analog Audio Left/Right In, Analog Audio Left/Right Out, HDMI Out, Component Video Out, Composite Video (CVBS) In, Composite Video (CVBS) Out, Digital Coaxial Out, S-Video In, S-Video Out, RF In, RF Out • On-Screen Display languages: English, French, Spanish Power • Power supply: 120V, 60Hz Accessories • Included accessories: 2 x AA Batteries, Audio/ Video cable, Remote Control, User Manual, RF antenna cable, Quick Start Guide • User Manual: English, Spanish Dimensions • Set dimensions...
..., DV In, S-Video In • Rear Connections: Analog Audio Left/Right In, Analog Audio Left/Right Out, HDMI Out, Component Video Out, Composite Video (CVBS) In, Composite Video (CVBS) Out, Digital Coaxial Out, S-Video In, S-Video Out, RF In, RF Out • On-Screen Display languages: English, French, Spanish Power • Power supply: 120V, 60Hz Accessories • Included accessories: 2 x AA Batteries, Audio/ Video cable, Remote Control, User Manual, RF antenna cable, Quick Start Guide • User Manual: English, Spanish Dimensions • Set dimensions...


