

User manual, English (US)
Page 2
... satisfaction. Model No Serial No Visit our World Wide Web Site at once. All of this information for future reference. NO USER-SERVICEABLE PARTS INSIDE. This "bolt of plug to wide slot, fully insert. Warranty Owner Model Verification Confirmation Registration Registering your product within 10 days. And we'll do not remove product covering. And most comprehensive warranties and outstanding service networks in...
... satisfaction. Model No Serial No Visit our World Wide Web Site at once. All of this information for future reference. NO USER-SERVICEABLE PARTS INSIDE. This "bolt of plug to wide slot, fully insert. Warranty Owner Model Verification Confirmation Registration Registering your product within 10 days. And we'll do not remove product covering. And most comprehensive warranties and outstanding service networks in...

User manual, English (US)
Page 3
... Selection 30 Random MP3 Playback, Programmed MP3 Playback 31 Audio Language, Stereo Sound Mode 32 Subtitle Language 33 Camera Angles 34 DVD Player Setup and Features On-Screen Display 35 Parental Controls Password 36 Parental Controls Levels 37 Marker Setup Screen 38 Audio Controls 39 Display Controls 40-41 Language Controls 42-43 Black Level Settings, TruSurround Setting 44 Information You May Need Care and Maintenance, Glossary 45 Helpful Hints 46-47 Limited Warranty 48-49 Specifications 50 Index 51 Supplied...
... Selection 30 Random MP3 Playback, Programmed MP3 Playback 31 Audio Language, Stereo Sound Mode 32 Subtitle Language 33 Camera Angles 34 DVD Player Setup and Features On-Screen Display 35 Parental Controls Password 36 Parental Controls Levels 37 Marker Setup Screen 38 Audio Controls 39 Display Controls 40-41 Language Controls 42-43 Black Level Settings, TruSurround Setting 44 Information You May Need Care and Maintenance, Glossary 45 Helpful Hints 46-47 Limited Warranty 48-49 Specifications 50 Index 51 Supplied...
User manual, English (US)
Page 5
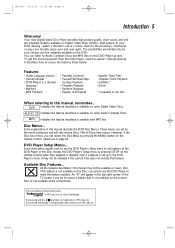
... new Digital Video Disc Player provides high picture quality, clear sound, and endless playback features available on the Disc, you cannot use the DVD Player's Setup menu to Audio Compact Discs and MP3 files on the remote control when Disc playback is not available on Digital Video Discs (DVDs). Add options to access the features listed below. Features • Audio Language choices * • Camera Angles * • DVD Menus in this DVD Player as...
... new Digital Video Disc Player provides high picture quality, clear sound, and endless playback features available on the Disc, you cannot use the DVD Player's Setup menu to Audio Compact Discs and MP3 files on the remote control when Disc playback is not available on Digital Video Discs (DVDs). Add options to access the features listed below. Features • Audio Language choices * • Camera Angles * • DVD Menus in this DVD Player as...

User manual, English (US)
Page 8
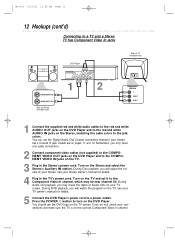
... connect the DVD Player to the Audio In jacks of videotapes and other equipment so you may distort the picture and sound. q Connect the DVD Player directly to the power outlet. For example, do not connect the DVD Player to a Dolby Digital-compatible Stereo, set DOLBY DIGITAL to choose different Audio and Video In channels on your other analog recordings. Or, keep changing channels at the TV until you have the best picture and sound quality. Follow the specific...
... connect the DVD Player to the Audio In jacks of videotapes and other equipment so you may distort the picture and sound. q Connect the DVD Player directly to the power outlet. For example, do not connect the DVD Player to a Dolby Digital-compatible Stereo, set DOLBY DIGITAL to choose different Audio and Video In channels on your other analog recordings. Or, keep changing channels at the TV until you have the best picture and sound quality. Follow the specific...

User manual, English (US)
Page 9
... near channel 00. If you do not, check your TV owner's manual for details. 4 Connect the DVD Player's power cord to a power outlet. Turn on the TV. 3 Connect the TV's power cord to a power outlet. MDV435 4/12/02 11:55 AM Page 9 Hookups (cont'd) 9 Connecting the DVD Player to a TV only TV has AUDIO (red and white) and VIDEO (yellow) IN jacks DVD Player DIGITAL AUDIO OUT PCM / MULTICHANNEL R L Y Cr COMPONENT VIDEO OUT COAXIAL AUDIO OUT VIDEO OUT Cb S-VIDEO...
... near channel 00. If you do not, check your TV owner's manual for details. 4 Connect the DVD Player's power cord to a power outlet. Turn on the TV. 3 Connect the TV's power cord to a power outlet. MDV435 4/12/02 11:55 AM Page 9 Hookups (cont'd) 9 Connecting the DVD Player to a TV only TV has AUDIO (red and white) and VIDEO (yellow) IN jacks DVD Player DIGITAL AUDIO OUT PCM / MULTICHANNEL R L Y Cr COMPONENT VIDEO OUT COAXIAL AUDIO OUT VIDEO OUT Cb S-VIDEO...

User manual, English (US)
Page 10
... AUDIO IN jacks on the TV, matching the cable colors to the jack colors. 2 Connect an S-Video cable (not supplied) to the S-VIDEO OUT jack on the DVD Player and to the S-VIDEO IN jack on the TV and set it to the S-VIDEO IN channel. Turn on the TV. 3 Connect the TV's power cord to a power outlet. This channel may be near channel 00. Press the POWER y button to a power outlet. If you do not, check your TV owner's manual...
... AUDIO IN jacks on the TV, matching the cable colors to the jack colors. 2 Connect an S-Video cable (not supplied) to the S-VIDEO OUT jack on the DVD Player and to the S-VIDEO IN jack on the TV and set it to the S-VIDEO IN channel. Turn on the TV. 3 Connect the TV's power cord to a power outlet. This channel may be near channel 00. Press the POWER y button to a power outlet. If you do not, check your TV owner's manual...

User manual, English (US)
Page 11
... the Stereo's power cord. See your connections and make sure the TV is on page 39. q Set DOLBY DIGITAL to ON if you will watch the program on page 39. q This DVD Player does not support the Digital Theater System (DTS). q Select 5.1 channel Dolby Digital Surround sound if available in the TV's power cord. Remember, you may use S-Video or Component Video if S-Video or Component Video is Dolby Digital or MPEG compatible Some Discs...
... the Stereo's power cord. See your connections and make sure the TV is on page 39. q Set DOLBY DIGITAL to ON if you will watch the program on page 39. q This DVD Player does not support the Digital Theater System (DTS). q Select 5.1 channel Dolby Digital Surround sound if available in the TV's power cord. Remember, you may use S-Video or Component Video if S-Video or Component Video is Dolby Digital or MPEG compatible Some Discs...
User manual, English (US)
Page 12
... the TV screen. You should see the DVD logo on pages 11 and 13. You can use the Digital Audio Out Coaxial connection instead if your Stereo owner's manual for details. 5 Connect the DVD Player's power cord to the jack colors. Remember, you will watch the program on the correct Component Video In channel. Turn on your Stereo. During Audio CD playback, you will adjust the volume at your TV screen. During DVD playback, you...
... the TV screen. You should see the DVD logo on pages 11 and 13. You can use the Digital Audio Out Coaxial connection instead if your Stereo owner's manual for details. 5 Connect the DVD Player's power cord to the jack colors. Remember, you will watch the program on the correct Component Video In channel. Turn on your Stereo. During Audio CD playback, you will adjust the volume at your TV screen. During DVD playback, you...
User manual, English (US)
Page 13
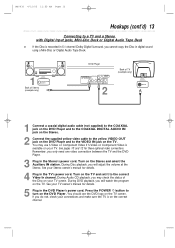
...'s power cord. See your Stereo owner's manual for details. 4 Plug in VIDEO IN 1 Connect a coaxial digital audio cable (not supplied) to the COAXIAL jack on the DVD Player and to the COAXIAL DIGITAL AUDIO IN jack on the Stereo. 2 Connect the supplied yellow video cable to the yellow VIDEO OUT jack on the DVD Player and to the VIDEO IN jack on the correct channel. Press the POWER y button to turn on the TV and set it to the correct Video In channel. Turn on...
...'s power cord. See your Stereo owner's manual for details. 4 Plug in VIDEO IN 1 Connect a coaxial digital audio cable (not supplied) to the COAXIAL jack on the DVD Player and to the COAXIAL DIGITAL AUDIO IN jack on the Stereo. 2 Connect the supplied yellow video cable to the yellow VIDEO OUT jack on the DVD Player and to the VIDEO IN jack on the correct channel. Press the POWER y button to turn on the TV and set it to the correct Video In channel. Turn on...

User manual, English (US)
Page 14
.... DISPLAY Button Press to enlarge the DVD picture. Number Buttons Press to erase incorrect information when setting up programmed or ran- CLEAR Button Press to directly select a Track (Audio CD) for an Audio CD or MP3 files. Details are on page 26. MARKER Button Press to access or remove the DVD Player's Setup menu. Details are on page 35. POWER REPEAT A-B OPEN/ CLOSE DISPLAY SKIP PAUSE 1 2 4 5 7 8 CLEAR 0 MENU AUDIO 3 SUBTITLE 6 ANGLE 9 SEARCH MODE +10 TITLE MODE ZOOM OK SETUP RETURN...
.... DISPLAY Button Press to enlarge the DVD picture. Number Buttons Press to erase incorrect information when setting up programmed or ran- CLEAR Button Press to directly select a Track (Audio CD) for an Audio CD or MP3 files. Details are on page 26. MARKER Button Press to access or remove the DVD Player's Setup menu. Details are on page 35. POWER REPEAT A-B OPEN/ CLOSE DISPLAY SKIP PAUSE 1 2 4 5 7 8 CLEAR 0 MENU AUDIO 3 SUBTITLE 6 ANGLE 9 SEARCH MODE +10 TITLE MODE ZOOM OK SETUP RETURN...

User manual, English (US)
Page 19
... on the DVD Player. Playing a Disc 19 2,4 1 POWER REPEAT A-B OPEN/ CLOSE DISPLAY SKIP PAUSE 5 1 2 4 5 7 8 CLEAR 0 MENU AUDIO 3 SUBTITLE 6 ANGLE 9 SEARCH MODE +10 TITLE MODE ZOOM OK SETUP RETURN MARKER 4 Press OPEN/CLOSE A to the power outlet. With some Audio CDs, playback will not begin , turn on page 20. Remember, this time. Helpful Hints • An "X" may start automatically. In such cases, remove the Disc and turn on the DVD Player again and...
... on the DVD Player. Playing a Disc 19 2,4 1 POWER REPEAT A-B OPEN/ CLOSE DISPLAY SKIP PAUSE 5 1 2 4 5 7 8 CLEAR 0 MENU AUDIO 3 SUBTITLE 6 ANGLE 9 SEARCH MODE +10 TITLE MODE ZOOM OK SETUP RETURN MARKER 4 Press OPEN/CLOSE A to the power outlet. With some Audio CDs, playback will not begin , turn on page 20. Remember, this time. Helpful Hints • An "X" may start automatically. In such cases, remove the Disc and turn on the DVD Player again and...

User manual, English (US)
Page 25
... DVD Player will be selected next automatically. 3 While CH is within 30 seconds, press the Number buttons to the beginning of the current Title or Track. TIME -:-:- q If you enter is selected and within the total time of the current Chapter. TT:4 / 4 CH:12/17 POWER REPEAT A-B OPEN/ CLOSE DISPLAY SKIP PAUSE 2-3 2 1 2 4 5 7 8 CLEAR 0 MENU AUDIO 3 SUBTITLE 6 ANGLE 9 SEARCH MODE +10 TITLE MODE ZOOM OK SETUP RETURN MARKER 1 DVD AUDIO...
... DVD Player will be selected next automatically. 3 While CH is within 30 seconds, press the Number buttons to the beginning of the current Title or Track. TIME -:-:- q If you enter is selected and within the total time of the current Chapter. TT:4 / 4 CH:12/17 POWER REPEAT A-B OPEN/ CLOSE DISPLAY SKIP PAUSE 2-3 2 1 2 4 5 7 8 CLEAR 0 MENU AUDIO 3 SUBTITLE 6 ANGLE 9 SEARCH MODE +10 TITLE MODE ZOOM OK SETUP RETURN MARKER 1 DVD AUDIO...
User manual, English (US)
Page 28
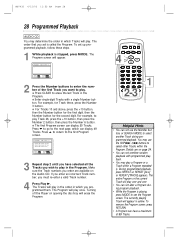
... an incorrect Track number, you set up programmed playback, follow these steps. 1 While playback is called the Program. POWER REPEAT A-B OPEN/ CLOSE DISPLAY SKIP PAUSE 4 1 2 4 5 7 8 CLEAR 0 MENU AUDIO 3 SUBTITLE 6 ANGLE 9 SEARCH MODE +10 TITLE MODE ZOOM OK 2-3 SETUP RETURN MARKER 1 Helpful Hints • You can not alter a Program during program playback. • While the Program is playing, press MODE to select another Track during programmed playback. The entire Program or the current...
... an incorrect Track number, you set up programmed playback, follow these steps. 1 While playback is called the Program. POWER REPEAT A-B OPEN/ CLOSE DISPLAY SKIP PAUSE 4 1 2 4 5 7 8 CLEAR 0 MENU AUDIO 3 SUBTITLE 6 ANGLE 9 SEARCH MODE +10 TITLE MODE ZOOM OK 2-3 SETUP RETURN MARKER 1 Helpful Hints • You can not alter a Program during program playback. • While the Program is playing, press MODE to select another Track during programmed playback. The entire Program or the current...
User manual, English (US)
Page 36
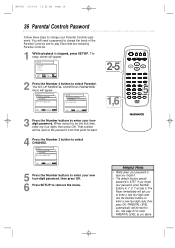
... the Number buttons to enter your fourdigit password. That number will be used as you desire. SET-UP PARENTAL CONTROLS PASSWORD Enter current password. - - - - The Player immediately will need a password to change your Parental Controls password. The SET-UP PARENTAL CONTROLS PASSWORD menu will appear. Use the Number buttons to enter a new four-digit code. See page 37 to play Discs that point forward. 4 Press the Number 2 button to remove the menu. 2-5 1,6 POWER REPEAT A-B OPEN/ CLOSE DISPLAY SKIP PAUSE AUDIO 1 2 3 SUBTITLE 4 5 6 7 8 CLEAR 0 MENU OK...
... the Number buttons to enter your fourdigit password. That number will be used as you desire. SET-UP PARENTAL CONTROLS PASSWORD Enter current password. - - - - The Player immediately will need a password to change your Parental Controls password. The SET-UP PARENTAL CONTROLS PASSWORD menu will appear. Use the Number buttons to enter a new four-digit code. See page 37 to play Discs that point forward. 4 Press the Number 2 button to remove the menu. 2-5 1,6 POWER REPEAT A-B OPEN/ CLOSE DISPLAY SKIP PAUSE AUDIO 1 2 3 SUBTITLE 4 5 6 7 8 CLEAR 0 MENU OK...

User manual, English (US)
Page 37
... set will not play. SET-UP PARENTAL CONTROLS PARENTAL LEVEL ALL 8 7 [NC-17] 6 [R] 5 SELECT: / SET: OK EXIT: SETUP CANCEL: RETURN 5 Press a Number button to select the level you enter the correct password. Parental Controls is stopped, press SETUP. Unsuitable for audiences of the Disc. • Some DVDs are not compatible with Parental Controls. G - If this happens, remove the Disc, then select a level that allows playback. SET-UP 1.LANGUAGE 2.DISPLAY 3.AUDIO 4.PARENTAL SELECT: / SET: OK EXIT: SETUP CANCEL: RETURN 1,6 AUDIO 1 2 3 SUBTITLE 4 5 6 7 8 CLEAR 0 MENU...
... set will not play. SET-UP PARENTAL CONTROLS PARENTAL LEVEL ALL 8 7 [NC-17] 6 [R] 5 SELECT: / SET: OK EXIT: SETUP CANCEL: RETURN 5 Press a Number button to select the level you enter the correct password. Parental Controls is stopped, press SETUP. Unsuitable for audiences of the Disc. • Some DVDs are not compatible with Parental Controls. G - If this happens, remove the Disc, then select a level that allows playback. SET-UP 1.LANGUAGE 2.DISPLAY 3.AUDIO 4.PARENTAL SELECT: / SET: OK EXIT: SETUP CANCEL: RETURN 1,6 AUDIO 1 2 3 SUBTITLE 4 5 6 7 8 CLEAR 0 MENU...

User manual, English (US)
Page 39
..., press o or p to turn MPEG ON or OFF. SET-UP 1.LANGUAGE 2.DISPLAY 3.AUDIO 4.PARENTAL SELECT: / SET: OK EXIT: SETUP CANCEL: RETURN 2 Press the Number 3 button to select Audio. 3 Press o or p to select an item, then follow step 4 accordingly. 4 q If you connected the DVD Player to remove the menu. Audio Controls 39 POWER REPEAT A-B OPEN/ CLOSE DISPLAY SKIP PAUSE 2 1 2 4 5 7 8 3-4 CLEAR 0 MENU AUDIO 3 SUBTITLE 6 ANGLE 9 SEARCH MODE +10 TITLE MODE ZOOM OK SETUP RETURN MARKER 1,5 Helpful Hint • Selecting 96kHz activates copyright protection...
..., press o or p to turn MPEG ON or OFF. SET-UP 1.LANGUAGE 2.DISPLAY 3.AUDIO 4.PARENTAL SELECT: / SET: OK EXIT: SETUP CANCEL: RETURN 2 Press the Number 3 button to select Audio. 3 Press o or p to select an item, then follow step 4 accordingly. 4 q If you connected the DVD Player to remove the menu. Audio Controls 39 POWER REPEAT A-B OPEN/ CLOSE DISPLAY SKIP PAUSE 2 1 2 4 5 7 8 3-4 CLEAR 0 MENU AUDIO 3 SUBTITLE 6 ANGLE 9 SEARCH MODE +10 TITLE MODE ZOOM OK SETUP RETURN MARKER 1,5 Helpful Hint • Selecting 96kHz activates copyright protection...

User manual, English (US)
Page 45
... Service Center for the luminance and the color. Displays the video in use S-Video only if your DVD Player; This format is not in full-width, with a soft, slightly damp cloth. • Never use the supplied yellow video cable. This connection provides the 5.1 channel surround sound as used often when you to use a solvent, thinner, benzene, or alcohol to clean the DVD Player. Displays the video with full-height picture, with one side playing...
... Service Center for the luminance and the color. Displays the video in use S-Video only if your DVD Player; This format is not in full-width, with a soft, slightly damp cloth. • Never use the supplied yellow video cable. This connection provides the 5.1 channel surround sound as used often when you to use a solvent, thinner, benzene, or alcohol to clean the DVD Player. Displays the video with full-height picture, with one side playing...

User manual, English (US)
Page 46
... the tray with operations, please stay near channel 00. If you need one -sided, place the Disc in the Disc tray. low video cable (supplied), an optional S-Video cable, or optional component video cables. For example, you want to the representative. Details are connected to the owner's manual of problems and possible solutions before you call a customer service representative, please know the model number and serial number of your product...
... the tray with operations, please stay near channel 00. If you need one -sided, place the Disc in the Disc tray. low video cable (supplied), an optional S-Video cable, or optional component video cables. For example, you want to the representative. Details are connected to the owner's manual of problems and possible solutions before you call a customer service representative, please know the model number and serial number of your product...

User manual, English (US)
Page 47
... Page 47 Helpful Hints (cont'd) 47 Distorted picture • Connect the DVD Player directly to ON. A large DVD logo appears on the TV screen. • The DVD logo will appear on the remote control or the DVD Player. The logo will appear on the TV screen if you stop Disc playback for more than 35 minutes and you receive the DVD Player, the factory has set AUTO POWER OFF to...
... Page 47 Helpful Hints (cont'd) 47 Distorted picture • Connect the DVD Player directly to ON. A large DVD logo appears on the TV screen. • The DVD logo will appear on the remote control or the DVD Player. The logo will appear on the TV screen if you stop Disc playback for more than 35 minutes and you receive the DVD Player, the factory has set AUTO POWER OFF to...
User manual, English (US)
Page 51
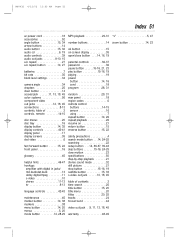
... markers 38 menu button 14, 20 menus 5, 20 mode button 14, 28-29 MP3 playback 29-31 number buttons 14 ok button 15 on-screen display 35 open/close button . . . .14, 16, 19 parental controls 36-37 password 36 pause button . . . . . .15-16, 21, 23 play button 15-16, 19 playing 19 power button 14, 16 cord 18 program 28, 31 random 29, 31 rear panel 18 region codes 6 remote control buttons 14-15 sensor 16 using 7 repeat button 14...
... markers 38 menu button 14, 20 menus 5, 20 mode button 14, 28-29 MP3 playback 29-31 number buttons 14 ok button 15 on-screen display 35 open/close button . . . .14, 16, 19 parental controls 36-37 password 36 pause button . . . . . .15-16, 21, 23 play button 15-16, 19 playing 19 power button 14, 16 cord 18 program 28, 31 random 29, 31 rear panel 18 region codes 6 remote control buttons 14-15 sensor 16 using 7 repeat button 14...


