
English User Manual
Page 2
EN Contents What's In the Box?... 3 Controls And Functions... 4 Instructions Guide... 6 Basic Operations 6 DAB/DAB+ Radio 7 FM Radio... 10 CD Mode... 13 Bluetooth Mode 15 AUX In Mode... 15 USB Playback Mode 15 Dual Alarm & Sleep Timer 16 System Settings 19 Troubleshooting & Support... 21 Product Specifications ... 22 Warranty... 22 Safety Information... 23 2
EN Contents What's In the Box?... 3 Controls And Functions... 4 Instructions Guide... 6 Basic Operations 6 DAB/DAB+ Radio 7 FM Radio... 10 CD Mode... 13 Bluetooth Mode 15 AUX In Mode... 15 USB Playback Mode 15 Dual Alarm & Sleep Timer 16 System Settings 19 Troubleshooting & Support... 21 Product Specifications ... 22 Warranty... 22 Safety Information... 23 2

English User Manual
Page 4
CD Tray Display Screen 2. Alarm 5. Scan/Play/Pause 4 8. Previous/Rewind 9. AUX In 13. Next/Fast Forward 10. USB Playback Port 15. Power Mode 3. Info/Menu 4. Preset 6. Headphone Port 14. Telescope Antenna 16. DC In 12. EN Controls & Functions Front & Rear View Control Buttons 12 14 15 11 13 1 16 4 8 3 9 2 5 7 10 6 1. Eject 11. Vol/Enter/Stop 7.
CD Tray Display Screen 2. Alarm 5. Scan/Play/Pause 4 8. Previous/Rewind 9. AUX In 13. Next/Fast Forward 10. USB Playback Port 15. Power Mode 3. Info/Menu 4. Preset 6. Headphone Port 14. Telescope Antenna 16. DC In 12. EN Controls & Functions Front & Rear View Control Buttons 12 14 15 11 13 1 16 4 8 3 9 2 5 7 10 6 1. Eject 11. Vol/Enter/Stop 7.

English User Manual
Page 5
Up 3. EQ 15. VOL- 20. Prog 22. Alarm 14. Menu 4. Mode 18. Input Letters and 9. Sleep 21. Fast Forward 5 Next 5. Mute 12. VOL+ 7. Controls & Functions EN Remote Control Buttons 1 2 10 3 5 4 14 6 7 8 21 9 11 13 12 15 16 18 19 20 22 1. Ok/Play/Pause 6. Power 13. Dimmer 2. Previous 19. Fav 11. Stop 16. Rewind 17. Down 8. Eject Number 10.
Up 3. EQ 15. VOL- 20. Prog 22. Alarm 14. Menu 4. Mode 18. Input Letters and 9. Sleep 21. Fast Forward 5 Next 5. Mute 12. VOL+ 7. Controls & Functions EN Remote Control Buttons 1 2 10 3 5 4 14 6 7 8 21 9 11 13 12 15 16 18 19 20 22 1. Ok/Play/Pause 6. Power 13. Dimmer 2. Previous 19. Fav 11. Stop 16. Rewind 17. Down 8. Eject Number 10.

English User Manual
Page 6
... radio buttons e.g. (Ref* number*) in page: Dimmer Press the 'Dimmer' button (Rem.13), to change the display brightness. Power ON/OFF To power on (Working Mode), press the Power/Mode button (Ref.2), or the Power button on the remote control to change the sound modes between Normal, Classic, Jazz, Pop, Rock, Speech, and My EQ. Changing the radio modes In working mode, press the Power/Mode (Ref.2), repeatedly to change the radio mode in between high, medium, and low. 6 Unwind the radio power cable...
... radio buttons e.g. (Ref* number*) in page: Dimmer Press the 'Dimmer' button (Rem.13), to change the display brightness. Power ON/OFF To power on (Working Mode), press the Power/Mode button (Ref.2), or the Power button on the remote control to change the sound modes between Normal, Classic, Jazz, Pop, Rock, Speech, and My EQ. Changing the radio modes In working mode, press the Power/Mode (Ref.2), repeatedly to change the radio mode in between high, medium, and low. 6 Unwind the radio power cable...

English User Manual
Page 7
... the Menu button on the remote (Rem.21) for 2-3 seconds. DAB/ DAB + Radio EN DAB/DAB+ Radio DAB Radio Ensure that the antenna is set to DAB mode for the first time, the Oakcastle DAB500 will automatically start playing. Press the Vol/Enter/Stop button (Ref.6) or use the 'Vol/Enter/Stop' dial (Ref.6) or the navigation buttons on the remote control (Rem.17) to start scanning for 2 seconds on the remote control to open 'Save to Presets' on remote control...
... the Menu button on the remote (Rem.21) for 2-3 seconds. DAB/ DAB + Radio EN DAB/DAB+ Radio DAB Radio Ensure that the antenna is set to DAB mode for the first time, the Oakcastle DAB500 will automatically start playing. Press the Vol/Enter/Stop button (Ref.6) or use the 'Vol/Enter/Stop' dial (Ref.6) or the navigation buttons on the remote control (Rem.17) to start scanning for 2 seconds on the remote control to open 'Save to Presets' on remote control...

English User Manual
Page 8
... play has been found , select using with the 'Vol/Enter/Stop' dial (Ref.6) or the OK button on the remote control. 8 To access 1-99 presets list, press the 'FAV' button on the remote control (Rem.21), or press 'Preset' button on the radio (Ref.5) (do not hold ) to open 'Recall from Preset'. DAB/DAB+ Radio Settings In DAB mode, press the MENU button on the unit or on the remote control to 'Recall from Preset' Settings. Manual Tune...
... play has been found , select using with the 'Vol/Enter/Stop' dial (Ref.6) or the OK button on the remote control. 8 To access 1-99 presets list, press the 'FAV' button on the remote control (Rem.21), or press 'Preset' button on the radio (Ref.5) (do not hold ) to open 'Recall from Preset'. DAB/DAB+ Radio Settings In DAB mode, press the MENU button on the unit or on the remote control to 'Recall from Preset' Settings. Manual Tune...

English User Manual
Page 9
... the station signal strength. DAB/ DAB+ Radio EN Station Order: Select in such as: alphanumeric, ensemble and valid. Channel and Frequency: Displays the station transmission channel number and frequency. PTY (Program Type): Shows the type and description of the program provided by pressing the 'Info/Menu' button repeatedly on the unit or on the remote: Program Information: Displays artist and song currently playing on the system. Signal Error/Strength: Provides details of the signal is...
... the station signal strength. DAB/ DAB+ Radio EN Station Order: Select in such as: alphanumeric, ensemble and valid. Channel and Frequency: Displays the station transmission channel number and frequency. PTY (Program Type): Shows the type and description of the program provided by pressing the 'Info/Menu' button repeatedly on the unit or on the remote: Program Information: Displays artist and song currently playing on the system. Signal Error/Strength: Provides details of the signal is...

English User Manual
Page 10
... Use the 'Vol/Enter/Stop' dial to manually navigate down the bandwidth slowly. Once a station has been saved, the screen will display 'Preset Stored', confirming that have no radio station saved on it, will have found your choice by pressing the dial button (Ref.6) or the 'OK' button on the remote control (Rem.7/16) to Presets'. Alternatively, quickly preset a radio station on remote keypad buttons (1-9), press the corresponding number on the remoter...
... Use the 'Vol/Enter/Stop' dial to manually navigate down the bandwidth slowly. Once a station has been saved, the screen will display 'Preset Stored', confirming that have no radio station saved on it, will have found your choice by pressing the dial button (Ref.6) or the 'OK' button on the remote control (Rem.7/16) to Presets'. Alternatively, quickly preset a radio station on remote keypad buttons (1-9), press the corresponding number on the remoter...

English User Manual
Page 11
... using mono. FM Radio Settings In FM Mode, press the 'MENU' button on the unit (Ref.3) or on the remote control (Rem.15) to open FM settings. Audio Setting: All stereo stations are reproduced in stereo or mono. Select whether to listen to play from. 11 System Settings: Select this can be improved by pressing down the button as this will display 'Listen in Mono Only?'. Use the 'Vol/Enter/Stop...
... using mono. FM Radio Settings In FM Mode, press the 'MENU' button on the unit (Ref.3) or on the remote control (Rem.15) to open FM settings. Audio Setting: All stereo stations are reproduced in stereo or mono. Select whether to listen to play from. 11 System Settings: Select this can be improved by pressing down the button as this will display 'Listen in Mono Only?'. Use the 'Vol/Enter/Stop...

English User Manual
Page 12
Today's Date: Displays the date information provided by the FM station. Frequency: Displays the station transmission frequency. PTY (Programmed Type): Shows the type and description of the program provided by the broadcaster, if available. 12 EN FM Radio FM Station Information While playing a FM radio station, the following information can be viewed by pressing the 'Info/Menu' button repeatedly (Ref.3) on the unit: Programmed Information: Displays artist and song currently being played on the station.
Today's Date: Displays the date information provided by the FM station. Frequency: Displays the station transmission frequency. PTY (Programmed Type): Shows the type and description of the program provided by the broadcaster, if available. 12 EN FM Radio FM Station Information While playing a FM radio station, the following information can be viewed by pressing the 'Info/Menu' button repeatedly (Ref.3) on the unit: Programmed Information: Displays artist and song currently being played on the station.

English User Manual
Page 13
... rotate 'Vol/Enter/Stop' (Ref.6) to switch on the remote control to start playing your audio CD through a track. (Rem.5 & 12) • Press 'Vol/Enter/Stop' (Ref.6) to stop playing a CD. CD Mode EN CD Mode Inserting/Playing a CD: • Press the 'Power/Mode' button (Ref.2) repeatedly to change into CD Mode. • Press the 'Eject' button (Ref.10) to open the CD player's tray and insert the disc. • Gently push...
... rotate 'Vol/Enter/Stop' (Ref.6) to switch on the remote control to start playing your audio CD through a track. (Rem.5 & 12) • Press 'Vol/Enter/Stop' (Ref.6) to stop playing a CD. CD Mode EN CD Mode Inserting/Playing a CD: • Press the 'Power/Mode' button (Ref.2) repeatedly to change into CD Mode. • Press the 'Eject' button (Ref.10) to open the CD player's tray and insert the disc. • Gently push...
English User Manual
Page 15
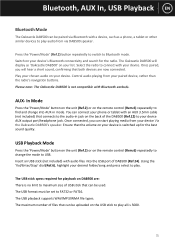
...). Using the 'Vol/Enter/Stop' dial (Ref.6), highlight your device Via the Oakcastle DAB500's speaker. The USB stick specs required for playback on your device is not compatible with your paired device, rather than the radio's navigation buttons. Once connected, you will display as a phone, a tablet or other similar devices to play . Play your chosen audio on DAB500 are now connected. Ensure that can connect your device AUX output port/headphone jack. The maximum number...
...). Using the 'Vol/Enter/Stop' dial (Ref.6), highlight your device Via the Oakcastle DAB500's speaker. The USB stick specs required for playback on your device is not compatible with your paired device, rather than the radio's navigation buttons. Once connected, you will display as a phone, a tablet or other similar devices to play . Play your chosen audio on DAB500 are now connected. Ensure that can connect your device AUX output port/headphone jack. The maximum number...

English User Manual
Page 16
...: Select to confirm. Preset: If DAB or FM radio station is selected, the date and time of your radio, press the 'Alarm' button on the remote control to set for the alarm, select 'Save' with the 'Vol/Enter/Stop' dial (Ref.6) or use the OK button to choose the alarm sequence in between last played radio station or any of the alarm will need to flash. Once entered, in...
...: Select to confirm. Preset: If DAB or FM radio station is selected, the date and time of your radio, press the 'Alarm' button on the remote control to set for the alarm, select 'Save' with the 'Vol/Enter/Stop' dial (Ref.6) or use the OK button to choose the alarm sequence in between last played radio station or any of the alarm will need to flash. Once entered, in...

English User Manual
Page 17
... 'Power/Mode' button (Ref.2) or the 'Power/Standby' button on the remote control (Rem.10) multiple times to choose and set a DAB or FM radio station as the alarm ring tone, and there is not stopped, the radio will sound a buzzer tone instead. 17 How to turn off the alarm by pressing the 'Alarm' button on the remote control. Navigate through the settings to cancel: Alarm 1 or Alarm 2 using the 'Vol/Enter/Stop...
... 'Power/Mode' button (Ref.2) or the 'Power/Standby' button on the remote control (Rem.10) multiple times to choose and set a DAB or FM radio station as the alarm ring tone, and there is not stopped, the radio will sound a buzzer tone instead. 17 How to turn off the alarm by pressing the 'Alarm' button on the remote control. Navigate through the settings to cancel: Alarm 1 or Alarm 2 using the 'Vol/Enter/Stop...
English User Manual
Page 18
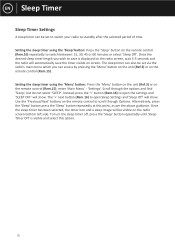
... access by pressing the 'Menu' button on the unit (Ref.3) or on the remote control (Rem.15). The '>' next button (Rem.16) to switch between: 15, 30, 45 or 60 minutes or select 'Sleep Off'. Setting the sleep timer using the 'Menu' button: Press the 'Menu' button on the unit (Ref.3) or on the remote control (Rem.15), enter 'Main Menu' - 'Settings'. Instead, press the '>' button (Rem.16) to...
... access by pressing the 'Menu' button on the unit (Ref.3) or on the remote control (Rem.15). The '>' next button (Rem.16) to switch between: 15, 30, 45 or 60 minutes or select 'Sleep Off'. Setting the sleep timer using the 'Menu' button: Press the 'Menu' button on the unit (Ref.3) or on the remote control (Rem.15), enter 'Main Menu' - 'Settings'. Instead, press the '>' button (Rem.16) to...
English User Manual
Page 19
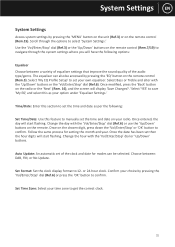
... digits will start flashing. Time/Date: Enter this section to set of the audio type/genre. Change the hour with the 'Vol/Enter/Stop' dial (Ref.6) or use the 'Up/Down' buttons on the remote control (Rem.3). Follow the same process for modes can also be selected. Scroll through the system settings where you will display 'Save Changes?.' Once on the remote control (Rem.15). or 24-hour clock. Auto Update: An automatic set...
... digits will start flashing. Time/Date: Enter this section to set of the audio type/genre. Change the hour with the 'Vol/Enter/Stop' dial (Ref.6) or use the 'Up/Down' buttons on the remote control (Rem.3). Follow the same process for modes can also be selected. Scroll through the system settings where you will display 'Save Changes?.' Once on the remote control (Rem.15). or 24-hour clock. Auto Update: An automatic set...
English User Manual
Page 20
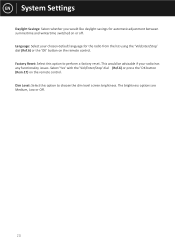
... dim level screen brightness. Factory Reset: Select this option to perform a factory reset. EN System Settings Daylight Savings: Select whether you would be advisable if your chosen default language for automatic adjustment between summertime and wintertime switched on the remote control. This would like daylight savings for the radio from the list using the 'Vol/Enter/Stop' dial (Ref.6) or the 'OK' button on the remote control. Select...
... dim level screen brightness. Factory Reset: Select this option to perform a factory reset. EN System Settings Daylight Savings: Select whether you would be advisable if your chosen default language for automatic adjustment between summertime and wintertime switched on the remote control. This would like daylight savings for the radio from the list using the 'Vol/Enter/Stop' dial (Ref.6) or the 'OK' button on the remote control. Select...
English User Manual
Page 21
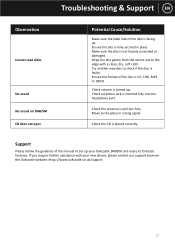
...format of the disk is fully secured in strong signal. Move to set up . Make sure the disc is inserted fully into the headphone port. Check volume is turned up your new device, please contact our support team on DAB/FM CD does not eject Potential Cause/Solution Make sure the label side of the disc.... Support Please follow the guidance of the manual to the place in place. Check the CD is pull-out fully. Wipe the disc gently from the centre out to check if the disc is CD, CDR, MP3 or HDCD. Troubleshooting & Support EN Observation Cannot read disks No sound No sound on...
...format of the disk is fully secured in strong signal. Move to set up . Make sure the disc is inserted fully into the headphone port. Check volume is turned up your new device, please contact our support team on DAB/FM CD does not eject Potential Cause/Solution Make sure the label side of the disc.... Support Please follow the guidance of the manual to the place in place. Check the CD is pull-out fully. Wipe the disc gently from the centre out to check if the disc is CD, CDR, MP3 or HDCD. Troubleshooting & Support EN Observation Cannot read disks No sound No sound on...
English User Manual
Page 22
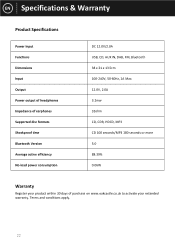
EN Specifications & Warranty Product Specifications Power Input Functions Dimensions Input Output Power output of headphones Impedance of earphones Supported disc formats Shockproof time Bluetooth Version Average active efficiency No-load power consumption DC 12.0V/2.0A USB, CD, AUX IN, DAB, FM, Bluetooth 38 x 21 x 13.5cm 100-240V, 50-60Hz, 1A Max 12.0V, 2.0A 3.2mw 32ohm CD, CDR, HDCD, MP3 CD 100 seconds/MP3 ...
EN Specifications & Warranty Product Specifications Power Input Functions Dimensions Input Output Power output of headphones Impedance of earphones Supported disc formats Shockproof time Bluetooth Version Average active efficiency No-load power consumption DC 12.0V/2.0A USB, CD, AUX IN, DAB, FM, Bluetooth 38 x 21 x 13.5cm 100-240V, 50-60Hz, 1A Max 12.0V, 2.0A 3.2mw 32ohm CD, CDR, HDCD, MP3 CD 100 seconds/MP3 ...

English User Manual
Page 23
... with water. 6. Do not block any ventilation openings. Install in doing so help the environment. Only use only identical replacement parts. RECYCLING ELECTRICAL PRODUCTS You should be disposed of used to your waste electrical goods and in accordance with water. Risk of time. 12. Do not install near or with the manufacturer's instructions. 7. No naked flame sources, such as radiators...
... with water. 6. Do not block any ventilation openings. Install in doing so help the environment. Only use only identical replacement parts. RECYCLING ELECTRICAL PRODUCTS You should be disposed of used to your waste electrical goods and in accordance with water. Risk of time. 12. Do not install near or with the manufacturer's instructions. 7. No naked flame sources, such as radiators...