
English User Manual
Page 2
Contents What's In The Box 1 Controls And Functions 2-10 Support 11 Connecting to the Everest soundbar 12 Instructions Guide 13-19 Using the AUX IN Cable 13 Using the HDMI (ARC) Input 14 Using the Optical Input 15 Using the MP3 Link Connection (Line In 16 Connecting to the Mains Supply 17 Using the Bluetooth Operation 18 Using the USB Operation 19 Troubleshooting 20 Specifications 21 Wall Mount Installation Guide 22-23 Quick System Installation Guide 24 Safety Information 25
Contents What's In The Box 1 Controls And Functions 2-10 Support 11 Connecting to the Everest soundbar 12 Instructions Guide 13-19 Using the AUX IN Cable 13 Using the HDMI (ARC) Input 14 Using the Optical Input 15 Using the MP3 Link Connection (Line In 16 Connecting to the Mains Supply 17 Using the Bluetooth Operation 18 Using the USB Operation 19 Troubleshooting 20 Specifications 21 Wall Mount Installation Guide 22-23 Quick System Installation Guide 24 Safety Information 25

English User Manual
Page 3
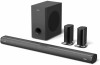
Box Contents 1. Surround 8. AUX IN 5. 3.5mm to 3.5mm Line In Cable 6. Side cover 11.Wall mount Pedestal accessories adaptor 1 AUX IN Cable 5. 3.5mm to Cable 3.5mm Line In Cable 6. Subwoofer 9. Wall mount adaptor 1. Remote 3. Aluminium 10 . Side cover accessories 11. Majority Everest Soundbar 2. User Manual 7.Surroundx2 8. Remote Control 3. Subwoofer x 1 9. User Manual What's In The Box? 7. Power Control Adapter 4. Power Adapter x 4 4. Majority Everest Soundbar 2. Aluminium Pedestal 10.
Box Contents 1. Surround 8. AUX IN 5. 3.5mm to 3.5mm Line In Cable 6. Side cover 11.Wall mount Pedestal accessories adaptor 1 AUX IN Cable 5. 3.5mm to Cable 3.5mm Line In Cable 6. Subwoofer 9. Wall mount adaptor 1. Remote 3. Aluminium 10 . Side cover accessories 11. Majority Everest Soundbar 2. User Manual 7.Surroundx2 8. Remote Control 3. Subwoofer x 1 9. User Manual What's In The Box? 7. Power Control Adapter 4. Power Adapter x 4 4. Majority Everest Soundbar 2. Aluminium Pedestal 10.
English User Manual
Page 6
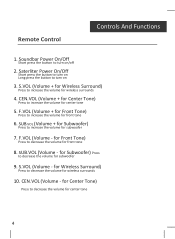
Soundbar Power On/Off Short press the button to increase the volume for center tone 4 SLSohanotgrtepprrreleistsssetthrheePbbouutwtttooennrttoOottunurr/nnOoonfnf 3. SUB.VOL (Volume + for Subwoofer) Press to increase the ...
Soundbar Power On/Off Short press the button to increase the volume for center tone 4 SLSohanotgrtepprrreleistsssetthrheePbbouutwtttooennrttoOottunurr/nnOoonfnf 3. SUB.VOL (Volume + for Subwoofer) Press to increase the ...
English User Manual
Page 9
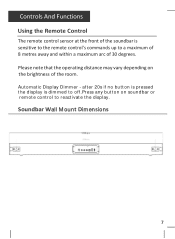
Please note that the operating distance may vary depending on the brightness of the soundbar is dim m ed t o off.Press any but t on is pressed t he display. Soundbar Wall M ount Dimensions 7 aft er 20s if no but t on on soundbar or rem ot e cont rol t o react ivat e t he display is sensitive to the remote control's commands up to a maximum of 8 metres away and within a maximum arc of 30 degrees. Controls And Functions Using the Remote Control The remote control sensor at ic Display Dim m er - Aut om at the front of the room.
Please note that the operating distance may vary depending on the brightness of the soundbar is dim m ed t o off.Press any but t on is pressed t he display. Soundbar Wall M ount Dimensions 7 aft er 20s if no but t on on soundbar or rem ot e cont rol t o react ivat e t he display is sensitive to the remote control's commands up to a maximum of 8 metres away and within a maximum arc of 30 degrees. Controls And Functions Using the Remote Control The remote control sensor at ic Display Dim m er - Aut om at the front of the room.

English User Manual
Page 11
... the left and right surround speaker. Controls And Functions Wireless Surround Speaker 2 pieces Wireless Surround Speaker Detachable Surround Speaker from main Soundbar to be charged with a DC 5V power supply after disassembly. The battery has an overcharge protection function. Power of Surround Speaker...to distinguish the left side of the main soundbar. 9 When connecting the surround speakers to the main soundbar, please pay attention to the right side of the main soundbar, and the right surround spaker is supporting charged by main soundbar directly, it can also be Standing Speaker...
... the left and right surround speaker. Controls And Functions Wireless Surround Speaker 2 pieces Wireless Surround Speaker Detachable Surround Speaker from main Soundbar to be charged with a DC 5V power supply after disassembly. The battery has an overcharge protection function. Power of Surround Speaker...to distinguish the left side of the main soundbar. 9 When connecting the surround speakers to the main soundbar, please pay attention to the right side of the main soundbar, and the right surround spaker is supporting charged by main soundbar directly, it can also be Standing Speaker...

English User Manual
Page 12
Keep the metal base stationary and turn the surround speaker clockwise (as shown in the picture. Controls And Functions Wireless Surround Speaker Remove the left and right surround speakers : Set the angle between the incline of the surround and the grain on the side cover (red), rotate according to install the surround speaker 10 Install left and right cover by rotating in the direction of the surround speaker removed from the main soundbar at the angle shown in the figure) to the arrow, then install the speaker. Install the metal base of the arrow.
Keep the metal base stationary and turn the surround speaker clockwise (as shown in the picture. Controls And Functions Wireless Surround Speaker Remove the left and right surround speakers : Set the angle between the incline of the surround and the grain on the side cover (red), rotate according to install the surround speaker 10 Install left and right cover by rotating in the direction of the surround speaker removed from the main soundbar at the angle shown in the figure) to the arrow, then install the speaker. Install the metal base of the arrow.

English User Manual
Page 13
For further technical support and warranty registration, please visit our website www.majority.co.uk 11 Please follow the guidance of the user manual to set up your purchasing the Majority Everest Soundbar. Support Support Thank you for your new purchase and begin enjoying its features.
For further technical support and warranty registration, please visit our website www.majority.co.uk 11 Please follow the guidance of the user manual to set up your purchasing the Majority Everest Soundbar. Support Support Thank you for your new purchase and begin enjoying its features.
English User Manual
Page 14
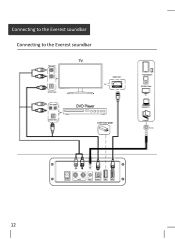
Connecting to the Everest soundbar Connecting to the Everest soundbar 12
Connecting to the Everest soundbar Connecting to the Everest soundbar 12

English User Manual
Page 15
... unit. This will ensure that the AUX cable is being connected to 'output' AUX port on your TV set. Press the POWER button on the soundbar or POWER button directly on the remote control (Rem.1) to switch on the unit to scroll to connect the TV's stereo AUX (L/R) audio output socket... the unit. Turn on your TV does not have 'output' AUX port, please use an alternative connection method. Connect the audio output cable of the soundbar via the 'AUX' input sockets of the unit 13
... unit. This will ensure that the AUX cable is being connected to 'output' AUX port on your TV set. Press the POWER button on the soundbar or POWER button directly on the remote control (Rem.1) to switch on the unit to scroll to connect the TV's stereo AUX (L/R) audio output socket... the unit. Turn on your TV does not have 'output' AUX port, please use an alternative connection method. Connect the audio output cable of the soundbar via the 'AUX' input sockets of the unit 13

English User Manual
Page 16
... control (Rem.20) to switch to select the ARC mode. O PTIC A ARC cable 14 Rear view of the unit Press the POWER button on the soundbar or POWER button directly on the remote control (Rem.1) to the ARC Input on the unit. Instructions Guide Using the HDMI ARC Input You will...
... control (Rem.20) to switch to select the ARC mode. O PTIC A ARC cable 14 Rear view of the unit Press the POWER button on the soundbar or POWER button directly on the remote control (Rem.1) to the ARC Input on the unit. Instructions Guide Using the HDMI ARC Input You will...

English User Manual
Page 17
Press the MODE button on the remote control (Rem.23)to switch to Optical mode or select the Mode button on the soundbar. Connect the Digital Optical Audio cable to the optical output on the audio source and to the Optical Input on main unit repeatedly to PCM ...
Press the MODE button on the remote control (Rem.23)to switch to Optical mode or select the Mode button on the soundbar. Connect the Digital Optical Audio cable to the optical output on the audio source and to the Optical Input on main unit repeatedly to PCM ...

English User Manual
Page 18
Plug the other audio source. Press the Power button on the soundbar or POWER button directly on the remote control (Rem.1)to switch on an MP3 player or other end of a 3.5mm to 3.5mm Line In cable (... through the connected device will now be heard through the speakers. LINE-IN 3.5mm to the Stereo RCAInputs. Press the Mode button repeatedly on the soundbar or press the MODE button on the unit. Instructions Guide Using the MP3 Link Connection (Line In) Plug one end of the cable into the...
Plug the other audio source. Press the Power button on the soundbar or POWER button directly on the remote control (Rem.1)to switch on an MP3 player or other end of a 3.5mm to 3.5mm Line In cable (... through the connected device will now be heard through the speakers. LINE-IN 3.5mm to the Stereo RCAInputs. Press the Mode button repeatedly on the soundbar or press the MODE button on the unit. Instructions Guide Using the MP3 Link Connection (Line In) Plug one end of the cable into the...

English User Manual
Page 21
Use the native controls on the soundbar to a selected track, use the remote control (Rem.17,14,15). Using the USB Operation Insert USB to select a track. Select and press the MODE ...
Use the native controls on the soundbar to a selected track, use the remote control (Rem.17,14,15). Using the USB Operation Insert USB to select a track. Select and press the MODE ...

English User Manual
Page 22
... connect to your device and reconnect. Check whether cables are , please try an alternative connection to your TV if possible. Troubleshootingg Troubleshooting If the soundbar does not work [properly] Switch off at the wall. Leave it for 2 minutes and switch it on or off and unplug the unit.... Replace with a new one if necessary. Check whether the power adaptor is switched on again. If they are properly installed. Forget the soundbar from bluetooth connection Possible causes/measures Check whether the power is properly connected to power outlet or not.
... connect to your device and reconnect. Check whether cables are , please try an alternative connection to your TV if possible. Troubleshootingg Troubleshooting If the soundbar does not work [properly] Switch off at the wall. Leave it for 2 minutes and switch it on or off and unplug the unit.... Replace with a new one if necessary. Check whether the power adaptor is switched on again. If they are properly installed. Forget the soundbar from bluetooth connection Possible causes/measures Check whether the power is properly connected to power outlet or not.
English User Manual
Page 23
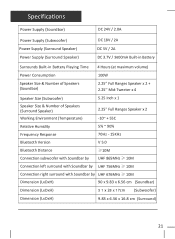
...3600mA Built-in Battery Surrounds Built-in Battery Playing Time 4 Hours (at maximum volume) Power Consumption 100W Speaker Size & Number of Speakers (Soundbar) 2.25'' Full Ranges Speaker x 2 + 2.25'' Mid-Tweeter x 4 Speaker Size (Subwoofer) Speaker Size & Number of Speakers (...5.0 Bluetooth Distance ≥10M Connection subwoofer with Soundbar by UHF 865MHz ≥ 10M Connection left surround with Soundbar by UHF 756MHz ≥ 10M Connection right surround with Soundbar by UHF 676MHz ≥ 10M Dimension (LxDxH) 90 x 9.83 x 6.56 cm (Soundbar) Dimension (LxDxH) 3 1 x 28 x ...
...3600mA Built-in Battery Surrounds Built-in Battery Playing Time 4 Hours (at maximum volume) Power Consumption 100W Speaker Size & Number of Speakers (Soundbar) 2.25'' Full Ranges Speaker x 2 + 2.25'' Mid-Tweeter x 4 Speaker Size (Subwoofer) Speaker Size & Number of Speakers (...5.0 Bluetooth Distance ≥10M Connection subwoofer with Soundbar by UHF 865MHz ≥ 10M Connection left surround with Soundbar by UHF 756MHz ≥ 10M Connection right surround with Soundbar by UHF 676MHz ≥ 10M Dimension (LxDxH) 90 x 9.83 x 6.56 cm (Soundbar) Dimension (LxDxH) 3 1 x 28 x ...
English User Manual
Page 24
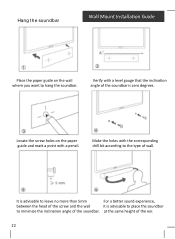
at the same height of the ear. 22 Verify with a level gauge that the inclination angle of the soundbar is advisable to place the soundbar to minimize the inclination angle of the soundbar. It is advisable to leave no more than 5mm For a better sound experience, between the head of the ...wall it is zero degrees. Make the holes with a pencil. Locate the screw holes on the wall where you want to hang the soundbar. Hang t he soundbar Wall Mount Installation Guide Place the paper guide on the paper guide and mark a point with the corresponding drill bit according to the ...
at the same height of the ear. 22 Verify with a level gauge that the inclination angle of the soundbar is advisable to place the soundbar to minimize the inclination angle of the soundbar. It is advisable to leave no more than 5mm For a better sound experience, between the head of the ...wall it is zero degrees. Make the holes with a pencil. Locate the screw holes on the wall where you want to hang the soundbar. Hang t he soundbar Wall Mount Installation Guide Place the paper guide on the paper guide and mark a point with the corresponding drill bit according to the ...
English User Manual
Page 26
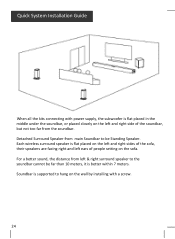
... of the sofa, their speakers are facing right and left ears of the soundbar, but not too far from main Soundbar to be far than 10 meters, it is flat placed in the middle under the soundbar, or placed closely on the left & right surround speaker to hang on ...by installing with power supply, the subwoofer is better within 7 meters. Detached Surround Speaker from the soundbar. Quick System Installation Guide When all the kits connecting with a screw. 24 Soundbar is supported to the soundbar cannot be Standing Speaker. For a better sound, the distance from left and right side of ...
... of the sofa, their speakers are facing right and left ears of the soundbar, but not too far from main Soundbar to be far than 10 meters, it is flat placed in the middle under the soundbar, or placed closely on the left & right surround speaker to hang on ...by installing with power supply, the subwoofer is better within 7 meters. Detached Surround Speaker from the soundbar. Quick System Installation Guide When all the kits connecting with a screw. 24 Soundbar is supported to the soundbar cannot be Standing Speaker. For a better sound, the distance from left and right side of ...
