
English User Manual
Page 2
Register your product online for a FREE 3 year extended warranty at: www.majority.co.uk Contents EN Controls And Functions...What's In The Box?...Wall Mounting and Auto-Power Off 5 Instructions Guide...Using the RCA Audio Cable 6 Using the ARC Input 7 Using the Optical Input 8 Using the MP3 LINK Connection (Line In 9 Connecting to the Mains Supply 10 Connecting the Soundbar and Sub-woofer 11 Bluetooth Operation 12 FM Mode 13 Troubleshooting ...Speci cation...Warranty ...Safety Information ...
Register your product online for a FREE 3 year extended warranty at: www.majority.co.uk Contents EN Controls And Functions...What's In The Box?...Wall Mounting and Auto-Power Off 5 Instructions Guide...Using the RCA Audio Cable 6 Using the ARC Input 7 Using the Optical Input 8 Using the MP3 LINK Connection (Line In 9 Connecting to the Mains Supply 10 Connecting the Soundbar and Sub-woofer 11 Bluetooth Operation 12 FM Mode 13 Troubleshooting ...Speci cation...Warranty ...Safety Information ...

English User Manual
Page 4
Mode: Switch between modes 22. Volume 18. EQ settings can be changed in AUX or Bluetooth mode to go forward a track 23. Forward step: Use in AUX or Bluetooth mode to turn the soundbar LED 24 light on and off. Treble increase 24. Treble decrease 2 Power On/Off 14. Bass increase 23 19. Play/Pause 17. Volume + 21 15. EQ: Press the button to adjust the equaliser� Press and hold the button to go back a track� 22 16. Controls And Functions EN Remote Control 13 14 15 16 17 18 19 20 13. Back step: Use in any play mode� 20. Bass decrease 21.
Mode: Switch between modes 22. Volume 18. EQ settings can be changed in AUX or Bluetooth mode to go forward a track 23. Forward step: Use in AUX or Bluetooth mode to turn the soundbar LED 24 light on and off. Treble increase 24. Treble decrease 2 Power On/Off 14. Bass increase 23 19. Play/Pause 17. Volume + 21 15. EQ: Press the button to adjust the equaliser� Press and hold the button to go back a track� 22 16. Controls And Functions EN Remote Control 13 14 15 16 17 18 19 20 13. Back step: Use in any play mode� 20. Bass decrease 21.

English User Manual
Page 6
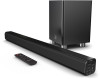
What's In The Box? EN Box Contents 27� Majority K2 Soundbar 28� Subwoofer 29� Remote Control 30� 3�5mm to 3�5mm Audio Cable 31� RCA Cable 32� HDMI Cable 33� Power Adapter x 2 27 28 29 30 31 32 33 4
What's In The Box? EN Box Contents 27� Majority K2 Soundbar 28� Subwoofer 29� Remote Control 30� 3�5mm to 3�5mm Audio Cable 31� RCA Cable 32� HDMI Cable 33� Power Adapter x 2 27 28 29 30 31 32 33 4

English User Manual
Page 7
To wall mount the K2 soundbar, the appropriate fittings for your application will automatically go into sleep mode after 180 minutes if the TV is off function Automatic Power Off Mode The Majority K2 Soundbar will need to a wall using the appropriate fittings for your wall type by using the wall mounting brackets positioned at the rear of the unit. As these differ between wall types the fittings are not included. EN Instructions Guide Wall Mounting and Auto-Power Off Wall Mounting The Majority K2 can be mounted to be sourced� Auto power off . 5
To wall mount the K2 soundbar, the appropriate fittings for your application will automatically go into sleep mode after 180 minutes if the TV is off function Automatic Power Off Mode The Majority K2 Soundbar will need to a wall using the appropriate fittings for your wall type by using the wall mounting brackets positioned at the rear of the unit. As these differ between wall types the fittings are not included. EN Instructions Guide Wall Mounting and Auto-Power Off Wall Mounting The Majority K2 can be mounted to be sourced� Auto power off . 5

English User Manual
Page 8
...� If your TV does not have 'output' RCA ports, please use an alternative connection method� RCA stereo audio cable Rear view of the soundbar via the 'LINE IN' input sockets (Ref.5). Connect the audio output cable to connect the TV's stereo RCA (L/R) audio output socket.
...� If your TV does not have 'output' RCA ports, please use an alternative connection method� RCA stereo audio cable Rear view of the soundbar via the 'LINE IN' input sockets (Ref.5). Connect the audio output cable to connect the TV's stereo RCA (L/R) audio output socket.

English User Manual
Page 9
Switch on the soundbar� Press the MODE button on the remote control (Ref.21) or on your audio source. Connect the ARC audio cable from the ARC input on the soundbar (Ref.7) to ARC or HDMI Audio� HDMI ARC cable Rear view of unit 7 Using the native controls on your connected device, ensure the audio settings are set to the ARC output on the unit (Ref.2) until ARC mode is selected. EN Instructions Guide Using the ARC Input You will need: an audio source with an ARC audio output and an HDMI ARC cable (included).
Switch on the soundbar� Press the MODE button on the remote control (Ref.21) or on your audio source. Connect the ARC audio cable from the ARC input on the soundbar (Ref.7) to ARC or HDMI Audio� HDMI ARC cable Rear view of unit 7 Using the native controls on your connected device, ensure the audio settings are set to the ARC output on the unit (Ref.2) until ARC mode is selected. EN Instructions Guide Using the ARC Input You will need: an audio source with an ARC audio output and an HDMI ARC cable (included).

English User Manual
Page 10
OPTICAL OPTICAL IN Opitcal cable 8 Rear view of unit When using the soundbar in Optical mode, or when using the soundbar with an App such as Netflix or Amazon Prime, you may experience sound issues if you will need... the audio settings are set the correct Audio settings for 'PCM/Dolby Digital/DTS/DTS Neo 2:5'. Connect the Optical cable from the soundbar (Ref.10) to PCM or Optical Audio� This setting can be found within your TV's sound settings, most likely under ....2) until OPTICAL mode is selected. Press the MODE button on the remote control (Ref.21) or on the soundbar.
OPTICAL OPTICAL IN Opitcal cable 8 Rear view of unit When using the soundbar in Optical mode, or when using the soundbar with an App such as Netflix or Amazon Prime, you may experience sound issues if you will need... the audio settings are set the correct Audio settings for 'PCM/Dolby Digital/DTS/DTS Neo 2:5'. Connect the Optical cable from the soundbar (Ref.10) to PCM or Optical Audio� This setting can be found within your TV's sound settings, most likely under ....2) until OPTICAL mode is selected. Press the MODE button on the remote control (Ref.21) or on the soundbar.
English User Manual
Page 11
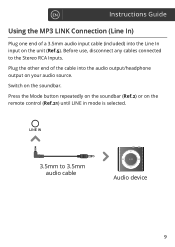
EN Instructions Guide Using the MP3 LINK Connection (Line In) Plug one end of the cable into the audio output/headphone output on your audio source� Switch on the soundbar� Press the Mode button repeatedly on the soundbar (Ref.2) or on the remote control (Ref.21) until LINE in mode is selected. 3.5mm to the Stereo RCA Inputs� Plug the other end of a 3.5mm audio input cable (included) into the Line In input on the unit (Ref.5). Before use, disconnect any cables connected to 3.5mm audio cable Audio device 9
EN Instructions Guide Using the MP3 LINK Connection (Line In) Plug one end of the cable into the audio output/headphone output on your audio source� Switch on the soundbar� Press the Mode button repeatedly on the soundbar (Ref.2) or on the remote control (Ref.21) until LINE in mode is selected. 3.5mm to the Stereo RCA Inputs� Plug the other end of a 3.5mm audio input cable (included) into the Line In input on the unit (Ref.5). Before use, disconnect any cables connected to 3.5mm audio cable Audio device 9

English User Manual
Page 13
...POWER button on the remote control (Ref.13). EN Instructions Guide Connecting the Soundbar and Subwoofer Please note: The soundbar and subwoofer must be successfully connected. The sub-woofer and soundbar will wirelessly connect to the soundbar for a surround sound experience. Follow by plugging the subwoofer into a power... source, and turning it ON via the power switch (Ref.26) The sub-woofer and soundbar should then automatically connect via wireless Bluetooth connectivity� If you to place the sub-woofer within the corner of the room to be...
...POWER button on the remote control (Ref.13). EN Instructions Guide Connecting the Soundbar and Subwoofer Please note: The soundbar and subwoofer must be successfully connected. The sub-woofer and soundbar will wirelessly connect to the soundbar for a surround sound experience. Follow by plugging the subwoofer into a power... source, and turning it ON via the power switch (Ref.26) The sub-woofer and soundbar should then automatically connect via wireless Bluetooth connectivity� If you to place the sub-woofer within the corner of the room to be...

English User Manual
Page 14
... and press the MODE button repeatedly on the remote control until in Bluetooth mode (Ref.21) or press the Mode button (Ref.2) repeatedly on the soundbar to connect, repeat the above steps. 12 Refer to the user manual for your specific device for the First Time Press the POWER button on... device should become unpaired or you find it is unable to enter Bluetooth mode� Using the native controls on your Bluetooth device, select the "Majority Ben Nevis II+" in your device requests a password, enter the default "0000".
... and press the MODE button repeatedly on the remote control until in Bluetooth mode (Ref.21) or press the Mode button (Ref.2) repeatedly on the soundbar to connect, repeat the above steps. 12 Refer to the user manual for your specific device for the First Time Press the POWER button on... device should become unpaired or you find it is unable to enter Bluetooth mode� Using the native controls on your Bluetooth device, select the "Majority Ben Nevis II+" in your device requests a password, enter the default "0000".

English User Manual
Page 15
....15/Ref.22). EN Instructions Guide FM Mode Press the MODE button on the remote control (Ref.21) or on the soundbar (Ref.2) until FM mode is complete, the soundbar will save the stations with receiving stations, complete another autoscan and adjust the aerial if required� 13 Please note: If you.../ Next' buttons on the remote (Ref.16) to begin searching for available FM stations. Ensure that the wire aerial on the back panel of the soundbar is extended.
....15/Ref.22). EN Instructions Guide FM Mode Press the MODE button on the remote control (Ref.21) or on the soundbar (Ref.2) until FM mode is complete, the soundbar will save the stations with receiving stations, complete another autoscan and adjust the aerial if required� 13 Please note: If you.../ Next' buttons on the remote (Ref.16) to begin searching for available FM stations. Ensure that the wire aerial on the back panel of the soundbar is extended.

English User Manual
Page 16
... Mode, Netflix or Amazon Prime Check that the power is switched on at the wall� Check that the power adaptor is switched on your soundbar, please refer to the following checklist� Observation Potential Cause/Solution No power/function No sound No sound in correct mode� Check that your...
... Mode, Netflix or Amazon Prime Check that the power is switched on at the wall� Check that the power adaptor is switched on your soundbar, please refer to the following checklist� Observation Potential Cause/Solution No power/function No sound No sound in correct mode� Check that your...

English User Manual
Page 17
You will also be valid� Once on www.majority.co.uk for an additional 24 months, free of charge. 15 EN Specification Power Supply Power Consumption Power Output (max) Frequency Response Bluetooth Dimension (WxHxD) ...�0 76.2 x 5.3 x 6.9 cm sound bar 28 x 19.7 x 19.7 cm sub woofer Support If you require further assistance with your new soundbar, please contact our support team on the Majority website: www.majority.co.uk/support Warranty All products come with a standard 12 month warranty� All items must be registered on the web...
You will also be valid� Once on www.majority.co.uk for an additional 24 months, free of charge. 15 EN Specification Power Supply Power Consumption Power Output (max) Frequency Response Bluetooth Dimension (WxHxD) ...�0 76.2 x 5.3 x 6.9 cm sound bar 28 x 19.7 x 19.7 cm sub woofer Support If you require further assistance with your new soundbar, please contact our support team on the Majority website: www.majority.co.uk/support Warranty All products come with a standard 12 month warranty� All items must be registered on the web...
