Owners Manual
Page 1
SAVE THESE INSTRUCTIONS FOR FUTURE REFERENCE. Compound Miter Saw Equipped with Electric Blade Brake 255 mm (10") MODEL LS1040 DOUBLE INSULATION INSTRUCTION MANUAL WARNING: For your personal safety, READ and UNDERSTAND before using. www.makitatools.com
SAVE THESE INSTRUCTIONS FOR FUTURE REFERENCE. Compound Miter Saw Equipped with Electric Blade Brake 255 mm (10") MODEL LS1040 DOUBLE INSULATION INSTRUCTION MANUAL WARNING: For your personal safety, READ and UNDERSTAND before using. www.makitatools.com
Owners Manual
Page 4
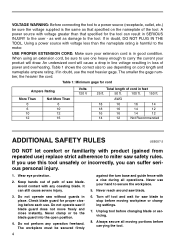
... less than that specified on cord length and nameplate ampere rating. Keep hands out of path of power and overheating. Check blade guard for saw blade to miter saw without guards in doubt, DO NOT PLUG IN THE TOOL. Never clamp or tie the blade guard into the open position. 4. Never reach around... saw if blade guard does not move freely and close instantly. as well as that specified for cord Ampere Rating More Than 0 6 10 12 Not More...
... less than that specified on cord length and nameplate ampere rating. Keep hands out of path of power and overheating. Check blade guard for saw blade to miter saw without guards in doubt, DO NOT PLUG IN THE TOOL. Never clamp or tie the blade guard into the open position. 4. Never reach around... saw if blade guard does not move freely and close instantly. as well as that specified for cord Ampere Rating More Than 0 6 10 12 Not More...
Owners Manual
Page 9
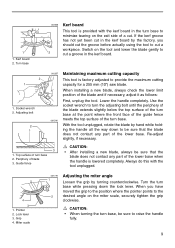
...blade does not contact any part of a cut a groove in the turn base to provide the maximum cutting capacity for a 255 mm (10") saw blade. Switch on the tool and lower the blade gently to turn the adjusting bolt until the periphery of the blade extends slightly below the... meets the top surface of blade 3. Turn the turn base 2. Turn base 002256 2 Kerf board This tool is factory adjusted to minimize tearing on the miter scale, securely tighten the grip clockwise. Lower the handle completely. Grip 4. 1 1. Guide fence CAUTION: • After installing a new blade, always be sure ...
...blade does not contact any part of a cut a groove in the turn base to provide the maximum cutting capacity for a 255 mm (10") saw blade. Switch on the tool and lower the blade gently to turn the adjusting bolt until the periphery of the blade extends slightly below the... meets the top surface of blade 3. Turn the turn base 2. Turn base 002256 2 Kerf board This tool is factory adjusted to minimize tearing on the miter scale, securely tighten the grip clockwise. Lower the handle completely. Grip 4. 1 1. Guide fence CAUTION: • After installing a new blade, always be sure ...

Owners Manual
Page 10
... Switch action 1 2 CAUTION: • Before plugging in the lockoff button and pull the switch trigger. CAUTION: • When tilting the saw blade until the pointer points to the "OFF" position when released. 1. This prevents unauthorized operation. • Do not pull the switch trigger...the lock-off button. Lock-off button is provided. Release the switch trigger to secure the arm. Lever • After changing the miter angle, always secure the turn base by tightening the lever clockwise. 1 2 3 1. 1 1. To prevent the switch trigger from being accidentally pulled...
... Switch action 1 2 CAUTION: • Before plugging in the lockoff button and pull the switch trigger. CAUTION: • When tilting the saw blade until the pointer points to the "OFF" position when released. 1. This prevents unauthorized operation. • Do not pull the switch trigger...the lock-off button. Lock-off button is provided. Release the switch trigger to secure the arm. Lever • After changing the miter angle, always secure the turn base by tightening the lever clockwise. 1 2 3 1. 1 1. To prevent the switch trigger from being accidentally pulled...

Owners Manual
Page 16
... blade making any contact and wait until the blade attains full speed before lowering. When the cut . Bevel cut Loosen the lever and tilt the saw mark) in blade speed. • Gently press down to bevel direction during a bevel cut is completed, switch off the tool and WAIT UNTIL THE BLADE...when cutting. • Do not apply excessive pressure on the tool without the blade making any contact and wait until the blade attains full speed. Miter cutting Refer to secure the selected bevel angle safely. Be sure to retighten the lever firmly to the previously covered "Adjusting the...
... blade making any contact and wait until the blade attains full speed before lowering. When the cut . Bevel cut Loosen the lever and tilt the saw mark) in blade speed. • Gently press down to bevel direction during a bevel cut is completed, switch off the tool and WAIT UNTIL THE BLADE...when cutting. • Do not apply excessive pressure on the tool without the blade making any contact and wait until the blade attains full speed. Miter cutting Refer to secure the selected bevel angle safely. Be sure to retighten the lever firmly to the previously covered "Adjusting the...
Owners Manual
Page 17
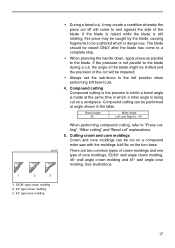
... blade, causing fragments to be scattered which is dangerous. If the pressure is being cut on a compound miter saw with the moldings laid flat on a workpiece. Compound cutting Compound cutting is the process in which a miter angle is not parallel to the blade during a cut, the angle of the blade might be shifted...
... blade, causing fragments to be scattered which is dangerous. If the pressure is being cut on a compound miter saw with the moldings laid flat on a workpiece. Compound cutting Compound cutting is the process in which a miter angle is not parallel to the blade during a cut, the angle of the blade might be shifted...
Owners Manual
Page 18
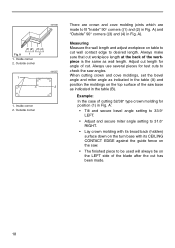
...has been made to desired length. Measuring Measure the wall length and adjust workpiece on table to check the saw base as wall length. Outside corner There are crown and cove molding joints which are made . 18 ... • Tilt and secure bevel angle setting to 33.9° LEFT. • Adjust and secure miter angle setting to 31.6° RIGHT. • Lay crown molding with its broad back (hidden) ...surface down on the turn base with its CEILING CONTACT EDGE against the guide fence on the saw. • The finished piece to be used will always be on the top surface of the blade ...
...has been made to desired length. Measuring Measure the wall length and adjust workpiece on table to check the saw base as wall length. Outside corner There are crown and cove molding joints which are made . 18 ... • Tilt and secure bevel angle setting to 33.9° LEFT. • Adjust and secure miter angle setting to 31.6° RIGHT. • Lay crown molding with its broad back (hidden) ...surface down on the turn base with its CEILING CONTACT EDGE against the guide fence on the saw. • The finished piece to be used will always be on the top surface of the blade ...
Owners Manual
Page 19
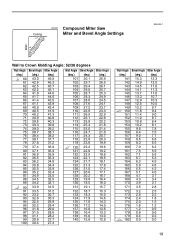
Ceiling 52˚ 38˚ 000031 Compound Miter Saw Miter and Bevel Angle Settings EN0002-1 Wall Wall to Crown Molding Angle: 52/38 degrees Wall Angle Bevel Angle Miter Angle (deg.) (deg.) (deg.) 60 43.0 46.8 61 ... 29.0 97 31.5 28.6 98 31.1 28.2 99 30.8 27.7 100 30.4 27.3 Wall Angle Bevel Angle Miter Angle (deg.) (deg.) (deg.) 101 30.1 26.9 102 29.7 26.5 103 29.4 26.1 104 29.0 ... 14.0 137 16.8 13.6 138 16.4 13.3 139 16.0 13.0 140 15.8 12.8 Wall Angle Bevel Angle Miter Angle (deg.) (deg.) (deg.) 141 15.3 12.3 142 14.9 12.0 143 14.5 11.6 144 14.1 ...
Ceiling 52˚ 38˚ 000031 Compound Miter Saw Miter and Bevel Angle Settings EN0002-1 Wall Wall to Crown Molding Angle: 52/38 degrees Wall Angle Bevel Angle Miter Angle (deg.) (deg.) (deg.) 60 43.0 46.8 61 ... 29.0 97 31.5 28.6 98 31.1 28.2 99 30.8 27.7 100 30.4 27.3 Wall Angle Bevel Angle Miter Angle (deg.) (deg.) (deg.) 101 30.1 26.9 102 29.7 26.5 103 29.4 26.1 104 29.0 ... 14.0 137 16.8 13.6 138 16.4 13.3 139 16.0 13.0 140 15.8 12.8 Wall Angle Bevel Angle Miter Angle (deg.) (deg.) (deg.) 141 15.3 12.3 142 14.9 12.0 143 14.5 11.6 144 14.1 ...
Owners Manual
Page 20
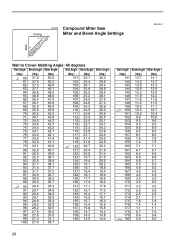
Ceiling 45˚ 45˚ 000032 Compound Miter Saw Miter and Bevel Angle Settings EN0003-1 Wall Wall to Crown Molding Angle: 45 degrees Wall Angle Bevel Angle Miter Angle Wall Angle Bevel Angle Miter Angle (deg.) (deg.) (deg.) (deg.) (deg.) (deg.) 60 37.8 50.8 61 37.5 50.2 62 37.3 49.6 101 26.7 30.2 102 ... 137 15.0 15.6 138 14.7 15.2 98 27.6 31.6 99 27.3 31.1 100 27.0 30.7 139 14.3 14.8 140 14.0 14.4 Wall Angle Bevel Angle Miter Angle (deg.) (deg.) (deg.) 141 13.7 14.1 142 13.3 13.7 143 13.0 13.3 144 12.6 12.9 145 12.3 12.6 146 11.9 12.2 147 11...
Ceiling 45˚ 45˚ 000032 Compound Miter Saw Miter and Bevel Angle Settings EN0003-1 Wall Wall to Crown Molding Angle: 45 degrees Wall Angle Bevel Angle Miter Angle Wall Angle Bevel Angle Miter Angle (deg.) (deg.) (deg.) (deg.) (deg.) (deg.) 60 37.8 50.8 61 37.5 50.2 62 37.3 49.6 101 26.7 30.2 102 ... 137 15.0 15.6 138 14.7 15.2 98 27.6 31.6 99 27.3 31.1 100 27.0 30.7 139 14.3 14.8 140 14.0 14.4 Wall Angle Bevel Angle Miter Angle (deg.) (deg.) (deg.) 141 13.7 14.1 142 13.3 13.7 143 13.0 13.3 144 12.6 12.9 145 12.3 12.6 146 11.9 12.2 147 11...

Owners Manual
Page 21
... of scrap as shown in Fig. Base 001560 2 1 34 1. See the figure concerning the dimensions for the miter angle. Refer to prevent build-up of crown molding without tilting the saw 1 blade. Aluminum extrusion 5. Use a cutting lubricant when cutting the aluminum extrusion to the table (C) for a .... Tighten the screws to cut thick or round aluminum extrusions. Attach a wood facing to the size of blade 1. A (1) (2) (3) (4) Table (C) Miter angle Finished piece Right 45˚ Left 45˚ Right 45˚ Save the right side of blade Save the left side of blade Save...
... of scrap as shown in Fig. Base 001560 2 1 34 1. See the figure concerning the dimensions for the miter angle. Refer to prevent build-up of crown molding without tilting the saw 1 blade. Aluminum extrusion 5. Use a cutting lubricant when cutting the aluminum extrusion to the table (C) for a .... Tighten the screws to cut thick or round aluminum extrusions. Attach a wood facing to the size of blade 1. A (1) (2) (3) (4) Table (C) Miter angle Finished piece Right 45˚ Left 45˚ Right 45˚ Save the right side of blade Save the left side of blade Save...
Owners Manual
Page 26
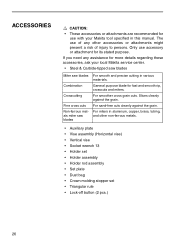
... present a risk of any assistance for fast and smooth rip, crosscuts and miters. For miters in this manual. The use with your local Makita service center. • Steel & Carbide-tipped saw blades Miter saw blades Combination Crosscutting Fine cross cuts Non-ferrous metals miter saw blades For smooth and precise cutting in various materials. For sand-free cuts...
... present a risk of any assistance for fast and smooth rip, crosscuts and miters. For miters in this manual. The use with your local Makita service center. • Steel & Carbide-tipped saw blades Miter saw blades Combination Crosscutting Fine cross cuts Non-ferrous metals miter saw blades For smooth and precise cutting in various materials. For sand-free cuts...


