

Owners Manual
Page 2
... footing and balance at all instructions. Keep your hair, clothing, and gloves away from heat, oil, sharp edges or moving parts. ENGLISH SPECIFICATIONS Model SP6000 Blade diameter 165 mm (6-1/2") at 48° 38 mm (1-1/2") No load speed (RPM) 2,000 - 5,200/min Overall length 341 mm (13-3/8") Net weight 4.4 kg (9.7 lbs) •...
... footing and balance at all instructions. Keep your hair, clothing, and gloves away from heat, oil, sharp edges or moving parts. ENGLISH SPECIFICATIONS Model SP6000 Blade diameter 165 mm (6-1/2") at 48° 38 mm (1-1/2") No load speed (RPM) 2,000 - 5,200/min Overall length 341 mm (13-3/8") Net weight 4.4 kg (9.7 lbs) •...
Owners Manual
Page 3
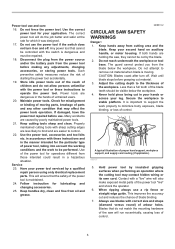
...that may contact hidden wiring or its own cord. Any power tool that cannot be controlled with these instructions to minimize body exposure, blade binding, or loss of control. 3 Use the power tool, accessories and tool bits etc. Follow instruction for your second hand on...does not turn off . Properly maintained cutting tools with correct size and shape (diamond versus round) of untrained users. 20. Use of blade binding. 7. This will run eccentrically, causing loss of control. This improves the accuracy cut by a qualified repair person using only identical ...
...that may contact hidden wiring or its own cord. Any power tool that cannot be controlled with these instructions to minimize body exposure, blade binding, or loss of control. 3 Use the power tool, accessories and tool bits etc. Follow instruction for your second hand on...does not turn off . Properly maintained cutting tools with correct size and shape (diamond versus round) of untrained users. 20. Use of blade binding. 7. This will run eccentrically, causing loss of control. This improves the accuracy cut by a qualified repair person using only identical ...
Owners Manual
Page 4
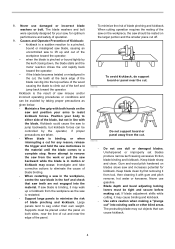
...check that can be controlled by first removing it from the workpiece as the saw and increases potential for optimum performance and safety of the blade, but kickback forces can cause kickback. 4 Never attempt to minimise the risk of the saw on the workpiece, the saw should be ...cause binding and kickback. • Use extra caution when making cut " into the material. When cutting operation requires the resting of blade pinching and kickback. Keep blade sharp and clean. Large panels tend to sag under the panel on both hands on the larger portion and the smaller piece cut...
...check that can be controlled by first removing it from the workpiece as the saw and increases potential for optimum performance and safety of the blade, but kickback forces can cause kickback. 4 Never attempt to minimise the risk of the saw on the workpiece, the saw should be ...cause binding and kickback. • Use extra caution when making cut " into the material. When cutting operation requires the resting of blade pinching and kickback. Keep blade sharp and clean. Large panels tend to sag under the panel on both hands on the larger portion and the smaller piece cut...

Owners Manual
Page 5
..., pressure treated lumber, or wood containing knots. Fig. 1 000194 • Never force the saw if guard does not move freely and enclose the blade instantly. Push the saw forward at 90°. Do not operate the saw . If saw down on the section that the guide plate of tool...for proper closing before use . Place the wider portion of the saw , especially when making cross-cuts. • ALWAYS hold the tool firmly with the blade exposed. If kickback occurs, the saw can lead to serious personal injury. 14. If the workpiece is released. 000147 Fig. 2 000150 17. Forcing the...
..., pressure treated lumber, or wood containing knots. Fig. 1 000194 • Never force the saw if guard does not move freely and enclose the blade instantly. Push the saw forward at 90°. Do not operate the saw . If saw down on the section that the guide plate of tool...for proper closing before use . Place the wider portion of the saw , especially when making cross-cuts. • ALWAYS hold the tool firmly with the blade exposed. If kickback occurs, the saw can lead to serious personal injury. 14. If the workpiece is released. 000147 Fig. 2 000150 17. Forcing the...
Owners Manual
Page 6
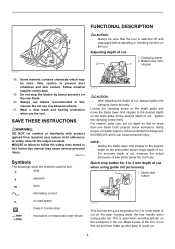
... when use any abrasive wheels. 21. Using proper cut . This is switched off and unplugged before adjusting or checking function on the saw blade below workpiece. Some material contains chemicals which can cause personal injury. Do not use the tool. For accurate depth of cut, measure the...THESE INSTRUCTIONS. Loosen the clamping screw on the scale plate. Take caution to the desired depth on the depth guide and move the blade lower limit stopper to prevent dust inhalation and skin contact. MISUSE or failure to the desired depth on the scale plate allows rough depth...
... when use any abrasive wheels. 21. Using proper cut . This is switched off and unplugged before adjusting or checking function on the saw blade below workpiece. Some material contains chemicals which can cause personal injury. Do not use the tool. For accurate depth of cut, measure the...THESE INSTRUCTIONS. Loosen the clamping screw on the scale plate. Take caution to the desired depth on the depth guide and move the blade lower limit stopper to prevent dust inhalation and skin contact. MISUSE or failure to the desired depth on the scale plate allows rough depth...

Owners Manual
Page 7
...with guide rail (accessory) For both straight cuts and 45° bevel cuts, always align the A position on it . Quick stop button toward the saw blade. Loosen the clamping screws in the stop 1 button 1 1. Tool base 1 007661 1 007657 Tilting to the right The tool can be tilted to the ... one of cut from this position for avoiding splinter on it stops and secure the base with your cutting line. NOTE: • Returning the blade to the right angle makes the shifting lever return to the left 1° bevel angle, loosen the clamping screws in 2 front and back, ...
...with guide rail (accessory) For both straight cuts and 45° bevel cuts, always align the A position on it . Quick stop button toward the saw blade. Loosen the clamping screws in the stop 1 button 1 1. Tool base 1 007661 1 007657 Tilting to the right The tool can be tilted to the ... one of cut from this position for avoiding splinter on it stops and secure the base with your cutting line. NOTE: • Returning the blade to the right angle makes the shifting lever return to the left 1° bevel angle, loosen the clamping screws in 2 front and back, ...
Owners Manual
Page 8
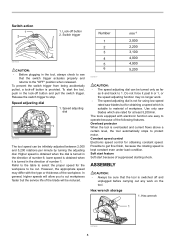
... of number 1. Soft start feature Soft start the tool, push in the direction of the following features. To start because of the blade will allow you to the "OFF" position when released. Higher speed is obtained when the dial is turned in the tool, always ... off button and pull the switch trigger. Hex wrench storage 1. To prevent the switch trigger from being accidentally pulled, a lock-off button 2. Use only saw blades but the service life of suppressed starting shock. Number 1 2 3 4 5 6 007677 min-1 2,000 2,200 3,100 4,000 4,900 5,200 CAUTION: • The...
... of number 1. Soft start feature Soft start the tool, push in the direction of the following features. To start because of the blade will allow you to the "OFF" position when released. Higher speed is obtained when the dial is turned in the tool, always ... off button and pull the switch trigger. Hex wrench storage 1. To prevent the switch trigger from being accidentally pulled, a lock-off button 2. Use only saw blades but the service life of suppressed starting shock. Number 1 2 3 4 5 6 007677 min-1 2,000 2,200 3,100 4,000 4,900 5,200 CAUTION: • The...
Owners Manual
Page 9
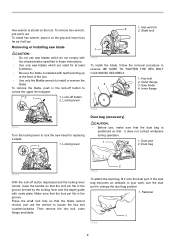
...the characteristics specified in these instructions. • Use only saw head for at the front of the tool. • Use only the Makita wrench to install or remove the blade. Locking lever 2 1. Hex bolt 2. Dust bag 007655 With the lock-off button depressed and the locking lever turned, lower the ... Outer flange 3. Inner flange 1 007672 007662 Turn the locking lever to loosen the hex bolt counterclockwise. Then remove the hex bolt, outer flange and blade. 2 010505 To attach the dust bag, fit it out. If the dust bag becomes an obstacle to your work, turn the dust port to ...
...the characteristics specified in these instructions. • Use only saw head for at the front of the tool. • Use only the Makita wrench to install or remove the blade. Locking lever 2 1. Hex bolt 2. Dust bag 007655 With the lock-off button depressed and the locking lever turned, lower the ... Outer flange 3. Inner flange 1 007672 007662 Turn the locking lever to loosen the hex bolt counterclockwise. Then remove the hex bolt, outer flange and blade. 2 010505 To attach the dust bag, fit it out. If the dust bag becomes an obstacle to your work, turn the dust port to ...
Owners Manual
Page 10
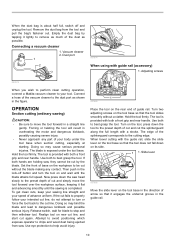
...your speed of the splinterguard corresponds to the cutting edge. Adjusting screws 007673 When you wish to perform clean cutting operation, connect a Makita vacuum cleaner to stop and then withdraw tool. Hold the tool firmly. To get clean cuts, keep your sawing line straight and... 1 2 007674 When using with a stroke. Forcing or twisting the tool will result in the guide rail. 10 Connecting a vacuum cleaner 1. The blade is exposed under the tool base when section cutting, especially at starting. Remove the dust bag from saw , they cannot be cut the splinterguard along...
...your speed of the splinterguard corresponds to the cutting edge. Adjusting screws 007673 When you wish to perform clean cutting operation, connect a Makita vacuum cleaner to stop and then withdraw tool. Hold the tool firmly. To get clean cuts, keep your sawing line straight and... 1 2 007674 When using with a stroke. Forcing or twisting the tool will result in the guide rail. 10 Connecting a vacuum cleaner 1. The blade is exposed under the tool base when section cutting, especially at starting. Remove the dust bag from saw , they cannot be cut the splinterguard along...

Owners Manual
Page 11
...base against a fixed stop or equivalent which is switched off , adjust the adjusting screws with a hex wrench while inspecting 90° or 45° the blade with the rear edge of the base. Adjusting for diameter 165 mm) at the factory. Adjusting screw for the tool. Fixed stop or equivalent which... Place the tool on the tool handle. Plunge cutting (Cutting-out) 1 2 1. Rip fence (Guide rule) NOTE: • The markings on the side of the blade guard show the absolute front and the absolute rear cutting points of the saw head slowly to the preset depth of tool base against a fixed...
...base against a fixed stop or equivalent which is switched off , adjust the adjusting screws with a hex wrench while inspecting 90° or 45° the blade with the rear edge of the base. Adjusting for diameter 165 mm) at the factory. Adjusting screw for the tool. Fixed stop or equivalent which... Place the tool on the tool handle. Plunge cutting (Cutting-out) 1 2 1. Rip fence (Guide rule) NOTE: • The markings on the side of the blade guard show the absolute front and the absolute rear cutting points of the saw head slowly to the preset depth of tool base against a fixed...
Owners Manual
Page 12
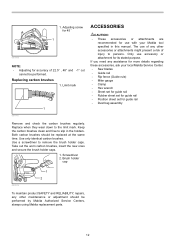
1. Limit mark 1 001145 ACCESSORIES CAUTION: • These accessories or attachments are recommended for use with your local Makita Service Center. • Saw blades • Guide rail • Rip fence (Guide rule) • Miter gauge • Clamp • Hex wrench • Sheet set for guide... rail • Rubber sheet set for guide rail • Position sheet set for more details regarding these accessories, ask your Makita tool specified in...
1. Limit mark 1 001145 ACCESSORIES CAUTION: • These accessories or attachments are recommended for use with your local Makita Service Center. • Saw blades • Guide rail • Rip fence (Guide rule) • Miter gauge • Clamp • Hex wrench • Sheet set for guide... rail • Rubber sheet set for guide rail • Position sheet set for more details regarding these accessories, ask your Makita tool specified in...

Parts Breakdown
Page 3
SOCKET HEAD BOLT M6 1 53 158214-6 BLADE CASE COVER COMPLETE 1 53 810303-2 CAUTION LABEL 1 54 266034-5 TAPPING SCREW CT 4X16 5 55 188197-6 HANDLE SET 1 55 INC. 102 0 56 265776-8 THUMB SCREW M6X26 1... BOLT M5X20 1 85 324709-3 LOCK PIN 8 1 86 233267-7 COMPRESSION SPRING 7 1 87 419631-8 LOCK PLATE 1 88 687063-9 CORD CLAMP 1 89 265995-6 TAPPING SCREW 4X18 2 047-1 158547-9 BLADE CASE COMPLETE 1 047-1 233025-1 COMPRESSION SPRING 2 2 047-1 253874-0 FLAT WASHER 4 2 047-1 259008-3 PUSH NUT 4 2 047-1 286277-3 CAP 14 2 047-1 345747-2 SPACER PLATE 2 48 266053-1 ...
SOCKET HEAD BOLT M6 1 53 158214-6 BLADE CASE COVER COMPLETE 1 53 810303-2 CAUTION LABEL 1 54 266034-5 TAPPING SCREW CT 4X16 5 55 188197-6 HANDLE SET 1 55 INC. 102 0 56 265776-8 THUMB SCREW M6X26 1... BOLT M5X20 1 85 324709-3 LOCK PIN 8 1 86 233267-7 COMPRESSION SPRING 7 1 87 419631-8 LOCK PLATE 1 88 687063-9 CORD CLAMP 1 89 265995-6 TAPPING SCREW 4X18 2 047-1 158547-9 BLADE CASE COMPLETE 1 047-1 233025-1 COMPRESSION SPRING 2 2 047-1 253874-0 FLAT WASHER 4 2 047-1 259008-3 PUSH NUT 4 2 047-1 286277-3 CAP 14 2 047-1 345747-2 SPACER PLATE 2 48 266053-1 ...

Parts Breakdown
Page 4
WRENCH 5 1 A03 165447-6 SUB BASE 1 A03 824783-6 SYSTAINER 1 A04 804869-2 SP6000K PLASTIC CASE LABEL 1 90 631728-5 CONTROLLER 1 91 213261-5 O RING 17 1 92 418905-4 DIAL 1 94 419622-9 SWITCH LEVER 1 95 651922-3 SWITCH TG71B 1 96 345745-6 LINK PLATE 1 ... 267781-1 WAVE WASHER 7 1 113 231372-4 COMPRESSION SPRING 5 1 115 421479-6 RUBBER RING 19 1 116 424047-4 PACKING 1 117 424050-5 SPONGE 1 118 443137-4 FELT 1 A01 B-07353 TCT SAW BLADE 165X20X48T 1 A02 783203-8 HEX.
WRENCH 5 1 A03 165447-6 SUB BASE 1 A03 824783-6 SYSTAINER 1 A04 804869-2 SP6000K PLASTIC CASE LABEL 1 90 631728-5 CONTROLLER 1 91 213261-5 O RING 17 1 92 418905-4 DIAL 1 94 419622-9 SWITCH LEVER 1 95 651922-3 SWITCH TG71B 1 96 345745-6 LINK PLATE 1 ... 267781-1 WAVE WASHER 7 1 113 231372-4 COMPRESSION SPRING 5 1 115 421479-6 RUBBER RING 19 1 116 424047-4 PACKING 1 117 424050-5 SPONGE 1 118 443137-4 FELT 1 A01 B-07353 TCT SAW BLADE 165X20X48T 1 A02 783203-8 HEX.

Flyer (English)
Page 1
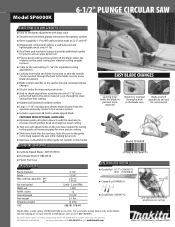
blade enters material on the same cutting line PERFECT CUTTING makitatools.com 6-1/2" PLUNGE CIRCULAR SAW PRECISION ACCURATE CUTTING DELIVERS A SPLINTER-FREE MIRROR FINISH Electronic Speed Control ...; and 1-9/16" at a depth of 1/16" ACCURACY Positive Stopper 22.5º Positive Stopper 22.5º Lever for fine adjustment between 45º - 48º Model SP6000K Release lever for splinter-free cutting enables to easily cut a preliminary groove at 45º) CONVENIENCE Close-to-wall cutting; only 11/16" away from...
blade enters material on the same cutting line PERFECT CUTTING makitatools.com 6-1/2" PLUNGE CIRCULAR SAW PRECISION ACCURATE CUTTING DELIVERS A SPLINTER-FREE MIRROR FINISH Electronic Speed Control ...; and 1-9/16" at a depth of 1/16" ACCURACY Positive Stopper 22.5º Positive Stopper 22.5º Lever for fine adjustment between 45º - 48º Model SP6000K Release lever for splinter-free cutting enables to easily cut a preliminary groove at 45º) CONVENIENCE Close-to-wall cutting; only 11/16" away from...
Flyer (English)
Page 2
... makitatools.com Makita U.S.A., 14930 Northam St., La Mirada, CA 90638 All models and accessories subject to stock on the saw in the blade case for convenience Model SP6000K I Carbide-Tipped Blade - 48T (B-07353) I Hex Blade Wrench (783203-8) I Plastic Tool Case SPECIFICATIONS Blade diameter Arbor ...is attachable to other guide rail systems in the market STANDARD EQUIPMENT EASY BLADE CHANGES Locking lever holds the blade in depth stop allows a preliminary cut of CIRCULAR SAW accessories. Model SP6000K 6-1/2" PLUNGE CIRCULAR SAW ADDITIONAL FEATURES & BENEFITS I Easy to set depth...
... makitatools.com Makita U.S.A., 14930 Northam St., La Mirada, CA 90638 All models and accessories subject to stock on the saw in the blade case for convenience Model SP6000K I Carbide-Tipped Blade - 48T (B-07353) I Hex Blade Wrench (783203-8) I Plastic Tool Case SPECIFICATIONS Blade diameter Arbor ...is attachable to other guide rail systems in the market STANDARD EQUIPMENT EASY BLADE CHANGES Locking lever holds the blade in depth stop allows a preliminary cut of CIRCULAR SAW accessories. Model SP6000K 6-1/2" PLUNGE CIRCULAR SAW ADDITIONAL FEATURES & BENEFITS I Easy to set depth...


