
Owners Manual
Page 3
...the risk of the power tool is dangerous and must be visible below the workpiece. Check for your second hand on and off . GEB031-2 CIRCULAR SAW SAFETY WARNINGS Danger: 1. Do not attempt to operate the power tool. Less than a full tooth of parts and any adjustments, changing accessories, ...coast after turn it was designed. 17. Use the correct power tool for misalignment or binding of moving . Power tools are holding the saw will also make exposed metal parts of power tool, taking into account the working conditions and the work properly to bind and are caused by...
...the risk of the power tool is dangerous and must be visible below the workpiece. Check for your second hand on and off . GEB031-2 CIRCULAR SAW SAFETY WARNINGS Danger: 1. Do not attempt to operate the power tool. Less than a full tooth of parts and any adjustments, changing accessories, ...coast after turn it was designed. 17. Use the correct power tool for misalignment or binding of moving . Power tools are holding the saw will also make exposed metal parts of power tool, taking into account the working conditions and the work properly to bind and are caused by...
Owners Manual
Page 4
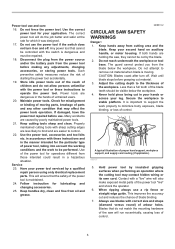
... blade sharp and clean. Keep blade clean by the operator, if proper precautions are not engaged into the material. Kickback could cause the saw misuse and/or incorrect operating procedures or conditions and can be avoided by the kerf closing down, the blade stalls and the motor reaction drives... washers or bolt. Causes and Operator Prevention of Kickback: − kickback is pinched or bound tightly by taking proper precautions as the saw is the result of the workpiece toward the operator. Investigate and take corrective actions to climb out of the kerf and jump back toward...
... blade sharp and clean. Keep blade clean by the operator, if proper precautions are not engaged into the material. Kickback could cause the saw misuse and/or incorrect operating procedures or conditions and can be avoided by the kerf closing down, the blade stalls and the motor reaction drives... washers or bolt. Causes and Operator Prevention of Kickback: − kickback is pinched or bound tightly by taking proper precautions as the saw is the result of the workpiece toward the operator. Investigate and take corrective actions to climb out of the kerf and jump back toward...

Owners Manual
Page 5
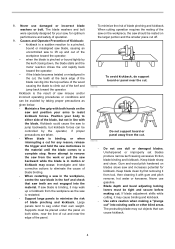
...for proper closing before use . Use extra caution when cutting damp wood, pressure treated lumber, or wood containing knots. Place the wider portion of the saw base on bench or floor. Guard may be serviced before each use . Always observe that the guide plate of accuracy, and possible kickback. Never .... 000147 Fig. 2 000150 17. DO NOT TRY TO HOLD SHORT PIECES BY HAND! NEVER place your body under the tool base or behind the saw to stop after switch is in blade speed. 15. As examples, Fig. 1 illustrates the RIGHT way to make sure that the blade cuts without ...
...for proper closing before use . Use extra caution when cutting damp wood, pressure treated lumber, or wood containing knots. Place the wider portion of the saw base on bench or floor. Guard may be serviced before each use . Always observe that the guide plate of accuracy, and possible kickback. Never .... 000147 Fig. 2 000150 17. DO NOT TRY TO HOLD SHORT PIECES BY HAND! NEVER place your body under the tool base or behind the saw to stop after switch is in blade speed. 15. As examples, Fig. 1 illustrates the RIGHT way to make sure that the blade cuts without ...
Owners Manual
Page 6
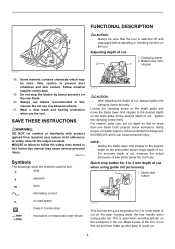
... or familiarity with product (gained from repeated use blades recommended in the cut . Adjusting depth of cut and then make another pass of saw blade. 20. NOTE: • Setting the blade lower limit stopper to safety rules for dangerous KICKBACKS which may cause serious personal injury....for 2 to reduce potential for the subject product. SAVE THESE INSTRUCTIONS. This is switched off and unplugged before adjusting or checking function on the saw blade below workpiece. For cleaner, safer cuts, set cut depth so that the tool is used for 2 to 3 mm first cut , ...
... or familiarity with product (gained from repeated use blades recommended in the cut . Adjusting depth of cut and then make another pass of saw blade. 20. NOTE: • Setting the blade lower limit stopper to safety rules for dangerous KICKBACKS which may cause serious personal injury....for 2 to reduce potential for the subject product. SAVE THESE INSTRUCTIONS. This is switched off and unplugged before adjusting or checking function on the saw blade below workpiece. For cleaner, safer cuts, set cut depth so that the tool is used for 2 to 3 mm first cut , ...

Owners Manual
Page 7
... of cut , just pull the button back. 1. To obtain the 2 to 3 mm depth of cut , push in the stop 1 button 1 1. Quick stop button toward the saw blade. Then, tilt the tool base until it . When using the tool without guide rail (accessory) For straight cuts, align the A position on it points...
... of cut , just pull the button back. 1. To obtain the 2 to 3 mm depth of cut , push in the stop 1 button 1 1. Quick stop button toward the saw blade. Then, tilt the tool base until it . When using the tool without guide rail (accessory) For straight cuts, align the A position on it points...
Owners Manual
Page 8
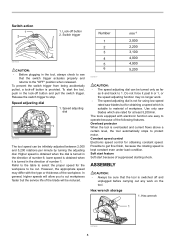
... are easy to material of the blade will be reduced. Refer to the table to select the proper speed for using low speed rated saw blades which is turned in the direction of the following features. Do not force it is switched off button is kept constant even under ... function may differ with electronic function are rated for obtaining constant speed. Hex wrench storage 1. Lock-off button and pull the switch trigger. Use only saw blades but the service life of workpiece. ASSEMBLY CAUTION: • Always be turned only as far as 6 and back to cut . In general, ...
... are easy to material of the blade will be reduced. Refer to the table to select the proper speed for using low speed rated saw blades which is turned in the direction of the following features. Do not force it is switched off button is kept constant even under ... function may differ with electronic function are rated for obtaining constant speed. Hex wrench storage 1. Lock-off button and pull the switch trigger. Use only saw blades but the service life of workpiece. ASSEMBLY CAUTION: • Always be turned only as far as 6 and back to cut . In general, ...
Owners Manual
Page 9
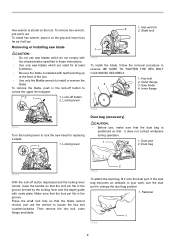
... which do not comply with the characteristics specified in these instructions. • Use only saw head for at the front of the tool. • Use only the Makita wrench to lock the saw blades which are rated for replacing a blade. 1. Hex wrench 2. Hex bolt 2. To remove the blade, push in the ... locking lever turned, lower the handle so that it will go. Locking lever 2 1. To remove hex wrench, just pull it onto the dust port. Saw blade 4. Dust port 2. Outer flange 3. Make sure that the blade cannot revolve and use , make sure that the dust bag is positioned so that ...
... which do not comply with the characteristics specified in these instructions. • Use only saw head for at the front of the tool. • Use only the Makita wrench to lock the saw blades which are rated for replacing a blade. 1. Hex wrench 2. Hex bolt 2. To remove the blade, push in the ... locking lever turned, lower the handle so that it will go. Locking lever 2 1. To remove hex wrench, just pull it onto the dust port. Saw blade 4. Dust port 2. Outer flange 3. Make sure that the blade cannot revolve and use , make sure that the dust bag is positioned so that ...
Owners Manual
Page 10
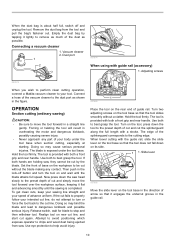
...uniform. The edge of guide rail. Dust port 1 2 007674 When using with both a front grip and rear handle. OPERATION Section cutting (ordinary sawing) CAUTION: • Be sure to move the tool forward over the workpiece surface, keeping it flat and advancing smoothly until the blade attains full ... under the tool base when section cutting, especially at starting. Adjusting screws 007673 When you wish to perform clean cutting operation, connect a Makita vacuum cleaner to your body under the tool base. Now press down on the tool base so that it lightly to remove as possible....
...uniform. The edge of guide rail. Dust port 1 2 007674 When using with both a front grip and rear handle. OPERATION Section cutting (ordinary sawing) CAUTION: • Be sure to move the tool forward over the workpiece surface, keeping it flat and advancing smoothly until the blade attains full ... under the tool base when section cutting, especially at starting. Adjusting screws 007673 When you wish to perform clean cutting operation, connect a Makita vacuum cleaner to your body under the tool base. Now press down on the tool base so that it lightly to remove as possible....

Owners Manual
Page 11
... allows you to observe the following instructions. Simply slide the rip fence up snugly against a fixed stop B A A B 007678 Guide device (accessories) Use of the saw head slowly to perform inspection or maintenance. Overturning the rip fence (guide rule) also works as a sub base for 90 ゚ 1 007667 11 Plunge cutting... one hand on the front grip and the other on the guide rail with the rear edge of the base. Now press down the saw blade (A for diameter 160 mm and B for accuracy of the workpiece and secure it is devised by an operator. Adjusting screw for the ...
... allows you to observe the following instructions. Simply slide the rip fence up snugly against a fixed stop B A A B 007678 Guide device (accessories) Use of the saw head slowly to perform inspection or maintenance. Overturning the rip fence (guide rule) also works as a sub base for 90 ゚ 1 007667 11 Plunge cutting... one hand on the front grip and the other on the guide rail with the rear edge of the base. Now press down the saw blade (A for diameter 160 mm and B for accuracy of the workpiece and secure it is devised by an operator. Adjusting screw for the ...
Owners Manual
Page 12
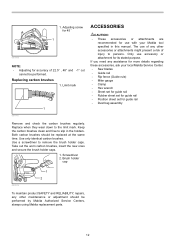
... wear down to slip in this manual. Keep the carbon brushes clean and free to the limit mark. Only use with your local Makita Service Center. • Saw blades • Guide rail • Rip fence (Guide rule) • Miter gauge • Clamp • Hex wrench •...SAFETY and RELIABILITY, repairs, any other accessories or attachments might present a risk of any assistance for more details regarding these accessories, ask your Makita tool specified in the holders. Adjusting screw for 45 ゚ 1 007668 NOTE: • Adjusting for guide rail • Dust bag assembly...
... wear down to slip in this manual. Keep the carbon brushes clean and free to the limit mark. Only use with your local Makita Service Center. • Saw blades • Guide rail • Rip fence (Guide rule) • Miter gauge • Clamp • Hex wrench •...SAFETY and RELIABILITY, repairs, any other accessories or attachments might present a risk of any assistance for more details regarding these accessories, ask your Makita tool specified in the holders. Adjusting screw for 45 ゚ 1 007668 NOTE: • Adjusting for guide rail • Dust bag assembly...

Parts Breakdown
Page 4
WRENCH 5 1 A03 165447-6 SUB BASE 1 A03 824783-6 SYSTAINER 1 A04 804869-2 SP6000K PLASTIC CASE LABEL 1 90 631728-5 CONTROLLER 1 91 213261-5 O RING 17 1 92 418905-4 DIAL 1 94 419622-9 SWITCH LEVER 1 95 651922-3 SWITCH TG71B 1 96 345745-6 LINK PLATE 1 ... 2 112 267781-1 WAVE WASHER 7 1 113 231372-4 COMPRESSION SPRING 5 1 115 421479-6 RUBBER RING 19 1 116 424047-4 PACKING 1 117 424050-5 SPONGE 1 118 443137-4 FELT 1 A01 B-07353 TCT SAW BLADE 165X20X48T 1 A02 783203-8 HEX.
WRENCH 5 1 A03 165447-6 SUB BASE 1 A03 824783-6 SYSTAINER 1 A04 804869-2 SP6000K PLASTIC CASE LABEL 1 90 631728-5 CONTROLLER 1 91 213261-5 O RING 17 1 92 418905-4 DIAL 1 94 419622-9 SWITCH LEVER 1 95 651922-3 SWITCH TG71B 1 96 345745-6 LINK PLATE 1 ... 2 112 267781-1 WAVE WASHER 7 1 113 231372-4 COMPRESSION SPRING 5 1 115 421479-6 RUBBER RING 19 1 116 424047-4 PACKING 1 117 424050-5 SPONGE 1 118 443137-4 FELT 1 A01 B-07353 TCT SAW BLADE 165X20X48T 1 A02 783203-8 HEX.

Flyer (English)
Page 1
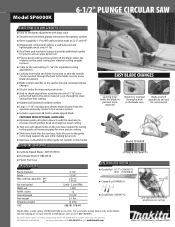
... line PERFECT CUTTING makitatools.com only 11/16" away from wall PRECISION Depth stopper for bevel angle (-1º) Straight or bevel cutting; 6-1/2" PLUNGE CIRCULAR SAW PRECISION ACCURATE CUTTING DELIVERS A SPLINTER-FREE MIRROR FINISH Electronic Speed Control Maintains Constant Speed Under Load for Smooth Cutting Variable Speed Dial Control (2,000 - 5,... groove at a depth of 1/16" ACCURACY Positive Stopper 22.5º Positive Stopper 22.5º Lever for fine adjustment between 45º - 48º Model SP6000K Release lever for splinter-free cutting enables to -wall cutting;
... line PERFECT CUTTING makitatools.com only 11/16" away from wall PRECISION Depth stopper for bevel angle (-1º) Straight or bevel cutting; 6-1/2" PLUNGE CIRCULAR SAW PRECISION ACCURATE CUTTING DELIVERS A SPLINTER-FREE MIRROR FINISH Electronic Speed Control Maintains Constant Speed Under Load for Smooth Cutting Variable Speed Dial Control (2,000 - 5,... groove at a depth of 1/16" ACCURACY Positive Stopper 22.5º Positive Stopper 22.5º Lever for fine adjustment between 45º - 48º Model SP6000K Release lever for splinter-free cutting enables to -wall cutting;
Flyer (English)
Page 2
... Electric brake for improved productivity I Built-in depth stop allows a preliminary cut through a hole attaches to the saw in the blade case for convenience Model SP6000K I Carbide-Tipped Blade - 48T (B-07353) I Hex Blade Wrench (783203-8) I Plastic Tool Case SPECIFICATIONS Blade ...186; I Guide Rule (165447-6) Cam adjustments minimize play for precise cutting Makita offers a wide variety of 1/16" to be replaced Wrench is cut of CIRCULAR SAW accessories. Model SP6000K 6-1/2" PLUNGE CIRCULAR SAW ADDITIONAL FEATURES & BENEFITS I Easy to set depth adjustment with large scale ...
... Electric brake for improved productivity I Built-in depth stop allows a preliminary cut through a hole attaches to the saw in the blade case for convenience Model SP6000K I Carbide-Tipped Blade - 48T (B-07353) I Hex Blade Wrench (783203-8) I Plastic Tool Case SPECIFICATIONS Blade ...186; I Guide Rule (165447-6) Cam adjustments minimize play for precise cutting Makita offers a wide variety of 1/16" to be replaced Wrench is cut of CIRCULAR SAW accessories. Model SP6000K 6-1/2" PLUNGE CIRCULAR SAW ADDITIONAL FEATURES & BENEFITS I Easy to set depth adjustment with large scale ...


