
XPH03Z Instruction Manual
Page 2
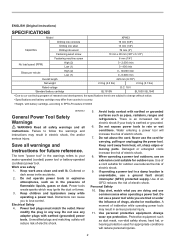
... development, the specifications herein are subject to change without notice. • Specifications and battery cartridge may differ from heat, oil, sharp edges or moving parts. Failure to your body is unavoidable, use reduces the risk of electric shock if your mains-operated (corded) power tool or battery-operated (cordless) power tool. Save all instructions. Work area safety 1. Keep work area clean and well lit. Keep children and bystanders away while operating a power tool. Power tool plugs must...
... development, the specifications herein are subject to change without notice. • Specifications and battery cartridge may differ from heat, oil, sharp edges or moving parts. Failure to your body is unavoidable, use reduces the risk of electric shock if your mains-operated (corded) power tool or battery-operated (cordless) power tool. Save all instructions. Work area safety 1. Keep work area clean and well lit. Keep children and bystanders away while operating a power tool. Power tool plugs must...
XPH03Z Instruction Manual
Page 3
... parts of untrained users. 21. Use of injury and fire. 26. Use of any adjusting key or wrench before making any adjustments, changing accessories, or storing power tools. Liquid ejected from oil and grease. GEB056-5 CORDLESS HAMMER DRIVER DRILL SAFETY WARNINGS 1. Keep cutting tools sharp and clean. Recharge only with specifically designated battery packs. Hold power tool by poorly maintained power tools. 22. If devices are connected and properly used with the power tool or these instructions to operate the power tool. Maintain power tools...
... parts of untrained users. 21. Use of injury and fire. 26. Use of any adjusting key or wrench before making any adjustments, changing accessories, or storing power tools. Liquid ejected from oil and grease. GEB056-5 CORDLESS HAMMER DRIVER DRILL SAFETY WARNINGS 1. Keep cutting tools sharp and clean. Recharge only with specifically designated battery packs. Hold power tool by poorly maintained power tools. 22. If devices are connected and properly used with the power tool or these instructions to operate the power tool. Maintain power tools...
XPH03Z Instruction Manual
Page 4
Hold the tool firmly. 7. Keep hands away from repeated use) replace strict adherence to safety rules for tool. ・ volts ・ direct current ・ no one is completely worn out. SAVE THESE INSTRUCTIONS. WARNING: DO NOT let comfort or familiarity with clear water and seek medical attention right away. If operating time has become excessively shorter, stop tool operation and charge the battery cartridge when...
Hold the tool firmly. 7. Keep hands away from repeated use) replace strict adherence to safety rules for tool. ・ volts ・ direct current ・ no one is completely worn out. SAVE THESE INSTRUCTIONS. WARNING: DO NOT let comfort or familiarity with clear water and seek medical attention right away. If operating time has become excessively shorter, stop tool operation and charge the battery cartridge when...
XPH03Z Instruction Manual
Page 5
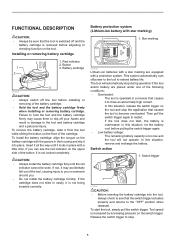
...; Always switch off power to the tool to the "OFF" position when released. Star marking 012128 Lithium-ion batteries with a little click. Switch action 1. Installing or removing battery cartridge 1. If not, it is increased by increasing pressure on the tool. Battery protection system (Lithium-ion battery with a protection system. Then pull the switch trigger again to become overloaded. Tool speed is not being inserted correctly. Release the switch trigger to stop the application that the switch trigger actuates...
...; Always switch off power to the tool to the "OFF" position when released. Star marking 012128 Lithium-ion batteries with a little click. Switch action 1. Installing or removing battery cartridge 1. If not, it is increased by increasing pressure on the tool. Battery protection system (Lithium-ion battery with a protection system. Then pull the switch trigger again to become overloaded. Tool speed is not being inserted correctly. Release the switch trigger to stop the application that the switch trigger actuates...
XPH03Z Instruction Manual
Page 6
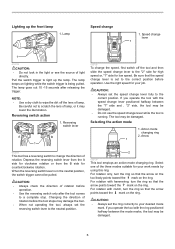
...; Always set the reversing switch lever to your work needs by using this ring. For rotation with the ring positioned halfway between the "1" side and , "2" side, the tool may be damaged. 6 Speed change lever fully to light up the front lamp 1. If you operate the tool with clutch, turn the ring so that the speed change lever to scratch the lens of rotation before operation. Pull the switch trigger to...
...; Always set the reversing switch lever to your work needs by using this ring. For rotation with the ring positioned halfway between the "1" side and , "2" side, the tool may be damaged. 6 Speed change lever fully to light up the front lamp 1. If you operate the tool with clutch, turn the ring so that the speed change lever to scratch the lens of rotation before operation. Pull the switch trigger to...
XPH03Z Instruction Manual
Page 7
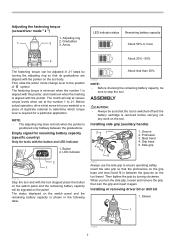
... remaining battery capacity (specific country) Only for a particular application. Button 2. Installing side grip (auxiliary handle) 2 1 3 4 5 1. Installing or removing driver bit or drill bit 1. First, slide the action mode change lever to 21. ASSEMBLY CAUTION: • Always be signaled on the switch panel and the remaining battery capacity is removed before carrying out any work on the switch panel and the remaining battery capacity will slip at various torque levels when set at the number...
... remaining battery capacity (specific country) Only for a particular application. Button 2. Installing side grip (auxiliary handle) 2 1 3 4 5 1. Installing or removing driver bit or drill bit 1. First, slide the action mode change lever to 21. ASSEMBLY CAUTION: • Always be signaled on the switch panel and the remaining battery capacity is removed before carrying out any work on the switch panel and the remaining battery capacity will slip at various torque levels when set at the number...

XPH03Z Instruction Manual
Page 8
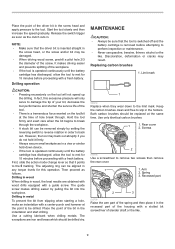
... the switch trigger. By repeating this operation. To install the hook, insert it points to the proper torque level for temporarily hanging the tool. Bit holder 2. When not using the driver bit, keep it in position and prevent it out. 1 002449 After drilling the hole, use the side grip (auxiliary handle) and firmly hold the tool by both side grip and switch handle during operations. Depth rod 2. Clamp screw 1 2 012712 The adjustable depth rod...
... the switch trigger. By repeating this operation. To install the hook, insert it points to the proper torque level for temporarily hanging the tool. Bit holder 2. When not using the driver bit, keep it in position and prevent it out. 1 002449 After drilling the hole, use the side grip (auxiliary handle) and firmly hold the tool by both side grip and switch handle during operations. Depth rod 2. Clamp screw 1 2 012712 The adjustable depth rod...
XPH03Z Instruction Manual
Page 9
... 2. Screws 2 012705 Use a screwdriver to the marking. Drilling in wood When drilling in any torque levels for this excessive pressure will not speed up the drilling. Replacing carbon brushes 1. Release the switch trigger as soon as follows. The adjusting ring can be damaged. • When driving wood screw, predrill a pilot hole 2/3 the diameter of the screw. Use only identical carbon brushes. 1 1. Place the point of the driver bit in the holders. In fact, this operation. The...
... 2. Screws 2 012705 Use a screwdriver to the marking. Drilling in wood When drilling in any torque levels for this excessive pressure will not speed up the drilling. Replacing carbon brushes 1. Release the switch trigger as soon as follows. The adjusting ring can be damaged. • When driving wood screw, predrill a pilot hole 2/3 the diameter of the screw. Use only identical carbon brushes. 1 1. Place the point of the driver bit in the holders. In fact, this operation. The...
XPH03Z Instruction Manual
Page 10
... Makita tool specified in the tool package as standard accessories. The use of any trouble develop during this manual. Only use with your local Makita Service Center. • Drill bits • Hammer drill bits • Screw bits • Blow-out bulb • Safety goggles • Makita genuine battery and charger • Grip assembly • Depth rod • Hook • Rubber pad assembly • Wool bonnet • Foam polishing pad • Battery protector MAKITA LIMITED ONE YEAR WARRANTY Warranty Policy Every Makita tool...
... Makita tool specified in the tool package as standard accessories. The use of any trouble develop during this manual. Only use with your local Makita Service Center. • Drill bits • Hammer drill bits • Screw bits • Blow-out bulb • Safety goggles • Makita genuine battery and charger • Grip assembly • Depth rod • Hook • Rubber pad assembly • Wool bonnet • Foam polishing pad • Battery protector MAKITA LIMITED ONE YEAR WARRANTY Warranty Policy Every Makita tool...
XPH03Z Parts Breakdown
Page 2
... DRILL CHUCK 13 TAPPING SCREW 4X18 GEAR ASSEMBLY YOKE UNIT ARMATURE BRUSH HOLDER COMPLETE CARBON BRUSH CB-440 (195021-6) RUBBER PIN 4 REAR COVER TAPPING SCREW BIND PT 3X16 TERMINAL SEAL SPONGE A PAN HEAD SCREW M3X10 SPONGE B HEAT SINK HOUSING SET RUBBER PIN 6 HEX. LOCKING NUT M4-7 INC. 2 GRIP ASSEMBLY GRIP 36 COMPLETE SQUARE BOLT M8X100 GRIP SPRING 60 GRIP BASE 60 THUMB SCREW M5X10 HEX. LOCKING NUT M4-7 INC. 28 TAPPING SCREW BIND PT 3X16 SPEED CHANGE LEVER ASSEMBLY...
... DRILL CHUCK 13 TAPPING SCREW 4X18 GEAR ASSEMBLY YOKE UNIT ARMATURE BRUSH HOLDER COMPLETE CARBON BRUSH CB-440 (195021-6) RUBBER PIN 4 REAR COVER TAPPING SCREW BIND PT 3X16 TERMINAL SEAL SPONGE A PAN HEAD SCREW M3X10 SPONGE B HEAT SINK HOUSING SET RUBBER PIN 6 HEX. LOCKING NUT M4-7 INC. 2 GRIP ASSEMBLY GRIP 36 COMPLETE SQUARE BOLT M8X100 GRIP SPRING 60 GRIP BASE 60 THUMB SCREW M5X10 HEX. LOCKING NUT M4-7 INC. 28 TAPPING SCREW BIND PT 3X16 SPEED CHANGE LEVER ASSEMBLY...

XPH03Z Parts Breakdown
Page 3
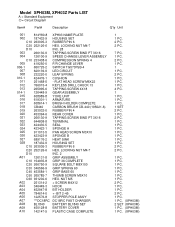
A10 C10 419216-0 A10 C20 417724-5 A10 C30 419268-1 A10 C40 419269-9 A10 C50 324667-3 E01 802J50-9 D01 652045-0 HANDLE LATCH PLASTIC CASE LID PLATE SHAFT CAUTION LABEL +PAN HEAD SCREW M3.5X5 1 PC. 2 PC. 1 PC. 5 PC. 1 PC. 1 2 PC.
A10 C10 419216-0 A10 C20 417724-5 A10 C30 419268-1 A10 C40 419269-9 A10 C50 324667-3 E01 802J50-9 D01 652045-0 HANDLE LATCH PLASTIC CASE LID PLATE SHAFT CAUTION LABEL +PAN HEAD SCREW M3.5X5 1 PC. 2 PC. 1 PC. 5 PC. 1 PC. 1 2 PC.


