
PM7005 Owner Manual - English
Page 2
... panel Rear panel Remote control unit Connections Connecting speakers Speaker connection Connecting a playback device Connecting a recording device 3 Playback 4 4 Turning the power on 27 5 Turning speaker output on 28 5 Selecting the input source 28 6 Adjusting the volume 28 6 Turning off the sound temporarily (Muting) 28 7 Adjusting the tone 28 7 Playing CDs 29 10 Connecting and playing back from a computer (USB-DAC) 30 12 Connect and playback from a digital device (Coaxial/Optical) 37 Recording 37 Settings 18 19 Setting the Auto Standby mode 38 20 Turning...
... panel Rear panel Remote control unit Connections Connecting speakers Speaker connection Connecting a playback device Connecting a recording device 3 Playback 4 4 Turning the power on 27 5 Turning speaker output on 28 5 Selecting the input source 28 6 Adjusting the volume 28 6 Turning off the sound temporarily (Muting) 28 7 Adjusting the tone 28 7 Playing CDs 29 10 Connecting and playing back from a computer (USB-DAC) 30 12 Connect and playback from a digital device (Coaxial/Optical) 37 Recording 37 Settings 18 19 Setting the Auto Standby mode 38 20 Turning...

PM7005 Owner Manual - English
Page 5
... left and right channels symmetrically. 0 CD direct buffer amplifier An input buffer amplifier exclusive for highend models. It is a high-speed amplifier using discrete components, is adopted in the pre-amplifier and power amplifier. The HDAM®SA3 is a high-speed buffer amplifier made with a newly developed 15000 μF large capacity condenser that incorporates the concepts of the power amplifier section. Settings Tips Appendix 0 Short-power-line layout...
... left and right channels symmetrically. 0 CD direct buffer amplifier An input buffer amplifier exclusive for highend models. It is a high-speed amplifier using discrete components, is adopted in the pre-amplifier and power amplifier. The HDAM®SA3 is a high-speed buffer amplifier made with a newly developed 15000 μF large capacity condenser that incorporates the concepts of the power amplifier section. Settings Tips Appendix 0 Short-power-line layout...

PM7005 Owner Manual - English
Page 6
... and output as a D/A convertor Digital audio signals input from a computer via USB connection. 0 Install the dedicated driver software onto the computer before use. Easy operation 0 Remote control compatible with CD players and network audio players The remote control provided with a USB-DAC function that supports DSD signals and 192 kHz/24 bit PCM signals. You can enjoy high-quality audio playback from the D/A converter built in addition to this unit's D/A converter. Contents Connections Playback Settings...
... and output as a D/A convertor Digital audio signals input from a computer via USB connection. 0 Install the dedicated driver software onto the computer before use. Easy operation 0 Remote control compatible with CD players and network audio players The remote control provided with a USB-DAC function that supports DSD signals and 192 kHz/24 bit PCM signals. You can enjoy high-quality audio playback from the D/A converter built in addition to this unit's D/A converter. Contents Connections Playback Settings...

PM7005 Owner Manual - English
Page 8
... button (X) This turns the power on : Off 0 Standby : Red 0 Power off : Off Front panel Rear panel Remote control 8 unit Index E BASS control knob This setting adjusts the volume level for the bass. (v p. 28) F Speaker output button/indicator (SPEAKERS) This switches speaker output on/off. (v p. 28) Indicates the status of the unit's as follows: 0 Speaker output on: Blue 0 Speaker output off: Off G MUTE button / indicator This switches the mute on/off. (v p. 28) 0 Mute on: Red 0 Mute off : Off 0 When the protection circuit is activated : Red (blinking) C Input source select...
... button (X) This turns the power on : Off 0 Standby : Red 0 Power off : Off Front panel Rear panel Remote control 8 unit Index E BASS control knob This setting adjusts the volume level for the bass. (v p. 28) F Speaker output button/indicator (SPEAKERS) This switches speaker output on/off. (v p. 28) Indicates the status of the unit's as follows: 0 Speaker output on: Blue 0 Speaker output off: Off G MUTE button / indicator This switches the mute on/off. (v p. 28) 0 Mute on: Red 0 Mute off : Off 0 When the protection circuit is activated : Red (blinking) C Input source select...

PM7005 Owner Manual - English
Page 9
... 0 ANALOG MODE off: Off J SOURCE DIRECT button/indicator This turns SOURCE DIRECT mode on/off. (v p. 29) 0 SOURCE DIRECT mode on: Blue 0 SOURCE DIRECT mode off: Off Settings Tips Appendix K BALANCE control knob This adjusts the balance of the volume output from the left and right speakers. (v p. 28) L Input indicator (v p. 28) M Remote control sensor This receives signals from the remote control unit. (v p. 4) N VOLUME knob These adjust the volume level. (v p. 28) 5, 8 and a can be adjusted when 0 is off (SOURCE DIRECT mode is off). Contents Connections Playback . Front panel Rear...
... 0 ANALOG MODE off: Off J SOURCE DIRECT button/indicator This turns SOURCE DIRECT mode on/off. (v p. 29) 0 SOURCE DIRECT mode on: Blue 0 SOURCE DIRECT mode off: Off Settings Tips Appendix K BALANCE control knob This adjusts the balance of the volume output from the left and right speakers. (v p. 28) L Input indicator (v p. 28) M Remote control sensor This receives signals from the remote control unit. (v p. 4) N VOLUME knob These adjust the volume level. (v p. 28) 5, 8 and a can be adjusted when 0 is off (SOURCE DIRECT mode is off). Contents Connections Playback . Front panel Rear...

PM7005 Owner Manual - English
Page 11
... player input connectors (NETWORK) Used to connect a network audio player. (v p. 20) G Tuner input connectors (TUNER) Used to connect a tuner. (v p. 20) H Recorder input/output connectors (RECORDER) Used to connect the input/output connector of a recorder. (v p. 21) I Speaker terminals (SPEAKERS) Used to connect speakers. (v p. 18) J Remote control input/output connectors (REMOTE CONTROL) Used to connect to a Marantz audio device that is compatible with the remote control function. (v p. 24) Front panel Rear panel Remote control 11 unit Index Contents Connections Playback Settings...
... player input connectors (NETWORK) Used to connect a network audio player. (v p. 20) G Tuner input connectors (TUNER) Used to connect a tuner. (v p. 20) H Recorder input/output connectors (RECORDER) Used to connect the input/output connector of a recorder. (v p. 21) I Speaker terminals (SPEAKERS) Used to connect speakers. (v p. 18) J Remote control input/output connectors (REMOTE CONTROL) Used to connect to a Marantz audio device that is compatible with the remote control function. (v p. 24) Front panel Rear panel Remote control 11 unit Index Contents Connections Playback Settings...

PM7005 Owner Manual - English
Page 13
...CD player operations The supplied remote control can be used to control a Marantz CD player in addition to the CD player operation mode. 0 REMOTE MODE CD button lights for approximately two seconds. A POWER button (X) B Remote mode select button (REMOTE MODE CD) C Skip buttons (8, 9) D Stop button (n) E Input source select button (INPUT) F Information button (INFO) G TIME button H Cursor buttons (uio p) I Program button (PROG) J Number buttons (0 - 9) K DIMMER button L RANDOM button (P) M SOUND MODE button Q1 Q2 . To operate a Marantz CD player, press the REMOTE MODE CD button to switch the...
...CD player operations The supplied remote control can be used to control a Marantz CD player in addition to the CD player operation mode. 0 REMOTE MODE CD button lights for approximately two seconds. A POWER button (X) B Remote mode select button (REMOTE MODE CD) C Skip buttons (8, 9) D Stop button (n) E Input source select button (INPUT) F Information button (INFO) G TIME button H Cursor buttons (uio p) I Program button (PROG) J Number buttons (0 - 9) K DIMMER button L RANDOM button (P) M SOUND MODE button Q1 Q2 . To operate a Marantz CD player, press the REMOTE MODE CD button to switch the...

PM7005 Owner Manual - English
Page 15
... audio player in addition to the network audio player operation mode. 0 REMOTE MODE NET button lights for approximately two seconds. A POWER button (X) B Remote mode select button (REMOTE MODE NET) C Skip buttons (8, 9) D Stop button (n) E Input source select button (INPUT) F Information button (INFO) G TOP MENU button H Cursor buttons (uio p) I FAVORITES button J Number buttons (0 - 9, +10) K DIMMER button L RANDOM button (P) . Front panel Rear panel Remote control 15 unit Index To operate a Marantz network audio player, press the REMOTE MODE NET button to switch the remote control...
... audio player in addition to the network audio player operation mode. 0 REMOTE MODE NET button lights for approximately two seconds. A POWER button (X) B Remote mode select button (REMOTE MODE NET) C Skip buttons (8, 9) D Stop button (n) E Input source select button (INPUT) F Information button (INFO) G TOP MENU button H Cursor buttons (uio p) I FAVORITES button J Number buttons (0 - 9, +10) K DIMMER button L RANDOM button (P) . Front panel Rear panel Remote control 15 unit Index To operate a Marantz network audio player, press the REMOTE MODE NET button to switch the remote control...

PM7005 Owner Manual - English
Page 17
... Settings Tips Appendix o Contents Connecting speakers 18 Connecting a playback device 20 Connecting a recording device 21 Connecting to connect. o Cables used for connections Provide necessary cables according to the devices you want to a device with digital audio output connectors 22 Connecting a PC or Mac 23 Connecting devices with remote control connectors 24 Connecting the power cord 25 NOTE 0 Do not plug in humming or noise. Speaker cable Audio cable L L R R Remote connector cable Optical cable Coaxial digital cable USB cable Front panel Rear panel...
... Settings Tips Appendix o Contents Connecting speakers 18 Connecting a playback device 20 Connecting a recording device 21 Connecting to connect. o Cables used for connections Provide necessary cables according to the devices you want to a device with digital audio output connectors 22 Connecting a PC or Mac 23 Connecting devices with remote control connectors 24 Connecting the power cord 25 NOTE 0 Do not plug in humming or noise. Speaker cable Audio cable L L R R Remote connector cable Optical cable Coaxial digital cable USB cable Front panel Rear panel...

PM7005 Owner Manual - English
Page 18
... the speaker cable, then either twist the core wire tightly or terminate it. Front panel Rear panel Remote control 18 unit Index . .. . . . Doing so could result in electric shock. 0 Use speakers with impedance of 4 - 8 Ω/ohms. o Connecting the speaker cables Carefully check the left (L) and right (R) channels and + (red) and (white) polarities on the speakers being connected to loosen it . Spade lug connector 2 Turn the speaker terminal counterclockwise to this unit's power plug...
... the speaker cable, then either twist the core wire tightly or terminate it. Front panel Rear panel Remote control 18 unit Index . .. . . . Doing so could result in electric shock. 0 Use speakers with impedance of 4 - 8 Ω/ohms. o Connecting the speaker cables Carefully check the left (L) and right (R) channels and + (red) and (white) polarities on the speakers being connected to loosen it . Spade lug connector 2 Turn the speaker terminal counterclockwise to this unit's power plug...

PM7005 Owner Manual - English
Page 23
... driver software and audio player software are installed . 0 Install the dedicated driver software on the computer to enable communication between the computer and this unit in order to the computer. Front panel Rear panel Remote control 23 unit Index NOTE Use a cable that is 3 m or less to connect to playback high-resolution sound source (DSD signal or 192 kHz/24 bit PCM signal) audio available on the internet. (v p. 30) 0 Download the driver...
... driver software and audio player software are installed . 0 Install the dedicated driver software on the computer to enable communication between the computer and this unit in order to the computer. Front panel Rear panel Remote control 23 unit Index NOTE Use a cable that is 3 m or less to connect to playback high-resolution sound source (DSD signal or 192 kHz/24 bit PCM signal) audio available on the internet. (v p. 30) 0 Download the driver...

PM7005 Owner Manual - English
Page 26
Contents Connections Playback o Contents Turning the power on 27 Turning speaker output on 28 Selecting the input source 28 Adjusting the volume 28 Turning off the sound temporarily (Muting) 28 Adjusting the tone 28 Playing CDs 29 Connecting and playing back from a computer (USB-DAC) 30 Connect and playback from a digital device (Coaxial/Optical) 37 Recording 37 Settings Tips Appendix Front panel Rear panel Remote control 26 unit Index
Contents Connections Playback o Contents Turning the power on 27 Turning speaker output on 28 Selecting the input source 28 Adjusting the volume 28 Turning off the sound temporarily (Muting) 28 Adjusting the tone 28 Playing CDs 29 Connecting and playing back from a computer (USB-DAC) 30 Connect and playback from a digital device (Coaxial/Optical) 37 Recording 37 Settings Tips Appendix Front panel Rear panel Remote control 26 unit Index

PM7005 Owner Manual - English
Page 29
... reconnect the USB cable or restart the audio player on the speaker output. If the unit cannot communicate with the computer after turning ANALOG MODE off . The SPEAKERS indicator lights. 3 Press the input source select button (CD) to switch the input source to adjust the volume. The ANALOG MODE indicator lights. 0 A digital input source (COAXIAL, OPTICAL, USB-DAC) cannot be selected when ANALOG MODE is activated for about 4 seconds. Front panel Rear panel Remote control 29 unit Index The SOURCE DIRECT indicator lights. This prevents the analog signal circuit from...
... reconnect the USB cable or restart the audio player on the speaker output. If the unit cannot communicate with the computer after turning ANALOG MODE off . The SPEAKERS indicator lights. 3 Press the input source select button (CD) to switch the input source to adjust the volume. The ANALOG MODE indicator lights. 0 A digital input source (COAXIAL, OPTICAL, USB-DAC) cannot be selected when ANALOG MODE is activated for about 4 seconds. Front panel Rear panel Remote control 29 unit Index The SOURCE DIRECT indicator lights. This prevents the analog signal circuit from...

PM7005 Owner Manual - English
Page 30
... panel Rear panel Remote control 30 unit Index o Computer (recommended system) OS 0 Windows® Vista, Windows 7 or Windows 8 0 Mac OS X 10.6.3 or later USB 0 USB 2.0: USB High speed/USB Audio Class Ver.2.0 0 DSD is switched on before installation, disconnect the USB and restart the computer. 2 Download the dedicated driver from a computer (USB-DAC) You can use whichever commercially available or downloadable player software...
... panel Rear panel Remote control 30 unit Index o Computer (recommended system) OS 0 Windows® Vista, Windows 7 or Windows 8 0 Mac OS X 10.6.3 or later USB 0 USB 2.0: USB High speed/USB Audio Class Ver.2.0 0 DSD is switched on before installation, disconnect the USB and restart the computer. 2 Download the dedicated driver from a computer (USB-DAC) You can use whichever commercially available or downloadable player software...
PM7005 Owner Manual - English
Page 34
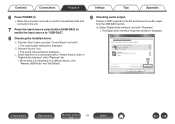
... Set Default Properties 1- %CPEGN #RRN[ . A Click the "Start" button and click "Control Panel" on , the PC automatically finds and connects to the unit. 7 Press the input source select button (USB-DAC) to switch the input source to "Default Device" under in "Digital Audio Interface" of the "Playback" tab. 0 When there is a checkmark for a different device, click "Marantz USB Audio" and "Set Default". 9 Checking audio output. B Click the "Sound" icon. 0 The sound menu window is displayed. Front panel Rear panel Remote control...
... Set Default Properties 1- %CPEGN #RRN[ . A Click the "Start" button and click "Control Panel" on , the PC automatically finds and connects to the unit. 7 Press the input source select button (USB-DAC) to switch the input source to "Default Device" under in "Digital Audio Interface" of the "Playback" tab. 0 When there is a checkmark for a different device, click "Marantz USB Audio" and "Set Default". 9 Checking audio output. B Click the "Sound" icon. 0 The sound menu window is displayed. Front panel Rear panel Remote control...

PM7005 Owner Manual - English
Page 36
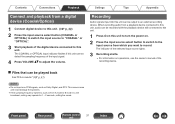
...-DAC" input indicator lights. 2 Start playback on the computer. NOTE 0 Perform operations such as a D/A converter, sound is not output from the computer's speakers. 0 If the computer is disconnected from this unit cannot detect the sampling frequency of the input signal. For the connection procedure, refer to the "Connecting a PC or Mac" (v p. 23) section. 1 Press the input source select button (USB-DAC) to switch the input source to a computer...
...-DAC" input indicator lights. 2 Start playback on the computer. NOTE 0 Perform operations such as a D/A converter, sound is not output from the computer's speakers. 0 If the computer is disconnected from this unit cannot detect the sampling frequency of the input signal. For the connection procedure, refer to the "Connecting a PC or Mac" (v p. 23) section. 1 Press the input source select button (USB-DAC) to switch the input source to a computer...
PM7005 Owner Manual - English
Page 37
... the input source select button to switch to the input source from A mode to adjust the volume. Front panel Rear panel Remote control 37 unit Index Recording Audio signals input into this unit can be output to this unit. NOTE 0 Do not input non-PCM signals, such as from which you want to record. This causes noise and could damage the speakers. 0 If the sampling frequency switches, such as Dolby Digital, and DTS. When recording audio from a playback device connected...
... the input source select button to switch to the input source from A mode to adjust the volume. Front panel Rear panel Remote control 37 unit Index Recording Audio signals input into this unit can be output to this unit. NOTE 0 Do not input non-PCM signals, such as from which you want to record. This causes noise and could damage the speakers. 0 If the sampling frequency switches, such as Dolby Digital, and DTS. When recording audio from a playback device connected...

PM7005 Owner Manual - English
Page 38
...Contents Connections Playback Setting the Auto Standby mode You can set to off . Power indicator SOURCE DIRECT Settings Tips Appendix Turning Auto Standby mode off 1 Press and hold SOURCE DIRECT for 30 minutes when there is set the unit to automatically switch to standby mode if the unit is not operated for more than 5 seconds to turn the Auto Standby mode off by default. Front panel Rear panel Remote control 38 unit Index The power indicator flashes once. Auto Standby mode is no audio input (Auto Standby mode). The power indicator flashes three times. .
...Contents Connections Playback Setting the Auto Standby mode You can set to off . Power indicator SOURCE DIRECT Settings Tips Appendix Turning Auto Standby mode off 1 Press and hold SOURCE DIRECT for 30 minutes when there is set the unit to automatically switch to standby mode if the unit is not operated for more than 5 seconds to turn the Auto Standby mode off by default. Front panel Rear panel Remote control 38 unit Index The power indicator flashes once. Auto Standby mode is no audio input (Auto Standby mode). The power indicator flashes three times. .

PM7005 Owner Manual - English
Page 47
...; (Ohms). Protection circuit This is smaller. Front panel Rear panel Remote control 47 unit Index Source direct Playback with higher fidelity to the source becomes possible, as an overload, excess voltage occurs or over temperature for any reason. Greater power can be obtained when this unit, the power indicator blinks red and the unit switches to standby mode. Contents Connections Playback D/A converter o Specifications of supported files n USB-DAC DSD (2-channel) Linear PCM (2-channel...
...; (Ohms). Protection circuit This is smaller. Front panel Rear panel Remote control 47 unit Index Source direct Playback with higher fidelity to the source becomes possible, as an overload, excess voltage occurs or over temperature for any reason. Greater power can be obtained when this unit, the power indicator blinks red and the unit switches to standby mode. Contents Connections Playback D/A converter o Specifications of supported files n USB-DAC DSD (2-channel) Linear PCM (2-channel...

PM7005 Specification Sheet
Page 1
... speaker terminals SPKT-1 • Phono equalizer (MM) • Digital optical and coaxial inputs with 192kHz/24bit D/A conversion • USB-B input for PCM 192kHz/24bit and DSD Audio Streaming (DSD2.8 & DSD5.6) • Signal isolator for DAC Mode operation • High quality and high current DA-Converter CS4398 • "Analog Amp Mode" for audiophiles wanting both excellent music quality and flexible operation, which means you can enjoy your vinyls. PM7005 INTEGRATED AMPLIFIER...
... speaker terminals SPKT-1 • Phono equalizer (MM) • Digital optical and coaxial inputs with 192kHz/24bit D/A conversion • USB-B input for PCM 192kHz/24bit and DSD Audio Streaming (DSD2.8 & DSD5.6) • Signal isolator for DAC Mode operation • High quality and high current DA-Converter CS4398 • "Analog Amp Mode" for audiophiles wanting both excellent music quality and flexible operation, which means you can enjoy your vinyls. PM7005 INTEGRATED AMPLIFIER...


