SR7009 Owner Manual In English
Page 2
... Part names and functions Front panel Display Rear panel Remote control unit Connections Connecting speakers Speaker installation Speaker connection Speaker configuration and "Amp Assign" settings Connecting a TV Connection 1 : TV equipped with an HDMI connector and compatible with the ARC (Audio Return Channel) Connection 2 : TV equipped with an HDMI connector and incompatible with the ARC (Audio Return Channel) Connection 3 : TV equipped without an HDMI connector 8 Connecting a playback device 63 9 Connecting a set-top box (Satellite tuner/cable TV) 64 9 Connecting a DVD player...
... Part names and functions Front panel Display Rear panel Remote control unit Connections Connecting speakers Speaker installation Speaker connection Speaker configuration and "Amp Assign" settings Connecting a TV Connection 1 : TV equipped with an HDMI connector and compatible with the ARC (Audio Return Channel) Connection 2 : TV equipped with an HDMI connector and incompatible with the ARC (Audio Return Channel) Connection 3 : TV equipped without an HDMI connector 8 Connecting a playback device 63 9 Connecting a set-top box (Satellite tuner/cable TV) 64 9 Connecting a DVD player...
SR7009 Owner Manual In English
Page 7
... zone used with the remote control unit Tips Tips Troubleshooting Resetting factory settings 265 Appendix 266 269 About HDMI 300 272 Video conversion function 303 272 Playing back a USB memory devices 305 273 Playing back a Bluetooth device 306 274 Playing back a file saved on a PC or NAS 307 275 Playing back Internet Radio 308 276 Personal memory plus function 308 276 Last function memory 308 276 Sound modes and channel output 309 277 Sound modes...
... zone used with the remote control unit Tips Tips Troubleshooting Resetting factory settings 265 Appendix 266 269 About HDMI 300 272 Video conversion function 303 272 Playing back a USB memory devices 305 273 Playing back a Bluetooth device 306 274 Playing back a file saved on a PC or NAS 307 275 Playing back Internet Radio 308 276 Personal memory plus function 308 276 Last function memory 308 276 Sound modes and channel output 309 277 Sound modes...
SR7009 Owner Manual In English
Page 23
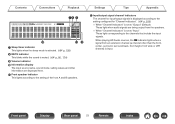
.../output signals is displayed according to the setting configured for "Channel Indicators". (v p. 259) 0 When "Channel Indicators" is set to "Output" (Default) These light when audio signals are being output from an extension channel (a channel other information are displayed here. When playing HD Audio sources, the A indicator lights when a signal from the speakers. 0 When "Channel Indicators" is input. Front panel Display Rear panel 23 Remote Index G Sleep timer indicator This lights when the sleep mode is selected. (v p. 158) H MUTE indicator This blinks while the sound...
.../output signals is displayed according to the setting configured for "Channel Indicators". (v p. 259) 0 When "Channel Indicators" is set to "Output" (Default) These light when audio signals are being output from an extension channel (a channel other information are displayed here. When playing HD Audio sources, the A indicator lights when a signal from the speakers. 0 When "Channel Indicators" is input. Front panel Display Rear panel 23 Remote Index G Sleep timer indicator This lights when the sleep mode is selected. (v p. 158) H MUTE indicator This blinks while the sound...

SR7009 Owner Manual In English
Page 31
... USB port 69 Connecting an HD radio receiver 71 Connecting to connect. Speaker cable Subwoofer cable HDMI cable Component video cable Video cable Coaxial digital cable Optical cable Audio cable LAN cable L L R R Front panel Display Rear panel 31 Remote Index However, when the "Setup Assistant" is running, follow the instructions in the "Setup Assistant" (page 9 in the separate "Quick Start Guide") screen for connections Provide necessary cables according to the devices you want to a home network (LAN) 73 Connecting an external control device 75 Connecting the power...
... USB port 69 Connecting an HD radio receiver 71 Connecting to connect. Speaker cable Subwoofer cable HDMI cable Component video cable Video cable Coaxial digital cable Optical cable Audio cable LAN cable L L R R Front panel Display Rear panel 31 Remote Index However, when the "Setup Assistant" is running, follow the instructions in the "Setup Assistant" (page 9 in the separate "Quick Start Guide") screen for connections Provide necessary cables according to the devices you want to a home network (LAN) 73 Connecting an external control device 75 Connecting the power...

SR7009 Owner Manual In English
Page 42
... application, such as 7.1-channel systems, bi-amp connections and 2-channel systems for the sound modes that are supported. Perform "Amp Assign" settings to suit the number of speaker systems can be configured by changing the "Amp Assign" (v p. 221) settings to the speaker configuration. See "Relationship between sound modes and channel output" (v p. 309) for multi-zone playback. In addition to the basic 5.1-channel system, a variety of rooms and speaker configuration to be installed. (v p. 221) Playback speaker in 9-channel power amplifier. The following pages provide...
... application, such as 7.1-channel systems, bi-amp connections and 2-channel systems for the sound modes that are supported. Perform "Amp Assign" settings to suit the number of speaker systems can be configured by changing the "Amp Assign" (v p. 221) settings to the speaker configuration. See "Relationship between sound modes and channel output" (v p. 309) for multi-zone playback. In addition to the basic 5.1-channel system, a variety of rooms and speaker configuration to be installed. (v p. 221) Playback speaker in 9-channel power amplifier. The following pages provide...
SR7009 Owner Manual In English
Page 149
... Auto sound mode Sound mode type Auto Description This mode is detected, and the playback mode switches automatically to the respective channel number. Stereo audio (2-channel) sources are played back via the front (L/R) speakers, the surround speakers and surround back speakers (if connected). Description In this mode, the type of digital signal input, such as Dolby Digital, Dolby TrueHD, Dolby Digital Plus, DolbyDigital EX, DTS, DTS-HD, DTS-ES, PCM (multi-channel) is for enjoying stereo sound from all speakers. For Dolby Digital or DTS, the music is used. If the input signal is analog...
... Auto sound mode Sound mode type Auto Description This mode is detected, and the playback mode switches automatically to the respective channel number. Stereo audio (2-channel) sources are played back via the front (L/R) speakers, the surround speakers and surround back speakers (if connected). Description In this mode, the type of digital signal input, such as Dolby Digital, Dolby TrueHD, Dolby Digital Plus, DolbyDigital EX, DTS, DTS-HD, DTS-ES, PCM (multi-channel) is for enjoying stereo sound from all speakers. For Dolby Digital or DTS, the music is used. If the input signal is analog...
SR7009 Owner Manual In English
Page 168
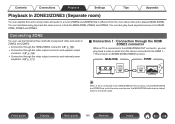
... to play back video and audio in ZONE2 and ZONE3. 0 Connection through the HDMI ZONE2 connector (v p. 168) 0 Connection through the video output connector and speaker output connector (v p. 169) 0 Connection through the video output connector and external power amplifiers (v p. 171) o Connection 1 : Connection through the HDMI ZONE2 connector When a TV is connected to the HDMI ZONE2 OUT connector, you can simultaneously play back the same source in the MAIN ZONE, ZONE2 and ZONE3. Front panel Display Rear panel 168 Remote...
... to play back video and audio in ZONE2 and ZONE3. 0 Connection through the HDMI ZONE2 connector (v p. 168) 0 Connection through the video output connector and speaker output connector (v p. 169) 0 Connection through the video output connector and external power amplifiers (v p. 171) o Connection 1 : Connection through the HDMI ZONE2 connector When a TV is connected to the HDMI ZONE2 OUT connector, you can simultaneously play back the same source in the MAIN ZONE, ZONE2 and ZONE3. Front panel Display Rear panel 168 Remote...
SR7009 Owner Manual In English
Page 176
... a wired LAN. 247 Used for manually setting the IP address or when using a proxy server. 250 Enables network communication in standby power mode. 251 The "Friendly Name" is not designed for input source. You can change 252 the Friendly Name according to check the network connection. 252 Used when receiving maintenance from the display input sources that are made automatically. Used to your preferences. Speakers . Removes from a Marantz service engineer or custom installer. 253 This mode...
... a wired LAN. 247 Used for manually setting the IP address or when using a proxy server. 250 Enables network communication in standby power mode. 251 The "Friendly Name" is not designed for input source. You can change 252 the Friendly Name according to check the network connection. 252 Used when receiving maintenance from the display input sources that are made automatically. Used to your preferences. Speakers . Removes from a Marantz service engineer or custom installer. 253 This mode...
SR7009 Owner Manual In English
Page 177
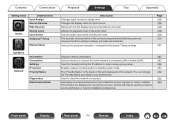
... Start Guide" Front panel Display Rear panel 177 Remote Index Makes settings for activating trigger out function. Performs basic installation/connections/settings from inadvertent changes. Sets individual setting items according to the display on the TV screen. Contents Connections Playback Settings Tips Appendix . Makes settings related to the guidance displayed on this unit settings, input signals, etc. Configures the ECO Mode and Auto Standby energy-saving functions. Checks for the latest firmware information about this unit. Language Select .
... Start Guide" Front panel Display Rear panel 177 Remote Index Makes settings for activating trigger out function. Performs basic installation/connections/settings from inadvertent changes. Sets individual setting items according to the display on the TV screen. Contents Connections Playback Settings Tips Appendix . Makes settings related to the guidance displayed on this unit settings, input signals, etc. Configures the ECO Mode and Auto Standby energy-saving functions. Checks for the latest firmware information about this unit. Language Select .

SR7009 Owner Manual In English
Page 198
... assigned either "HDMI", "COMP" or "VIDEO", when you turn the power of the HDMI connectors is assigned to "On". Last: The most recently used input source will go into standby mode. Front panel Display Rear panel 198 Remote Index CBL/SAT / DVD / Blu-ray / Game / AUX1 / AUX2 / Media Player / CDz (Default : CBL/SAT): Pass through the selected input source. Do not select the "TV Audio" input Off: automatically when receiving a command from the TV. "TV Audio Switching" can be set when "HDMI Control...
... assigned either "HDMI", "COMP" or "VIDEO", when you turn the power of the HDMI connectors is assigned to "On". Last: The most recently used input source will go into standby mode. Front panel Display Rear panel 198 Remote Index CBL/SAT / DVD / Blu-ray / Game / AUX1 / AUX2 / Media Player / CDz (Default : CBL/SAT): Pass through the selected input source. Do not select the "TV Audio" input Off: automatically when receiving a command from the TV. "TV Audio Switching" can be set when "HDMI Control...
SR7009 Owner Manual In English
Page 209
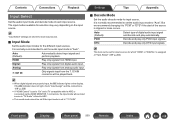
...Auto (Default): HDMI: Digital: Analog: 7.1CH IN: Automatically detect input signal and perform playback. PCM: Decode and play automatically. Only signals input from digital audio input. If the ~ indicator does not light, check "Input Assign" and the connections. (v p. 206) 0 If "HDMI Control" is set to "On" and a TV compatible with the ARC is connected via the HDMI MONITOR 1 connectors, the input mode whose input source is "TV Audio" is fixed to ARC. 0 The sound mode cannot be played back. Front panel Display Rear panel 209 Remote Index o Input Mode Set the audio input...
...Auto (Default): HDMI: Digital: Analog: 7.1CH IN: Automatically detect input signal and perform playback. PCM: Decode and play automatically. Only signals input from digital audio input. If the ~ indicator does not light, check "Input Assign" and the connections. (v p. 206) 0 If "HDMI Control" is set to "On" and a TV compatible with the ARC is connected via the HDMI MONITOR 1 connectors, the input mode whose input source is "TV Audio" is fixed to ARC. 0 The sound mode cannot be played back. Front panel Display Rear panel 209 Remote Index o Input Mode Set the audio input...
SR7009 Owner Manual In English
Page 216
... Audyssey Dynamic Volume®. The following screen is displayed during television programs. Front panel Display Rear panel 216 Remote Index when enjoying a movie or TV program in consideration of the audio characteristics of the audio input to the optimal level while constantly monitoring the level of the room and human hearing ability so that sound can be heard even at low volumes letting you enjoy late-night movies and television. Contents Connections Playback Settings Tips...
... Audyssey Dynamic Volume®. The following screen is displayed during television programs. Front panel Display Rear panel 216 Remote Index when enjoying a movie or TV program in consideration of the audio characteristics of the audio input to the optimal level while constantly monitoring the level of the room and human hearing ability so that sound can be heard even at low volumes letting you enjoy late-night movies and television. Contents Connections Playback Settings Tips...

SR7009 Owner Manual In English
Page 221
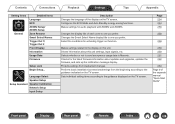
...Mode Select how to 9.1-channels in accordance with the input signal and sound mode. (v p. 227) Front panel Display Rear panel 221 Remote Index Speakers to output audio are automatically switched for MAIN ZONE. Contents Connections Playback Settings Tips Appendix Manual Setup Perform when setting the speakers manually or when changing settings made in Audyssey® Setup. 0 If you change the speaker settings after performing Audyssey® Setup, you will no longer be used without changing "Manual Setup" settings. You need to select Audyssey MultEQ® XT32, Audyssey Dynamic...
...Mode Select how to 9.1-channels in accordance with the input signal and sound mode. (v p. 227) Front panel Display Rear panel 221 Remote Index Speakers to output audio are automatically switched for MAIN ZONE. Contents Connections Playback Settings Tips Appendix Manual Setup Perform when setting the speakers manually or when changing settings made in Audyssey® Setup. 0 If you change the speaker settings after performing Audyssey® Setup, you will no longer be used without changing "Manual Setup" settings. You need to select Audyssey MultEQ® XT32, Audyssey Dynamic...

SR7009 Owner Manual In English
Page 253
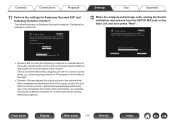
Ordinarily, this function if so instructed by a trained service technician or custom installation professional. Settings Tips Appendix Front panel Display Rear panel 253 Remote Index NOTE Only use this mode isn't suitable for use by the end user, only by a Marantz serviceperson or installer. Contents Connections Playback Maintenance Mode Use when receiving maintenance from a Marantz service engineer or custom installer.
Ordinarily, this function if so instructed by a trained service technician or custom installation professional. Settings Tips Appendix Front panel Display Rear panel 253 Remote Index NOTE Only use this mode isn't suitable for use by the end user, only by a Marantz serviceperson or installer. Contents Connections Playback Maintenance Mode Use when receiving maintenance from a Marantz service engineer or custom installer.
SR7009 Owner Manual In English
Page 279
... is set to "LFE+Main", you to enjoy clear sound without the bass being lost even during playback at a lower volume level 0 Set "Dynamic EQ" in the menu to "On". You can have the subwoofer always output audio 0 Depending on for "Volume Limit" in the menu beforehand. To use a fixed volume level, set the volume level at the same level when I turn the power on 0 By default, the volume setting when power was previously set this for each zone...
... is set to "LFE+Main", you to enjoy clear sound without the bass being lost even during playback at a lower volume level 0 Set "Dynamic EQ" in the menu to "On". You can have the subwoofer always output audio 0 Depending on for "Volume Limit" in the menu beforehand. To use a fixed volume level, set the volume level at the same level when I turn the power on 0 By default, the volume setting when power was previously set this for each zone...
SR7009 Owner Manual In English
Page 284
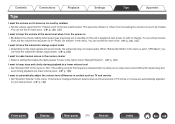
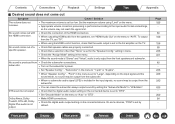
... sound is selected. 0 Adjust the volume. 0 Cancel the mute mode. 0 Check the digital audio input connector setting. 0 Check the digital audio output setting on speaker terminals. 0 Securely tighten the speaker terminals. On some devices, the digital audio output is set to off by default. 0 When a headphone is plugged into the PHONES jack on the main unit, sound is connected via HDMI. 0 Audio signals input to 7.1CH IN connectors on this unit is connected to the TV. Check that cable core wires come...
... sound is selected. 0 Adjust the volume. 0 Cancel the mute mode. 0 Check the digital audio input connector setting. 0 Check the digital audio output setting on speaker terminals. 0 Securely tighten the speaker terminals. On some devices, the digital audio output is set to off by default. 0 When a headphone is plugged into the PHONES jack on the main unit, sound is connected via HDMI. 0 Audio signals input to 7.1CH IN connectors on this unit is connected to the TV. Check that cable core wires come...
SR7009 Owner Manual In English
Page 285
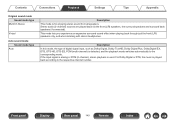
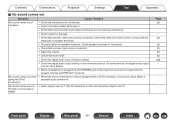
...0 Check the digital audio output setting on the subwoofer's power. 0 Set "Speaker Config." - setting in menu. 0 Check the "Assign Mode" setting in the input signals, no subwoofer audio signal (LFE) is set to "Auto" or "DTS". Dolby Atmos, Dolby TrueHD, DTS-HD, Dolby Digital Plus audio is performed according to the input audio format and settings, so the volume may be output from the subwoofer. 0 When no sound may be output from 0 Check the subwoofer connections. subwoofer. 0 Turn on the connected device. Set the maximum volume using the HDMI control function, check...
...0 Check the digital audio output setting on the subwoofer's power. 0 Set "Speaker Config." - setting in menu. 0 Check the "Assign Mode" setting in the input signals, no subwoofer audio signal (LFE) is set to "Auto" or "DTS". Dolby Atmos, Dolby TrueHD, DTS-HD, Dolby Digital Plus audio is performed according to the input audio format and settings, so the volume may be output from the subwoofer. 0 When no sound may be output from 0 Check the subwoofer connections. subwoofer. 0 Turn on the connected device. Set the maximum volume using the HDMI control function, check...
SR7009 Owner Manual In English
Page 301
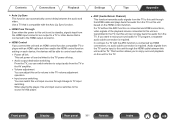
... enjoy surround playback on this unit based on this unit for TV program, a separate audio cable connection is required. Use a TV that player. When playing the player, this unit through linkage to standby, signals input from the TV on the HDMI control function. Settings Tips Appendix 0 ARC (Audio Return Channel) This function transmits audio signals from the TV to this unit input source switches to the source for that is compatible with the Auto Lip Sync function. 0 HDMI Pass Through Even when the power to...
... enjoy surround playback on this unit based on this unit for TV program, a separate audio cable connection is required. Use a TV that player. When playing the player, this unit through linkage to standby, signals input from the TV on the HDMI control function. Settings Tips Appendix 0 ARC (Audio Return Channel) This function transmits audio signals from the TV to this unit input source switches to the source for that is compatible with the Auto Lip Sync function. 0 HDMI Pass Through Even when the power to...

SR7009 Owner Manual In English
Page 336
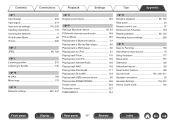
... iPod 69 Connecting an USB memory device 69 Connecting HD Radio receiver 71 Connecting a power cord 77 Connecting to a home network (LAN 73 Connecting ZONE2/ZONE3 52, 168 v D Direct sound mode 150 Display 20 DLNA 324 Dolby Atmos 318 Dolby sound mode 146, 319 DTS sound mode 147, 320 v E ECO Mode 254 Error messages (Audyssey® Setup 218 Explanation of terms/technology .......... 300, 317 v F Firmware Update 262 Front panel 15 v G General settings 177, 254 v H HD Radio playback 94 HDCP 302 HDMI Control 156, 197 Front panel Display Rear panel...
... iPod 69 Connecting an USB memory device 69 Connecting HD Radio receiver 71 Connecting a power cord 77 Connecting to a home network (LAN 73 Connecting ZONE2/ZONE3 52, 168 v D Direct sound mode 150 Display 20 DLNA 324 Dolby Atmos 318 Dolby sound mode 146, 319 DTS sound mode 147, 320 v E ECO Mode 254 Error messages (Audyssey® Setup 218 Explanation of terms/technology .......... 300, 317 v F Firmware Update 262 Front panel 15 v G General settings 177, 254 v H HD Radio playback 94 HDCP 302 HDMI Control 156, 197 Front panel Display Rear panel...
SR7009 Owner Manual In English
Page 337
... 168 Preset codes 339 Protection circuit 327 PURE DIRECT 144 v R Random playback 85, 132 Rear panel 24 Remote control unit 27 Remove from Favorites 134 Repeat playback 85, 132 Resetting factory settings 299 v S Save to Favorites 133 Selecting the input source 79 Setup Assistant 177 Sleep timer 157 Slideshow 135 Slideshow Interval 136 Smart select function 159 Sound mode 143, 309, 311 Speaker connection 32 Speaker Settings 176, 210 Stereo sound mode 150 Front panel Display Rear panel 337 Remote Index
... 168 Preset codes 339 Protection circuit 327 PURE DIRECT 144 v R Random playback 85, 132 Rear panel 24 Remote control unit 27 Remove from Favorites 134 Repeat playback 85, 132 Resetting factory settings 299 v S Save to Favorites 133 Selecting the input source 79 Setup Assistant 177 Sleep timer 157 Slideshow 135 Slideshow Interval 136 Smart select function 159 Sound mode 143, 309, 311 Speaker connection 32 Speaker Settings 176, 210 Stereo sound mode 150 Front panel Display Rear panel 337 Remote Index


