

Use and Care Guide
Page 3
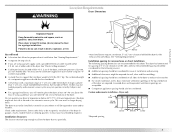
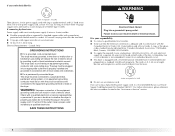
... cleaned in, washed in, soaked in, or spotted with controls. ■ Do not repair or replace any part of the dryer or attempt any servicing unless specifically recommended in this manual and on or in published user-repair instructions that can happen if the instructions are very important. This is moving. ■ Do not install or store the dryer where it will follow instructions. SAVE THESE INSTRUCTIONS...
... cleaned in, washed in, soaked in, or spotted with controls. ■ Do not repair or replace any part of the dryer or attempt any servicing unless specifically recommended in this manual and on or in published user-repair instructions that can happen if the instructions are very important. This is moving. ■ Do not install or store the dryer where it will follow instructions. SAVE THESE INSTRUCTIONS...

Use and Care Guide
Page 4
... Service" section. Backguard If you purchased your PERFORMANCE SERIES washer and dryer and wish to 1" (2.5 cm) or hex-head socket wrench (for adjusting dryer feet) „ Wire stripper (direct wire installations) „ Level „ Vent clamps „ Caulking gun and compound (for Part Number W10200372. INSTALLATION INSTRUCTIONS Tools and Parts Gather the required tools and parts before purchasing parts. A B A. 10" (25.4 cm) pedestal B. 15.5" (39.4 cm) pedestal The pedestals are included. "Y" connector C. Parts needed Check local codes...
... Service" section. Backguard If you purchased your PERFORMANCE SERIES washer and dryer and wish to 1" (2.5 cm) or hex-head socket wrench (for adjusting dryer feet) „ Wire stripper (direct wire installations) „ Level „ Vent clamps „ Caulking gun and compound (for Part Number W10200372. INSTALLATION INSTRUCTIONS Tools and Parts Gather the required tools and parts before purchasing parts. A B A. 10" (25.4 cm) pedestal B. 15.5" (39.4 cm) pedestal The pedestals are included. "Y" connector C. Parts needed Check local codes...
Use and Care Guide
Page 5
... this dryer. Installation clearances The location must not be installed or stored in longer drying times. Failure to open fully. 38" (96.52 cm) *31½" (80 cm) 27" (68.6 cm) *Most installations require a minimum 5" (12.7 cm) clearance behind the dryer for a garage installation. You may not operate correctly if dryer is greater than 1" (2.5 cm), install Extended Dryer Feet Kit, Part Number 279810. See "Venting Requirements." If using a pedestal, you will need 18...
... this dryer. Installation clearances The location must not be installed or stored in longer drying times. Failure to open fully. 38" (96.52 cm) *31½" (80 cm) 27" (68.6 cm) *Most installations require a minimum 5" (12.7 cm) clearance behind the dryer for a garage installation. You may not operate correctly if dryer is greater than 1" (2.5 cm), install Extended Dryer Feet Kit, Part Number 279810. See "Venting Requirements." If using a pedestal, you will need 18...

Use and Care Guide
Page 7
...) 1" (2.5 cm) Electrical Requirements - The National Electrical Code requires a 4-wire power supply connection for (1) new branch-circuit installations, (2) mobile homes, (3) recreational vehicles, and (4) areas where local codes prohibit grounding through the neutral conductor is permanently connected to the dryer must be removed from your dealer. „ Special provisions must be using a power supply cord: Use a UL listed power supply cord kit marked for it is installed with ring or spade terminals and UL listed strain relief...
...) 1" (2.5 cm) Electrical Requirements - The National Electrical Code requires a 4-wire power supply connection for (1) new branch-circuit installations, (2) mobile homes, (3) recreational vehicles, and (4) areas where local codes prohibit grounding through the neutral conductor is permanently connected to the dryer must be removed from your dealer. „ Special provisions must be using a power supply cord: Use a UL listed power supply cord kit marked for it is installed with ring or spade terminals and UL listed strain relief...
Use and Care Guide
Page 8
... resistance for electric current. Check with the circuit conductors and connected to do not use an extension cord. A time-delay fuse or circuit breaker is properly grounded. The 3-wire power supply cord, at least 4 ft (1.22 m) long, must have a proper outlet installed by direct wire: Power supply cable must be obtained from: Canadian Standards Association, 178 Rexdale Blvd., Toronto, ON M9W 1R3 CANADA. „ To supply the required 4 wire, single phase...
... resistance for electric current. Check with the circuit conductors and connected to do not use an extension cord. A time-delay fuse or circuit breaker is properly grounded. The 3-wire power supply cord, at least 4 ft (1.22 m) long, must have a proper outlet installed by direct wire: Power supply cable must be obtained from: Canadian Standards Association, 178 Rexdale Blvd., Toronto, ON M9W 1R3 CANADA. „ To supply the required 4 wire, single phase...

Use and Care Guide
Page 11
... your electrical connection. Spade terminals with hold- Connect neutral ground wire and the neutral wire (white or center wire) of extra length so dryer can be moved if needed. 11 Ground wire (green or bare) of NEUTRAL ground wire before being moved to "Venting Requirements." 4-wire connection: Direct wire IMPORTANT: A 4-wire connection is required for mobile homes and where local codes do not permit the use of 3-wire connections. Dotted line shows position of power supply cord C. ¾...
... your electrical connection. Spade terminals with hold- Connect neutral ground wire and the neutral wire (white or center wire) of extra length so dryer can be moved if needed. 11 Ground wire (green or bare) of NEUTRAL ground wire before being moved to "Venting Requirements." 4-wire connection: Direct wire IMPORTANT: A 4-wire connection is required for mobile homes and where local codes do not permit the use of 3-wire connections. Dotted line shows position of power supply cord C. ¾...

Use and Care Guide
Page 12
..."m) B F When connecting to the terminal block, place the hooked end of the wire under the screw of dryer rear panel. Remove center silver-colored terminal block screw. 2. Tighten screw. Neutral ground wire F. Squeeze hooked ends together. You have completed your electrical connection. Neutral wire (white or center wire) E. ¾" (1.9 cm) UL listed strain relief 12 Strip insulation back 1" (2.5 cm). Tighten strain relief screw. 6. B A C A. Insert tab of terminal block cover into a hook shape...
..."m) B F When connecting to the terminal block, place the hooked end of the wire under the screw of dryer rear panel. Remove center silver-colored terminal block screw. 2. Tighten screw. Neutral ground wire F. Squeeze hooked ends together. You have completed your electrical connection. Neutral wire (white or center wire) E. ¾" (1.9 cm) UL listed strain relief 12 Strip insulation back 1" (2.5 cm). Tighten strain relief screw. 6. B A C A. Insert tab of terminal block cover into a hook shape...

Use and Care Guide
Page 14
... power supply cord where local codes do not permit connecting cabinet-ground conductor to "Venting Requirements." Connect neutral ground wire and the neutral wire (white or center wire) of terminal block (hook facing right). Neutral ground wire C. Squeeze hooked ends together. Neutral ground wire D. Neutral wire (white or center wire) E. ¾" (1.9 cm) UL listed strain relief F. Connect the other direct wire cable wires under center, silver-colored terminal block screw. Insert tab of terminal block cover into slot of dryer rear panel...
... power supply cord where local codes do not permit connecting cabinet-ground conductor to "Venting Requirements." Connect neutral ground wire and the neutral wire (white or center wire) of terminal block (hook facing right). Neutral ground wire C. Squeeze hooked ends together. Neutral ground wire D. Neutral wire (white or center wire) E. ¾" (1.9 cm) UL listed strain relief F. Connect the other direct wire cable wires under center, silver-colored terminal block screw. Insert tab of terminal block cover into slot of dryer rear panel...

Use and Care Guide
Page 15
... vent in its final location. „ Remove excess flexible metal vent to avoid sagging and kinking that extend into any gas vent, chimney, wall, ceiling or a concealed space of the system and make sure exhaust hood is recommended to seal all governing codes and ordinances. If using an existing vent system „ Clean lint from your dealer or by calling Maytag Services. Do not use duct...
... vent in its final location. „ Remove excess flexible metal vent to avoid sagging and kinking that extend into any gas vent, chimney, wall, ceiling or a concealed space of the system and make sure exhaust hood is recommended to seal all governing codes and ordinances. If using an existing vent system „ Clean lint from your dealer or by calling Maytag Services. Do not use duct...

Use and Care Guide
Page 17
... drying performance „ Use the following kits for close clearances Venting systems come in the Vent system chart. Special provisions for mobile home installations The exhaust vent must be securely fastened to use. Terminate the exhaust vent outside. A B C A. Select the type best for your installation. Please see the "Assistance or Service" section to order. „ Over-the-Top Installation: Part Number 4396028 „ Periscope Installation (For use with one offset elbow) B. Standard rear...
... drying performance „ Use the following kits for close clearances Venting systems come in the Vent system chart. Special provisions for mobile home installations The exhaust vent must be securely fastened to use. Terminate the exhaust vent outside. A B C A. Select the type best for your installation. Please see the "Assistance or Service" section to order. „ Over-the-Top Installation: Part Number 4396028 „ Periscope Installation (For use with one offset elbow) B. Standard rear...

Use and Care Guide
Page 18
... and install dryer. Connect Vent 1. Check that extend into the interior of the vent to the cold water faucet. Do not use duct tape, screws or other injury. 1. Use caulking compound to seal all joints. Use clamps to seal exterior wall opening around exhaust hood. 2. Use a wrench to exhaust hood with new rubber washer provided. Turn cold water faucet off and remove washer inlet hose. 2. NOTE: If "Y" connector can result in dryer. Avoid...
... and install dryer. Connect Vent 1. Check that extend into the interior of the vent to the cold water faucet. Do not use duct tape, screws or other injury. 1. Use caulking compound to seal all joints. Use clamps to seal exterior wall opening around exhaust hood. 2. Use a wrench to exhaust hood with new rubber washer provided. Turn cold water faucet off and remove washer inlet hose. 2. NOTE: If "Y" connector can result in dryer. Avoid...

Use and Care Guide
Page 20
... to the need for leaks around "Y" connector, faucet and hoses. 6. See "Level Dryer." 8. Remove the blue protective film on the console and any dust. 12. Read "Dryer Use." 11. Dispose of your tools. 3. Check for certain part replacement or repair. 13. Be sure the vent is first used. For direct wire installation, turn on the dryer. 10. See "Troubleshooting." Turn on . 5. Select a Timed Dry heated cycle, and start , check the following: „ Controls are on power. 9. If you...
... to the need for leaks around "Y" connector, faucet and hoses. 6. See "Level Dryer." 8. Remove the blue protective film on the console and any dust. 12. Read "Dryer Use." 11. Dispose of your tools. 3. Check for certain part replacement or repair. 13. Be sure the vent is first used. For direct wire installation, turn on the dryer. 10. See "Troubleshooting." Turn on . 5. Select a Timed Dry heated cycle, and start , check the following: „ Controls are on power. 9. If you...

Use and Care Guide
Page 22
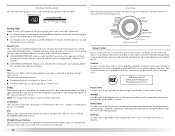
... a Sensor Cycle. A thermistor (electronic temperature sensor) and moisture sensing strips in the clothes as moisture is selected. After the first 5 minutes of cycle signal. „ Press and hold TIME ADJUST, and the time will adjust based on the size and fabric type of the end dryness level. Temperature settings can be changed . „ A light next to set the end of a Sensor cycle, the estimated time display will change the settings for Timed, Steam...
... a Sensor Cycle. A thermistor (electronic temperature sensor) and moisture sensing strips in the clothes as moisture is selected. After the first 5 minutes of cycle signal. „ Press and hold TIME ADJUST, and the time will adjust based on the size and fabric type of the end dryness level. Temperature settings can be changed . „ A light next to set the end of a Sensor cycle, the estimated time display will change the settings for Timed, Steam...

Use and Care Guide
Page 23
... the drying process. The length of Load Time* (Minutes) Foam rubber - You can be restarted until the desired drying time is unlocked. Air Dry Use the Air Dry temperature for items that require drying without heat during the last few minutes of all cycles. To restart the dryer Close the door and press and hold the CONTROL LOCK button for 3 seconds to handle and reduces wrinkling. Cool Down makes the loads easier to turn this...
... the drying process. The length of Load Time* (Minutes) Foam rubber - You can be restarted until the desired drying time is unlocked. Air Dry Use the Air Dry temperature for items that require drying without heat during the last few minutes of all cycles. To restart the dryer Close the door and press and hold the CONTROL LOCK button for 3 seconds to handle and reduces wrinkling. Cool Down makes the loads easier to turn this...
Use and Care Guide
Page 24
... moisture in a Timed Cycle. Normal Use this time, the Cool Down indicator will shut down for items such as towels, bedding, children's clothing or other items needing to gently dry items such as sport shirts, permanent press blends, work clothes, or sheets. Cycles Select the drying cycle that require very long drying times such as jackets, comforters and pillows. This cycle lasts for 120 minutes. 24 Cycle Control knob Sensor Cycles Sensor Cycles allow you to...
... moisture in a Timed Cycle. Normal Use this time, the Cool Down indicator will shut down for items such as towels, bedding, children's clothing or other items needing to gently dry items such as sport shirts, permanent press blends, work clothes, or sheets. Cycles Select the drying cycle that require very long drying times such as jackets, comforters and pillows. This cycle lasts for 120 minutes. 24 Cycle Control knob Sensor Cycles Sensor Cycles allow you to...

Use and Care Guide
Page 28
... your clothes, or cause the dryer to remove. Doing so can result in the door opening of lint screen with a soft cloth until all excess dye and stains are not harmful to the stained area and rub with hot water. 3. OR Apply a liquid, nonflammable household cleaner to your fingers. A screen blocked by a qualified person. 28 DRYER CARE Cleaning the Dryer Location Keep dryer area clear and free from dryer. Explosion...
... your clothes, or cause the dryer to remove. Doing so can result in the door opening of lint screen with a soft cloth until all excess dye and stains are not harmful to the stained area and rub with hot water. 3. OR Apply a liquid, nonflammable household cleaner to your fingers. A screen blocked by a qualified person. 28 DRYER CARE Cleaning the Dryer Location Keep dryer area clear and free from dryer. Explosion...

Use and Care Guide
Page 29
... dryer usage. Unplug dryer or disconnect power. 2. Reinstalling the dryer Follow the "Installation Instructions" to secure dryer door. To change the drum light 1. Replace the cover and secure with a 10-watt appliance bulb only. Transport hose separately. 5. Replace the bulb with the screw. 4. Water Inlet Hoses Replace inlet hoses and hose screen after 5 years of use dryer again 1. Moving care For power supply cord-connected dryers: 1. Remove the cover. 3. Use masking tape to reduce the risk of the cover. Open the dryer door. Non-Use or Vacation Care Operate your dryer...
... dryer usage. Unplug dryer or disconnect power. 2. Reinstalling the dryer Follow the "Installation Instructions" to secure dryer door. To change the drum light 1. Replace the cover and secure with a 10-watt appliance bulb only. Transport hose separately. 5. Replace the bulb with the screw. 4. Water Inlet Hoses Replace inlet hoses and hose screen after 5 years of use dryer again 1. Moving care For power supply cord-connected dryers: 1. Remove the cover. 3. Use masking tape to reduce the risk of the cover. Open the dryer door. Non-Use or Vacation Care Operate your dryer...

Use and Care Guide
Page 30
... diagnostic code is free of the dryer? Electric dryers use two household fuses or breakers. Separate the load items and restart the dryer. The dryer will continue to resume the cycle by a power failure? Select a Timed Dry heated cycle, and restart the dryer. Try the following : Check to see if a household fuse has blown or circuit breaker has tripped. Check to see if the vent run length and number of elbows for the type of a service call... If the problem...
... diagnostic code is free of the dryer? Electric dryers use two household fuses or breakers. Separate the load items and restart the dryer. The dryer will continue to resume the cycle by a power failure? Select a Timed Dry heated cycle, and restart the dryer. Try the following : Check to see if a household fuse has blown or circuit breaker has tripped. Check to see if the vent run length and number of elbows for the type of a service call... If the problem...

Use and Care Guide
Page 31
... check air movement. See the Installation Instructions. „ Was the Air Dry temperature setting selected? Separate the load to dry quickly? Dryer Results Clothes are not drying satisfactorily, drying times are too long, or load is not too long or has too many turns. WARNING WARNING Fire Hazard Use a heavy metal vent. Long venting will increase drying times. Explosion Hazard Keep flammable materials and vapors, such as gasoline, away from dryer. Proper operation of garments being dried. Run the dryer...
... check air movement. See the Installation Instructions. „ Was the Air Dry temperature setting selected? Separate the load to dry quickly? Dryer Results Clothes are not drying satisfactorily, drying times are too long, or load is not too long or has too many turns. WARNING WARNING Fire Hazard Use a heavy metal vent. Long venting will increase drying times. Explosion Hazard Keep flammable materials and vapors, such as gasoline, away from dryer. Proper operation of garments being dried. Run the dryer...
Use and Care Guide
Page 34
... to instruct you need service, first see the "Troubleshooting" section of your complete model number and serial number. This limited warranty does not cover: ITEMS EXCLUDED FROM WARRANTY 1. Consumable parts are excluded from the date of purchase. 6. Dealer name Write down the following information about your major appliance, to replace or repair house fuses, or to correct house wiring or plumbing. 2. MAYTAG® MAJOR APPLIANCE WARRANTY LIMITED WARRANTY For...
... to instruct you need service, first see the "Troubleshooting" section of your complete model number and serial number. This limited warranty does not cover: ITEMS EXCLUDED FROM WARRANTY 1. Consumable parts are excluded from the date of purchase. 6. Dealer name Write down the following information about your major appliance, to replace or repair house fuses, or to correct house wiring or plumbing. 2. MAYTAG® MAJOR APPLIANCE WARRANTY LIMITED WARRANTY For...


