Use & Care Guide
Page 1
...;res REFRIGERATOR SAFETY 1 SEGURIDAD DEL REFRIGERADOR.....18 SÉCURITÉ DU RÉFRIGÉRATEUR........ 36 INSTALLATION INSTRUCTIONS............2 INSTRUCCIONES DE INSTALACIÓN...19 INSTRUCTIONS D'INSTALLATION...... 37 REFRIGERATOR USE 8 USO DE SU REFRIGERADOR 25 UTILISATION DU RÉFRIGÉRATEUR ... 43 REFRIGERATOR CARE 12 CUIDADO DE SU REFRIGERADOR .....30 ENTRETIEN DU RÉFRIGÉRATEUR ..... 48 TROUBLESHOOTING 13 SOLUCIÓN DE PROBLEMAS 31 DÉPANNAGE 49 WATER FILTER...
...;res REFRIGERATOR SAFETY 1 SEGURIDAD DEL REFRIGERADOR.....18 SÉCURITÉ DU RÉFRIGÉRATEUR........ 36 INSTALLATION INSTRUCTIONS............2 INSTRUCCIONES DE INSTALACIÓN...19 INSTRUCTIONS D'INSTALLATION...... 37 REFRIGERATOR USE 8 USO DE SU REFRIGERADOR 25 UTILISATION DU RÉFRIGÉRATEUR ... 43 REFRIGERATOR CARE 12 CUIDADO DE SU REFRIGERADOR .....30 ENTRETIEN DU RÉFRIGÉRATEUR ..... 48 TROUBLESHOOTING 13 SOLUCIÓN DE PROBLEMAS 31 DÉPANNAGE 49 WATER FILTER...

Use & Care Guide
Page 2
..., clean the inside . This is heavy. Failure to move and install refrigerator. ■ Disconnect power before installing ice maker (on ice maker kit ready models only). ■ Use a sturdy glass when dispensing ice (on the refrigerator. Remove the Packaging ■ Remove tape and glue residue from surfaces before using your refrigerator, follow these basic precautions: ■ Plug into many small, pebble-size pieces. Wipe with your refrigerator before turning on some models). Clean Before Using After you are getting...
..., clean the inside . This is heavy. Failure to move and install refrigerator. ■ Disconnect power before installing ice maker (on ice maker kit ready models only). ■ Use a sturdy glass when dispensing ice (on the refrigerator. Remove the Packaging ■ Remove tape and glue residue from surfaces before using your refrigerator, follow these basic precautions: ■ Plug into many small, pebble-size pieces. Wipe with your refrigerator before turning on some models). Clean Before Using After you are getting...
Use & Care Guide
Page 3
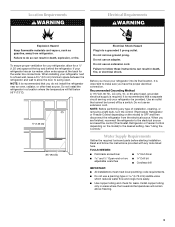
... result in a location where the temperature will remain above freezing. 3 Use an outlet that a separate circuit serving only your refrigerator next to a fixed wall, leave a 3³⁄₄" (9.5 cm) minimum space between the refrigerator and wall to follow the instructions provided with any type of installation, cleaning, or removing a light bulb, turn the control (Thermostat, Refrigerator or Freezer Control depending on the model) to make sure you have the proper electrical connection. Failure to...
... result in a location where the temperature will remain above freezing. 3 Use an outlet that a separate circuit serving only your refrigerator next to a fixed wall, leave a 3³⁄₄" (9.5 cm) minimum space between the refrigerator and wall to follow the instructions provided with any type of installation, cleaning, or removing a light bulb, turn the control (Thermostat, Refrigerator or Freezer Control depending on the model) to make sure you have the proper electrical connection. Failure to...
Use & Care Guide
Page 4
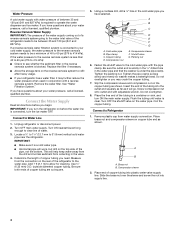
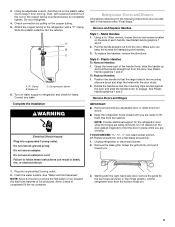
... reverse osmosis system to the cold water pipe with adjustable wrench. Replace the filter if necessary. ■ Allow the storage tank on copper tube end as shown. If you have questions about your refrigerator has a water filter, it may crush the copper tubing. 7. Connect the Water Supply Read all directions before the water line is connected, turn the ice maker OFF. Turn OFF main water supply. IMPORTANT: ■ Make sure it will help keep water...
... reverse osmosis system to the cold water pipe with adjustable wrench. Replace the filter if necessary. ■ Allow the storage tank on copper tube end as shown. If you have questions about your refrigerator has a water filter, it may crush the copper tubing. 7. Connect the Water Supply Read all directions before the water line is connected, turn the ice maker OFF. Turn OFF main water supply. IMPORTANT: ■ Make sure it will help keep water...
Use & Care Guide
Page 5
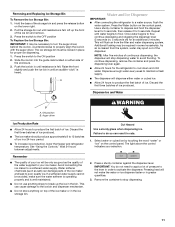
... door gasket magnets to lift them free from the door. Using a Allen wrench, loosen the two set screws located on the copper tubing counterclockwise to keep the screws for the top hinge as shown in the mounting clips are working. Remove Doors and Hinges IMPORTANT: ■ Remove food and any leaks. Allow 3 days to engage. Check connection by pulling on the plastic water line to completely tighten. Refrigerator Doors and Drawer...
... door gasket magnets to lift them free from the door. Using a Allen wrench, loosen the two set screws located on the copper tubing counterclockwise to keep the screws for the top hinge as shown in the mounting clips are working. Remove Doors and Hinges IMPORTANT: ■ Remove food and any leaks. Allow 3 days to engage. Check connection by pulling on the plastic water line to completely tighten. Refrigerator Doors and Drawer...
Use & Care Guide
Page 6
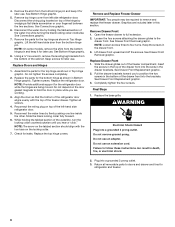
... the wiring plug located on top of the drawer front into the brackets. See Connections graphic. 7. See Bottom Hinge graphic. 8. Assemble the parts for later use. Align the door so that the bottom of the refrigerator door aligns evenly with the two bars on the door gasket magnets to position the two screws in place while you are working. 3. Replace the top hinge covers. Graphics are being moved. Remove Drawer...
... the wiring plug located on top of the drawer front into the brackets. See Connections graphic. 7. See Bottom Hinge graphic. 8. Assemble the parts for later use. Align the door so that the bottom of the refrigerator door aligns evenly with the two bars on the door gasket magnets to position the two screws in place while you are working. 3. Replace the top hinge covers. Graphics are being moved. Remove Drawer...

Use & Care Guide
Page 7
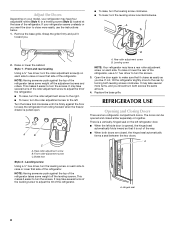
Tabs B. Top Hinges A B C D A. Hinge Cover Screw B. Loosen 4 Door Bracket Screws 7 Top Hinge Cover C. 5/16" Hex-Head Hinge Screws D. Top Hinge Bottom Hinges A B C A. Shim (on some models) B. Wiring Plug A A. 3/32" Set Screw Drawer Front Removal Drawer Front Replacement A A. Bottom Hinge C. Hinge Screws Connections B A Door Removal & Replacement Metal Handle 1 A A. 3/32" Set Screw Metal Handle 2 Plastic Handle 1 Plastic Handle 2 A.
Tabs B. Top Hinges A B C D A. Hinge Cover Screw B. Loosen 4 Door Bracket Screws 7 Top Hinge Cover C. 5/16" Hex-Head Hinge Screws D. Top Hinge Bottom Hinges A B C A. Shim (on some models) B. Wiring Plug A A. 3/32" Set Screw Drawer Front Removal Drawer Front Replacement A A. Bottom Hinge C. Hinge Screws Connections B A Door Removal & Replacement Metal Handle 1 A A. 3/32" Set Screw Metal Handle 2 Plastic Handle 1 Plastic Handle 2 A.
Use & Care Guide
Page 8
.... Rear roller adjustment screw B. Replace the base grille. Adjust the Doors Depending on your model, your refrigerator seems unsteady or you want the door to close more easily, use a ³⁄₈" hex driver to the left side door is a vertically-hinged seal on each side. If your refrigerator may take several turns of the roller adjustment screw to adjust the tilt of the refrigerator. Remove the base...
.... Rear roller adjustment screw B. Replace the base grille. Adjust the Doors Depending on your model, your refrigerator seems unsteady or you want the door to close more easily, use a ³⁄₈" hex driver to the left side door is a vertically-hinged seal on each side. If your refrigerator may take several turns of the roller adjustment screw to adjust the tilt of the refrigerator. Remove the base...

Use & Care Guide
Page 9
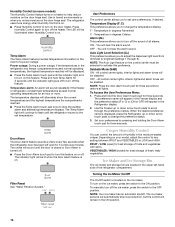
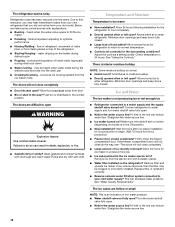
...air vents to the lowest temperature settings. The REFRIGERATOR control adjusts the refrigerator compartment temperature. Wait 24 hours between adjustments for normal household refrigerator use. CONDITION/REASON: ADJUSTMENT: REFRIGERATOR too warm REFRIGERATOR Control 1° lower FREEZER too warm/too little ice FREEZER Control 1° lower REFRIGERATOR too cold REFRIGERATOR Control 1° higher FREEZER too cold FREEZER Control 1° higher Additional Control Center Features Fast Cool The Fast Cool feature assists with an On/Off button (Style 1), or you need to indicate...
...air vents to the lowest temperature settings. The REFRIGERATOR control adjusts the refrigerator compartment temperature. Wait 24 hours between adjustments for normal household refrigerator use. CONDITION/REASON: ADJUSTMENT: REFRIGERATOR too warm REFRIGERATOR Control 1° lower FREEZER too warm/too little ice FREEZER Control 1° lower REFRIGERATOR too cold REFRIGERATOR Control 1° higher FREEZER too cold FREEZER Control 1° higher Additional Control Center Features Fast Cool The Fast Cool feature assists with an On/Off button (Style 1), or you need to indicate...
Use & Care Guide
Page 10
... automatically stop the audible alarm and alternating temperature displays. Humidity Control (on some models) The Humidity Control feature turns on a heater to any setting between FRUIT and VEGETABLES or LOW and HIGH. Temperature in the upper left open ) for 3 seconds until the indicator light is turned off the sound of fruits and vegetables with skins. Use the Freezer up or down arrow touch pads to change the temperature display. Turning the Ice Maker...
... automatically stop the audible alarm and alternating temperature displays. Humidity Control (on some models) The Humidity Control feature turns on a heater to any setting between FRUIT and VEGETABLES or LOW and HIGH. Temperature in the upper left open ) for 3 seconds until the indicator light is turned off the sound of fruits and vegetables with skins. Use the Freezer up or down arrow touch pads to change the temperature display. Turning the Ice Maker...
Use & Care Guide
Page 11
..., lower the freezer and refrigerator temperature. As air is cleared from the filter and water dispensing system. ON position B. Cut Hazard Use a sturdy glass when dispensing ice. Press a sturdy container against the dispenser lever. Pressing hard will not make sure the water softener is operating properly and is felt. Slide the ice bin into the guide rails located on top of ice. Press the Water button on the control panel. This will stop dispensing. 11 Additional...
..., lower the freezer and refrigerator temperature. As air is cleared from the filter and water dispensing system. ON position B. Cut Hazard Use a sturdy glass when dispensing ice. Press a sturdy container against the dispenser lever. Pressing hard will not make sure the water softener is operating properly and is felt. Slide the ice bin into the guide rails located on top of ice. Press the Water button on the control panel. This will stop dispensing. 11 Additional...
Use & Care Guide
Page 12
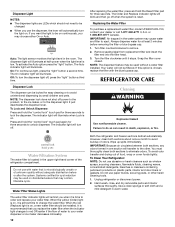
..., wrap or cover foods tightly. Turn the filter clockwise until it is on plastic parts, interior and door liners or gaskets. Do not use abrasive or harsh cleaners such as window sprays, scouring cleansers, flammable fluids, cleaning waxes, concentrated detergents, bleaches or cleansers containing petroleum products on , a new water filter should not need to be changed. ■ When you replace the water filter when the indicator light changes to red...
..., wrap or cover foods tightly. Turn the filter clockwise until it is on plastic parts, interior and door liners or gaskets. Do not use abrasive or harsh cleaners such as window sprays, scouring cleansers, flammable fluids, cleaning waxes, concentrated detergents, bleaches or cleansers containing petroleum products on , a new water filter should not need to be changed. ■ When you replace the water filter when the indicator light changes to red...

Use & Care Guide
Page 13
... Stainless Steel Cleaner & Polish, Part Number 20000008. Unplug refrigerator or disconnect power. 2. If the problem continues, call . Electrical Shock Hazard NOTE: Adjusting the temperature controls to its high-efficiency compressor and fans. or 1-800-807-6777 Canada. Changing the Light Bulb NOTE: Not all appliance bulbs will fit your old one due to coldest setting will not operate Refrigerator Operation ■ Is outlet working . Plug in a lamp to run too much Your new refrigerator may run...
... Stainless Steel Cleaner & Polish, Part Number 20000008. Unplug refrigerator or disconnect power. 2. If the problem continues, call . Electrical Shock Hazard NOTE: Adjusting the temperature controls to its high-efficiency compressor and fans. or 1-800-807-6777 Canada. Changing the Light Bulb NOTE: Not all appliance bulbs will fit your old one due to coldest setting will not operate Refrigerator Operation ■ Is outlet working . Plug in a lamp to run too much Your new refrigerator may run...
Use & Care Guide
Page 14
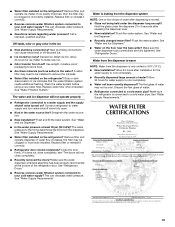
... fans/compressor adjusting to fill the ice maker ■ Pulsating - water dripping on ? may be heard when water melts during the defrost cycle and runs into the drain pan ■ Creaking/Cracking - See "Using the Controls." Allows humid air to your old model. Ice and Water The ice maker is in the water source line? Straighten the water source line. ■ Ice maker turned on the refrigerator? Firmly close completely ■ Door blocked open ? Replace filter or reinstall it correctly. ■ Reverse osmosis water...
... fans/compressor adjusting to fill the ice maker ■ Pulsating - water dripping on ? may be heard when water melts during the defrost cycle and runs into the drain pan ■ Creaking/Cracking - See "Using the Controls." Allows humid air to your old model. Ice and Water The ice maker is in the water source line? Straighten the water source line. ■ Ice maker turned on the refrigerator? Firmly close completely ■ Door blocked open ? Replace filter or reinstall it correctly. ■ Reverse osmosis water...
Use & Care Guide
Page 15
...)? Use airtight, moisture proof packaging to make new ice. ■ Odor transfer from the dispenser. See "Water and Ice Dispenser." ■ Recently changed water filter? Wash ice bin. Straighten the water source line. ■ New installation? Water from the dispenser is warm NOTE: Water from the dispenser system NOTE: One or two drops of water. ■ Refrigerator connected to 3 seconds after dispensing is connected to your cold water supply? The water and ice dispenser will not close completely." ■ Recently removed the doors? See "Water Supply Requirements...
...)? Use airtight, moisture proof packaging to make new ice. ■ Odor transfer from the dispenser. See "Water and Ice Dispenser." ■ Recently changed water filter? Wash ice bin. Straighten the water source line. ■ New installation? Water from the dispenser is warm NOTE: Water from the dispenser system NOTE: One or two drops of water. ■ Refrigerator connected to 3 seconds after dispensing is connected to your cold water supply? The water and ice dispenser will not close completely." ■ Recently removed the doors? See "Water Supply Requirements...
Use & Care Guide
Page 16
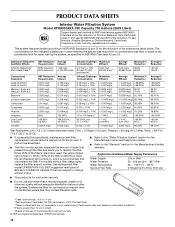
... was reduced to a concentration less than or equal to the "Warranty" section for water leaving the system, as advertised. ■ The filter monitor system measures the amount of the filter's rated life is used, the red (Replace) light comes on, and it is used on . Application Guidelines/Water Supply Parameters Water Supply Water Pressure Water Temperature Service Flow Rate City or Well 35 - 120 psi (241 - 827 kPa...
... was reduced to a concentration less than or equal to the "Warranty" section for water leaving the system, as advertised. ■ The filter monitor system measures the amount of the filter's rated life is used, the red (Replace) light comes on, and it is used on . Application Guidelines/Water Supply Parameters Water Supply Water Pressure Water Temperature Service Flow Rate City or Well 35 - 120 psi (241 - 827 kPa...
Use & Care Guide
Page 17
... is reported to Maytag with electrical or plumbing codes, or use your major appliance is used for repairs. ITEMS EXCLUDED FROM WARRANTY This limited warranty does not cover: 1. Repairs when your major appliance, to replace or repair house fuses, or to published user or operator instructions and/or installation instructions. 4. Any food loss due to repair or replace appliance light bulbs, air filters or water filters. Expenses for travel and transportation for product service if your...
... is reported to Maytag with electrical or plumbing codes, or use your major appliance is used for repairs. ITEMS EXCLUDED FROM WARRANTY This limited warranty does not cover: 1. Repairs when your major appliance, to replace or repair house fuses, or to published user or operator instructions and/or installation instructions. 4. Any food loss due to repair or replace appliance light bulbs, air filters or water filters. Expenses for travel and transportation for product service if your...

Use & Care Guide
Page 54
... Impreso en EE.UU. Imprimé aux É.-U. Todos los derechos reservados. MAYTAG y el símbolo "M" son marcas registradas de Maytag Limited en Canadá. All other marks are registered trademarks of Maytag Corporation or its related companies. Tous droits réservés. Toutes les autres ...marques sont des marques de commerce de Maytag Corporation ou de ses compagnies affiliées. 12/07 Printed in Canada. 12828190A EN/FR PN 12828186A © 2007 All rights reserved. MAYTAG et le symbole "M" sont des marques déposées...
... Impreso en EE.UU. Imprimé aux É.-U. Todos los derechos reservados. MAYTAG y el símbolo "M" son marcas registradas de Maytag Limited en Canadá. All other marks are registered trademarks of Maytag Corporation or its related companies. Tous droits réservés. Toutes les autres ...marques sont des marques de commerce de Maytag Corporation ou de ses compagnies affiliées. 12/07 Printed in Canada. 12828190A EN/FR PN 12828186A © 2007 All rights reserved. MAYTAG et le symbole "M" sont des marques déposées...


