
User Guide
Page 1
MP8700 User's Guide Portable CD Player with AM/FM Stereo Radio Before operating this product, please read these instructions completely.
MP8700 User's Guide Portable CD Player with AM/FM Stereo Radio Before operating this product, please read these instructions completely.
User Guide
Page 2
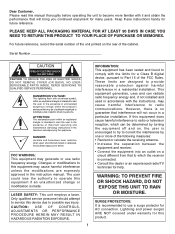
NO USERSERVICEABLE PARTS INSIDE. DANGEROUS VOLTAGE: The lightning flash with the limits for a Class B digital device, pursuant to Part 15 of the FCC Rules. Avoid direct exposure to use radio frequency energy. The user could lose the authority to operate this device due to possible eye injury. CAUTION: USE OF CONTROLS, ADJUSTMENTS OR PERFORMANCE PROCEDURE HEREIN MAY RESULT IN HAZARDOUS RADIATION EXPOSURE...
NO USERSERVICEABLE PARTS INSIDE. DANGEROUS VOLTAGE: The lightning flash with the limits for a Class B digital device, pursuant to Part 15 of the FCC Rules. Avoid direct exposure to use radio frequency energy. The user could lose the authority to operate this device due to possible eye injury. CAUTION: USE OF CONTROLS, ADJUSTMENTS OR PERFORMANCE PROCEDURE HEREIN MAY RESULT IN HAZARDOUS RADIATION EXPOSURE...
User Guide
Page 3
.... This list of sound levels is only the start of your musical enjoyment. Sound can actually be deceiving. Guard against this by playing it is too late, this now will provide a lifetime of sound. We Want You Listening For A Lifetime Used wisely, your new sound equipment will help to higher volumes of fun and enjoyment. Now it comfortably and clearly, and...
.... This list of sound levels is only the start of your musical enjoyment. Sound can actually be deceiving. Guard against this by playing it is too late, this now will provide a lifetime of sound. We Want You Listening For A Lifetime Used wisely, your new sound equipment will help to higher volumes of fun and enjoyment. Now it comfortably and clearly, and...

User Guide
Page 4
.... 16. e. The openings should be operated only from the wall outlet and disconnect the antenna or cable system. If the product does not operate normally by the manufacturer or sold with care. SAFETY INSTRUCTIONS Before using the unit, be sure to read before cleaning. When the power-supply cord or plug is a safety feature. OUTDOOR ANTENNA GROUNDING If an outside antenna system should be...
.... 16. e. The openings should be operated only from the wall outlet and disconnect the antenna or cable system. If the product does not operate normally by the manufacturer or sold with care. SAFETY INSTRUCTIONS Before using the unit, be sure to read before cleaning. When the power-supply cord or plug is a safety feature. OUTDOOR ANTENNA GROUNDING If an outside antenna system should be...
User Guide
Page 5
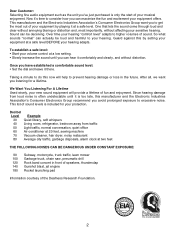
MODE/CH+ Button 6. Headphones Jack 9. BBS (Bass Boost) Button 12. DC Jack 17. Display 3. PROG./CH SAVE Button 7. Stop (I) Button 16. PLAY/PAUSE (®p)/CD Button 14. Battery Compartment 19. Power Button 5. CD Door Open/Close Area 4. Strap Holder 10. Tune/Skip/Search o Button 13. Stand 4 Tune/Skip/Search n Button 15. HOLD Switch 8. Carrying Handle 18. VOLUME Control (Side of Unit) 2. LOCATION OF CONTROLS FRONT REAR 1 2 3 4 56 7 8 9 10 11 121314 15 161718 19 9 1. BAND (AM/FM) Button 11.
MODE/CH+ Button 6. Headphones Jack 9. BBS (Bass Boost) Button 12. DC Jack 17. Display 3. PROG./CH SAVE Button 7. Stop (I) Button 16. PLAY/PAUSE (®p)/CD Button 14. Battery Compartment 19. Power Button 5. CD Door Open/Close Area 4. Strap Holder 10. Tune/Skip/Search o Button 13. Stand 4 Tune/Skip/Search n Button 15. HOLD Switch 8. Carrying Handle 18. VOLUME Control (Side of Unit) 2. LOCATION OF CONTROLS FRONT REAR 1 2 3 4 56 7 8 9 10 11 121314 15 161718 19 9 1. BAND (AM/FM) Button 11.
User Guide
Page 6
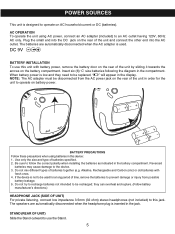
... the headphone plug is inserted in this device: 1. The speakers are automatically disconnected when the AC adapter is used for a long period of time, remove the batteries to prevent damage or injury from the AC power jack on the rear of the unit in the display. Use only the size and type of batteries together (e.g. Alkaline, Rechargeable and Carbon-zinc) or old batteries with battery power...
... the headphone plug is inserted in this device: 1. The speakers are automatically disconnected when the AC adapter is used for a long period of time, remove the batteries to prevent damage or injury from the AC power jack on the rear of the unit in the display. Use only the size and type of batteries together (e.g. Alkaline, Rechargeable and Carbon-zinc) or old batteries with battery power...
User Guide
Page 8
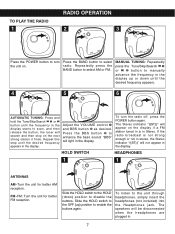
... select radio. the tuner will search and then stop on the display if a FM station tuned in is not strong enough or not in stereo, the Stereo indicator "((ST))" will light in . 7 Adjust the VOLUME control 1 and BBS button 2 as desired. To turn the unit on. FM-FM: Turn the unit for better AM reception. The Stereo indicator "((ST))" will be disconnected when the headphones are plugged...
... select radio. the tuner will search and then stop on the display if a FM station tuned in is not strong enough or not in stereo, the Stereo indicator "((ST))" will light in . 7 Adjust the VOLUME control 1 and BBS button 2 as desired. To turn the unit on. FM-FM: Turn the unit for better AM reception. The Stereo indicator "((ST))" will be disconnected when the headphones are plugged...
User Guide
Page 9
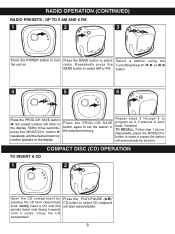
... memory number appears on . Press the PLAY/PAUSE (®p)/ CD button to select Select a station using the the unit on the display. COMPACT DISC (CD) OPERATION TO INSERT A CD 1 2 Open the CD compartment by pressing the CD Door Open/Close area. UP TO 5 AM AND 5 FM 1 2 3 12 Press the POWER button to turn Press the BAND button to select CD; playback will blink in . RADIO OPERATION (CONTINUED) RADIO PRESETS - button. 4 5 6 2 1 Press the PROG./CH SAVE button 1; the station will automatically be tuned...
... memory number appears on . Press the PLAY/PAUSE (®p)/ CD button to select Select a station using the the unit on the display. COMPACT DISC (CD) OPERATION TO INSERT A CD 1 2 Open the CD compartment by pressing the CD Door Open/Close area. UP TO 5 AM AND 5 FM 1 2 3 12 Press the POWER button to turn Press the BAND button to select CD; playback will blink in . RADIO OPERATION (CONTINUED) RADIO PRESETS - button. 4 5 6 2 1 Press the PROG./CH SAVE button 1; the station will automatically be tuned...
User Guide
Page 10
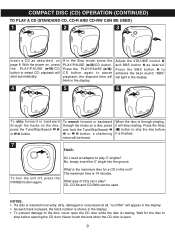
... the bass sound; Adjust the VOLUME control 1 and BBS button 2 as described on a disc, press and hold the Tune/Skip/Search o 1 or n 2 button, a chattering noise will appear in the display. • As each track is played, the track number is shown in this unit? With the power on the disc, press the Tune/Skip/Search o 1 or n 2 button. COMPACT DISC (CD) OPERATION (CONTINUED) TO PLAY A CD (STANDARD CD, CD-R AND CD-RW CAN BE USED) 1 2 3 2 1 Insert a CD as desired. playback will...
... the bass sound; Adjust the VOLUME control 1 and BBS button 2 as described on a disc, press and hold the Tune/Skip/Search o 1 or n 2 button, a chattering noise will appear in the display. • As each track is played, the track number is shown in this unit? With the power on the disc, press the Tune/Skip/Search o 1 or n 2 button. COMPACT DISC (CD) OPERATION (CONTINUED) TO PLAY A CD (STANDARD CD, CD-R AND CD-RW CAN BE USED) 1 2 3 2 1 Insert a CD as desired. playback will...
User Guide
Page 11
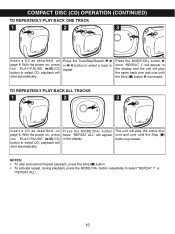
... and cancel Repeat playback, press the Stop (I ) button is pressed. "REPEAT 1" will appear in the display. The unit will appear in the display and the unit will start automatically. With the power on page 8. With the power on page 8. Press the MODE/CH+ button twice; COMPACT DISC (CD) OPERATION (CONTINUED) TO REPEATEDLY PLAY BACK ONE TRACK 1 2 3 12 2 1 Insert a CD as described on , press the PLAY/PAUSE (®p)/CD button to select...
... and cancel Repeat playback, press the Stop (I ) button is pressed. "REPEAT 1" will appear in the display. The unit will appear in the display and the unit will start automatically. With the power on page 8. With the power on page 8. Press the MODE/CH+ button twice; COMPACT DISC (CD) OPERATION (CONTINUED) TO REPEATEDLY PLAY BACK ONE TRACK 1 2 3 12 2 1 Insert a CD as described on , press the PLAY/PAUSE (®p)/CD button to select...
User Guide
Page 12
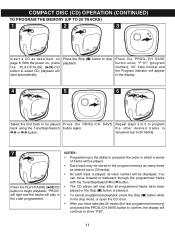
... the order programmed. playback will play in the stop playback. COMPACT DISC (CD) OPERATION (CONTINUED) TO PROGRAM THE MEMORY (UP TO 20 TRACKS) 1 2 3 Insert a CD as desired (up to 20 tracks). 7 Press the PLAY/PAUSE (®p)/CD button to begin playback; With the power on page 8. "P 01" (program number), "00" track number and the Program indicator will be played. • Each track may be stored in o 1 or n 2 button. the other desired tracks in the program memory as many times as...
... the order programmed. playback will play in the stop playback. COMPACT DISC (CD) OPERATION (CONTINUED) TO PROGRAM THE MEMORY (UP TO 20 TRACKS) 1 2 3 Insert a CD as desired (up to 20 tracks). 7 Press the PLAY/PAUSE (®p)/CD button to begin playback; With the power on page 8. "P 01" (program number), "00" track number and the Program indicator will be played. • Each track may be stored in o 1 or n 2 button. the other desired tracks in the program memory as many times as...
User Guide
Page 13
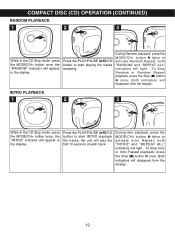
... first 10 seconds of each track. Both indicators will disappear from the display. Press the PLAY/PAUSE (®p)/CD button to start INTRO playback the tracks; To Stop Random or Random Repeat playback, press the Stop (I ) button 2 once. To Stop Intro or Intro Repeat playback, press the Stop (I ) button 2 once. COMPACT DISC (CD) OPERATION (CONTINUED) RANDOM PLAYBACK 1 2 3 2 1 While in the CD Stop mode, press the MODE/CH+ button once, the "RANDOM" indicator...
... first 10 seconds of each track. Both indicators will disappear from the display. Press the PLAY/PAUSE (®p)/CD button to start INTRO playback the tracks; To Stop Random or Random Repeat playback, press the Stop (I ) button 2 once. To Stop Intro or Intro Repeat playback, press the Stop (I ) button 2 once. COMPACT DISC (CD) OPERATION (CONTINUED) RANDOM PLAYBACK 1 2 3 2 1 While in the CD Stop mode, press the MODE/CH+ button once, the "RANDOM" indicator...
User Guide
Page 14
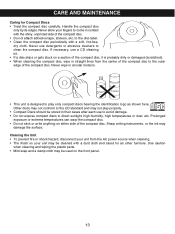
... in straight lines from the AC power source when cleaning. • The finish on your unit from the center of the compact disc to the disc label. • Clean the compact disc periodically with a dust cloth and cared for Compact Discs • Treat the compact disc carefully. Never wipe in their cases after each use a CD cleaning kit. • If a disc skips or...
... in straight lines from the AC power source when cleaning. • The finish on your unit from the center of the compact disc to the disc label. • Clean the compact disc periodically with a dust cloth and cared for Compact Discs • Treat the compact disc carefully. Never wipe in their cases after each use a CD cleaning kit. • If a disc skips or...
User Guide
Page 15
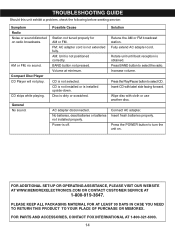
.... FOR ADDITIONAL SET-UP OR OPERATING ASSISTANCE, PLEASE VISIT OUR WEBSITE AT WWW.MEMOREXELECTRONICS.COM OR CONTACT CUSTOMER SERVICE AT 1-800-919-3647. No batteries, dead batteries or batteries not installed properly. Press the POWER button to turn the unit on radio broadcasts. CD skips while playing. Retune the AM or FM broadcast station. Compact Disc Player CD Player will not play. Fully extend AC adapter cord. TROUBLESHOOTING GUIDE Should this unit exhibit a problem, check the...
.... FOR ADDITIONAL SET-UP OR OPERATING ASSISTANCE, PLEASE VISIT OUR WEBSITE AT WWW.MEMOREXELECTRONICS.COM OR CONTACT CUSTOMER SERVICE AT 1-800-919-3647. No batteries, dead batteries or batteries not installed properly. Press the POWER button to turn the unit on radio broadcasts. CD skips while playing. Retune the AM or FM broadcast station. Compact Disc Player CD Player will not play. Fully extend AC adapter cord. TROUBLESHOOTING GUIDE Should this unit exhibit a problem, check the...

User Guide
Page 16
SPECIFICATIONS GENERAL: Power Source DC IN 9V, Center Positive Battery 9V DC (6 x 1.5V "C" size batteries) Alkaline is recommended for longer life Speaker...2 x 3W 4 Ohms Output Power ...2 x 1.2W RADIO SECTION: Frequency Range (FM 87.5 - 108 MHz Frequency Range (AM 520 -1710 KHz CD SECTION: Disc Diameter 4.72" (120mm) 3.15" (80mm) Single CD Optical Source Semiconductor Laser Specifications are subject to change without notice. 15
SPECIFICATIONS GENERAL: Power Source DC IN 9V, Center Positive Battery 9V DC (6 x 1.5V "C" size batteries) Alkaline is recommended for longer life Speaker...2 x 3W 4 Ohms Output Power ...2 x 1.2W RADIO SECTION: Frequency Range (FM 87.5 - 108 MHz Frequency Range (AM 520 -1710 KHz CD SECTION: Disc Diameter 4.72" (120mm) 3.15" (80mm) Single CD Optical Source Semiconductor Laser Specifications are subject to change without notice. 15


