
User Guide
Page 1
MP8806 User's Guide Portable CD Player with AM/FM Stereo Radio Before operating this product, please read these instructions completely.
MP8806 User's Guide Portable CD Player with AM/FM Stereo Radio Before operating this product, please read these instructions completely.

User Guide
Page 7
... 1 2 3 4 5 6 7 8 9 10 11 12 13 14 15 16 17 18 19 20 21 22 1. 2. 3. 4. 5. 6. 7. 8. 9. 10. 11. 12. 13. 14. PLAY/PAUSE (®p) Button CD Door Open/Close Area STOP (I) Button Right Speaker SKIP/SEARCH n Button SKIP/SEARCH o Button Battery Compartment (Bottom of Unit) (DETACHABLE POWER CORD PART NO. 00003...Antenna (Rear of Unit) AUX IN Jack (Rear of Unit) Carrying Handle VOLUME Control FUNCTION Switch (AUX.CD/RADIO/OFF) MIX (Random) Button Left Speaker REPEAT Button PROGRAM Button Display TUNING Control CD Compartment BAND Switch (AM/FM/FM ST.) AC Power Jack (Rear of Unit) NO. 00002*) (BATTERY...
... 1 2 3 4 5 6 7 8 9 10 11 12 13 14 15 16 17 18 19 20 21 22 1. 2. 3. 4. 5. 6. 7. 8. 9. 10. 11. 12. 13. 14. PLAY/PAUSE (®p) Button CD Door Open/Close Area STOP (I) Button Right Speaker SKIP/SEARCH n Button SKIP/SEARCH o Button Battery Compartment (Bottom of Unit) (DETACHABLE POWER CORD PART NO. 00003...Antenna (Rear of Unit) AUX IN Jack (Rear of Unit) Carrying Handle VOLUME Control FUNCTION Switch (AUX.CD/RADIO/OFF) MIX (Random) Button Left Speaker REPEAT Button PROGRAM Button Display TUNING Control CD Compartment BAND Switch (AM/FM/FM ST.) AC Power Jack (Rear of Unit) NO. 00002*) (BATTERY...
User Guide
Page 10
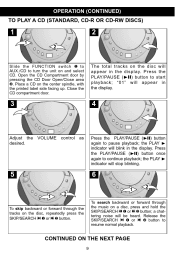
... NEXT PAGE 9 Release the SKIP/SEARCH o 1 or n 2 button to continue playback; a chattering noise will appear in the display. TO PLAY A CD (STANDARD, CD-R OR CD-RW DISCS) OPERATION (CONTINUED) 1 1 2 2 The total tracks on the center spindle, with the printed label side facing up. Place... a CD on the disc will be heard. Close the CD compartment door. 3 4 Adjust the VOLUME control as desired. 5 1 2 Press the PLAY/PAUSE (®p) button again to turn the unit on and select CD. Slide the FUNCTION switch 1 to AUX./CD to pause playback; Press ...
... NEXT PAGE 9 Release the SKIP/SEARCH o 1 or n 2 button to continue playback; a chattering noise will appear in the display. TO PLAY A CD (STANDARD, CD-R OR CD-RW DISCS) OPERATION (CONTINUED) 1 1 2 2 The total tracks on the center spindle, with the printed label side facing up. Place... a CD on the disc will be heard. Close the CD compartment door. 3 4 Adjust the VOLUME control as desired. 5 1 2 Press the PLAY/PAUSE (®p) button again to turn the unit on and select CD. Slide the FUNCTION switch 1 to AUX./CD to pause playback; Press ...
User Guide
Page 11
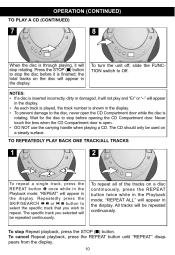
...specific track you wish to the disc, never open . • DO NOT use the carrying handle when playing a CD. Never touch the lens when the CD Compartment door is open the CD Compartment door while the disc is rotating. "REPEAT ALL" will appear in the display. • To prevent damage ... will be repeated continuously. Wait for the disc to select the specific track that you selected will stop the disc before opening the CD Compartment door. TO PLAY A CD (CONTINUED) OPERATION (CONTINUED) 7 8 When the disc is through playing, it is finished; the total tracks on the disc ...
...specific track you wish to the disc, never open . • DO NOT use the carrying handle when playing a CD. Never touch the lens when the CD Compartment door is open the CD Compartment door while the disc is rotating. "REPEAT ALL" will appear in the display. • To prevent damage ... will be repeated continuously. Wait for the disc to select the specific track that you selected will stop the disc before opening the CD Compartment door. TO PLAY A CD (CONTINUED) OPERATION (CONTINUED) 7 8 When the disc is through playing, it is finished; the total tracks on the disc ...
User Guide
Page 12
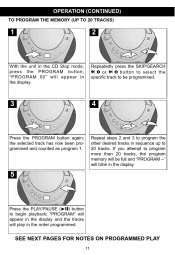
... the tracks will be programmed. 3 4 1 2 Press the PROGRAM button again; TO PROGRAM THE MEMORY (UP TO 20 TRACKS) OPERATION (CONTINUED) 1 2 1 With the unit in the CD Stop mode, press the PROGRAM button;
... the tracks will be programmed. 3 4 1 2 Press the PROGRAM button again; TO PROGRAM THE MEMORY (UP TO 20 TRACKS) OPERATION (CONTINUED) 1 2 1 With the unit in the CD Stop mode, press the PROGRAM button;

User Guide
Page 13
... until "REPEAT" disappears from the display to cancel the Repeat function and press the STOP (I) button to select Radio or Off, or open the CD Compartment door. Press the PLAY/PAUSE ( ®p ) button to hear them . You can move forward or backward through the programmed tracks with... the SKIP/SEARCH o or n buttons. • The CD player will appear in the display. The "PROGRAM" indicator will blink and the "REPEAT ALL" indicator will stop after all programmed tracks have been played...
... until "REPEAT" disappears from the display to cancel the Repeat function and press the STOP (I) button to select Radio or Off, or open the CD Compartment door. Press the PLAY/PAUSE ( ®p ) button to hear them . You can move forward or backward through the programmed tracks with... the SKIP/SEARCH o or n buttons. • The CD player will appear in the display. The "PROGRAM" indicator will blink and the "REPEAT ALL" indicator will stop after all programmed tracks have been played...

User Guide
Page 14
To cancel Random playback and stop Random playback before it is finished. The unit will begin automatically. Press the STOP ( I ) button to stop playback entirely, press the STOP (I) button. 13 "MIX" will appear in the Stop mode, press the MIX (Random) button once; TO RANDOMLY PLAY A CD OPERATION (CONTINUED) 1 2 While in the display and playback will randomly play the tracks on the CD and then stop.
To cancel Random playback and stop Random playback before it is finished. The unit will begin automatically. Press the STOP ( I ) button to stop playback entirely, press the STOP (I) button. 13 "MIX" will appear in the Stop mode, press the MIX (Random) button once; TO RANDOMLY PLAY A CD OPERATION (CONTINUED) 1 2 While in the display and playback will randomly play the tracks on the CD and then stop.

User Guide
Page 15
...'s AUX OUT jack. OPERATION (CONTINUED) 1 1 2 2 Connect the external unit to turn the unit on and select AUX. USING AN EXTERNAL UNIT You can not playback a CD while an audio cable is connected to the AUX IN jack. • Connecting the unit to an external audio source will allow you to broadcast... cable (not included) from the AUX IN jack on . Adjust the VOLUME Control as a cassette player, MP3 player, etc. Slide the FUNCTION switch 2 to AUX./CD to the AUX IN jack 1.
...'s AUX OUT jack. OPERATION (CONTINUED) 1 1 2 2 Connect the external unit to turn the unit on and select AUX. USING AN EXTERNAL UNIT You can not playback a CD while an audio cable is connected to the AUX IN jack. • Connecting the unit to an external audio source will allow you to broadcast... cable (not included) from the AUX IN jack on . Adjust the VOLUME Control as a cassette player, MP3 player, etc. Slide the FUNCTION switch 2 to AUX./CD to the AUX IN jack 1.

User Guide
Page 16
... disc. • Do not attach adhesive tape, stickers, etc. to play properly. • Compact discs should be stored in their cases after each use a CD cleaning kit. • If a disc skips or gets stuck on your unit may not play only compact discs bearing the identification logo as other furniture...or shock hazard, disconnect your unit from the center of the compact disc to clean the compact disc. Other discs may not conform to the CD standard and may be used on either side of the compact disc. Never allow your fingers to direct sunlight, high humidity, high temperatures...
... disc. • Do not attach adhesive tape, stickers, etc. to play properly. • Compact discs should be stored in their cases after each use a CD cleaning kit. • If a disc skips or gets stuck on your unit may not play only compact discs bearing the identification logo as other furniture...or shock hazard, disconnect your unit from the center of the compact disc to clean the compact disc. Other discs may not conform to the CD standard and may be used on either side of the compact disc. Never allow your fingers to direct sunlight, high humidity, high temperatures...

User Guide
Page 17
...FM telescopic antenna. If you experience a problem with soft cloth. Moisture condensation on . FM: Telescopic antenna is obtained. 16 Try another disc. CD Compartment door not closed. AM/FM, poor sound. Reinsert disc correctly. Increase volume. Wipe disc with this unit, check the chart below before ... AC cord connection. AM or FM, no sound. Disc will not turn on disc. Disc inserted incorrectly. Dirty or defective CD. No sound. VOLUME control set to minimum. Defective disc. VOLUME control set to Radio. AM: Unit is not positioned correctly. Close...
...FM telescopic antenna. If you experience a problem with soft cloth. Moisture condensation on . FM: Telescopic antenna is obtained. 16 Try another disc. CD Compartment door not closed. AM/FM, poor sound. Reinsert disc correctly. Increase volume. Wipe disc with this unit, check the chart below before ... AC cord connection. AM or FM, no sound. Disc will not turn on disc. Disc inserted incorrectly. Dirty or defective CD. No sound. VOLUME control set to minimum. Defective disc. VOLUME control set to Radio. AM: Unit is not positioned correctly. Close...
User Guide
Page 18
... life Speaker...2 x 1.5W Output Power ...2 x 0.8W Dimensions ...11" (W) x 9.5" (D) x 5.5" (H) Weight...3.5 lbs RADIO SECTION: Frequency Range (FM)...88-108 MHz Frequency Range (AM) ...540-1700 KHz SPECIFICATIONS CD SECTION: Disc Diameter ...4.72" (120mm) 3.15" (80mm) Single CD Optical Source...Semiconductor Laser Specifications are subject to change without notice.
... life Speaker...2 x 1.5W Output Power ...2 x 0.8W Dimensions ...11" (W) x 9.5" (D) x 5.5" (H) Weight...3.5 lbs RADIO SECTION: Frequency Range (FM)...88-108 MHz Frequency Range (AM) ...540-1700 KHz SPECIFICATIONS CD SECTION: Disc Diameter ...4.72" (120mm) 3.15" (80mm) Single CD Optical Source...Semiconductor Laser Specifications are subject to change without notice.


