

User Guide
Page 1
MSS4001 User's Guide Orb Speaker System Before operating this product, please read these instructions completely.
MSS4001 User's Guide Orb Speaker System Before operating this product, please read these instructions completely.
User Guide
Page 2
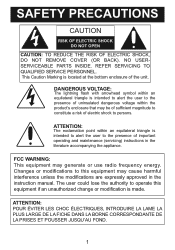
... change or modification is intended to alert the user to the presence of uninsulated dangerous voltage within the product's enclosure that may generate or use radio frequency energy. SAFETY PRECAUTIONS CAUTION RISK OF ELECTRIC SHOCK DO NOT OPEN CAUTION: TO REDUCE THE RISK OF ELECTRIC SHOCK, DO NOT REMOVE COVER (OR BACK). REFER SERVICING TO QUALIFIED SERVICE...
... change or modification is intended to alert the user to the presence of uninsulated dangerous voltage within the product's enclosure that may generate or use radio frequency energy. SAFETY PRECAUTIONS CAUTION RISK OF ELECTRIC SHOCK DO NOT OPEN CAUTION: TO REDUCE THE RISK OF ELECTRIC SHOCK, DO NOT REMOVE COVER (OR BACK). REFER SERVICING TO QUALIFIED SERVICE...

User Guide
Page 3
... for AC connection. However, there is recommended to which can radiate radio frequency energy and, if not installed and used in a particular installation. WARNING: TO PREVENT FIRE OR SHOCK HAZARD, DO NOT EXPOSE THIS UNIT TO RAIN OR MOISTURE. SAFETY PRECAUTIONS INFORMATION: This equipment generates, uses and can be determined by turning the equipment off and on, the user is...
... for AC connection. However, there is recommended to which can radiate radio frequency energy and, if not installed and used in a particular installation. WARNING: TO PREVENT FIRE OR SHOCK HAZARD, DO NOT EXPOSE THIS UNIT TO RAIN OR MOISTURE. SAFETY PRECAUTIONS INFORMATION: This equipment generates, uses and can be determined by turning the equipment off and on, the user is...

User Guide
Page 4
DC IN Jack 3. Audio In Jack 5. Power/Volume Control 4. Battery Compartment (Bottom of Right Speaker) 3 LOCATION OF CONTROLS FRONT 1. Power Indicator REAR 1. Right Speaker with Interchangeable Speaker Rings 2. L (Left) Audio Out Jack 4. Left Speaker with Interchangeable Speaker Rings 5. Speaker Stand 3. LINE IN Jack 2.
DC IN Jack 3. Audio In Jack 5. Power/Volume Control 4. Battery Compartment (Bottom of Right Speaker) 3 LOCATION OF CONTROLS FRONT 1. Power Indicator REAR 1. Right Speaker with Interchangeable Speaker Rings 2. L (Left) Audio Out Jack 4. Left Speaker with Interchangeable Speaker Rings 5. Speaker Stand 3. LINE IN Jack 2.
User Guide
Page 5
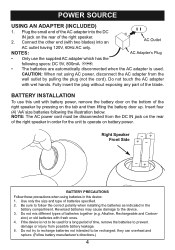
... cord). If the device is used for the unit to operate on the rear of time, remove the batteries to be disconnected from the wall outlet by pressing on the rear of the right speaker in this unit with two blades) into the DC IN jack on battery power. Right Speaker + Front Side - - + - + + - Alkaline, Rechargeable and Carbon- Fully insert the plug without exposing any part...
... cord). If the device is used for the unit to operate on the rear of time, remove the batteries to be disconnected from the wall outlet by pressing on the rear of the right speaker in this unit with two blades) into the DC IN jack on battery power. Right Speaker + Front Side - - + - + + - Alkaline, Rechargeable and Carbon- Fully insert the plug without exposing any part...

User Guide
Page 6
... insert batteries as desired. Turn on page 4. Place each speaker on the Speaker stand, if desired. 2 Insert one side of the audio cable's plug into the L (Left) Audio Out Jack on the Right speaker and the other side into the Audio In Jack on the left speaker. 3 4 Connect the other audio cable's plug into a LINE OUT jack on ; Rotate counterclockwise u1ntil a click is heard to turn the speakers off. Rotate the Power/Volume control clockwise...
... insert batteries as desired. Turn on page 4. Place each speaker on the Speaker stand, if desired. 2 Insert one side of the audio cable's plug into the L (Left) Audio Out Jack on the Right speaker and the other side into the Audio In Jack on the left speaker. 3 4 Connect the other audio cable's plug into a LINE OUT jack on ; Rotate counterclockwise u1ntil a click is heard to turn the speakers off. Rotate the Power/Volume control clockwise...
User Guide
Page 7
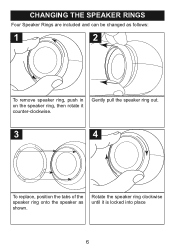
CHANGING THE SPEAKER RINGS Four Speaker Rings are included and can be changed as shown. Rotate the speaker ring clockwise until it counter-clockwise. Gently pull the speaker ring out. 3 4 To replace, position the tabs of the speaker ring onto the speaker as follows: 1 2 To remove speaker ring, push in on the speaker ring, then rotate it is locked into place 6
CHANGING THE SPEAKER RINGS Four Speaker Rings are included and can be changed as shown. Rotate the speaker ring clockwise until it counter-clockwise. Gently pull the speaker ring out. 3 4 To replace, position the tabs of the speaker ring onto the speaker as follows: 1 2 To remove speaker ring, push in on the speaker ring, then rotate it is locked into place 6
User Guide
Page 8
SPECIFICATIONS GENERAL: Power requirements.....DC 6V (4 x 1.5 "AA" size batteries Alkaline is recommended for longer life DC IN 9V adapter (center positive) Speaker 2 x 4 Ohms Output Power 2 x 3W FOR ADDITIONAL SET-UP OR OPERATING ASSISTANCE, PLEASE VISIT OUR WEBSITE AT: WWW.MEMOREXELECTRONICS.COM OR CONTACT CUSTOMER SERVICE AT (954) 660-7100. FOR PARTS AND ACCESSORIES, CONTACT FOX INTERNATIONAL AT 1-800-321-6993. 7 PLEASE KEEP ALL PACKAGING MATERIAL FOR AT LEAST 90 DAYS IN CASE YOU NEED TO RETURN THIS PRODUCT TO YOUR PLACE OF PURCHASE OR MEMOREX.
SPECIFICATIONS GENERAL: Power requirements.....DC 6V (4 x 1.5 "AA" size batteries Alkaline is recommended for longer life DC IN 9V adapter (center positive) Speaker 2 x 4 Ohms Output Power 2 x 3W FOR ADDITIONAL SET-UP OR OPERATING ASSISTANCE, PLEASE VISIT OUR WEBSITE AT: WWW.MEMOREXELECTRONICS.COM OR CONTACT CUSTOMER SERVICE AT (954) 660-7100. FOR PARTS AND ACCESSORIES, CONTACT FOX INTERNATIONAL AT 1-800-321-6993. 7 PLEASE KEEP ALL PACKAGING MATERIAL FOR AT LEAST 90 DAYS IN CASE YOU NEED TO RETURN THIS PRODUCT TO YOUR PLACE OF PURCHASE OR MEMOREX.


