User Guide
Page 2
... Inc., registered in the literature accompanying the appliance. and other countries. 1 NO USERSERVICEABLE PARTS INSIDE. iPod is intended to alert the user to the presence of important operating and maintenance (servicing) instructions in the U.S. ATTENTION: The exclamation point within the product's enclosure that may be of...presence of uninsulated dangerous voltage within an equilateral triangle is intended to alert the user to persons. SAFETY PRECAUTIONS CAUTION RISK OF ELECTRIC SHOCK DO NOT OPEN CAUTION: TO REDUCE THE RISK OF ELECTRIC SHOCK, DO NOT REMOVE COVER (OR BACK).
... Inc., registered in the literature accompanying the appliance. and other countries. 1 NO USERSERVICEABLE PARTS INSIDE. iPod is intended to alert the user to the presence of important operating and maintenance (servicing) instructions in the U.S. ATTENTION: The exclamation point within the product's enclosure that may be of...presence of uninsulated dangerous voltage within an equilateral triangle is intended to alert the user to persons. SAFETY PRECAUTIONS CAUTION RISK OF ELECTRIC SHOCK DO NOT OPEN CAUTION: TO REDUCE THE RISK OF ELECTRIC SHOCK, DO NOT REMOVE COVER (OR BACK).
User Guide
Page 3
...; Minimum distances of the AC adapter should not be obstructed OR should not be impeded by covering the ventilation openings with European Union CE - EMC Directive (89/336/EEC) and European Union CE - SURGE PROTECTORS: It is recommended to use . • Excessively high sound pressure could harm or damage hearing. • Battery shall not be exposed to...
...; Minimum distances of the AC adapter should not be obstructed OR should not be impeded by covering the ventilation openings with European Union CE - EMC Directive (89/336/EEC) and European Union CE - SURGE PROTECTORS: It is recommended to use . • Excessively high sound pressure could harm or damage hearing. • Battery shall not be exposed to...
User Guide
Page 4
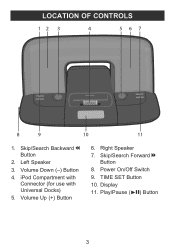
Volume Up (+) Button 6. Display 11. Left Speaker 3. Volume Down (-) Button 4. iPod Compartment with Connector (for use with Universal Docks) 5. Power On/Off Switch 9. Play/Pause (®p) Button 3 Skip/Search Forward l Button 8. LOCATION OF CONTROLS 12 3 4 567 8 9 10 11 1. TIME SET Button 10. Skip/Search Backward m Button 2. Right Speaker 7.
Volume Up (+) Button 6. Display 11. Left Speaker 3. Volume Down (-) Button 4. iPod Compartment with Connector (for use with Universal Docks) 5. Power On/Off Switch 9. Play/Pause (®p) Button 3 Skip/Search Forward l Button 8. LOCATION OF CONTROLS 12 3 4 567 8 9 10 11 1. TIME SET Button 10. Skip/Search Backward m Button 2. Right Speaker 7.
User Guide
Page 5
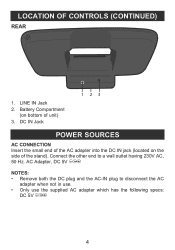
Connect the other end to disconnect the AC adapter when not in use. • Only use the supplied AC adapter which has the following specs: DC 5V Z 4 LINE IN Jack 2. Battery Compartment (on the side of unit) 3. LOCATION OF CONTROLS (CONTINUED) REAR 1. AC Adapter, DC 5V Z NOTES: • Remove both the DC plug and the AC-IN plug to a wall outlet having 230V AC, 50 Hz. DC IN Jack 1 23 POWER SOURCES AC CONNECTION Insert the small end of the AC adapter into the DC IN jack (located on bottom of the stand).
Connect the other end to disconnect the AC adapter when not in use. • Only use the supplied AC adapter which has the following specs: DC 5V Z 4 LINE IN Jack 2. Battery Compartment (on the side of unit) 3. LOCATION OF CONTROLS (CONTINUED) REAR 1. AC Adapter, DC 5V Z NOTES: • Remove both the DC plug and the AC-IN plug to a wall outlet having 230V AC, 50 Hz. DC IN Jack 1 23 POWER SOURCES AC CONNECTION Insert the small end of the AC adapter into the DC IN jack (located on bottom of the stand).
User Guide
Page 6
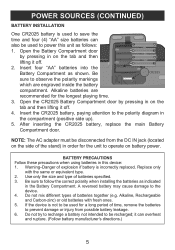
...: The AC adapter must be disconnected from possible battery leakage. 6. Do not mix different types of explosion if battery is incorrectly replaced. POWER SOURCES (CONTINUED) BATTERY INSTALLATION One CR2025 battery is used to save the time and four (4) "AA" size batteries can overheat and rupture. (Follow battery manufacturer's directions.) 5 Warning-Danger of batteries together (e.g. Do not try to recharge a battery not intended to operate on the tab...
...: The AC adapter must be disconnected from possible battery leakage. 6. Do not mix different types of explosion if battery is incorrectly replaced. POWER SOURCES (CONTINUED) BATTERY INSTALLATION One CR2025 battery is used to save the time and four (4) "AA" size batteries can overheat and rupture. (Follow battery manufacturer's directions.) 5 Warning-Danger of batteries together (e.g. Do not try to recharge a battery not intended to operate on the tab...
User Guide
Page 7
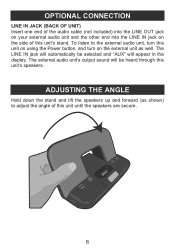
...'s stand. ADJUSTING THE ANGLE Hold down the stand and lift the speakers up and forward (as well. The external audio unit's output sound will be selected and "AUX" will automatically be heard through this unit's speakers. The LINE IN jack will appear in the display. OPTIONAL CONNECTION LINE IN JACK (BACK OF UNIT) Insert one end of the audio cable (not included) into the LINE OUT jack...
...'s stand. ADJUSTING THE ANGLE Hold down the stand and lift the speakers up and forward (as well. The external audio unit's output sound will be selected and "AUX" will automatically be heard through this unit's speakers. The LINE IN jack will appear in the display. OPTIONAL CONNECTION LINE IN JACK (BACK OF UNIT) Insert one end of the audio cable (not included) into the LINE OUT jack...
User Guide
Page 8
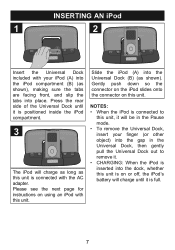
... AC adapter. Please see the next page for instructions on or off, the iPod's battery will be in the Pause mode. • To remove the Universal Dock, insert your finger (or other object) into the gap in the Universal Dock, then gently pull the Universal Dock out to remove it is on using an iPod with your iPod (A) into the iPod compartment (B) (as shown), making...
... AC adapter. Please see the next page for instructions on or off, the iPod's battery will be in the Pause mode. • To remove the Universal Dock, insert your finger (or other object) into the gap in the Universal Dock, then gently pull the Universal Dock out to remove it is on using an iPod with your iPod (A) into the iPod compartment (B) (as shown), making...
User Guide
Page 9
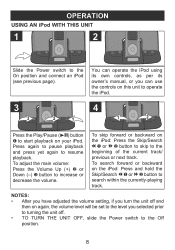
...; After you have adjusted the volume setting, if you turn the unit off . • TO TURN THE UNIT OFF, slide the Power switch to search within the currently-playing track. To adjust the main volume: Press the Volume Up (+) 2 or Down (-) 3 button to the On position and connect an iPod (see previous page). OPERATION USING AN iPod WITH THIS UNIT 1 2 Slide the Power switch to increase or decrease...
...; After you have adjusted the volume setting, if you turn the unit off . • TO TURN THE UNIT OFF, slide the Power switch to search within the currently-playing track. To adjust the main volume: Press the Volume Up (+) 2 or Down (-) 3 button to the On position and connect an iPod (see previous page). OPERATION USING AN iPod WITH THIS UNIT 1 2 Slide the Power switch to increase or decrease...
User Guide
Page 10
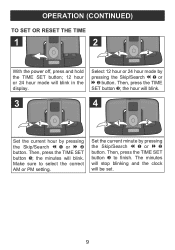
... stop blinking and the clock will blink in the display. OPERATION (CONTINUED) TO SET OR RESET THE TIME 1 2 31 2 With the power off, press and hold the TIME SET button; 12 hour or 24 hour mode will be set. 9 Make sure to finish. Select 12 hour or 24 hour mode by pressing the Skip/Search m 1 or l 2 button. the minutes...
... stop blinking and the clock will blink in the display. OPERATION (CONTINUED) TO SET OR RESET THE TIME 1 2 31 2 With the power off, press and hold the TIME SET button; 12 hour or 24 hour mode will be set. 9 Make sure to finish. Select 12 hour or 24 hour mode by pressing the Skip/Search m 1 or l 2 button. the minutes...
User Guide
Page 11
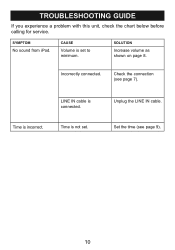
SOLUTION Increase volume as shown on page 8. TROUBLESHOOTING GUIDE If you experience a problem with this unit, check the chart below before calling for service. Line in cable. Unplug the line in cable is not set to minimum. Check the connection (see page 9). 10 Time is connected. Incorrectly connected. CAUSE Volume is incorrect. SYMPTOM No sound from iPod. Time is set . Set the time (see page 7).
SOLUTION Increase volume as shown on page 8. TROUBLESHOOTING GUIDE If you experience a problem with this unit, check the chart below before calling for service. Line in cable. Unplug the line in cable is not set to minimum. Check the connection (see page 9). 10 Time is connected. Incorrectly connected. CAUSE Volume is incorrect. SYMPTOM No sound from iPod. Time is set . Set the time (see page 7).
User Guide
Page 12
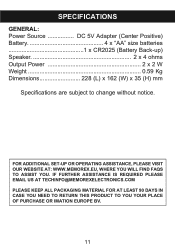
... YOU YOUR PLACE OF PURCHASE OR IMATION EUROPE BV. 11 SPECIFICATIONS GENERAL: Power Source DC 5V Adapter (Center Positive) Battery 4 x "AA" size batteries 1 x CR2025 (Battery Back-up) Speaker 2 x 4 ohms Output Power 2 x 2 W Weight 0.59 Kg Dimensions 228 (L) x 162 (W) x 35 (H) mm Specifications are subject to change without notice. FOR ADDITIONAL SET-UP OR OPERATING ASSISTANCE, PLEASE VISIT OUR WEBSITE AT: WWW.MEMOREX.EU, WHERE YOU WILL FIND FAQS TO ASSIST YOU.
... YOU YOUR PLACE OF PURCHASE OR IMATION EUROPE BV. 11 SPECIFICATIONS GENERAL: Power Source DC 5V Adapter (Center Positive) Battery 4 x "AA" size batteries 1 x CR2025 (Battery Back-up) Speaker 2 x 4 ohms Output Power 2 x 2 W Weight 0.59 Kg Dimensions 228 (L) x 162 (W) x 35 (H) mm Specifications are subject to change without notice. FOR ADDITIONAL SET-UP OR OPERATING ASSISTANCE, PLEASE VISIT OUR WEBSITE AT: WWW.MEMOREX.EU, WHERE YOU WILL FIND FAQS TO ASSIST YOU.

User Guide
Page 106
LINE IN LINE OUT LINE IN LINE IN AUX
LINE IN LINE OUT LINE IN LINE IN AUX

User Guide
Page 108
LINE IN
LINE IN

User Guide
Page 111
iPod Apple Inc
iPod Apple Inc

User Guide
Page 112
... iPod. Includes iPod Universal Dock. UU. Impreso en China memorex.com memorex.com iPod is a trademark of Apple Inc., registered in China Weston, Florida. This product has been designed speci cally to meet Apple performance standards. iPod es una marca registrada de Apple Inc. Compatible with any iPod with iPod and has been certi ed by the developer to work with dock connector...
... iPod. Includes iPod Universal Dock. UU. Impreso en China memorex.com memorex.com iPod is a trademark of Apple Inc., registered in China Weston, Florida. This product has been designed speci cally to meet Apple performance standards. iPod es una marca registrada de Apple Inc. Compatible with any iPod with iPod and has been certi ed by the developer to work with dock connector...


