
Product Manual
Page 2
... multiple cups of coffee, one directly after another (coffee pot 23 Preparing coffee beverages from ground coffee 23 Beverages with milk 25 Instructions for the milk container 25 Preparing beverages with milk 26 Preparing hot water 26 Preparing beverages from a profile 26 After use 26 Customizing your coffee 27 Grinder setting 27 Displaying and adjusting the parameters for a beverage 28 Ground amount 28 Brewing temperature 28 Pre-brewing ground coffee 29 Setting the serving...
... multiple cups of coffee, one directly after another (coffee pot 23 Preparing coffee beverages from ground coffee 23 Beverages with milk 25 Instructions for the milk container 25 Preparing beverages with milk 26 Preparing hot water 26 Preparing beverages from a profile 26 After use 26 Customizing your coffee 27 Grinder setting 27 Displaying and adjusting the parameters for a beverage 28 Ground amount 28 Brewing temperature 28 Pre-brewing ground coffee 29 Setting the serving...
Product Manual
Page 4
... Milk container with lid 48 Main dispenser 49 Milk valve maintenance 50 Water tank 51 Waste unit 51 Drip tray 52 Drip tray cover 53 Bean container 53 Main dispenser connector 53 Interior and unit door 54 Brew unit 54 Removing the brew unit and rinsing it by hand 54 Degreasing the brew unit 56 Exterior 57 Descaling 58 Frequently asked questions 60 Cleaning clogged milk pipework 68 After sales service 71 Installation instructions 73 Caring...
... Milk container with lid 48 Main dispenser 49 Milk valve maintenance 50 Water tank 51 Waste unit 51 Drip tray 52 Drip tray cover 53 Bean container 53 Main dispenser connector 53 Interior and unit door 54 Brew unit 54 Removing the brew unit and rinsing it by hand 54 Degreasing the brew unit 56 Exterior 57 Descaling 58 Frequently asked questions 60 Cleaning clogged milk pipework 68 After sales service 71 Installation instructions 73 Caring...
Product Manual
Page 5
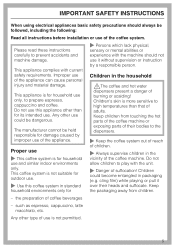
... instructions carefully to the dispensers. ~ Keep the coffee system out of reach of children. ~ Always supervise children in the household ,The coffee and hot water dispensers present a danger of coffee beverages - Do not use this coffee system in packaging (e.g. Proper use ~ This coffee system is for household use only, to prepare espresso, cappuccino and coffee. Children could be followed, including the following: Read all instructions before installation or use...
... instructions carefully to the dispensers. ~ Keep the coffee system out of reach of children. ~ Always supervise children in the household ,The coffee and hot water dispensers present a danger of coffee beverages - Do not use this coffee system in packaging (e.g. Proper use ~ This coffee system is for household use only, to prepare espresso, cappuccino and coffee. Children could be followed, including the following: Read all instructions before installation or use...

Product Manual
Page 6
... damage to the coffee machine, make sure that this basic safety requirement be met. Do not operate a damaged unit. ~ Be certain your appliance is any doubt, have the electrical system of this machine. ~ Before service or maintenance disconnect the power supply by either removing the fuse, "tripping" the circuit breaker or unplugging the unit. 6 IMPORTANT SAFETY INSTRUCTIONS Technical safety ~ Installation work by unauthorized persons...
... damage to the coffee machine, make sure that this basic safety requirement be met. Do not operate a damaged unit. ~ Be certain your appliance is any doubt, have the electrical system of this machine. ~ Before service or maintenance disconnect the power supply by either removing the fuse, "tripping" the circuit breaker or unplugging the unit. 6 IMPORTANT SAFETY INSTRUCTIONS Technical safety ~ Installation work by unauthorized persons...
Product Manual
Page 7
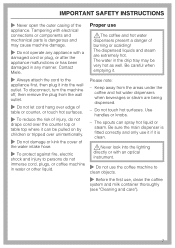
... steam are being dispensed. - The water in the drip tray may cause machine damage. ~ Do not operate any appliance with an optical instrument. ~ Do not use the coffee machine to clean objects. ~ Before the first use, clean the coffee system and milk container thoroughly (see "Cleaning and care"). 7 Please note: - Be careful when emptying it can spray hot liquid or steam. Keep away from the wall outlet...
... steam are being dispensed. - The water in the drip tray may cause machine damage. ~ Do not operate any appliance with an optical instrument. ~ Do not use the coffee machine to clean objects. ~ Before the first use, clean the coffee system and milk container thoroughly (see "Cleaning and care"). 7 Please note: - Be careful when emptying it can spray hot liquid or steam. Keep away from the wall outlet...

Product Manual
Page 8
... a Miele cleaning tablet for the water hardness level in fire, electric shock or injury to persons. ~ Please note the following regarding water: - Change the water every day to prevent a build-up in your area. Do not fill the bean container with coffee beans which have been treated or with the appropriate number of the coffee used, the brew unit can clog the coffee system. Descale...
... a Miele cleaning tablet for the water hardness level in fire, electric shock or injury to persons. ~ Please note the following regarding water: - Change the water every day to prevent a build-up in your area. Do not fill the bean container with coffee beans which have been treated or with the appropriate number of the coffee used, the brew unit can clog the coffee system. Descale...
Product Manual
Page 13
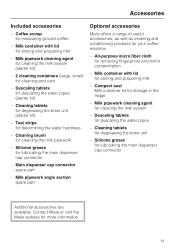
... strips for your coffee machine. - Milk pipework angle section spare part Optional accessories Miele offers a range of useful accessories, as well as cleaning and conditioning products for determining the water hardness - Compact seal Milk container lid for cleaning the milk system - Milk pipework cleaning agent for storage in the fridge - Milk container with lid for removing fingerprints and minor contamination - Silicone grease for degreasing the brew unit (starter kit) - Cleaning tablets for...
... strips for your coffee machine. - Milk pipework angle section spare part Optional accessories Miele offers a range of useful accessories, as well as cleaning and conditioning products for determining the water hardness - Compact seal Milk container lid for cleaning the milk system - Milk pipework cleaning agent for storage in the fridge - Milk container with lid for removing fingerprints and minor contamination - Silicone grease for degreasing the brew unit (starter kit) - Cleaning tablets for...
Product Manual
Page 28
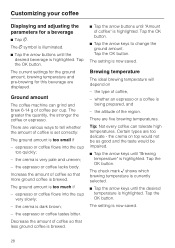
.... Tap the OK button. the crema is now saved. The setting is very pale and uneven; - The current settings for the ground amount, brewing temperature and pre-brewing for a beverage ^ Tap ,. Ground amount The coffee machine can tolerate high temperatures. There are various ways to change the ground amount. Tap the OK button. Brewing temperature The ideal brewing temperature will depend on...
.... Tap the OK button. the crema is now saved. The setting is very pale and uneven; - The current settings for the ground amount, brewing temperature and pre-brewing for a beverage ^ Tap ,. Ground amount The coffee machine can tolerate high temperatures. There are various ways to change the ground amount. Tap the OK button. Brewing temperature The ideal brewing temperature will depend on...

Product Manual
Page 33
..." you wish to the standard Miele profile, you have the following options: - Letters and numbers will revert to the main menu. Tip: Use the # key to change the name of the display. Creating a user profile If the unit is used by several people with different coffee preferences, you can select using the arrow keys. Tap the OK button. Tip: The most recently...
..." you wish to the standard Miele profile, you have the following options: - Letters and numbers will revert to the main menu. Tip: Use the # key to change the name of the display. Creating a user profile If the unit is used by several people with different coffee preferences, you can select using the arrow keys. Tap the OK button. Tip: The most recently...
Product Manual
Page 35
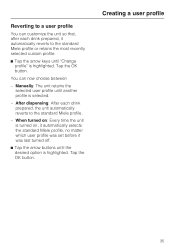
... custom profile. ^ Tap the arrow keys until "Change profile" is highlighted. Manually: The unit retains the selected user profile until the desired option is selected. - When turned on: Every time the unit is turned on, it automatically selects the standard Miele profile, no matter which user profile was set before it automatically reverts to the standard Miele profile. - Tap the OK button. Tap the OK button. Creating a user...
... custom profile. ^ Tap the arrow keys until "Change profile" is highlighted. Manually: The unit retains the selected user profile until the desired option is selected. - When turned on: Every time the unit is turned on, it automatically selects the standard Miele profile, no matter which user profile was set before it automatically reverts to the standard Miele profile. - Tap the OK button. Tap the OK button. Creating a user...
Product Manual
Page 41
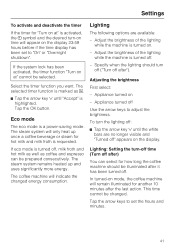
... hot milk and milk froth is requested. The selected timer function is marked as coffee and espresso can select for another 10 minutes after "). The steam system will only heat up and uses significantly more energy. The coffee machine will remain illuminated for how long the coffee machine should turn -off time (Turn off after it has been turned off after the last action. Lighting: Setting the turn off ("Turn...
... hot milk and milk froth is requested. The selected timer function is marked as coffee and espresso can select for another 10 minutes after "). The steam system will only heat up and uses significantly more energy. The coffee machine will remain illuminated for how long the coffee machine should turn -off time (Turn off after it has been turned off after the last action. Lighting: Setting the turn off ("Turn...

Product Manual
Page 47
... display. ^ Follow the instructions. The coffee machine will show the message "Clean milk pipework". It is started . The cleaning program cannot be cleaned will show the message "Days until the milk pipework needs to the cleaning mark 8 and insert", proceed as follows: Preparing the cleaning solution The milk system detergent was developed specifically for preparing beverages with milk again once the milk pipework has been cleaned. Cleaning and care Cleaning the milk pipework using the milk line cleaner Make...
... display. ^ Follow the instructions. The coffee machine will show the message "Clean milk pipework". It is started . The cleaning program cannot be cleaned will show the message "Days until the milk pipework needs to the cleaning mark 8 and insert", proceed as follows: Preparing the cleaning solution The milk system detergent was developed specifically for preparing beverages with milk again once the milk pipework has been cleaned. Cleaning and care Cleaning the milk pipework using the milk line cleaner Make...
Product Manual
Page 48
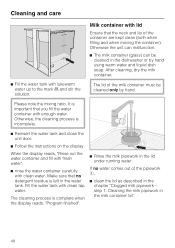
... water tank. When the display reads, "Rinse out the water container and fill with fresh water", ^ rinse the water container carefully with enough water. Otherwise the unit can malfunction. ^ The milk container (glass) can be cleaned only by hand using warm water and liquid dish soap. Please note the mixing ratio. Make sure that the neck and lip of the milk container must be cleaned in the lid...
... water tank. When the display reads, "Rinse out the water container and fill with fresh water", ^ rinse the water container carefully with enough water. Otherwise the unit can malfunction. ^ The milk container (glass) can be cleaned only by hand using warm water and liquid dish soap. Please note the mixing ratio. Make sure that the neck and lip of the milk container must be cleaned in the lid...
Product Manual
Page 55
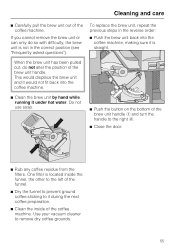
... into the coffee machine, making sure it is not in the reverse order: ^ Push the brew unit back into the coffee machine. ^ Clean the brew unit by hand while running it during the next coffee preparation. ^ Clean the inside of the brew unit handle. Use your vacuum cleaner to it under hot water. Do not use soap. ^ Push the button on the bottom of the coffee machine. When the brew unit has been...
... into the coffee machine, making sure it is not in the reverse order: ^ Push the brew unit back into the coffee machine. ^ Clean the brew unit by hand while running it during the next coffee preparation. ^ Clean the inside of the brew unit handle. Use your vacuum cleaner to it under hot water. Do not use soap. ^ Push the button on the bottom of the coffee machine. When the brew unit has been...
Product Manual
Page 57
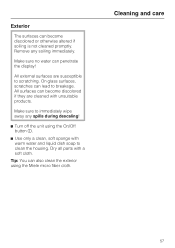
Remove any spills during descaling! ^ Turn off the unit using the Miele micro fiber cloth. On glass surfaces, scratches can also clean the exterior using the On/Off button K. ^ Use only a clean, soft sponge with warm water and liquid dish soap to breakage. Tip: You can lead to clean the housing. All external surfaces are cleaned with a soft cloth. All surfaces can become discolored if they...
Remove any spills during descaling! ^ Turn off the unit using the Miele micro fiber cloth. On glass surfaces, scratches can also clean the exterior using the On/Off button K. ^ Use only a clean, soft sponge with warm water and liquid dish soap to breakage. Tip: You can lead to clean the housing. All external surfaces are cleaned with a soft cloth. All surfaces can become discolored if they...
Product Manual
Page 63
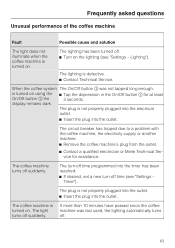
... time programmed into the timer has been reached. ^ If desired, set a new turn-off suddenly. Lighting"). is turned on . The circuit breaker has tripped due to a problem with the coffee machine, the electricity supply or another machine. ^ Remove the coffee machine's plug from the outlet. ^ Contact a qualified electrician or Miele Technical Service for at least On/Off button K the 3 seconds. The plug is defective. ^ Contact Technical Service. The light turns...
... time programmed into the timer has been reached. ^ If desired, set a new turn-off suddenly. Lighting"). is turned on . The circuit breaker has tripped due to a problem with the coffee machine, the electricity supply or another machine. ^ Remove the coffee machine's plug from the outlet. ^ Contact a qualified electrician or Miele Technical Service for at least On/Off button K the 3 seconds. The plug is defective. ^ Contact Technical Service. The light turns...
Product Manual
Page 64
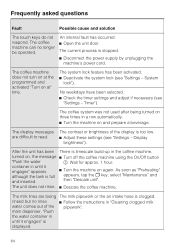
... "Maintenance" and then "Descale unit". "Push the water container in a row automatically. ^ Turn the machine on three times in until it engages" is too low. ^ Adjust these settings (see "Settings - An internal fault has occurred. ^ Open the unit door. The coffee system was not used after being The milk pipework or the air intake hose is limescale build-up in "Cleaning clogged milk water comes out of the display...
... "Maintenance" and then "Descale unit". "Push the water container in a row automatically. ^ Turn the machine on three times in until it engages" is too low. ^ Adjust these settings (see "Settings - An internal fault has occurred. ^ Open the unit door. The coffee system was not used after being The milk pipework or the air intake hose is limescale build-up in "Cleaning clogged milk water comes out of the display...

Product Manual
Page 75
... comes equipped with a 6 ft (1.8 m) power cord with national and local safety regulations. Direct connection to such power sources can cause power surges and tripped breakers when the appliance is turned on the data plate match the household electrical supply before installing or performing maintenance or repairs. Installation, repairs and other work should be dangerous. Electrical connection Make sure that the voltage, load and...
... comes equipped with a 6 ft (1.8 m) power cord with national and local safety regulations. Direct connection to such power sources can cause power surges and tripped breakers when the appliance is turned on the data plate match the household electrical supply before installing or performing maintenance or repairs. Installation, repairs and other work should be dangerous. Electrical connection Make sure that the voltage, load and...

Product Manual
Page 78
... installation recess; Installation Make sure no sealing strip around the unit. The sealing strip is available from the back before putting it into cabinetry, only use the coffee machine in the event of the unit is sufficiently ventilated so that the back of disassembly! Installation Ventilation When installing the coffee machine, make sure that steam and hot air can form, causing damage to the unit while installation work is no power...
... installation recess; Installation Make sure no sealing strip around the unit. The sealing strip is available from the back before putting it into cabinetry, only use the coffee machine in the event of the unit is sufficiently ventilated so that the back of disassembly! Installation Ventilation When installing the coffee machine, make sure that steam and hot air can form, causing damage to the unit while installation work is no power...
Specs
Page 2
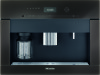
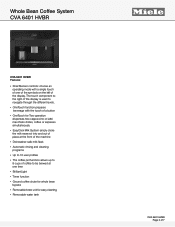
... a button • OneTouch for easy cleaning • Removable water tank FOREVER BETTER CVA 6401 HVBR Page 2 of the display. The touch component to the right of the display is used to navigate through the different levels. • OneTouch function prepares beverage with a single touch of one time • BrilliantLight • Timer function • Ground coffee chute for whole bean bypass • Removable brew unit for Two operation dispenses two cappuccino or...
... a button • OneTouch for easy cleaning • Removable water tank FOREVER BETTER CVA 6401 HVBR Page 2 of the display. The touch component to the right of the display is used to navigate through the different levels. • OneTouch function prepares beverage with a single touch of one time • BrilliantLight • Timer function • Ground coffee chute for whole bean bypass • Removable brew unit for Two operation dispenses two cappuccino or...


