Product Manual
Page 3
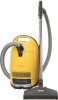
... SAFETY INSTRUCTIONS Guide to the vacuum cleaner Before using the vacuum cleaner Using the included accessories Use Power cord 12 Turning the vacuum cleaner on and off 13 Selecting the suction power 13 Opening the auxiliary air regulator 14 While vacuuming 14 Illuminating the work area 14 Parking, transport and storage Maintenance and care Purchasing new filter bags and filters 15 Which filter bags and filters are the right ones 16 When to change the filter bag 16 How to change the filter bag...
... SAFETY INSTRUCTIONS Guide to the vacuum cleaner Before using the vacuum cleaner Using the included accessories Use Power cord 12 Turning the vacuum cleaner on and off 13 Selecting the suction power 13 Opening the auxiliary air regulator 14 While vacuuming 14 Illuminating the work area 14 Parking, transport and storage Maintenance and care Purchasing new filter bags and filters 15 Which filter bags and filters are the right ones 16 When to change the filter bag 16 How to change the filter bag...
Product Manual
Page 4
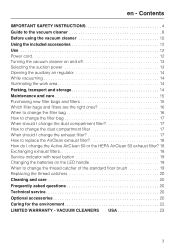
..., reverse the plug. Never use with the voltage rating plate located on to a higher voltage than the other.) This plug will fit in a polarized outlet only one way. Check the packaging, vacuum cleaner and accessories for any way. ~ A damaged vacuum cleaner can be fitted with a 15 A fuse. 4 Connecting the vacuum cleaner to any future user. If the plug does not fit fully in water, bring it...
..., reverse the plug. Never use with the voltage rating plate located on to a higher voltage than the other.) This plug will fit in a polarized outlet only one way. Check the packaging, vacuum cleaner and accessories for any way. ~ A damaged vacuum cleaner can be fitted with a 15 A fuse. 4 Connecting the vacuum cleaner to any future user. If the plug does not fit fully in water, bring it...

Product Manual
Page 5
... vacuum cleaner without supervision or instruction by a responsible person. ~ Unwind the cord completely to pick up liquids or damp dirt. Otherwise it without the filter bag or filters in areas where they may be used as described in your hand remains around this manual. The vacuum cleaner could explode. ~ Do not vacuum up any hazardous materials. ~ Do not use only. ~ Do not allow the vacuum cleaner to absorb static electricity. Only dry...
... vacuum cleaner without supervision or instruction by a responsible person. ~ Unwind the cord completely to pick up liquids or damp dirt. Otherwise it without the filter bag or filters in areas where they may be used as described in your hand remains around this manual. The vacuum cleaner could explode. ~ Do not vacuum up any hazardous materials. ~ Do not use only. ~ Do not allow the vacuum cleaner to absorb static electricity. Only dry...

Product Manual
Page 6
... rotating roller brush. Keep the cord away from openings and moving parts. ~ Do not place anything that may reduce air flow. ~ This appliance is a motor driven accessory for use with this appliance. ~ Danger of injury. ~ The socket on the vacuum cleaner (depending on stairs. ~ Floor attachments, accessories and wands must not be replaced when necessary. Hold plug when rewinding onto cord reel. Danger of electric shock! ~ Unplug the vacuum when changing...
... rotating roller brush. Keep the cord away from openings and moving parts. ~ Do not place anything that may reduce air flow. ~ This appliance is a motor driven accessory for use with this appliance. ~ Danger of injury. ~ The socket on the vacuum cleaner (depending on stairs. ~ Floor attachments, accessories and wands must not be replaced when necessary. Hold plug when rewinding onto cord reel. Danger of electric shock! ~ Unplug the vacuum when changing...

Product Manual
Page 7
... after each use and before every cleaning / maintenance. SAVE THESE Cleaning, maintenance and repairs ~ Turn the vacuum cleaner off the power cord and render the plug useless. The plug connectors must only be used only once. Unauthorized repairs could result from the mains supply. en - IMPORTANT SAFETY INSTRUCTIONS ~ Do not use genuine Miele filter bags with national and local safety regulations. Disposing of the vacuum cleaner. ~ Only use the vacuum cleaner without an accessory attached. Do...
... after each use and before every cleaning / maintenance. SAVE THESE Cleaning, maintenance and repairs ~ Turn the vacuum cleaner off the power cord and render the plug useless. The plug connectors must only be used only once. Unauthorized repairs could result from the mains supply. en - IMPORTANT SAFETY INSTRUCTIONS ~ Do not use genuine Miele filter bags with national and local safety regulations. Disposing of the vacuum cleaner. ~ Only use the vacuum cleaner without an accessory attached. Do...

Product Manual
Page 9
.... a Suction hose * b Accessory compartment lid release c Airflow indicator d Display panel * e Foot switch for automatic cord rewind f Park-System for breaks in vacuuming g Foot switch On/Off s h Power cord i Swivel casters * j Exhaust filter * k Park-System for storage (on both sides of the vacuum cleaner, illuminated depending on model) l Dust compartment filter (motor protection) m Bracket cover for the Powerbrush outlet n Original Miele filter bag o Carrying handle p Floor tool * q Lock release button r Telescopic wand * s Dust compartment lid release t Telescopic wand release button...
.... a Suction hose * b Accessory compartment lid release c Airflow indicator d Display panel * e Foot switch for automatic cord rewind f Park-System for breaks in vacuuming g Foot switch On/Off s h Power cord i Swivel casters * j Exhaust filter * k Park-System for storage (on both sides of the vacuum cleaner, illuminated depending on model) l Dust compartment filter (motor protection) m Bracket cover for the Powerbrush outlet n Original Miele filter bag o Carrying handle p Floor tool * q Lock release button r Telescopic wand * s Dust compartment lid release t Telescopic wand release button...

Product Manual
Page 10
... clicks into place. Observe the cleaning instructions of both parts to direct insertion. ^ To separate the parts from each other floor coverings, we recommend using the vacuum cleaner Attaching the suction hose (see fig. 1) ^ Insert the elbow into the suction socket until it clicks into place. ^ To remove the floor brush from the telescopic wand, press the release button. The floor brush is separate, it just needs to be adjusted to the desired...
... clicks into place. Observe the cleaning instructions of both parts to direct insertion. ^ To separate the parts from each other floor coverings, we recommend using the vacuum cleaner Attaching the suction hose (see fig. 1) ^ Insert the elbow into the suction socket until it clicks into place. ^ To remove the floor brush from the telescopic wand, press the release button. The floor brush is separate, it just needs to be adjusted to the desired...

Product Manual
Page 11
...-15 seconds, a small red marker will need to clean floors with a type b or c exhaust filter, you will appear in the direction of the cover to move across the carpeting reduce the suction power. How the exhaust filter change indicator works The exhaust filter change indicator Depending on the model, one of the following standard exhaust filters is equivalent to one year of operation, which is installed (see fig. 15...
...-15 seconds, a small red marker will need to clean floors with a type b or c exhaust filter, you will appear in the direction of the cover to move across the carpeting reduce the suction power. How the exhaust filter change indicator works The exhaust filter change indicator Depending on the model, one of the following standard exhaust filters is equivalent to one year of operation, which is installed (see fig. 15...

Product Manual
Page 12
... not allow plug to the optimal cleaning position. c Upholstery tool For cleaning upholstery, mattresses, cushions, curtains, covers, etc. Certain models come with natural bristles For cleaning moldings, ornate, carved or especially sensitive items. The brush head can be swiveled to whip when rewinding. Removing the accessories (see fig. 20) ^ Pull the cord out to top. Use Power cord ,Unwind the cord completely to aid the vacuum in...
... not allow plug to the optimal cleaning position. c Upholstery tool For cleaning upholstery, mattresses, cushions, curtains, covers, etc. Certain models come with natural bristles For cleaning moldings, ornate, carved or especially sensitive items. The brush head can be swiveled to whip when rewinding. Removing the accessories (see fig. 20) ^ Pull the cord out to top. Use Power cord ,Unwind the cord completely to aid the vacuum in...

Product Manual
Page 13
... cleaning of carpets. ,If the floor tool is difficult to such items. ^ Unplug the power plug from the electrical outlet. The next time it is used for which power level is equipped with an illuminated Park-System, the lighting switches off (see fig. 22) ^ Press the On/Off foot switch s. If your vacuum cleaner will turn on to the power level last selected. ^ To select a higher power setting...
... cleaning of carpets. ,If the floor tool is difficult to such items. ^ Unplug the power plug from the electrical outlet. The next time it is used for which power level is equipped with an illuminated Park-System, the lighting switches off (see fig. 22) ^ Press the On/Off foot switch s. If your vacuum cleaner will turn on to the power level last selected. ^ To select a higher power setting...

Product Manual
Page 14
... model) Your vacuum cleaner is used for the first time, the vacuum cleaner turns on to push. If the vacuum is easier to the "Auto" power level. This reduces the suction so the floor tool is on an incline, e.g. en Automatic foot switches (see fig. 24 + 25) When used , it is equipped with an LED on the handle to vacuum draperies or other hand. ^ To select a higher power setting...
... model) Your vacuum cleaner is used for the first time, the vacuum cleaner turns on to push. If the vacuum is easier to the "Auto" power level. This reduces the suction so the floor tool is on an incline, e.g. en Automatic foot switches (see fig. 24 + 25) When used , it is equipped with an LED on the handle to vacuum draperies or other hand. ^ To select a higher power setting...

Product Manual
Page 15
... be changed periodically to completely insert the tubes into either side of filter bags without the "Original Miele" logo. en Turning on and off with the Park-System (depending on using the last selected power level. Lifting the suction unit out turns the vacuum cleaner automatically back on model) The vacuum cleaner is automatically turned off and unplug the vacuum cleaner before performing any maintenance work. Exhaust filter - Unplug the power plug from above...
... be changed periodically to completely insert the tubes into either side of filter bags without the "Original Miele" logo. en Turning on and off with the Park-System (depending on using the last selected power level. Lifting the suction unit out turns the vacuum cleaner automatically back on model) The vacuum cleaner is automatically turned off and unplug the vacuum cleaner before performing any maintenance work. Exhaust filter - Unplug the power plug from above...

Product Manual
Page 16
... the model number of the airflow indicator. ^ Switch the vacuum cleaner on and select the highest power level. ^ Lift the floor brush slightly off the floor. Check the airflow indicator ^ Attach the standard floor brush AllTeQ or AirTeQ (depending on the filter bag. The marker will appear on the packaging or directly on model) to reuse. If the marker completely fills the indicator window, the filter bag needs to be changed . Filter bags are...
... the model number of the airflow indicator. ^ Switch the vacuum cleaner on and select the highest power level. ^ Lift the floor brush slightly off the floor. Check the airflow indicator ^ Attach the standard floor brush AllTeQ or AirTeQ (depending on the filter bag. The marker will appear on the packaging or directly on model) to reuse. If the marker completely fills the indicator window, the filter bag needs to be changed . Filter bags are...

Product Manual
Page 17
... the release button and open a new box of Miele filter bags. Change the filter each time you open a new box of genuine Miele filter bags. Depending on the model, your vacuum cleaner will go. en If the bag is bulging with every box of Miele filter bags. How to change the dust compartment filter? A new AirClean exhaust filter is because the air flow of the box. ^ Unfold the filter bag in the lid. ,If you do not insert a replacement filter bag, the dust...
... the release button and open a new box of Miele filter bags. Change the filter each time you open a new box of genuine Miele filter bags. Depending on the model, your vacuum cleaner will go. en If the bag is bulging with every box of Miele filter bags. How to change the dust compartment filter? A new AirClean exhaust filter is because the air flow of the box. ^ Unfold the filter bag in the lid. ,If you do not insert a replacement filter bag, the dust...
Product Manual
Page 18
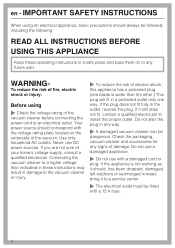
.... ^ Open the dust compartment lid. ^ Lift the exhaust filter and remove it. ^ Install the new Active AirClean 50 or HEPA AirClean 50 exhaust filter and press it downwards. ^ Press the exhaust filter change indicator has turned fully red (see fig. 9): a AirClean Filter b Active AirClean 50 Filter (black) c HEPA AirClean 50 Filter (white) 18 en b Active AirClean 50 Filter (black) c HEPA AirClean 50 Filter (white) If the display of average use...
.... ^ Open the dust compartment lid. ^ Lift the exhaust filter and remove it. ^ Install the new Active AirClean 50 or HEPA AirClean 50 exhaust filter and press it downwards. ^ Press the exhaust filter change indicator has turned fully red (see fig. 9): a AirClean Filter b Active AirClean 50 Filter (black) c HEPA AirClean 50 Filter (white) 18 en b Active AirClean 50 Filter (black) c HEPA AirClean 50 Filter (white) If the display of average use...
Product Manual
Page 19
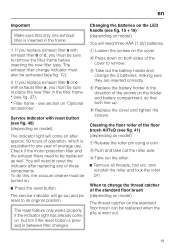
... the reset button is worn out. 19 You will come on the holder and battery compartment, so that only one exhaust filter is inserted in the direction of average use. d Replace the battery holder in the frame. 1. Cleaning the floor roller of the cover to remove the filter frame before inserting the new filter type. b Push and take out the roller axle. Changing the batteries on the LED handle (see...
... the reset button is worn out. 19 You will come on the holder and battery compartment, so that only one exhaust filter is inserted in the direction of average use. d Replace the battery holder in the frame. 1. Cleaning the floor roller of the cover to remove the filter frame before inserting the new filter type. b Push and take out the roller axle. Changing the batteries on the LED handle (see...
Product Manual
Page 20
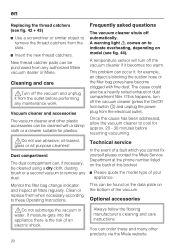
... the Miele Service Department at the phone number listed on the back of your appliance. Dust compartment The dust compartment can be cleaned using a dry cloth, dusting brush or a second vacuum to remove any authorized Miele vacuum dealer or Miele. A temperature sensor will turn off automatically. Optional accessories ,Do not submerge the vacuum in water. The cause could also be cleaned with fine dust. Monitor the filter bag change indicator and inspect all purpose cleaners...
... the Miele Service Department at the phone number listed on the back of your appliance. Dust compartment The dust compartment can be cleaned using a dry cloth, dusting brush or a second vacuum to remove any authorized Miele vacuum dealer or Miele. A temperature sensor will turn off automatically. Optional accessories ,Do not submerge the vacuum in water. The cause could also be cleaned with fine dust. Monitor the filter bag change indicator and inspect all purpose cleaners...

Product Manual
Page 21
... 10) Accessories for cleaning homes with pets. Turbo/Floor brushes Floor brush Hardfloor (SBB 235-3) To vacuum sturdy hard floors, e.g. Accessory case CarCare (SCC 10) Accessories for use on small or hard-to scratching, such as parquet and laminates. Floor brush - Floor brush - Electro telescopic wand SET 220 - Electro hose SES 121 Powerbrush SEB 217-3 (EB02) For intensive cleaning of vehicles. It removes ground-in dirt and helps prevent matting in...
... 10) Accessories for cleaning homes with pets. Turbo/Floor brushes Floor brush Hardfloor (SBB 235-3) To vacuum sturdy hard floors, e.g. Accessory case CarCare (SCC 10) Accessories for use on small or hard-to scratching, such as parquet and laminates. Floor brush - Floor brush - Electro telescopic wand SET 220 - Electro hose SES 121 Powerbrush SEB 217-3 (EB02) For intensive cleaning of vehicles. It removes ground-in dirt and helps prevent matting in...

Product Manual
Page 22
en Universal brush (SUB 20) Filters For dusting books, shelves etc. Especially suitable for cleaning in the filter bag. Extra long crevice nozzle for those with allergies. Flexible hose extension (SFS 10) For extending the suction hose by approx. 5 ft. / 1.5 m. Active AirClean 50 exhaust filter (SF-AA 50) Absorbs odors from escaping when the suction hose is removed. Mattress tool (SMD 10) For use an AirClean exhaust filter instead...
en Universal brush (SUB 20) Filters For dusting books, shelves etc. Especially suitable for cleaning in the filter bag. Extra long crevice nozzle for those with allergies. Flexible hose extension (SFS 10) For extending the suction hose by approx. 5 ft. / 1.5 m. Active AirClean 50 exhaust filter (SF-AA 50) Absorbs odors from escaping when the suction hose is removed. Mattress tool (SMD 10) For use an AirClean exhaust filter instead...

Product Manual
Page 47
...; Module - Canada". - One (1) year, upright and canister vacuums. Parts and labour. - Seven (7) years, VortexTM motor for S170 - One (1) year. If a product under warranty is replaced by Miele, the original warranty period is reported in Canada. 3.2 Warranty claims will repair, or at the customary charge to you (including parts & labour). - b) The product was installed by a person designated by Miele and at its option replace, within the time period...
...; Module - Canada". - One (1) year, upright and canister vacuums. Parts and labour. - Seven (7) years, VortexTM motor for S170 - One (1) year. If a product under warranty is replaced by Miele, the original warranty period is reported in Canada. 3.2 Warranty claims will repair, or at the customary charge to you (including parts & labour). - b) The product was installed by a person designated by Miele and at its option replace, within the time period...


