
Specs
Page 2
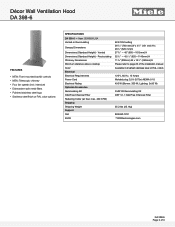
... options SPECIFICATIONS DA 398-6 - Recirculating Chimney Dimensions Minimum distance above cooktop Color Electrical Electrical Requirements Power Cord Electrical Rating Optional Accessories Recirculating Kit OdorFree Charcoal Filter Reducing Collar (air flow max. 400 CFM) Shipping Shipping Weight Support Call 20/20 625 CFM setting 297/16" (748 mm) W x 43/4" (121 mm) H x 201/2" (520 mm) D 273/8" - 40" (695-1015mm) H 321/2" - 451/16" (825-1145mm) H 113/8" (290mm) W x 101/4" (260mm) D Please refer to page 26 of 3 Décor Wall Ventilation Hood DA...
... options SPECIFICATIONS DA 398-6 - Recirculating Chimney Dimensions Minimum distance above cooktop Color Electrical Electrical Requirements Power Cord Electrical Rating Optional Accessories Recirculating Kit OdorFree Charcoal Filter Reducing Collar (air flow max. 400 CFM) Shipping Shipping Weight Support Call 20/20 625 CFM setting 297/16" (748 mm) W x 43/4" (121 mm) H x 201/2" (520 mm) D 273/8" - 40" (695-1015mm) H 321/2" - 451/16" (825-1145mm) H 113/8" (290mm) W x 101/4" (260mm) D Please refer to page 26 of 3 Décor Wall Ventilation Hood DA...

Product Manual
Page 2
... 18 Grease filters ...19 OdorFree Charcoal Filter 21 Disposing of the OdorFree Charcoal Filter 21 Changing an overhead light 22 Installation ...23 Before installation 23 Removing the protective film 23 Installation Instructions 23 Disassembly...23 Installation parts...24 Appliance dimensions 26 Distance between cooktop and ventilation hood (S 27 Installation recommendations 29 Drilling diagram for wall mounting 29 Plywood backing 30 To install a plywood backing 30 Exhaust duct...31 Condensate trap ...32 Reducing Collar ...32 Electrical connection 33 Service and warranty...
... 18 Grease filters ...19 OdorFree Charcoal Filter 21 Disposing of the OdorFree Charcoal Filter 21 Changing an overhead light 22 Installation ...23 Before installation 23 Removing the protective film 23 Installation Instructions 23 Disassembly...23 Installation parts...24 Appliance dimensions 26 Distance between cooktop and ventilation hood (S 27 Installation recommendations 29 Drilling diagram for wall mounting 29 Plywood backing 30 To install a plywood backing 30 Exhaust duct...31 Condensate trap ...32 Reducing Collar ...32 Electrical connection 33 Service and warranty...

Product Manual
Page 3
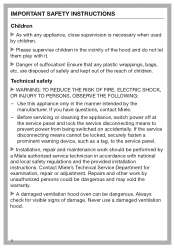
... for installation above gas or electric cooking surfaces. Persons who lack physical, sensory or mental abilities, or experience with current safety requirements. IMPORTANT SAFETY INSTRUCTIONS READ AND SAVE THESE INSTRUCTIONS This appliance complies with the appliance should not use it without supervision or instruction by a responsible person. 3 Only use the appliance for residential use only. Keep these operating instructions. This ventilation hood is...
... for installation above gas or electric cooking surfaces. Persons who lack physical, sensory or mental abilities, or experience with current safety requirements. IMPORTANT SAFETY INSTRUCTIONS READ AND SAVE THESE INSTRUCTIONS This appliance complies with the appliance should not use it without supervision or instruction by a responsible person. 3 Only use the appliance for residential use only. Keep these operating instructions. This ventilation hood is...
Product Manual
Page 4
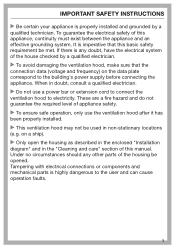
... use a damaged ventilation hood. 4 Contact Miele's Technical Service Department for visible signs of children. Before servicing or cleaning the appliance, switch power off at the service panel and lock the service disconnecting means to the service panel. Installation, repair and maintenance work by children. Please supervise children in accordance with national and local safety regulations and the provided installation instructions. Always check for examination, repair or adjustment. Use this...
... use a damaged ventilation hood. 4 Contact Miele's Technical Service Department for visible signs of children. Before servicing or cleaning the appliance, switch power off at the service panel and lock the service disconnecting means to the service panel. Installation, repair and maintenance work by children. Please supervise children in accordance with national and local safety regulations and the provided installation instructions. Always check for examination, repair or adjustment. Use this...
Product Manual
Page 5
...; To avoid damaging the ventilation hood, make sure that this basic safety requirement be used in the "Cleaning and care" section of appliance safety. To ensure safe operation, only use a power bar or extension cord to connect the ventilation hood to electricity. If there is highly dangerous to the user and can cause operation faults. 5 These are a fire hazard and do not guarantee the required level of this appliance, continuity...
...; To avoid damaging the ventilation hood, make sure that this basic safety requirement be used in the "Cleaning and care" section of appliance safety. To ensure safe operation, only use a power bar or extension cord to connect the ventilation hood to electricity. If there is highly dangerous to the user and can cause operation faults. 5 These are a fire hazard and do not guarantee the required level of this appliance, continuity...
Product Manual
Page 6
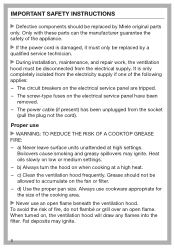
... the socket (pull the plug not the cord). The power cable (if present) has been unplugged from the electrical supply. When turned on the fan or filter. - c) Clean the ventilation hood frequently. Grease should be replaced by a qualified service technician. During installation, maintenance, and repair work, the ventilation hood must only be replaced by Miele original parts only. Always use cookware appropriate for the size of fire, do not flambé or...
... the socket (pull the plug not the cord). The power cable (if present) has been unplugged from the electrical supply. When turned on the fan or filter. - c) Clean the ventilation hood frequently. Grease should be replaced by a qualified service technician. During installation, maintenance, and repair work, the ventilation hood must only be replaced by Miele original parts only. Always use cookware appropriate for the size of fire, do not flambé or...

Product Manual
Page 8
The filters should be cleaned or replaced at regular intervals. Please note that cooking vapors are properly cleaned, never use the ventilation hood without the grease filters in place. A filter containing too much grease is a fire hazard! Do not touch the housing or the grease filters until the ventilation hood has cooled down. 8 IMPORTANT SAFETY INSTRUCTIONS Overheated oils and fats can cause the ventilation hood to become...
The filters should be cleaned or replaced at regular intervals. Please note that cooking vapors are properly cleaned, never use the ventilation hood without the grease filters in place. A filter containing too much grease is a fire hazard! Do not touch the housing or the grease filters until the ventilation hood has cooled down. 8 IMPORTANT SAFETY INSTRUCTIONS Overheated oils and fats can cause the ventilation hood to become...

Product Manual
Page 9
... one cooking appliance is required. a) Installation work and electrical wiring must be done by the appliance's manufacturer. Safety regulations prohibit the installation of fuel burning equipment to the outdoors. - d) Ducted hoods must be vented to prevent back drafting. b) Sufficient air is needed for Heating, Refrigeration and Air Conditioning Engineers (ASHRAE), and the local code authorities. - c) When cutting or drilling into the wall or ceiling, do not damage electrical wiring...
... one cooking appliance is required. a) Installation work and electrical wiring must be done by the appliance's manufacturer. Safety regulations prohibit the installation of fuel burning equipment to the outdoors. - d) Ducted hoods must be vented to prevent back drafting. b) Sufficient air is needed for Heating, Refrigeration and Air Conditioning Engineers (ASHRAE), and the local code authorities. - c) When cutting or drilling into the wall or ceiling, do not damage electrical wiring...
Product Manual
Page 10
... be obtained from your Miele dealer or from Miele Technical Service. Exhaust air should not be channeled into a chimney or vent flue no longer used for other purposes, be extracted into ducting which is to be sure to comply with fuel-burning installations. If exhaust air is otherwise in the "Installation" section when mounting the ventilation hood. When installing the exhaust duct, only use pipes or tubes made...
... be obtained from your Miele dealer or from Miele Technical Service. Exhaust air should not be channeled into a chimney or vent flue no longer used for other purposes, be extracted into ducting which is to be sure to comply with fuel-burning installations. If exhaust air is otherwise in the "Installation" section when mounting the ventilation hood. When installing the exhaust duct, only use pipes or tubes made...
Product Manual
Page 13
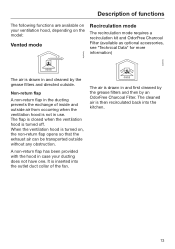
... model: Vented mode Recirculation mode The recirculation mode requires a recirculation kit and OdorFree Charcoal Filter (available as optional accessories, see "Technical Data" for more information) The air is drawn in and first cleaned by the grease filters and then by the grease filters and directed outside without any obstruction. A non-return flap has been provided with the hood in use. The air is drawn in and cleaned by an OdorFree Charcoal Filter. When the ventilation hood...
... model: Vented mode Recirculation mode The recirculation mode requires a recirculation kit and OdorFree Charcoal Filter (available as optional accessories, see "Technical Data" for more information) The air is drawn in and first cleaned by the grease filters and then by the grease filters and directed outside without any obstruction. A non-return flap has been provided with the hood in use. The air is drawn in and cleaned by an OdorFree Charcoal Filter. When the ventilation hood...
Product Manual
Page 16
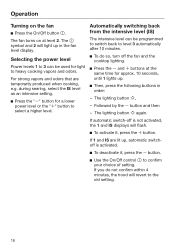
Selecting the power level Power levels 1 to 3 can be used for approx. 10 seconds, until 1 lights up. Then, press the following buttons in the fan level display. If automatic switch-off the fan and the cooktop lighting. Press the and buttons at level 2. The symbol and 2 will flash. To activate it , press the button. Use the On/Off control to...
Selecting the power level Power levels 1 to 3 can be used for approx. 10 seconds, until 1 lights up. Then, press the following buttons in the fan level display. If automatic switch-off the fan and the cooktop lighting. Press the and buttons at level 2. The symbol and 2 will flash. To activate it , press the button. Use the On/Off control to...
Product Manual
Page 18
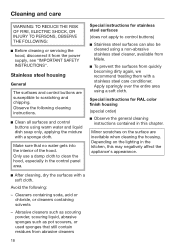
... to clean the hood, especially in the control panel area. Only use a damp cloth to scratching and chipping. Apply sparingly over the entire area using warm water and liquid dish soap only, applying the mixture with a soft cloth. Special instructions for stainless steel surfaces (does not apply to control buttons) Stainless steel surfaces can also be cleaned using a non-abrasive stainless steel cleaner, available from Miele. ...
... to clean the hood, especially in the control panel area. Only use a damp cloth to scratching and chipping. Apply sparingly over the entire area using warm water and liquid dish soap only, applying the mixture with a soft cloth. Special instructions for stainless steel surfaces (does not apply to control buttons) Stainless steel surfaces can also be cleaned using a non-abrasive stainless steel cleaner, available from Miele. ...

Product Manual
Page 19
... care Special instructions for control buttons Do not leave dirt and debris on the buttons for any dirt or debris immediately. Remove any length of time, fat buildup on the grease filter hardens and makes cleaning more difficult. Do not use a stainless steel cleaner to the cooktop. This can result in damage to the filter and to clean the control buttons. Then, open the filter to drop it . To remove a grease filter...
... care Special instructions for control buttons Do not leave dirt and debris on the buttons for any dirt or debris immediately. Remove any length of time, fat buildup on the grease filter hardens and makes cleaning more difficult. Do not use a stainless steel cleaner to the cooktop. This can result in damage to the filter and to clean the control buttons. Then, open the filter to drop it . To remove a grease filter...

Product Manual
Page 21
This filter is designed to absorb odorcausing agents and is equipped for the type and reference number. Disposing of the filter up into the frame. Reinstall the grease filters. 21 Installing/replacing the OdorFree Charcoal Filter To install or replace the OdorFree Charcoal Filter, the grease filters must be installed in the canopy above . Remove the charcoal filter from Miele. When to the grease filters. See "Technical data" for recirculation, an OdorFree Charcoal Filter must...
This filter is designed to absorb odorcausing agents and is equipped for the type and reference number. Disposing of the filter up into the frame. Reinstall the grease filters. 21 Installing/replacing the OdorFree Charcoal Filter To install or replace the OdorFree Charcoal Filter, the grease filters must be installed in the canopy above . Remove the charcoal filter from Miele. When to the grease filters. See "Technical data" for recirculation, an OdorFree Charcoal Filter must...

Product Manual
Page 22
... reversing the steps shown above. Cleaning and care Changing an overhead light The halogen lights become very hot when in use. Allow them . Disconnect the hood from the electrical supply before replacing the lamps (see "IMPOARTANT SAFETY INSTRUCTIONS"). Remove the grease filters. Turn the bolt counterclockwise as far as it with a new lamp of the same type: GU/GZ 10, 120 V, 50W. They can...
... reversing the steps shown above. Cleaning and care Changing an overhead light The halogen lights become very hot when in use. Allow them . Disconnect the hood from the electrical supply before replacing the lamps (see "IMPOARTANT SAFETY INSTRUCTIONS"). Remove the grease filters. Turn the bolt counterclockwise as far as it with a new lamp of the same type: GU/GZ 10, 120 V, 50W. They can...
Product Manual
Page 25
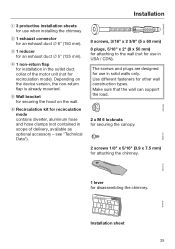
... the hood on the device version, the non-return flap is already mounted. e Wall bracket for an exhaust duct 5" (125 mm). The screws and plugs are designed for use in USA / CDN). Make sure that the wall can support the load. 2 x M 6 locknuts for securing the canopy. 2 screws 1/8" x 5/16" (3.9 x 7.5 mm) for attaching the chimney. 1 lever for other wall construction types. MontagIenstallaMtioonntajMeontagMgoionterMinogntagAesmennus Installation sheet 25 Installation a 3 protective installation sheets for use in solid walls...
... the hood on the device version, the non-return flap is already mounted. e Wall bracket for an exhaust duct 5" (125 mm). The screws and plugs are designed for use in USA / CDN). Make sure that the wall can support the load. 2 x M 6 locknuts for securing the canopy. 2 screws 1/8" x 5/16" (3.9 x 7.5 mm) for attaching the chimney. 1 lever for other wall construction types. MontagIenstallaMtioonntajMeontagMgoionterMinogntagAesmennus Installation sheet 25 Installation a 3 protective installation sheets for use in solid walls...
Product Manual
Page 29
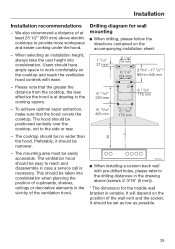
... the ventilation hood. Please note that the hood covers the cooktop. Drilling diagram for wall mounting When drilling, please follow the directions contained on the accompanying installation sheet. When installing a custom back wall with ease. - Installation Installation recommendations - Users should be no wider than the hood. It will depend on the cooktop and reach the ventilation hood controls with pre-drilled holes, please refer to the side or rear. - The mounting area...
... the ventilation hood. Please note that the hood covers the cooktop. Drilling diagram for wall mounting When drilling, please follow the directions contained on the accompanying installation sheet. When installing a custom back wall with ease. - Installation Installation recommendations - Users should be no wider than the hood. It will depend on the cooktop and reach the ventilation hood controls with pre-drilled holes, please refer to the side or rear. - The mounting area...
Product Manual
Page 30
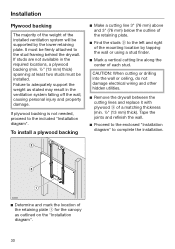
... cutting or drilling into the wall or ceiling, do not damage electrical wiring and other hidden utilities. Remove the drywall between the cutting lines and replace it with plywood of the retaining plate for the canopy as stated may result in the required locations, a plywood backing (min. ½" (13 mm) thick) spanning at least two studs must be installed...
... cutting or drilling into the wall or ceiling, do not damage electrical wiring and other hidden utilities. Remove the drywall between the cutting lines and replace it with plywood of the retaining plate for the canopy as stated may result in the required locations, a plywood backing (min. ½" (13 mm) thick) spanning at least two studs must be installed...

Product Manual
Page 31
... building codes when installing the hood. Only use metal ductwork. Do not vent exhaust air into the ventilation hood. If the exhaust duct is to be kinked or compressed. - The exhaust duct will need to be conducted into a vent flue, the intake piece must slope it away from nonflammable materials for exhaust ductwork. To achieve the greatest possible air extraction with the flow direction of the exhaust connector...
... building codes when installing the hood. Only use metal ductwork. Do not vent exhaust air into the ventilation hood. If the exhaust duct is to be kinked or compressed. - The exhaust duct will need to be conducted into a vent flue, the intake piece must slope it away from nonflammable materials for exhaust ductwork. To achieve the greatest possible air extraction with the flow direction of the exhaust connector...

Product Manual
Page 33
... kits that the voltage, load and circuit rating information found acceptable for use an extension cord. If there is any doubt, have the electrical system of this model hood. Electrical connection WARNING: TO REDUCE THE RISK OF FIRE, ELECTRIC SHOCK, OR INJURY TO PERSONS, OBSERVE THE FOLLOWING: All electrical work should be performed by a qualified electrician in accordance with CSA C22.1-12, Canadian Electrical Code, Part I. Grounding instructions (Canada...
... kits that the voltage, load and circuit rating information found acceptable for use an extension cord. If there is any doubt, have the electrical system of this model hood. Electrical connection WARNING: TO REDUCE THE RISK OF FIRE, ELECTRIC SHOCK, OR INJURY TO PERSONS, OBSERVE THE FOLLOWING: All electrical work should be performed by a qualified electrician in accordance with CSA C22.1-12, Canadian Electrical Code, Part I. Grounding instructions (Canada...


