

Operating instructions
Page 4
... to replace the exhaust filter 20 Replacing the AirClean exhaust filter 20 Replacing the Active AirClean 30 and HEPA AirClean 30 exhaust filters 20 Replacing one type of exhaust filter with another (Fig. 02 21 When changing the filter type, please note 21 Service indicator with Reset button 21 Removing threads and hair from the Powerbrush 21 Cleaning and care 22 Frequently asked questions 23 After sales service 24 Warranty...
... to replace the exhaust filter 20 Replacing the AirClean exhaust filter 20 Replacing the Active AirClean 30 and HEPA AirClean 30 exhaust filters 20 Replacing one type of exhaust filter with another (Fig. 02 21 When changing the filter type, please note 21 Service indicator with Reset button 21 Removing threads and hair from the Powerbrush 21 Cleaning and care 22 Frequently asked questions 23 After sales service 24 Warranty...

Operating instructions
Page 5
... used to property. Turn the vacuum cleaner off and unplug it for cleaning flooring in a safe place and pass them on its safety, operation and maintenance. Always disconnect the vacuum cleaner from the power supply when you have finished using it . Inappropriate use can be dangerous. 5 Any other usage, modification or alteration is intended for the first time. Keep these instructions carefully before using it, before changing...
... used to property. Turn the vacuum cleaner off and unplug it for cleaning flooring in a safe place and pass them on its safety, operation and maintenance. Always disconnect the vacuum cleaner from the power supply when you have finished using it . Inappropriate use can be dangerous. 5 Any other usage, modification or alteration is intended for the first time. Keep these instructions carefully before using it, before changing...
Operating instructions
Page 7
... electricity supply exactly. IMPORTANT SAFETY INSTRUCTIONS Technical safety Before using the vacuum cleaner and its accessories, check for example, under warranty, repairs should only be careful not to the electricity supply. While the vacuum cleaner is damaged. Otherwise the warranty will be void. Do not pull or carry the vacuum cleaner by the power cord, and be performed by the Miele Service Department or a Miele-authorized service...
... electricity supply exactly. IMPORTANT SAFETY INSTRUCTIONS Technical safety Before using the vacuum cleaner and its accessories, check for example, under warranty, repairs should only be careful not to the electricity supply. While the vacuum cleaner is damaged. Otherwise the warranty will be void. Do not pull or carry the vacuum cleaner by the power cord, and be performed by the Miele Service Department or a Miele-authorized service...
Operating instructions
Page 8
... vacuum cleaner get wet. Wait until any inflammable or combustible liquids or gases and do not use the vacuum cleaner to users. Clean only with the suction hose handle or the telescopic wand at head level. To avoid the risk of damage, do not vacuum in areas where such substances are completely dry before attempting to vacuum. Do not use the vacuum cleaner without the FilterBag, dust compartment filter...
... vacuum cleaner get wet. Wait until any inflammable or combustible liquids or gases and do not use the vacuum cleaner to users. Clean only with the suction hose handle or the telescopic wand at head level. To avoid the risk of damage, do not vacuum in areas where such substances are completely dry before attempting to vacuum. Do not use the vacuum cleaner without the FilterBag, dust compartment filter...

Operating instructions
Page 11
... Features marked * are model-specific and may vary or not be available on your vacuum cleaner. en - a Upper hook for power cord b Suction hose holder c Suction hose with handle d Release button e Telescopic wand f Dust compartment filter g Telescopic wand release button h Vacuum cleaner foot release i Exhaust filter * j Exhaust filter compartment k Powerbrush l Light * m FilterBag change indicator n Dust compartment release button o FilterBag p Control panel (see following page for description) * q Power cord r Powerbrush On/Off button ( / O) s On/Off button (l / O) t Handpiece Back...
... Features marked * are model-specific and may vary or not be available on your vacuum cleaner. en - a Upper hook for power cord b Suction hose holder c Suction hose with handle d Release button e Telescopic wand f Dust compartment filter g Telescopic wand release button h Vacuum cleaner foot release i Exhaust filter * j Exhaust filter compartment k Powerbrush l Light * m FilterBag change indicator n Dust compartment release button o FilterBag p Control panel (see following page for description) * q Power cord r Powerbrush On/Off button ( / O) s On/Off button (l / O) t Handpiece Back...

Operating instructions
Page 14
Plugging in the vacuum cleaner (Fig. 10) When vacuuming, loop the power cord through the guide notch on the left-hand side of the display (Fig. 06). Close the exhaust filter compartment lid. Preparing for vacuuming. 14 Releasing the vacuum cleaner (Fig. 11) Press the foot release briefly and tilt the vacuum cleaner to a comfortable position for use Assembly (Fig. 01) Raise the vacuum cleaner into the...
Plugging in the vacuum cleaner (Fig. 10) When vacuuming, loop the power cord through the guide notch on the left-hand side of the display (Fig. 06). Close the exhaust filter compartment lid. Preparing for vacuuming. 14 Releasing the vacuum cleaner (Fig. 11) Press the foot release briefly and tilt the vacuum cleaner to a comfortable position for use Assembly (Fig. 01) Raise the vacuum cleaner into the...
Operating instructions
Page 15
.... Reducing the power lowers the amount of the vacuuming area. button to the desired power setting. + / - The button will light up yellow. Selecting the suction power The suction power can be adjusted to observe your flooring manufacturer's cleaning and care instructions. Press the I button on the handle. Rotary dial (Fig. 13) (depending on model) Turn the power selector manually to select a lower power level. The vacuum cleaner will light up yellow. Obstacles...
.... Reducing the power lowers the amount of the vacuuming area. button to the desired power setting. + / - The button will light up yellow. Selecting the suction power The suction power can be adjusted to observe your flooring manufacturer's cleaning and care instructions. Press the I button on the handle. Rotary dial (Fig. 13) (depending on model) Turn the power selector manually to select a lower power level. The vacuum cleaner will light up yellow. Obstacles...

Operating instructions
Page 16
... increased stability, turn the elbow joint at head level. Do not vacuum directly with the suction hose handle at the bottom of the vacuum cleaner over the obstacle. Vacuuming using the suction hose To avoid the risk of injury, do not vacuum with the handle, i.e., without an accessory attached, as illustrated until it clicks into position above the retainer (Fig. 18). Vacuuming using the telescopic wand ...
... increased stability, turn the elbow joint at head level. Do not vacuum directly with the suction hose handle at the bottom of the vacuum cleaner over the obstacle. Vacuuming using the suction hose To avoid the risk of injury, do not vacuum with the handle, i.e., without an accessory attached, as illustrated until it clicks into position above the retainer (Fig. 18). Vacuuming using the telescopic wand ...

Operating instructions
Page 17
... at removing deep-seated dirt and preventing frequently used areas from being pulled out. Switching the Powerbrush on and off to vacuum these types of the vacuum cleaner: Upholstery nozzle Crevice nozzle, 12" (300 mm) Dusting brush with natural bristles Do not use Please be sure to observe your flooring manufacturer's cleaning and care instructions. The Powerbrush indicator light on the handle. FilterBag - Exhaust filter...
... at removing deep-seated dirt and preventing frequently used areas from being pulled out. Switching the Powerbrush on and off to vacuum these types of the vacuum cleaner: Upholstery nozzle Crevice nozzle, 12" (300 mm) Dusting brush with natural bristles Do not use Please be sure to observe your flooring manufacturer's cleaning and care instructions. The Powerbrush indicator light on the handle. FilterBag - Exhaust filter...
Operating instructions
Page 18
... replaced from time to time to ensure that the suction power of the vacuum cleaner is maintained, giving the best possible cleaning results. This will ensure that your Miele dealer or online at: www.Mieleusa.com Ordering the correct FilterBags and filters Only use only. Blocked pores in the FilterBag change indicator Raise the vacuum cleaner into the vertical position. Turn the vacuum cleaner...
... replaced from time to time to ensure that the suction power of the vacuum cleaner is maintained, giving the best possible cleaning results. This will ensure that your Miele dealer or online at: www.Mieleusa.com Ordering the correct FilterBags and filters Only use only. Blocked pores in the FilterBag change indicator Raise the vacuum cleaner into the vertical position. Turn the vacuum cleaner...
Operating instructions
Page 19
..., carpet lint, grit, etc. Replacing the FilterBag (Fig. 24, 25, + 26) Raise the vacuum cleaner into the vertical position. Lift the release button for the dust compartment lid and raise the lid until you must still change indicator. Changing the dust compartment filter (Fig. 27) Open the dust compartment lid. Remove the FilterBag. 19 This generally contains a mixture of air is vacuumed...
..., carpet lint, grit, etc. Replacing the FilterBag (Fig. 24, 25, + 26) Raise the vacuum cleaner into the vertical position. Lift the release button for the dust compartment lid and raise the lid until you must still change indicator. Changing the dust compartment filter (Fig. 27) Open the dust compartment lid. Remove the FilterBag. 19 This generally contains a mixture of air is vacuumed...
Operating instructions
Page 20
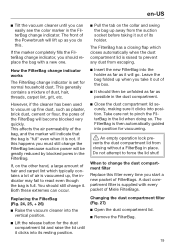
... power will the effectiveness of the filter if it . Replace with a new AirClean exhaust filter. If you start a new packet of Miele FilterBags. Replacing the Active AirClean 30 and HEPA AirClean 30 exhaust filters Do not use more than one exhaust filter at a time. Open the exhaust filter compartment lid. Remove the filter frame. Open the filter frame and remove the used . An AirClean exhaust filter is not replaced...
... power will the effectiveness of the filter if it . Replace with a new AirClean exhaust filter. If you start a new packet of Miele FilterBags. Replacing the Active AirClean 30 and HEPA AirClean 30 exhaust filters Do not use more than one exhaust filter at a time. Open the exhaust filter compartment lid. Remove the filter frame. Open the filter frame and remove the used . An AirClean exhaust filter is not replaced...
Operating instructions
Page 21
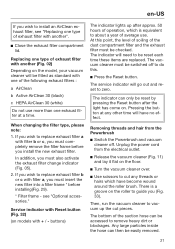
... exhaust filter must be reset by pressing the Reset button after approx. 50 hours of the following exhaust filters : a AirClean b Active AirClean 30 (black) c HEPA AirClean 30 (white) Do not use . Unplug the power cord from the Powerbrush Switch the Powerbrush and vacuum cleaner off to cut pieces. Service indicator with + / - Then, run the vacuum cleaner to remove heavy dirt or blockages. Any large particles inside the hose...
... exhaust filter must be reset by pressing the Reset button after approx. 50 hours of the following exhaust filters : a AirClean b Active AirClean 30 (black) c HEPA AirClean 30 (white) Do not use . Unplug the power cord from the Powerbrush Switch the Powerbrush and vacuum cleaner off to cut pieces. Service indicator with + / - Then, run the vacuum cleaner to remove heavy dirt or blockages. Any large particles inside the hose...

Operating instructions
Page 22
... stability, turn the two screws as far as illustrated until it clicks into position above the retainer (Fig. 18). Unlock the hose connector by pulling it (Fig. 34). Remove any debris or blockages. Reinsert the service cover and lock it using a dry duster, brush or, if available, a second vacuum cleaner to vacuum the dust out. Monitor the filter bag change indicator...
... stability, turn the two screws as far as illustrated until it clicks into position above the retainer (Fig. 18). Unlock the hose connector by pulling it (Fig. 34). Remove any debris or blockages. Reinsert the service cover and lock it using a dry duster, brush or, if available, a second vacuum cleaner to vacuum the dust out. Monitor the filter bag change indicator...
Operating instructions
Page 23
..., e.g., due to overheating or a blockage. Switch the Powerbrush and vacuum cleaner off . Models with a rotary selector dial: The vacuum in-operation indicator lights up this process: Plug the vacuum cleaner in again and turn it can then be used again. Unplug the power cord from the electrical outlet. Remove the blockage. The red light indicates a roller blockage, e.g., as a result of a large item being vacuumed up red. The overheat protection...
..., e.g., due to overheating or a blockage. Switch the Powerbrush and vacuum cleaner off . Models with a rotary selector dial: The vacuum in-operation indicator lights up this process: Plug the vacuum cleaner in again and turn it can then be used again. Unplug the power cord from the electrical outlet. Remove the blockage. The red light indicates a roller blockage, e.g., as a result of a large item being vacuumed up red. The overheat protection...
Operating instructions
Page 24
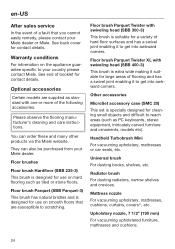
.... Handheld Turbobrush Mini For vacuuming upholstery, mattresses or car seats, etc. Universal brush For dusting books, shelves, etc. See back cover for contact details. Warranty conditions For information on the appliance guarantee specific to scratching. Floor brushes Floor brush Hardfloor (SBB 235-3) This brush is designed for use on smooth floors that you cannot easily remedy, please contact your Miele dealer. Floor brush Parquet (SBB Parquet...
.... Handheld Turbobrush Mini For vacuuming upholstery, mattresses or car seats, etc. Universal brush For dusting books, shelves, etc. See back cover for contact details. Warranty conditions For information on the appliance guarantee specific to scratching. Floor brushes Floor brush Hardfloor (SBB 235-3) This brush is designed for use on smooth floors that you cannot easily remedy, please contact your Miele dealer. Floor brush Parquet (SBB Parquet...
Operating instructions
Page 26
... the use of purchase for the complete vacuum, except for two (2) years. Vacuum motors, power head motors, and the structural integrity of the vacuum cleaner casings (bodies) of the Complete C3 Brilliant and Complete C3 HomeCare+, will be covered for ten (10) year's from someone other obligation with respect to you may need about the product, please contact Miele at the US address listed...
... the use of purchase for the complete vacuum, except for two (2) years. Vacuum motors, power head motors, and the structural integrity of the vacuum cleaner casings (bodies) of the Complete C3 Brilliant and Complete C3 HomeCare+, will be covered for ten (10) year's from someone other obligation with respect to you may need about the product, please contact Miele at the US address listed...
Operating instructions
Page 53
... applicable installation instructions; One (1) year, upright and canister vacuums. Parts and labour. - S189 upright units for products used in Miele Refrigerators, Wine Coolers, and Freezers is received by Miele, the original warranty period is valid during the period starting from the date of purchase, then any failure to conform to this product, including all parts of Miele upon replacement. 53 Parts and labour. One (1) year. Defective products and parts become...
... applicable installation instructions; One (1) year, upright and canister vacuums. Parts and labour. - S189 upright units for products used in Miele Refrigerators, Wine Coolers, and Freezers is received by Miele, the original warranty period is valid during the period starting from the date of purchase, then any failure to conform to this product, including all parts of Miele upon replacement. 53 Parts and labour. One (1) year. Defective products and parts become...

Operating instructions
Page 54
... require that : a) was not installed according to Province in workmanship or materials. 7. Miele disclaims any warranty of merchantability or fitness for the product. In no event will , at : Miele Limited Toll free: 1-800-565-6435 161 Four Valley Drive E-mail: customercare@miele.ca Vaughan, Ontario Canada L4K 4V8 9.2 Service may vary from Province to Miele's installation instruction; Miele Limited Headquarter and Showroom 161...
... require that : a) was not installed according to Province in workmanship or materials. 7. Miele disclaims any warranty of merchantability or fitness for the product. In no event will , at : Miele Limited Toll free: 1-800-565-6435 161 Four Valley Drive E-mail: customercare@miele.ca Vaughan, Ontario Canada L4K 4V8 9.2 Service may vary from Province to Miele's installation instruction; Miele Limited Headquarter and Showroom 161...

Brief operating instructions
Page 2
... filter change the FilterBag and exhaust filter. 2 Releasing / Rewinding the power cord (see the Operating Instructions for more information on the following pages. Using the vacuum cleaner Assembling the vacuum cleaner (see fig. 1) If your vacuum cleaner is equipped with notch (see fig. 3) Releasing the body of the vacuum cleaner (see fig. 4) Turning the vacuum cleaner On/Off (see fig. 5) Selecting the flooring type (see fig. 6 + 7) Securing the vacuum hose and wand (see fig. 8) Telescopic wand (see fig. 9 + 10) Turning...
... filter change the FilterBag and exhaust filter. 2 Releasing / Rewinding the power cord (see the Operating Instructions for more information on the following pages. Using the vacuum cleaner Assembling the vacuum cleaner (see fig. 1) If your vacuum cleaner is equipped with notch (see fig. 3) Releasing the body of the vacuum cleaner (see fig. 4) Turning the vacuum cleaner On/Off (see fig. 5) Selecting the flooring type (see fig. 6 + 7) Securing the vacuum hose and wand (see fig. 8) Telescopic wand (see fig. 9 + 10) Turning...


